
Subscribe to Our Youtube Channel
Related Manuals for Elmo P30HD


Summary of Contents for Elmo P30HD
- Page 1 English Document Camera INSTRUCTION MANUAL Please read this instruction manual carefully before using this product and keep it for future reference.
- Page 2 English IMPORTANT SAFEGUARDS Read Instructions All the safety and operating instructions should be read before the appliance is operated. Retain Instructions The safety and operating instructions should be retained for future reference. Heed Warnings All warnings on the product and in the operating instructions should be adhered to. ...
- Page 3 English Power Sources This product should be operated only from the type of power source indicated on the marking label. If you are not sure of the type of power supply to your home consult your appliance dealer or local power company. For products intended to operate from battery power, or other sources, refer to the operating instructions.
- Page 4 English Servicing Do not attempt to service this product yourself as opening or removing covers may expose you to dangerous voltage or other hazards. Refer all servicing to qualified service personnel. Damage Requiring Service Unplug this product from the wall outlet and refer servicing to qualified service personnel under the following conditions: •...
- Page 5 English CAUTION RISK OF ELECTRIC SHOCK DO NOT OPEN CAUTION: TO REDUCE THE RISK OF ELECTRIC SHOCK, DO NOT REMOVE COVER (OR BACK). NO USER-SERVICEABLE PARTS INSIDE. REFER SERVICING TO QUALIFIED SERVICE PERSONNEL. The lightning flash with arrowhead symbol, within an equilateral triangle, is intended to alert the user to the presence of uninsulated “dangerous voltage”...
- Page 6 English WARNING: TO REDUCE THE RISK OF FIRE OR ELECTRIC SHOCK, DO NOT EXPOSE THIS PRODUCT TO RAIN OR MOISTURE. THIS IS A CLASS A PRODUCT. IN A DOMESTIC ENVIRONMENT THIS PRODUCT MAY CAUSE RADIO INTERFERENCE IN WHICH CASE THE USER MAY BE REQUIRED TO TAKE ADEQUATE MEASURES.
- Page 7 English BEFORE YOU USE Be sure to use the power cord and the AC adapter attached to this product. Be sure to use the power cord applicable to your local power specifications. If the product was sold in Japan, use the AC adapter sold with the product with 100 VAC and 50 or 60 Hz.
- Page 8 English Battery precautions: • If this product is not going to be used for a long time, take the batteries out of the remote control. • Do not use rechargeable batteries (e.g., Ni-Cd (NiCad batteries)). • Do not use new and old batteries or batteries of different types together. •...
-
Page 10: Table Of Contents
English CONTENTS IMPORTANT SAFEGUARDS ......................i BEFORE YOU USE ............................vi Contents ............................2 1. BUNDLED ITEMS .......................... 4 2. BASIC OPERATIONS ........................5 2-1 Document Camera ........................... 5 Part Names .............................. 5 Operating panel ............................6 Rear panel and cable connection ......................7 Side panel .............................. - Page 11 3-2 Saving data stored on an SD card to PC via USB cable ............... 57 3-3 Presentation using a USB-connected PC with the supplied software ........... 59 3-4 Using the ELMO Wireless Slate/Tablet (CRA-1) with the equipment ............. 60 Connecting the ELMO Wireless Slate/Tablet (CRA-1) ................60 Basic operations ............................
-
Page 12: Important Safeguards
English BUNDLED ITEMS The items below are included with this product. If any item is missing, contact the dealer from whom you purchased this product. Strap Slide shooting adapter P.13 (for Remote control) P.13 Document camera Remote control RGB cable P.12 USB cable AC adapter... -
Page 13: Basic Operations
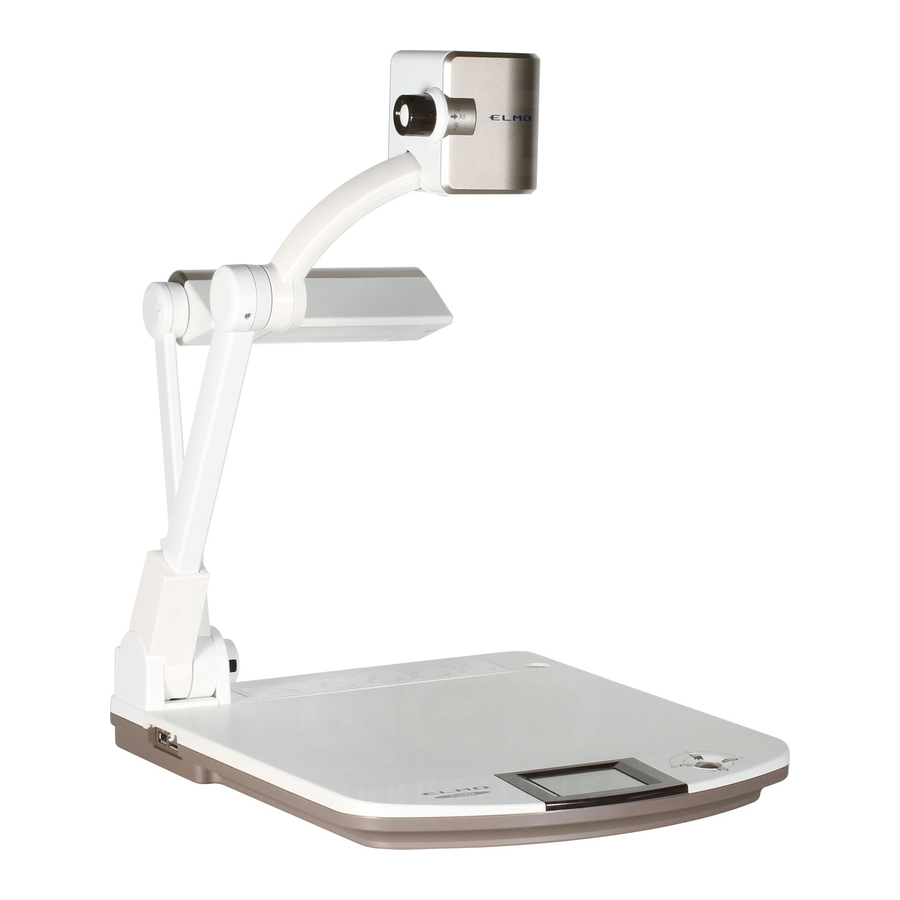
English BASIC OPERATIONS 2-1 Document Camera „ Part Names Operation of the main unit: P.11 ① ② ⑧ ③ ④ ⑨ ⑤ ⑦ ⑥ Name ① Zoom dial P.16 ② AF button ③ Illumination P.19 ④ Remote control sensor P.12 ⑤... -
Page 14: Operating Panel
English „ Operating panel ① ② ③ Mark Function ① LCD panel To display the output video and the OSD. displayed To switch the screen to camera image. in the (up) button The color of the front operating panel LED changes to blue. P.20 OSD. -
Page 15: Rear Panel And Cable Connection
• Please use the monitor corresponding to the input of the image (resolution) or 720p or more. It doesn’t operate with the cable that doesn’t conform to the HDMI standard. • Elmo does not guarantee operation for all HDMI-compatible monitors. - Page 16 English ② To connect the unit to a device with an analog RGB input terminal. Connect the RGB cable to the [ ] terminal on the rear panel. RGB OUT Only 1 RGB cable is supplied with the product. ③ To connect the unit to a device with an analog RGB output terminal.
- Page 17 English ⑦ To connect a PC with the USB cable. Connect the supplied USB cable to the [ ] terminal on the rear panel. ⑧ To connect the AC adapter. Before inserting the AC adapter in an outlet, connect the DC plug of the supplied AC adapter to the ] terminal on the rear panel.
-
Page 18: Side Panel
English „ Side panel ① ② Mark Function ① To connect a wireless pen Tablet (commercially available) or a USB P.60 flash drive (commercially available) P.37 ② To insert an SD card (commercially available). Push the card again to remove the SD card. -
Page 19: Moving Parts Of The Document Camera
English „ Moving Parts of the Document Camera This unit can be moved as shown below. -
Page 20: Supplied Accessories
English 2-2 Supplied Accessories „ Remote Control Preparation of Remote Control Remove the battery case cover at the back of the remote control and install 2 batteries. (TYPE AAA) Children may ingest small batteries; always keep batteries safe and out of reach. -
Page 21: Remote Control Strap
English „ Remote Control Strap The strap can be fastened to the remote control as shown below. „ Slide shooting adapter Slide shooting adapter Set a slide or a film as shown in the picture to shoot it. P.75 „ Image Mate CD-ROM The CD-ROM contains the software for connecting to a PC. -
Page 22: Shooting Images
English 2-3 Shooting Images Zoom dial for size adjustment P.16 AC cord AC adapter Camera Power button P.15 ON/OFF switch for illumination P.19 Brightness Control button P.17 „ Setting up the main unit Set up the main unit as shown in the figure above. Then connect the main unit to a projector or a PC monitor, and turn on the power of the main unit. -
Page 23: Connecting The Video Cable
English Connecting the video cable Connect the document camera to the display device with a video cable corresponding to the display device. CAUTION Before connecting the main unit to other devices, be sure to turn OFF the power for all of the devices. Set the resolution corresponding to the display device from the menu. -
Page 24: Adjusting The Size
English „ Adjusting the size The display range of the document can be adjusted by rotating the zoom dial on the main unit or by pressing the [ ] buttons on the remote control. • ZOOM-IN : The object can be shown in large size. •... -
Page 25: Adjusting The Brightness
English „ Adjusting the brightness Press the [ ] buttons on the remote control to adjust the image brightness. The following two adjustment modes can be set by selecting [Brightness] from the menu on the screen. Automatic brightness adjustment → →... -
Page 26: Manual Brightness Adjustment
English Manual brightness adjustment Brightness >Auto → → → Manual [Manual]) The level of brightness can be adjusted using the [ buttons on the remote control. The brightness of the image will not change automatically in response to the brightness of the shooting environment. -
Page 27: Turning The Illumination On/Off
English „ Turning the illumination ON/OFF Illumination lamp After confirming that no icons are displayed on the screen, press [ ] button on the operating panel to turn ON/OFF the lamp. CAUTION • To take shots of people, turn the illumination light switch to OFF. •... -
Page 28: Image Selection
English „ Image selection Select the image as described below. Camera image: ] button on the operating panel or ] button on the remote control. Image input to the [ ] terminal: RGB IN ] button on the operating panel or ] button on the remote control. -
Page 29: Setting Changes
English 2-4 Setting Changes Various settings for this unit are changed through the menu (characters and icons) displayed on the screen. „ Changing a Setting ① Press the [ ] button on the operating panel to display the menu on the screen, and then use the ] buttons to move the cursor to the icon you want to operate or set. -
Page 30: Descriptions Of Each Menu
English „ Descriptions of Each Menu Main Unit Icon Name Function Camera Controls To display the setting menu for camera image. Preferences To display the preference menu for various functions. Exit To hide the menu. Camera Controls [Second Layer] Fac- Selection Icon Name... - Page 31 English Fac- Selection Icon Name tory Function Item Setting To constantly adjust the white balance. The white White Balance balance is adjusted automatically to ensure a more ★ What is White Auto ✔ natural color according to the characteristics of the Balance? object.
-
Page 32: Preferences [Second Layer]
English Preferences [Second Layer] Selection Factory Icon Name Function Item Setting USB Mode To send the data on the SD card loaded in the device Mass Storage to the PC. ★What is USB Mode? Functions described on the right can be used by connecting To control this device from a PC using special soft- Application... -
Page 33: Support Function
English Selection Factory Icon Name Function Item Setting Save Presets ★Saved Items Zoom To save the current setting as the preset setting of the Brightness Mode selected number. Brightness Level White Balance R-Gain B-Gain Image Mode Edge Effect Exit To go back one layer in the menu. Gamma To call the setting saved for the selected number. -
Page 34: Suppport Function Setting
English Suppport Function Setting Pause Icon Name Function Exit Highlight Icon Name Selection Item Function Darken To set the darkness of a dark section. The dark Darkness section becomes darker when [ ] is selected, Lighten and becomes more visible when [ ] is selected. - Page 35 English Compare Picture Icon Name Function Prev Picture To show the previous picture. Next Picture To show the next picture. Exit Icon Name Function Prev Picture To show the previous picture. Next Picture To show the next picture. Change Window To switch the sub screen and the main screen.
-
Page 36: Details Of Each Function
English „ Details of Each Function Pause function Pause the camera image. Highlight Function This is a function to highlight a particular section of the image. Use this function to draw attention to a section. Highlight operations When you press the [ ] button on the remote control or [ ] on the menu while a camera image or a Play mode is displayed, the Highlight function uses the... - Page 37 English Setting operations You can change the darkness of a particular section by changing the setting of [ ] on the menu while the section is highlighted. Darken You can also change the size of the highlighted display area by changing the setting of [ ] on the menu.
-
Page 38: Mask Function
English Mask Function This is a function to mask a section of an image. Mask operations When you press the [ ] button on the remote control or [ ] on the menu while a camera image or a Play mode is displayed, the mask effect is applied with the darkness set previously. -
Page 39: Scroll Function
English Scroll Function The image expands to the digital zoom set previously, and the enlarged screen can be scrolled. Scroll operations When you press the [ ] button on the remote control or [ ] on the menu while a camera image or a Play mode is displayed, the image expands to the digital zoom set previously. -
Page 40: Compare Picture Function
English Compare Picture Function To display the camera image and the picture stored on the SD card/USB flash drive together. Compare Picture operations When you press the [ ] button on the remote control or [ ] on the menu, while a camera image or a play mode is displayed, the camera image is displayed at the right side of the screen and the picture stored on the SD card/USB flash drive is displayed at the left side of the screen. -
Page 41: Picture In Picture Function
English Picture in Picture Function To display either a picture stored on the SD card/USB flash drive or a camera image at the bottom right of the screen. Picture in Picture Operations When you press the [ ] on the menu, while a camera image is displayed, the picture stored on the SD card/USB flash drive is displayed at the bottom right of the screen. - Page 42 English Switching the subscreen and the main screen. You can switch the subscreen and the main screen by selecting [ ] on the menu. While the Picture in Picture function is working. Camera image Picture Picture Camera image N o t e •...
-
Page 43: Mosaic Function
English Mosaic Function To apply a mosaic effect to the image. You can change the extent of mosaic. Mosaic Operations When you press the [ ] on the menu, while a camera image or a Play mode is displayed, the mosaic effect is applied. -
Page 44: Marker Mask Function
English Marker Mask Function This is a filter to blacken the color section of an image. For instance, this can be used to temporarily hide colored text, so students can be questioned about the hidden text. Marker Mask operations Press [ ] on the menu to blacken the color section in the image. -
Page 45: Advanced Operations
English ADVANCED OPERATIONS 3-1 Using an SD card/USB flash drive With this equipment, you can save a camera image as a picture or movie on an SD card or USB flash drive. You can also display the data stored on the SD card or USB flash drive on the screen. Before you begin, insert a commercially available SD card or USB flash drive into the corresponding slot on the side panel. -
Page 46: Saving Images
English N o t e • Formatting the SD card/USB flash drive. When you need to format the SD card/USB flash drive, insert it into this product and execute formatting. ① Press the [ ] button on the operating panel or [ ] button on the remote control to switch the output image to Play mode. -
Page 47: Movie
English ③ Saving begins when [ ] appears on the screen. - Saving - Movie Basic operations ① Press [ ] button on the remote control. ② Press the [ ] button on the remote control. ③ Recording begins when [ ] appears at the top left of the screen. - Page 48 English N o t e • Even if the output image is set to HDMI and the resolution is set to 1080p, it is recorded with 720p. • Use a memory card with a faster read/write speeds (in case of SD card: Class 6 or better), or the image quality may deteriorates.
-
Page 49: Displaying The Stored Data
English „ Displaying the stored data Thumbnail display (list of pictures/movies) Basic operations ① Press the [ ] button on the operating panel or the ] button on the remote control to display the thumbnails (list of pictures/movies). Next Menu SD/Picture 001/003... - Page 50 English ② How to move the cursor Move the cursor with [ ] and [ ] buttons in the menu or the [ button on the remote control. (2) Move between thumbnail pages with [ and [ ] buttons on the operating panel. SD/Picture SD/Picture 001/003...
- Page 51 English You can display a picture or movie selected from the thumbnail list full-screen by pressing the [ ] button in the menu or the [ button on the remote control. SD/Picture 001/003 Changing settings • Move the cursor using the [ ] or ] button on the operating panel.
- Page 52 English • Finalize the menu setting with the [ ] button on the operating panel. Press the menu icon [ ] to display the next set of menu icons. SD/Picture SD/Picture 001/003 001/003 CAUTION You can not operate the menu from the remote control.
- Page 53 English Menu descriptions Thumbnail display ・ Menu 1 Icon Name Selection Item Function Previous Picture To move to the previous picture. Next Picture To move to the next picture. Full-Screen Display To display selected picture or movie full-screen. Movie To switch the data displayed as thumbnails between movies and pictures.
- Page 54 English Icon Name Selection Item Function SD card To change the memory device to save or dis- play the image. USB Flash Drive Prev Menu To move to the previous menu page.
-
Page 55: Displaying A Picture Full-Screen
English Displaying a picture full-screen You can display a picture you selected from the thumbnails (list of pictures/movies) full-screen. SD/Picture 001/003 <Thumbnail Images> <Full-Screen Picture> Basic operations ① Show in the Thumbnail Menu the icon for displaying the list of pictures. Then, the current status of the selection is displayed at the bottom right of the screen. - Page 56 English ② Select the picture you want to display full-screen. Move the cursor with [ ] and [ ] buttons in the menu or the [ ] button on the remote control. SD/Picture 001/003 ③ Select the picture you want to display full-screen. Press the [ ] button in the menu or the [ button on the remote control.
- Page 57 English ④ To return to the thumbnail display, press the [ button on the operating panel to display the menu and press the [ ] button or the [ ] button on the remote control. Thumbnail Display SD/Picture 001/003 <Full-Screen Picture> <Thumbnail Images>...
- Page 58 English Menu descriptions Picture Display Menu Selection Icon Name Function Item To delete the image displayed on the screen (You can not delete the image if it is protected). Delete To cancel deletion. Exit Exit the current menu. To lock (set as protected) or unlock (set as unprotected) the selected Memory Lock image.
- Page 59 English Highlight Icon Name Selection Item Function Darken To set the darkness of the darkened (not highlighted) area. [ ] makes the dark area less Darkness Lighten transparent and harder to see through, and [ makes the area more transparent and easier to see through.
- Page 60 English Icon Name Function Prev Picture To show the previous picture. Next Picture To show the next picture. Change Window To switch the sub screen and the main screen. Exit Mosaic Icon Name Function Coarse To make the mosaic pattern coarser. Fine To make the mosaic pattern finer.
-
Page 61: Playing A Movie Full-Screen
English Playing a movie full-screen You can play a selected movie from the thumbnails (list of pictures/movies) full-screen. Full-Screen Display SD/Movie 001/003 <Thumbnail Images> <Full-Screen Picture> Basic operations ① Show in the Thumbnail Menu the icon for displaying the list of movies. Then, the current status of the selection is displayed at the bottom right of the screen. - Page 62 English ② Select the movie you want to display full-screen. Move the cursor with [ ] and [ ] buttons in the menu or the [ ] button on the remote control. SD/Movie 001/003 ③ Select the movie you want to display full-screen. Press the [ ] button in the menu or the [ button on the remote control.
- Page 63 English ④ To return to the thumbnail display, press the [ button on the operating panel to display the menu and press the [ ] button or the [ ] button on the remote control. Thumbnail Display SD/Movie 001/003 Changing settings You can display the Movie Menu by pressing the [ ] button on the...
- Page 64 English Menu descriptions Movie Menu Icon Name Function Thumbnail Display To display thumbnails (a list of pictures or movies). Play Pause To play/stop/cueing the movie. Cueing To set the output audio volume. Down Exit To go back one layer in the menu. N o t e •...
-
Page 65: Saving Data Stored On An Sd Card To Pc Via Usb Cable
English 3-2 Saving data stored on an SD card to PC via USB cable CAUTION • Set [ ] (USB Mode) to [Mass Storage] from the Preferences menu on the screen. P.24 • Insert the SD card with the label facing up. Forcing it into the slot with the wrong side up may cause a malfunction. - Page 66 English ③ The equipment is recognized as a removable disk. You can view the image data on the SD card with the viewer software of the PC. • The image data is stored as JPEG files in the following folders: My Computer Removable Disk DCIM...
-
Page 67: Presentation Using A Usb-Connected Pc With The Supplied Software
English 3-3 Presentation using a USB-connected PC with the supplied software N o t e • Set [USB Mode] to [Application] from the Preferences menu on the screen. “Image Mate” is available from the supplied CD-ROM. By using the “Image Mate” software for controlling this equipment included in the CD-ROM, you can perform the following tasks: ・... -
Page 68: Using The Elmo Wireless Slate/Tablet (Cra-1) With The Equipment
English 3-4 Using the ELMO Wireless Slate/Tablet (CRA-1) with the equipment By using the separately sold wireless pen tablet with this equipment, you can add comments or draw on camera images directly. You can also directly perform such operations as zooming in/out. -
Page 69: Basic Operations
English „ Basic operations 1. Draw 2. Move the cursor 3. Select a menu button Touch the tablet Lift from the tablet Touch the and move and move menu button ● Drawing lines Touch the tip of the pen to the surface of the tablet and move the pen. If [ ] or [ ] has been selected, the pen will draw a line. - Page 70 English ● Selecting a menu button Move the pen slightly above the surface of the tablet to move the cursor and then touch the pen within the working area on the tablet. Use this function to select a menu button. Touch once Touch once CAUTION...
-
Page 71: Selecting How To Use The Pen Tablet From The Tablet Menu
English „ Selecting how to use the pen tablet from the tablet menu To use the pen tablet, touch a function key at the top of the tablet and select a mode according to the situation described in the table below: Icon Name Function... -
Page 72: Writing To Camera Images
English „ Writing to camera images You can draw on camera images. Next Menu descriptions Pressing [ ] or [ ]switches the menu pages. Main menu Next Switch page Support Function menu Switch page Next Next... - Page 73 English ・ Main Menu 1 Icon Name Function To select Pen1. Pen1 The initial color setting is Red. You can change the settings for the pen in the Setting menu. To select Pen2. Pen2 The initial color setting is Black. You can change the settings for the pen in the Setting menu.
- Page 74 English Setting Menu Icon Name Selection Item Default Function To set the pen color to red. ✔ Pen1 Color Blue To set the pen color to blue. Black To set the pen color to black. Thin To decrease the pen thickness. Pen1 Thickness Medium To set the pen thickness to medium width.
- Page 75 English Support Function Menu Icon Name Function Show To show/hide the Support Function Menu. Hide Menu To change Support Function Menu. Next Picture To move to the next picture page.* Prev Picture To move to the prev picture page.* Pause To pause the camera image.
-
Page 76: Using As A Whiteboard
English „ Using as a whiteboard You can draw on any blank white images or areas used as a background. Next Menu descriptions Main Menu Icon Name Function To select Pen 1. Pen 1 The initial color setting is Red. You can change the settings for the pen in the Setting menu. - Page 77 English Setting Menu Icon Name Selection Item Default Function To set the pen color to red. ✔ Pen 1 Color Blue To set the pen color to blue. Black To set the pen color to black. Thin To decrease the pen thickness. Pen 1 Thickness Medium To set the pen thickness to medium width.
-
Page 78: Using The Sd Card
English „ Using the SD card You can display a picture or movie stored on the SD card and use the tablet to draw or write on it. SD/Picture 001/003 • Thumbnail display SD/Picture 001/003 When you select an image from the thumbnails, the selected image is displayed on the screen. -
Page 79: Menu Descriptions
English Menu descriptions Thumbnail display ・ Menu 1 Icon Name Selection Item Function Previous Picture To move to the previous picture. Next Picture To move to the next picture. Full-Screen Display To display selected picture or movie full-screen. Movie To switch the data displayed as thumbnails between movies and pictures. - Page 80 English Icon Name Selection Item Function To change the memory device to save or dis- USB Flash Drive play the image. Prev Menu To move to the previous menu page. Single Mode • Picture Display Menu 1 Icon Name Function To select Pen 1.
- Page 81 English Icon Name Selection Item Default Function Thin To decrease the pen thickness. Pen 1 Thickness Medium To set the pen thickness to medium width. ✔ Thick To increase the pen thickness. To set the pen color to red. Pen 2 Color Blue To set the pen color to blue.
-
Page 82: Shooting Off The Stage
English „ Shooting off the stage For shooting forward and backward from the camera ① Set the camera head in the horizontal direction. The camera head is adjusted automatically so that the camera image will not be inverted. < > <... -
Page 83: Presentation Using Films
English „ Presentation using films ① Set the main unit. Fold only the lamp column of the main unit and turn ON the power after connecting the main unit to a projector or a PC monitor. ② Set the slide shooting adapter. Place the supplied slide shooting adapter over the lamp head and adjust, while Slide shooting... - Page 84 English ④ Adjust the focus. Press the [ ] button on the camera head or the remote control to bring the image into focus. AF button on the main unit P.16 ⑤ Adjust the brightness. If the screen is too bright or too dark, adjust the brightness by selecting [ in the OSD menu or pressing [ ] buttons on the remote control.
-
Page 85: About Rs-232C
English 3-5 About RS-232C „ Connection via RS-232C When the RS-232C port is connected to a PC, the unit can be controlled from a For setting up To use communication control, be sure to set up in the order described below. ①... -
Page 86: Rs-232C Specifications
English „ RS-232C specifications Data format specifications This command is executed in the form of 1 command / 1 packet. Until one process is completed, the next command is not accepted. ・ The communication command always starts with STX (Start of Text) and ends with ETX (End of Text). - Page 87 English ・Status 4 Compare Picture Mosaic Marker Mask 0:OFF 0:OFF 0:OFF 0:OFF 1:ON 1:ON 1:ON 1:ON ・ROM version 1 (loader) ** H ** H ** H ** H ** H ** H ・ROM version 2 (SH microcomputer) ** H ** H **...
-
Page 88: Uart Communication Format
English UART Communication format Commands, parameters and data are all transmitted in ASCII code. Operation Command Parameter Data Function 0 (OFF) ■■ Power To turn ON/OFF the power. 1 (ON) ■■ Auto Focus To perform the one-shot auto focus. + (TELE) ■■... - Page 89 English Operation Command Parameter Data Function ■■ ROM Version To inquire about the ROM version. 0 (OFF) ■■ ACK Check To switch the ACK check mode. 1 (ON) 0 (OFF) ■■ CR Addition To switch the CR addition settings. 1 (ON) *For “■■”...
-
Page 90: Trouble Shooting
English TROUBLE SHOOTING 4-1 Symptoms and Confirmation Check the following items. If any abnormality is found, consult the dealer from whom you purchased this product or our nearest branch/office. Symptom Possible cause/remedy No image is • The cable is not correctly connected. displayed. - Page 91 English Symptom Possible cause/remedy The image is • This may be interference fringes between dots of printed striped. matter and TV scanning lines or CMOS pixels. Changing the shooting range may help the problem. • Vertical stripes may appear on an LCD projector image. Manually adjusting the dot clock at the projector side may help the problem.
-
Page 92: Specifications
English SPECIFICATIONS 5-1 General Item Specifications Power source 12VDC (AC adapter AC100 - 240V) Power consumption 23.5W W376 x D482 x H549mm (W14.8 x D19.0 x H21.6 in) (When setup) Outside dimensions W376 x D482 x H181mm (W14.8 x D19.0 x H7.1 in) (When folded) Weight Approx. -
Page 93: Main Camera
English 5-2 Main Camera Item Specifications Lens f = 4.9mm – 78.4mm (16x zoom) F2.7 Frame rate 30fps Max. Min. 1080p 400mm x 223mm 27mm x 15mm 720p 400mm x 223mm 27mm x 15mm Shooting area SXGA 400mm x 320mm 27mm x 22mm WXGA... -
Page 94: Illumination Device
English Item Specifications Image output 1080p HDMI output 720p Audio output PCM 44.1kHz sampling frequency White Balance Auto/One-Push/Manual Brightness Control Auto (W/Level adjustment)/Manual Posi/Nega conversion Provided Color/B&W selection Provided Image rotation Provided (0°/180°) Text1/Text2/Text3/ Image Mode Graphics1/Graphics2 Gamma setting Provided (Only for graphic mode) Edge Effect Provided (Only for graphic mode) Pause... -
Page 95: Trademarks · License
English 5-4 Trademarks · License is a registered trademark of ELMO Co., Ltd. are the registered trademarks of SD-3C, LLC respectively. , High-Definition Multimedia Interface are the registered trademarks of HDMI Licensing LLC. This product is based on the work of the Independent JPEG Group.
Need help?
Do you have a question about the P30HD and is the answer not in the manual?
Questions and answers