Table of Contents
Advertisement
Advertisement
Table of Contents

Related Manuals for Compex WP11B+


Summary of Contents for Compex WP11B+
-
Page 2: Trademark Information
Novell Inc. All other brand and product names are trademarks or registered trademarks of their respective owners. Notice: Copyrights © 2003 by Compex, Inc. All rights reserved. Reproduction, adaptation, or translation without prior permission of Compex, Inc. is prohibited, except as allowed under the copyright laws. Manual Revision by Mah. -
Page 3: Fcc Notice
FCC NOTICE This device has been tested and found to comply with the limits for a Class B digital device, pursuant to Part 15 of the FCC Rules. These limits are designed to provide reasonable protection against harmful interference in a residential installation. This device generates, uses and can radiate radio frequency energy and, if not installed and used in accordance with the instructions, may cause harmful interference to radio communications. -
Page 4: Declaration Of Conformity
Declaration of Conformity Compex, Inc. declares the following: Product Name: Compex 11Mbps Wireless LAN Access Point Model No.: WP11B+ conforms to the following Product Standards: This device complies with the Electromagnetic Compatibility Directive (89/336/EEC) issued by the Commission of the European Community. -
Page 5: Technical Support Information
The warranty information and registration form are found in the Quick Install Guide. For technical support, you may contact Compex or its subsidiaries. For your convenience, you may also seek technical assistance from the local distributor, or from the authorized dealer/reseller that you have purchased this product from. -
Page 6: About This Document
The product described in this document, Compex NetPassage Series, Compex WP11B+ is a licensed product of Compex Systems Pte Ltd. This document contains instructions for installing, configuring and using Compex WP11B+. It also gives an overview of the key applications and the networking concepts with respect to the product. -
Page 7: Table Of Contents
Table of Contents Copyrights © 2003 Compex Systems Pte Ltd...............i Trademark Information ......................i Disclaimer ..........................i Your Feedback ........................i FCC NOTICE ........................ii Declaration of Conformity ....................iii Technical Support Information .....................iv About This Document ......................v How to Use this Document ....................v Firmware ..........................v Conventions ..........................v... - Page 8 Chapter 10 Setting up of WAN using Wireless Routing Client ..44 10.1 Setting up Compex WP11B+ as Wireless Routing Client ...........44 10.2 Configuring Compex WP11B+ as Wireless Routing Client through Web Interface ...46 Chapter 11 Setting up of Wireless Ethernet Adapter Mode ....49...
- Page 9 Chapter 12 Setting up WAN using Wireless Bridge Link Mode ..55 12.1 Setting up Compex WP11B+ as Wireless Bridge Link..........56 12.2 Configuring Compex WP11B+ as Wireless Bridge Link Mode through Web Interface ........................57 Chapter 13 Configuration on Various WAN Type ......61 13.1 Configuring Static IP Connection ................61...
- Page 10 Appendix III Configuration and Commands on Telnet Interface ..102 AIII-1 Telnet Interface Configuration..................102 AIII-2 Command Line Interface Commands List ..............103 AIII-3 How to recover Compex WP11B+ from failed firmware .........105 AIII-4 If you have any problem to accessing to the Internet..........107...
-
Page 11: Chapter 1 Product Overview
With the many benefits that a wireless network environment brings, many users are contemplating of expanding their network environment with wireless devices. Overview Compex WP11B+ is an easy-to-use 11Mbps Wireless LAN Access Point configurable for six operating modes, namely •... -
Page 12: Features And Benefits
Chapter 1 Product Overview Features and Benefits Compex WP11B+ is designed to give you a complete solution of a wireless network by establishing connection with a wireless client. The list below identifies some of the features and benefits of Compex WP11B+. -
Page 13: Lan-To-Lan Bridging
Client, working in conjunction with another ESS Access Point (AP) to function as a LAN-to-LAN Wireless Bridge. 1.3.7 Upgradeable Firmware Compex WP11B+ is specially designed with a flash ROM that allows you to update the Compex WP11B+ with the latest firmware release via a web-based configuration interface. 1.3.8... - Page 14 Chapter 1 Product Overview Figure 1.4b Side view of Compex WP11B+ (Section #1) Figure 1.4c Side view of Compex WP11B+ (Section #2) Connecting WA-HGA-5+ to WP11B+ will increase the wireless network coverage. WA-HGA-5+ (sold separately) Figure 1.4d Connection to indoor antenna...
-
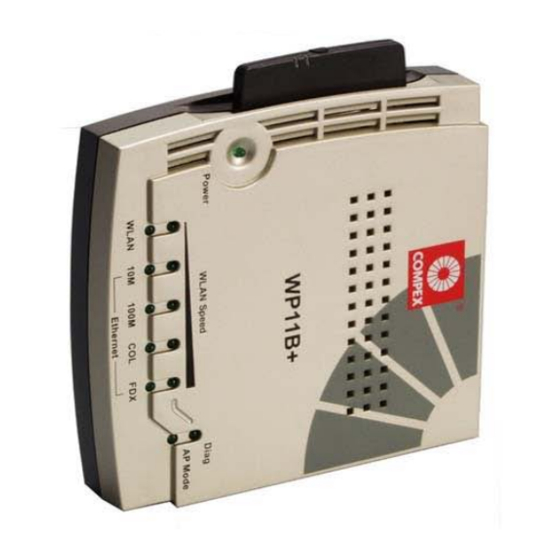
Page 15: Panel Description
More LEDs lighting up indicate a higher speed of data transmission. DIAG LED Steady Green Light Compex WP11B+ is booting and loading firmware. Flashing Green Light Firmware is corrupted. No Light Firmware has been completely downloaded onto the Compex WP11B+. The device is connected to the network. - Page 16 Compex WP11B+ will reboot the device, set to default setting or switch between the selections of work mode. For more details please refer to “Hardware Reset of Compex WP11B+”. CAUTION Do not remove the wireless Interface Card from Compex WP11B+.
-
Page 17: Technical Specifications
Chapter 1 Product Overview Technical Specifications Items Specifications • Industry Standards IEEE 802.3 10Base-T; • IEEE 802.3u 100Base-TX; • IEEE 802.11 DSSS; • IEEE 802.11b High Rate; • IEEE 802.1d LAN Bridging • IEEE 802.1x Port-Based Authentication Safety Certifications CE Mark, FCC Class B, Gost, C-Tick, UL Radio Technology Direct Sequence Spread Spectrum (DSSS) •... - Page 18 Chapter 1 Product Overview Items Specifications Roaming Unrestricted client roaming across multiple access points Media Access Method Carrier Sense Multiple Access with Collision Avoidance (CSMA/CA) Gateway Mode (Selectable) Wired Interface RJ45 10/100Mbps port Wireless Pseudo VLAN Per Node & Per Group Private Subnet All Classful/Classless subnet Built-In DHCP Server...
-
Page 19: Chapter 2 Getting Started
Chapter 2 Getting Started This chapter outlines the basic requirements before you begin any installation and configuration of Compex WP11B+. Package Content Thank you for purchasing Compex WP11B+. The package should contain the following: • Compex WP11B+ unit • Compex WP11B+ switching Power Adapter •... -
Page 20: Chapter 3 Hardware Installation
Compex WP11B+ Connections To begin setting up the Compex WP11B+, please follow the steps listed below: 1. Snap the Compex WP11B+ onto the clip holder stand as shown in Figure 3b. Slide it into the slot of the other clip holder stand to place side by side. - Page 21 3. Place the device in a standing position. 4. Connect your PC to the Ethernet port of Compex WP11B+ using an MDIX UTP RJ45 cable. Please note that before your PC can access to the Internet, the NIC adapter and TCP/IP protocol have to be installed and configured first.
-
Page 22: Chapter 4 Software Configuration
TCP/IP protocol is installed and configured for Internet access. Please refer to Appendix II. Login into Web-based Interface Compex has developed an utility configuration software, uConfig, that provides hassle- free access to the web-based configuration interface. The uniqueness of this program is that it does not require any alteration to the TCP/IP configuration on your computer. - Page 23 Figure 4.1a Utility Configuration GUI 3. Click on the “OpenWeb” button and the system will automatically link you to Compex WP11B+’s authentication page as shown in Figure 4.1b. Figure 4.1b Log in to Compex WP11B+...
- Page 24 • Help menu are also displayed here. Figure 4.1c Compex WP11B+ Configuration Interface From here, you will able to see three different window frames on the screen, namely Command Menu Window, Configuration Window and Message Window. You will see a listing of the functions stated in the Command Menu Window. The functions will vary according to the mode which you have selected.
-
Page 25: Ap Bridge And Ap Client Mode
CONFIGURATION menu – Basic Ethernet and Wireless setup • Mode Selection • Management Port • SNMP Setup • IEEE 802.1X / RADIUS SYSTEM TOOLS menu –Edit various internal settings of Compex WP11B+ • System Identity • Set System’s Clock • Firmware Update • Save or Reset Settings •... -
Page 26: Wireless Ethernet Adapter Mode
ExituConfig CONFIGURATION menu – Basic Ethernet and Wireless setup • Mode Selection • Management Port • SNMP Setup SYSTEM TOOLS menu –Edit various internal settings of Compex WP11B+ • System Identity • Set System’s Clock • Firmware Update • Save or Reset Settings •... -
Page 27: Wireless Bridge Link Mode
HELP menu – Contact information of a technical support engineer • Get Technical Support • About System With this user-friendly web based configuration interface, all configurations on the Compex WP11B+ can now easily be achieved, allowing you to configure your network promptly. -
Page 28: Chapter 5 Basic Configuration For Compex Wp11B
Chapter 5 Basic Configuration for Compex WP11B+ This chapter explains the Configuration Menu tool of Compex WP11B+ the web-based configuration interface. To communicate with the network, DHCP Gateway IP Address should be common to the AP Client. Settings for network parameters depend on the configuration of your individual network. -
Page 29: Changing The Ip Address Of Compex Wp11B
Chapter 5 Basic Configuration for Compex WP11B+ Changing the IP Address of Compex WP11B+ You can also assign a specific IP address to the Compex WP11B+. To change the IP address, 1. Enter the new IP address in IP Address entry. - Page 30 Chapter 5 Basic Configuration for Compex WP11B+ CAUTION The reserved IP address to be assigned should NOT have the same Dynamic IP address range as the DHCP Start and End IP address. To reserve a certain IP address for a specific workstation 1.
- Page 31 5.2b. Figure 5.2b Show DHCP Leases NOTE Invalid date and time shown under Expires column indicates that the router’s clock of your Compex WP11B+ has not been set. Refer to section on “Set System Time” to set the system’s clock.
-
Page 32: Chapter 6 Snmp Settings
Chapter 6 SNMP Settings Chapter 6 SNMP Settings Simple Network Management Protocol (SNMP) is a de facto standard for internet work management. Because it is a simple solution, requiring little code to implement, vendors can easily build SNMP agents to their products. SNMP is extensible, allowing vendors to easily add network management functions to their existing products. -
Page 33: Chapter 7 Setting Up Of Wireless Per Group Pseudo Lan Using
Chapter 7 Setting up of Wireless Per Group Pseudo LAN using AP Bridge Mode Chapter 7 Setting up of Wireless Per Group Pseudo LAN using AP Bridge Mode With more wireless networks being deployed in public premises, privacy protection against unknown users has been an increasingly grave concern. -
Page 34: Adding A Client From The Pseudo Group
Physical Setup for Wireless to Ethernet Bridging Adding a client from the Pseudo Group The default mode for Compex WP11B+ is in AP Bridge, therefore no further configuration is required. 1. Activate uConfig program. Click on “OpenWeb” button. You are now in the default web page of Compex WP11B+. - Page 35 Chapter 7 Setting up of Wireless Per Group Pseudo LAN using AP Bridge Mode 2. Click “Apply” button from the Network Mode Setup GUI and the web page for Access Point Setup as shown in Figure 7.1b will appear. Figure 7.1b Selection of Network Mode 3.
- Page 36 Pseudo VLAN for wireless clients to have the capability to communicate with one another, or set as Per Node (maximum of 10 nodes) or Tag VLAN which extends Pseudo VLAN feature to the wired network. Figure 7.1c Access Point Setup Elaboration of Compex WP11B+...
- Page 37 Chapter 7 Setting up of Wireless Per Group Pseudo LAN using AP Bridge Mode 4. Select Pseudo VLAN in the Access Control pull-down menu as shown below and click the “Apply” button. Figure 7.1d Defining Access Control 5. Add in the MAC Address of those wireless clients into the various groups. For the example illustrated in Figure 7.1e, you need to add in the MAC Addresses for the three groups of wireless clients.
- Page 38 Chapter 7 Setting up of Wireless Per Group Pseudo LAN using AP Bridge Mode 6. Click “Add” button. Choose your GroupID and key in the client’s MAC address as shown below. Click on “Apply” button as shown in Figure 7.1f. Figure 7.1f Adding MAC address 7.
-
Page 39: Delete A Client From The Pseudo Group
“Save” button. Reboot the device. Figure 7.1i Defining the key for 128 bit WEP 9. Click on the “Save” button and then reboot Compex WP11B+ for the changes to take effect. Delete a client from the Pseudo Group If you want to delete any of the unnecessary MAC Addresses, 1. -
Page 40: Closed System
Chapter 7 Setting up of Wireless Per Group Pseudo LAN using AP Bridge Mode You can also have a combination of encryption settings in each Access Control setting. The combinations can be summarized in the table below: Access Control WEP encryption method Disable Disable Disable... -
Page 41: Ieee 802.1X/Radius Setup
Chapter 7 Setting up of Wireless Per Group Pseudo LAN using AP Bridge Mode IEEE 802.1X/RADIUS Setup The advent of wireless technology has also raised certain security issues. With the new IEEE 802.1x security mode, users can ensure of a better wireless security. IEEE 802.1x provides precise access control and identification which allows a wide variety of services to be offered. - Page 42 Chapter 7 Setting up of Wireless Per Group Pseudo LAN using AP Bridge Mode Primary RADIUS Server IP The IP address of the RADIUS server that is using for the authentication purpose. Authentication Port The RADIUS authentication port. The default is 1812 which must match the port that RADIUS server is using for the same purpose.
-
Page 43: Chapter 8 Setting Up Of Wireless Lan-To-Lan Bridge Network Using Ap Client Mode
Chapter 8 Setting up of Wireless LAN-to-LAN Bridge Network using AP Client Mode Compex WP11B+ may be configured as a wireless client, functioning in conjunction with another IEEE 802.11b-compliant Access Point to perform transparent Bridging between two Fast Ethernet networks. - Page 44 “OpenWeb” button to proceed. The system will lead you to the authentication page again. Logon again and Compex WP11B+ will be in AP Client Mode. 11. Go to “Mode Selection”. Click on the “Apply” button again. This time, the web page for AP...
- Page 45 Chapter 8 Setting up of Wireless LAN-to-LAN Bridge Network using AP Client Mode 12. Enter the parameters as shown in Figure 8.1c. State Channel 3 kinds of status: Associated: BSS The Direct Spread Sequence Spectrum (DSSS) Address, Authentication technology divides the 2.4GHz band into 14 Association failed and Not connected.
- Page 46 Chapter 8 Setting up of Wireless LAN-to-LAN Bridge Network using AP Client Mode 14. Enter your encryption key. The parameters take in hexadecimals. Figure 8.1e Encryption entries for 64-bit Figure 8.1f Encryption entries for 128-bit 15. Click on the “Save” button and then reboot to take effect.
-
Page 47: Chapter 9 Setting Up Of Wide Area Network Using Gateway Mode
Chapter 9 Setting up of Wide Area Network using Gateway Mode This chapter will elaborate on how the Compex WP11B+ can be set as a Broadband Internet Gateway. As the Compex WP11B+ supports different types of broadband connections, it is important that you choose the right connection type. -
Page 48: Setup On Compex Wp11B+ For Broadband Internet Access
Setup on Compex WP11B+ for Broadband Internet Access For such service, you should have the IP address provided by your ISP ready before proceeding. 1. Connect a crossover cable from the Ethernet port of the Compex WP11B+ to your workstation. WP11B+ Workstation Figure 9.2a... - Page 49 7. Power on your broadband modem and wait for it to complete the initialization process which may take a minute or more. 8. Next, power ON the Compex WP11B+. When either of the 10M or 100M Ethernet LED lights up, this shows that there is a cable connection between the ADSL modem and the Compex WP11B+.
-
Page 50: Configure Compex Wp11B+ Using Web Interface
Figure 9.3a Physical layout for Wireless Broadband Internet Gateway Assuming that Compex WP11B+ is in the default setting. 1. Activate the uConfig program, click on the “OpenWeb” button. 2. Go to the CONFIGURATION menu and click on Mode Selection. Select Gateway mode and click on the “Apply”... - Page 51 Setting up of Wide Area Network using Gateway Mode 3. Go to uConfig program and click on the “OpenWeb” button. Logon again and now Compex WP11B+ is in Gateway Mode. Figure 9.3b Selection of Network Mode – Gateway 4. Next, click on the “Apply” button to proceed to the Access Point Setup.
- Page 52 Section 7.1 “Adding a client from the Pseudo Group”, Step 4. 6. If you want to configure WAN setup, proceed to WAN Setup and the following GUI will appear. By default, Compex WP11B+ is pre-configured with Dynamic IP, which is suitable for most Cable Internet service providers.
-
Page 53: Advanced Configuration In Gateway Mode
Figure 9.3e uConfig IP Setup More advanced features can also be configured to Compex WP11B+ for you to manage the LAN usage of Internet access better, such as installing the filter rule. Details on how to create rules for filtering can be found in “Packet... -
Page 54: Chapter 10 Setting Up Of Wan Using Wireless Routing Client
Access Point and then from there, we can access to Internet through the ADSL/Cable modem which is connected to the Access Point. In this way, the Ethernet port of Compex WP11B+ can be used to connect to other networking devices, such as switches to cater for more PCs. - Page 55 6. Power ON the PC/notebook and the WLAN port LED should light up after entering the Windows environment. This indicates good cable connection between the switch/notebook and the Compex WP11B+. 7. Assume that Compex NetPassage 16A has been configured as an Access Point, you can now access to the Internet.
-
Page 56: Configuring Compex Wp11B+ As Wireless Routing Client Through Web Interface
Chapter 10 Setting up of WAN using Wireless Routing Client 10.2 Configuring Compex WP11B+ as Wireless Routing Client through Web Interface Assuming that Compex WP11B+ is in the default setting. 1. Activate the uConfig program, click on the “OpenWeb” button. - Page 57 Chapter 10 Setting up of WAN using Wireless Routing Client 4. Next, click on the “Apply” button to proceed to the AP Client Setup. Signal Strength Indicates the strength of the signal. 100% will be in the full strength. Figure 10.2b Wireless Routing Client Setup 5.
- Page 58 7. Click on the “Save” button and then reboot to take effect. 8. If you want to configure WAN setup, proceed to WAN Setup and the following GUI will appear. By default, Compex WP11B+ is pre-configured with Dynamic IP, which is suitable for most Cable Internet service providers.
-
Page 59: Chapter 11 Setting Up Of Wireless Ethernet Adapter Mode
Chapter 11 Setting up of WAN using Wireless Ethernet Adapter Chapter 11 Setting up of Wireless Ethernet Adapter Mode Wireless Ethernet Adaptor is like our AP Client, but it only can connect one wired PC. This mode is for some ISPs which use it to bridge wired to wireless network. Base Station WP11B+ ( Access Point) -
Page 60: Configuring The Wireless Ethernet Adapter Mode
4. Go to uConfig program and wait for the system to refresh the screen. Click on the “OpenWeb” button to proceed. The system will lead you to the authentication page again. Logon again and Compex WP11B+ will be in Wireless Ethernet Adapter Mode. -
Page 61: Configuring The Wireless Ethernet Setup
Chapter 11 Setting up of WAN using Wireless Ethernet Adapter 11.2 Configuring the Wireless Ethernet Setup Figure 11.2a Wireless Ethernet Adapter Setup Figure 11.2b Wireless Ethernet Adapter Setup Station Name This is used to identify the Access Point Client in the network. This is particular useful if there are many wireless devices in the network. - Page 62 Chapter 11 Setting up of WAN using Wireless Ethernet Adapter SSID. A device will not be permitted to join the network group unless it can provide the same unique SSID. A SSID is also referred to as a Network Name because essentially it is a name that identifies a wireless network.
-
Page 63: Configuring The Wep Setup
Chapter 11 Setting up of WAN using Wireless Ethernet Adapter 11.3 Configuring the WEP setup Select WEP settings. Figure 11.3a WEP Setup Next, you may wish to use a private encryption key to ensure data security. From Figure 11.3a, you have the option to choose either 64-bit or 128-bit for WEP Encryption from the WEP Setup as shown below. - Page 64 Chapter 11 Setting up of WAN using Wireless Ethernet Adapter Figure 11.3c Encryption entries for 128-bit ( for illustration purposes) Click on and then reboot to take effect.
-
Page 65: Chapter 12 Setting Up Wan Using Wireless Bridge Link Mode
Chapter 12 Setting up WAN using Wireless Bridge Link Mode Compex WP11B+ may also be configured in Wireless Bridge Link mode which allows point- to-point communication between different buildings (within 100meters). In Figure 12.1a, both Compex WP11B+ are configured to perform transparent Bridging between two buildings. -
Page 66: Setting Up Compex Wp11B+ As Wireless Bridge Link
Chapter 12 Setting up of WAN using Wireless Bridge Link Mode 12.1 Setting up Compex WP11B+ as Wireless Bridge Link 1. Connect a crossover cable from the Ethernet port of the Compex WP11B+ to your workstation. WP11B+ Workstation Figure 12.1a Connect Compex WP11B+ to PC 2. -
Page 67: Configuring Compex Wp11B+ As Wireless Bridge Link Mode Through Web Interface
Chapter 12 Setting up of WAN using Wireless Bridge Link Mode 12.2 Configuring Compex WP11B+ as Wireless Bridge Link Mode through Web Interface Assuming that Compex WP11B+ is in the default setting. 1. Activate the uConfig program, click on the “OpenWeb” button. - Page 68 Figure 12.2b Wireless Point to Point Setup 5. From here, you need to know the MAC address of the other Compex WP11B+. Simply logon to the web interface of another Compex WP11B+ and hit on the About System option in the Command Menu Window. A Graphic User Interface will appear as shown in Figure 12.2c.
- Page 69 Chapter 12 Setting up of WAN using Wireless Bridge Link Mode 6. Now, you can enter the peer MAC address in the field provided. Click on the “Apply” button. WP11B+ Figure 12.2d Entering MAC address in respective field The message window will indicates that the MAC address has changed to 00-02-2d-a6- a2-4a, and will prompt you to reboot your system.
- Page 70 Chapter 12 Setting up of WAN using Wireless Bridge Link Mode 8. Enter your encryption key. The parameters take in hexadecimals. Figure 12.2f Encryption entries for 64-bit Figure 12.2g Encryption entries for 128-bit 9. Click on the “Save” button and then reboot to take effect.
-
Page 71: Chapter 13 Configuration On Various Wan Type
For simplicity and illustration purposes, it is assumed that the following LAN environment uses the IP address 192.168.168.xxx and Compex WP11B+ is using the default settings. However, if you have assigned a different IP address for Compex WP11B+, then use the new settings in the setup procedures. - Page 72 4. Fill in the required field for the IP address, Network Mask and Gateway. 5. All these information can be obtained from your ISP/Network Administrator. 6. After you have entered every field, click on the “Save” button to save the configuration and reboot the Compex WP11B+. Now you can surf the Internet freely.
-
Page 73: Configuring Dynamic Ip Connection
However, if your account requires a DHCP Client ID in order to release an IP address, you may need to configure the name of Compex WP11B+ with that of the DHCP Client ID issued by your ISP. See the section on “System Identity”, and remember to enter the DHCP Client ID issued by the ISP into the System Name field in the System Identity. -
Page 74: How To Configure @Home Cable Service
Chapter 13 Configuration on Various WAN Type Now, you can start surfing the Internet. You might want to manage the Internet access by setting Filtering rules etc. For details, please refer to section on “Packet Filtering”. 13.2.2 How to Configure @HOME Cable Service Many broadband services require a simple DHCP request for connection. -
Page 75: Configuring Ppp Over Ethernet Session (Pppoe)
ADSL modem by logging in from your PC. Make sure it can connect successfully before attempting to run it with the Compex WP11B+ 1. Click on the WAN Type option on the Command window. The default Dynamic IP setup page will display. - Page 76 Reboot the Compex WP11B+. Now, you may activate the Internet Explorer and start surfing the Internet. Once the Compex WP11B+ is up and running, you might want to add advanced configurations such as Filtering to better manage your LAN. For...
-
Page 77: Configuring For Singtel Magix Supersurf
Chapter 13 Configuration on Various WAN Type 13.4 Configuring for SingTel Magix SuperSurf With your ADSL modem and PC, you can configure your WAN using the login account from SingTel Magix broadband service. 1. Select WAN Type and click on the “Change” button. 2. -
Page 78: Configuring For Bigpond Australia (Bpa)
5. Click first the “Save” and then on the “Reboot” button to complete the WAN configuration. If all connections are properly established an Internet request, the Compex WP11B+ will detect and automatically establish the connection with Magix SuperSurf. Next, activate the Netscape/Microsoft Internet Explorer browser to start surfing the Net. - Page 79 4. After you have entered every field, click on the “Save” button to save the configuration. 5. Reboot Compex WP11B+. Now, you can start surfing the Internet. To configure the Compex WP11B+ with advanced functions such as NAT, filtering please refer to the “Configuring Network Address Translation” section and “Packet Filtering” section.
-
Page 80: Point To Point Tunneling Protocol (Pptp)
Chapter 13 Configuration on Various WAN Type 13.6 Point to Point Tunneling Protocol (PPTP) PPTP enables implementation of secure, multi-protocol Virtual Private Networks (VPNs) through public data networks, such as Internet. 1. Click on WAN Setup and click on the “Change” to select WAN type as PPTP. 2. - Page 81 Idle Timeout This field allows you to specify the idling timeout value for Compex WP11B+ to disconnect from the ISP. “0” value in this field disables idling timeout function. When set to “0”, Compex WP11B+ remains connected unless disconnected by the ISP.
-
Page 82: Chapter 14 Configuring Network Address Translation
One feature of the NAT is that any unauthorized requests from the Internet will not be allowed to pass through Compex WP11B+. Hence, with NAT, you can host a Virtual Server on the LAN. NAT works by translating packets of Private IP addresses to appear as originating from a single Public IP address;... -
Page 83: Defining Port-Forwarding Virtual Server
Port Forwarding redirects any incoming Public IP Internet request to another computer on a Private IP based on its TCP/UDP Port number. Hence, when a WAN user sends a request to your network, the Compex WP11B+ (based on the Port–Forwarding configurations) will forward these requests to the assigned PC. - Page 84 Chapter 14 Configuring Network Address Translation 2. Click on the “Port Forwarding” button to display the NAT Static Port Based Entries GUI. Figure 14.3b NAT Static Port Based Entries 3. Click on the “Add” button. Known Server It supports a pre-defined list of common Internet applications.
- Page 85 Chapter 14 Configuring Network Address Translation If you require assigning more PCs in your LAN as servers, use the “Add” button to define the port-forwarding virtual server. To utilize NAT, you have to enter the Private IP Address of the Virtual Server and the Server Type (e.g.
-
Page 86: Chapter 15 Routing
LAN, you may need to set up a static route between them to avoid the hassle of reconfigurating to the network. In this way, you can also have better control over the routes of your Compex WP11B+. For such cases, you can add a Static Routing to the router. - Page 87 For example, if you want to route your WP11B+ to your entire LAN, you may enter the IP address as 192.168.168.0. Gateway IP The IP address that provides the gateway between Compex WP11B+ and the remote network. Figure 15.2b Adding Static IP Routing...
-
Page 88: Chapter 16 Packet Filtering
16.1 Filtering Compex WP11B+ allows Packet Filtering rules to be defined based on three factors, Source IP Address, TCP Port and Time. IP Packet Filtering examines the outgoing packets and decides whether to bypass or to block them. After the Packet Filtering rules have been defined, the users may select to bypass or to block the outgoing packets that do not match the rules. - Page 89 Chapter 16 Packet Filtering To add a new rule 1. Press “Add” button. The screen facilitates the users to add rules for IP Packet Filtering. IP Address Three values are possible for this field: Any, Range or Single. If you have selected Any, you may leave the next two fields blank.
- Page 90 4. To save the rules, click the Save or Reset Settings at the Command window on SYSTEM TOOLS menu. CAUTION You must synchronize the clock of Compex WP11B+ to your PC’s time for the rules to execute accurately. Refer to “Set System Time” to utilize the timing based function of Compex...
-
Page 91: Chapter 17 Remote Management
Internet access at your Remote site, you can still manage your network. To enable remote management, 1. Select Remote management at the Command window. 2. Enter the information, for example: HTTP Port: 80 TELNET Port: 23 Figure 17.1a Remote management 3. Click on the “Save” and reboot the Compex WP11B+. -
Page 92: Chapter 18 Using System Tools Menu
18.1 System Identity If you have multiple Compex WP11B+s in your network, it will be useful if you define the respective Compex WP11B+ identities for ease of identification. In some cases, your ISP may require you to define a System Name before you can access the Internet. -
Page 93: Set System Time
Using SYSTEM TOOLS menu 18.2 Set System Time It is recommended that you configure the Compex WP11B+’s timer to synchronize with your PC so that you can utilize the time-based functions. NOTE To manage and utilize the time-based functions provided in the Compex WP11B+, (such as the Filtering functions), you MUST set its clock to synchronize with your managing workstation. -
Page 94: Firmware Upgrade
2. Click on the “Browse” button to locate the filename. Next, click on the “Upgrade” button to begin the upgrading to the latest firmware revision. Follow through the instructions during the upgrading process. Once completed, remember to reboot Compex WP11B+ and login again to proceed with any configurations. NOTE The firmware image file that you install from the CD-ROM may not be the latest version. -
Page 95: Save Or Reset Settings
The Save and Reset Settings allows you to execute the changes or reset the Compex WP11B+ back to the default configuration. Figure 18.4a... -
Page 96: Reboot System
Reboot System You can reboot the device by clicking on the Reboot System menu. Most of the changes require you to reboot your Compex WP11B+ in order for the new settings to take effect. Click “Reboot System” button and then the “Yes” button. -
Page 97: Change Password
3. Then click on the “Save & Reboot” button to activate the changes. If you forget your password, simply reset Compex WP11B+. The password will reset back to default, which is password. Please note that upon resetting the device, all... -
Page 98: Logout
The system will prompt you to log in again as shown in Figure 18.7a. If you need access to the Compex WP11B+ Configuration again, please activate uConfig program again, regardless which mode you may have previously worked in. - Page 99 Chapter 18 Using SYSTEM TOOLS menu uConfig icon will disappear after clicking on the ExitUconfig bar. Figure 18.8a uConfig icon at the taskbar...
-
Page 100: Chapter 19 Using Help Menu
Chapter 19 Using HELP menu Chapter 19 Using HELP menu 19.1 Get Technical Help For more information on Compex’s technical support around the world, click on the Get Technical Support in the HELP Menu. Figure 19.1a Technical Support Information... -
Page 101: About System
Using HELP menu 19.2 About System You can check the various configuration of the Compex WP11B+ by clicking on the About System menu. After you have upgraded your firmware in the Compex WP11B+, you can check for the version. 19.2.1 AP Bridge/AP Client/Wireless Bridge Link Mode Figure 19.2a... -
Page 102: Chapter 20 Hardware Reset Of Compex Wp11B
Chapter 20 Hardware Reset of Compex WP11B+ The Compex WP11B+ is designed with a reset button located at the back of the cover. This facilitates the resetting of the Compex WP11B+ to factory default settings, or to switch between the work modes of Compex WP11B+. The reset push button functions in the three ways:... - Page 103 Chapter 20 Hardware Reset of Compex WP11B+ This page is intentionally left blank.
- Page 104 Chapter 20 Hardware Reset of Compex WP11B+ This page is intentionally left blank...
-
Page 105: Appendix I Login To Web-Based Interface Manually
In Netscape Navigator 1. Select the File menu, then select Open Location. 2. In the Open Location dialog box, key in the IP address of the Compex WP11B+. This address is set at the factory to: http://192.168.168.1. 3. Click on the “Open” button. - Page 106 In Netscape Communicator 1. Select the File menu, and then click on the Open Page. 2. In the Open Page dialog box, key in the IP address of the Compex WP11B+. This address is set at the factory to: http://192.168.168.1.
-
Page 107: Appendix Ii Tcp/Ip Configuration
This section discusses the configuration of your TCP/IP connection of your Compex WP11B+. Upon the successful installation of the Compex WP11B+, the network adapter will be added to your network folder. To configure your TCP/IP connection for Compex WP11B+, please follow the steps listed below. - Page 108 Appendix II TCP/IP Configuration 3. Check your list of Network Components in the Network window Configuration tab. If TCP/IP is not installed, click on the “Add” button to start the installation. 4. Select Protocol and click on the “Add “button. Figure A11-2 Select Network Component Type 5.
- Page 109 Appendix II TCP/IP Configuration 6. After TCP/IP is installed, go back to the Network screen and select TCP/IP in the list of Network Components. 7. Click on the “Properties’ button, and configure the settings in each of the TCP/IP Properties window. Figure AII-4 Select TCP/IP protocol Figure AII-5 IP Address Configuration NOTE...
-
Page 110: Tcp/Ip Network Protocol Configuration For Windows Xp/2000
Connections. Then click Network Connections and your computer screen will change to a similar figure shown below. Figure AII-6 Network Connections 2. Right click the network connections you want to edit and click on the “Properties” button. Figure AII-7 Compex WP11B+ Network Connection... - Page 111 Appendix II TCP/IP Configuration 3. Select the Internet Protocol (TCP/IP) item and click on the “Properties” button. Figure AII-8 IP Address Configuration 4. Configure your IP address and the rest of the parameters so that you can connect to the network. NOTE Please check with your system administrator or Internet Service Provider for more information on the TCP/IP parameters.
-
Page 112: Appendix Iii Configuration And Commands On Telnet Interface
Appendix III Configuration and Commands on Telnet Interface AIII-1 Telnet Interface Configuration This feature connects the Compex WP11B+ Gateway Local LAN port to your network. You can directly connect your PC to Gateway Local LAN port, or Gateway to any hub/switch on your network. -
Page 113: Aiii-2 Command Line Interface Commands List
Appendix III Configuration and Commands on Telnet Interface AIII-2 Command Line Interface Commands List Command Examples ping <d.d.d.d> show ip show ip stat show ip routing table show arp table show icmp stat... - Page 114 Appendix III Configuration and Commands on Telnet Interface Command Examples show udp stat show tcp stat show ethernet address show gateway set gateway <d.d.d.d There are also some other commands such as: set ip private <d.d.d.d> <d.d.d.d> set ip lan <d.d.d.d> <d.d.d.d> add ip routing <d.d.d.d>...
-
Page 115: Aiii-3 How To Recover Compex Wp11B+ From Failed Firmware
1. Disconnect Compex WP11B+ from the network. 2. Connect one end of a cross-connect Ethernet cable on the WAN port of Compex WP11B+ and the other end to your PC/notebook LAN adapter. - Page 116 Appendix III Configuration and Commands on Telnet Interface When the firmware image file is uploaded, it will copy it to the flashrom. During uploading the firmware image file to Compex WP11B+, the DIAG LED will light up. NOTE The firmware image file, which you upload from the CD-ROM may not be the latest version.
-
Page 117: Aiii-4 If You Have Any Problem To Accessing To The Internet
Should you have any other problem accessing to the Internet we suggest you check through the following list of common solutions. 1. Make sure the Cable or ADSL modem is powered ON first followed by Compex WP11B+. The PC should be powered ON after the devices are ready. - Page 118 Appendix III Configuration and Commands on Telnet Interface you still have problems connecting with a browser, this is more likely your Internet browser configuration issue. Check and remove any proxy setting in the Web browser application as shown: Uncheck all options.
Need help?
Do you have a question about the WP11B+ and is the answer not in the manual?
Questions and answers