Sign In
Upload
Manuals
Brands
Sony Manuals
Camcorder
PMW-500
Sony PMW-500 Manuals
Manuals and User Guides for Sony PMW-500. We have
12
Sony PMW-500 manuals available for free PDF download: Operation Manual, Supplement Manual, Operator's Manual, Manual, Brochure, Features, Getting Started, Product Information
Sony PMW-500 Operation Manual (202 pages)
SOLID-STATE MEMORY CAMCORDER
Brand:
Sony
| Category:
Camcorder
| Size: 8.02 MB
Table of Contents
Table of Contents
4
Foreword
10
Before Use
10
Mode Indications in this Manual
10
Chapter 1 : Overview
11
Features
11
Locations and Functions of Parts and Controls
13
Power Supply
13
Light Switch
13
Power Switch
13
Accessory Attachments
14
Fitting for Optional Microphone Holder
14
Shoulder Pad
14
Shoulder Strap Fitting
14
Operating and Connectors Section
15
Filter Selector
15
Shutter Selector
15
Gain Selector
17
Menu On/Off Switch
17
Lcd Monitor
18
Access Lamp
19
Prev Button
19
Next Button
19
Menu Button
20
Reset/Return Button
20
Shift Button
21
Essence Mark Button
21
Pc Connector
22
LCD Monitor
24
Recording Mode
25
Status Display
25
HDVF-20A Viewfinder (Optional)
26
CBK-VF01 Viewfinder (Optional)
27
Status Display on the Viewfinder Screen
28
Mirror Switch
28
Green Tally Indicator
28
Green Tally
29
Color Temperature
30
Video Format
30
Electric Color Temperature Filter
31
Filter Position
31
White Balance Memory
31
Chapter 2 : Preparations
33
Preparing a Power Supply
33
Using a Battery Pack
33
Using AC Power
34
Attaching the Viewfinder
34
Adjusting the Viewfinder Position
35
Using the BKW-401 Viewfinder Rotation Bracket
35
Detaching the Eyepiece
36
Adjusting the Viewfinder Focus and Screen
37
Setting the Area of Use
38
Setting the Date/Time of the Internal Clock
39
Mounting and Adjusting the Lens
39
Adjusting the Flange Focal Length
40
Preparing the Audio Input System
41
Connecting a Microphone to the MIC in Connector
41
Connecting Microphones to the AUDIO in Connectors
42
Attaching a UHF Portable Tuner (for a UHF Wireless Microphone System)
43
Connecting Line Input Audio Equipment
44
Tripod Mounting
45
Connecting a Video Light
46
Using the Shoulder Strap
47
Adjusting the Shoulder Pad Position
48
Chapter 3 : Adjustments and Settings
49
Setting the Video Format
49
Selecting the Recording Mode
51
Changing the Video Format
51
Adjusting the Black Balance and the White Balance
52
Adjusting the Black Balance
52
Adjusting the White Balance
53
Setting the Electronic Shutter
55
Shutter Modes
55
Selecting the Shutter Mode and Shutter Speed
55
Changing the Reference Value for Automatic Iris Adjustment
57
Adjusting the Audio Level
58
Manually Adjusting the Audio Levels of the Audio Inputs from the AUDIO in CH-1/CH-2 Connectors
58
Manually Adjusting the Audio Level of the MIC in Connector
58
Recording Audio on Channels 3 and 4
59
Setting the Time Data
60
Setting the Timecode
60
Setting the User Bits
61
Synchronizing the Timecode
61
Setting Shot Data
63
Creating a Shot ID
63
Checking Camcorder Settings and Status Information (Status Screens)
64
Chapter 4 : Shooting
66
Handling Sxs Memory Cards
66
About Sxs Memory Cards
66
Loading and Ejecting Sxs Memory Cards
67
Selecting the Sxs Memory Card to Use
68
Formatting (Initializing) Sxs Memory Cards
68
If You Load a Memory Card Formatted in the Different Recording Mode from the Mode Selected on the Camcorder
69
Checking the Remaining Recording Time
69
Restoring Sxs Memory Cards
70
Handling USB Flash Drives
71
Formatting (Initializing) USB Flash Drives
71
Restoring USB Flash Drives
71
Basic Operations
72
Playing Recorded Clips
74
Deleting Recorded Clips
75
Advanced Operations
75
Recording Shot Marks
75
Setting OK Marks
76
Starting to Record from Pre-Stored Video (Picture Cache Function)
76
Recording Time-Lapse Video (Interval Rec Function)
77
Shooting Stop Motion Animations (Frame Rec Function)
79
Shooting with Slow & Quick Motion
80
Recording with the Clip Continuous Rec Function
81
Framing Shots with the Freeze MIX Function
82
Recording Proxy Data
83
Recording Proxy Data While Recording Clips
83
Recording Proxy Data for Existing Clips
84
Deleting All Proxy Data from a USB Flash Drive
84
Planning Metadata Operations
85
Loading a Planning Metadata File into Camcorder's Internal Memory
85
Defining Clip Names in Planning Metadata
86
Defining Shot Mark Names in Planning Metadata
88
Chapter 5 : Clip Operations
89
Clip Playback
89
Thumbnail Screen
89
Index Picture
90
Clip Name
90
File Format
90
Playing Clips
92
Using Thumbnails to Search Inside Clips
93
Expand Thumbnail Screen
93
Thumbnail Operations
94
THUMBNAIL Menu Configuration
94
Basic THUMBNAIL Menu Operations
96
Changing the Thumbnail Screen Type
96
Displaying Clip Properties
98
Adding and Deleting OK, NG or KP Marks
99
Protecting Clips
100
Copying Clips
100
Deleting Clips
101
Displaying the Expand Thumbnail Screen
102
Displaying the Essence Mark Thumbnail Screen
103
Adding and Deleting Shot Marks
104
Changing Clip Index Pictures
104
Dividing Clips
104
Chapter 6 : Menu and Detailed Settings
105
Setup Menu Organization and Levels
105
Setup Menu Organization
105
Setup Menu Levels
105
Basic Setup Menu Operations
107
Menu List
109
USER Menu (Factory Default Configuration)
109
OPERATION Menu
110
PAINT Menu
128
MAINTENANCE Menu
134
FILE Menu
149
Assigning Functions to Assignable Switches
154
Functions that Can be Assigned to the ASSIGN. 0 Switch
154
Functions that Can be Assigned to the ASSIGN. 2 Switch
155
Functions that Can be Assigned to the ASSIGN. 1 and 3 Switches
155
Button
155
Functions that Can be Assigned to the RET Button on the Lens
158
Chapter 7 : Saving and Loading User Setting Data
159
Saving and Loading Settings
159
Saving Setting Data
159
Loading Setting Data
160
Resetting a File after Changing Its Contents
161
Saving and Loading Scene Files
161
Saving Scene Files
161
Loading Scene Files
162
Saving and Loading Lens Files
163
Setting Lens File Data
163
Saving Lens Files
163
Loading Lens Files
163
Loading Lens Files Automatically
164
Saving and Loading User Files
164
Saving User Files
164
Loading Setting Data
165
Chapter 8 : Connecting External Devices
166
Connecting External Monitors
166
Operating Clips with a Computer
168
Using the Expresscard Slot of a Computer
168
USB Connection with a Computer
168
Connecting an External Device (I.link Connection)
170
Recording the Camera Picture on an External Device
170
Nonlinear Editing
171
Recording External Input Signals
171
Configuring a Shooting and Recording System
172
Advertisement
Sony PMW-500 Operation Manual (202 pages)
SOLID-STATE MEMORY CAMCORDER
Brand:
Sony
| Category:
Camcorder
| Size: 7.96 MB
Table of Contents
Table of Contents
4
Foreword
10
Before Use
10
Mode Indications in this Manual
10
Chapter 1 : Overview
11
Features
11
Using the Software
13
Reading the CD-ROM Manuals
13
Locations and Functions of Parts and Controls
14
Power Supply
14
Accessory Attachments
15
Operating and Connectors Section
16
Gain Selector
18
Lcd Monitor
19
Prev Button
20
Warning Indicator
20
Access Lamp
20
Stop Button
20
Next Button
20
Display Switch
21
D Menu Button
21
Shift Button
22
Essence Mark Button
22
Slot Cover
23
LCD Monitor
25
Recording Format
26
Recording Mode
26
Time Counter Display
26
Status Display
26
Warning Indicator Area
26
HDVF-20A Viewfinder (Optional)
27
CBK-VF01 Viewfinder (Optional)
28
Status Display on the Viewfinder Screen
29
Green Tally
30
Video Format
31
Color Temperature
31
Electric Color Temperature Filter
32
Filter Position
32
White Balance Memory
32
Gain Value
33
Chapter 2 : Preparations
34
Preparing a Power Supply
34
Using a Battery Pack
34
Using AC Power
35
Attaching the Viewfinder
35
Adjusting the Viewfinder Position
36
Using the BKW-401 Viewfinder Rotation Bracket
36
Detaching the Eyepiece
37
Adjusting the Viewfinder Focus and Screen
38
Setting the Area of Use
39
Setting the Date/Time of the Internal Clock
40
Mounting and Adjusting the Lens
40
Adjusting the Flange Focal Length
41
Preparing the Audio Input System
42
Connecting a Microphone to the MIC in Connector
42
Connecting Microphones to the AUDIO in Connectors
43
Attaching a UHF Portable Tuner (for a UHF Wireless Microphone System)
44
Connecting Line Input Audio Equipment
45
Tripod Mounting
46
Connecting a Video Light
47
Using the Shoulder Strap
48
Adjusting the Shoulder Pad Position
49
Chapter 3 : Adjustments and Settings
50
Setting the Video Format
50
Selecting the Recording Mode
52
Changing the Video Format
52
Adjusting the Black Balance and the White Balance
53
Adjusting the Black Balance
53
Adjusting the White Balance
54
Setting the Electronic Shutter
56
Shutter Modes
56
Selecting the Shutter Mode and Shutter Speed
56
Changing the Reference Value for Automatic Iris Adjustment
58
Adjusting the Audio Level
59
Manually Adjusting the Audio Levels of the Audio Inputs from the AUDIO in CH-1/CH-2 Connectors
59
Manually Adjusting the Audio Level of the MIC in Connector
59
Recording Audio on Channels 3 and 4
60
Setting the Time Data
61
Setting the Timecode
61
Setting the User Bits
62
Synchronizing the Timecode
62
Setting Shot Data
64
Creating a Shot ID
64
Checking Camcorder Settings and Status Information (Status Screens)
65
Chapter 4 : Shooting
67
Handling Sxs Memory Cards
67
About Sxs Memory Cards
67
Loading and Ejecting Sxs Memory Cards
68
Selecting the Sxs Memory Card to Use
69
Formatting (Initializing) Sxs Memory Cards
69
If You Load a Memory Card Formatted in the Different Recording Mode from the Mode Selected on the Camcorder
70
Checking the Remaining Recording Time
70
Restoring Sxs Memory Cards
71
Handling USB Flash Drives
72
Formatting (Initializing) USB Flash Drives
72
Restoring USB Flash Drives
73
Basic Operations
73
Playing Recorded Clips
75
Deleting Recorded Clips
76
Advanced Operations
76
Recording Shot Marks
76
Setting OK Marks
77
Starting to Record from Pre-Stored Video (Picture Cache Function)
77
Recording Time-Lapse Video (Interval Rec Function)
78
Shooting Stop Motion Animations (Frame Rec Function)
80
Shooting with Slow & Quick Motion
81
Recording with the Clip Continuous Rec Function
82
Framing Shots with the Freeze MIX Function
83
Recording Proxy Data
84
Recording Proxy Data While Recording Clips
84
Recording Proxy Data for Existing Clips
85
Deleting All Proxy Data from a USB Flash Drive
85
Planning Metadata Operations
86
Loading a Planning Metadata File into Camcorder's Internal Memory
86
Defining Clip Names in Planning Metadata
87
Defining Shot Mark Names in Planning Metadata
89
Chapter 5 : Clip Operations
90
Clip Playback
90
Thumbnail Screen
90
Index Picture
91
Clip Name
91
Playing Clips
93
Using Thumbnails to Search Inside Clips
94
Thumbnail Operations
95
THUMBNAIL Menu Configuration
95
Basic THUMBNAIL Menu Operations
97
Changing the Thumbnail Screen Type
97
Displaying Clip Properties
99
Adding and Deleting OK, NG or KP Marks
100
Protecting Clips
101
Copying Clips
101
Deleting Clips
102
Displaying the Expand Thumbnail Screen
103
Displaying the Essence Mark Thumbnail Screen
104
Adding and Deleting Shot Marks
105
Changing Clip Index Pictures
105
Dividing Clips
105
Chapter 6 : Menu and Detailed Settings
106
Setup Menu Organization and Levels
106
Setup Menu Organization
106
Setup Menu Levels
106
Basic Setup Menu Operations
108
Menu List
110
USER Menu (Factory Default Configuration)
110
OPERATION Menu
111
PAINT Menu
128
MAINTENANCE Menu
134
FILE Menu
149
Assigning Functions to Assignable Switches
154
Functions that Can be Assigned to the ASSIGN. 0 Switch
154
Functions that Can be Assigned to the ASSIGN. 2 Switch
155
Functions that Can be Assigned to the ASSIGN. 1 and 3 Switches
155
Button
155
Functions that Can be Assigned to the RET Button on the Lens
158
Chapter 7 : Saving and Loading User Setting Data
159
Saving and Loading Settings
159
Saving Setting Data
159
Loading Setting Data
160
Resetting a File after Changing Its Contents
161
Saving and Loading Scene Files
161
Saving Scene Files
161
Loading Scene Files
162
Saving and Loading Lens Files
163
Setting Lens File Data
163
Saving Lens Files
163
Loading Lens Files
163
Loading Lens Files Automatically
164
Saving and Loading User Files
164
Saving User Files
164
Loading Setting Data
165
Chapter 8 : Connecting External Devices
166
Connecting External Monitors
166
Operating Clips with a Computer
168
Using the Expresscard Slot of a Computer
168
USB Connection with a Computer
168
Connecting an External Device (I.link Connection)
170
Recording the Camera Picture on an External Device
170
Nonlinear Editing
171
Recording External Input Signals
171
Configuring a Shooting and Recording System
172
Sony PMW-500 Operation Manual (203 pages)
Solid-State Memory Camcorder
Brand:
Sony
| Category:
Camcorder
| Size: 4.36 MB
Table of Contents
Table of Contents
5
Foreword
11
Before Use
11
Mode Indications in this Manual
11
Chapter 1 : Overview
12
Features
12
Using the CD-ROM
14
Reading the CD-ROM Manuals
14
Locations and Functions of Parts and Controls
15
Power Supply
15
Accessory Attachments
16
Operating and Connectors Section
17
Gain Selector
19
Lcd Monitor
20
Access Lamp
21
Menu Button
22
Shift Button
23
Essence Mark Button
23
Slot Cover
24
LCD Monitor
26
Recording Format
27
Recording Mode
27
Status Display
27
HDVF-20A Viewfinder (Optional)
28
CBK-VF01 Viewfinder (Optional)
29
Status Display on the Viewfinder Screen
30
Green Tally
31
Video Format
32
Color Temperature
32
Electric Color Temperature Filter
33
Filter Position
33
White Balance Memory
33
Chapter 2 : Preparations
35
Preparing a Power Supply
35
Using a Battery Pack
35
Using AC Power
36
Attaching the Viewfinder
37
Adjusting the Viewfinder Position
37
Using the BKW-401 Viewfinder Rotation Bracket
38
Detaching the Eyepiece
39
Adjusting the Viewfinder Focus and Screen
39
Setting the Area of Use
40
Setting the Date/Time of the Internal Clock
41
Mounting and Adjusting the Lens
42
Adjusting the Flange Focal Length
42
Preparing the Audio Input System
43
Connecting a Microphone to the MIC in Connector
43
Connecting Microphones to the AUDIO in Connectors
44
Attaching a UHF Portable Tuner (for a UHF Wireless Microphone System)
45
Connecting Line Input Audio Equipment
47
Tripod Mounting
48
Connecting a Video Light
49
Using the Shoulder Strap
49
Adjusting the Shoulder Pad Position
50
Chapter 3 : Adjustments and Settings
51
Setting the Video Format
51
Selecting the Recording Mode
53
Changing the Video Format
53
Adjusting the Black Balance and the White Balance
54
Adjusting the Black Balance
54
Adjusting the White Balance
55
Setting the Electronic Shutter
57
Shutter Modes
57
Selecting the Shutter Mode and Shutter Speed
57
Changing the Reference Value for Automatic Iris Adjustment
59
Adjusting the Audio Level
60
Manually Adjusting the Audio Levels of the Audio Inputs from the AUDIO in CH-1/CH-2 Connectors
60
Manually Adjusting the Audio Level of the MIC in Connector
60
Recording Audio on Channels 3 and 4
61
Setting the Time Data
62
Setting the Timecode
62
Setting the User Bits
63
Synchronizing the Timecode
63
Setting Shot Data
65
Creating a Shot ID
65
Checking Camcorder Settings and Status Information (Status Screens)
66
Chapter 4 : Shooting
68
Handling Sxs Memory Cards
68
About Sxs Memory Cards
68
Loading and Ejecting Sxs Memory Cards
69
Selecting the Sxs Memory Card to Use
70
Formatting (Initializing) Sxs Memory Cards
70
If You Load a Memory Card Formatted in the Different Recording Mode from the Mode Selected on the Camcorder
71
Checking the Remaining Recording Time
71
Restoring Sxs Memory Cards
72
Handling USB Flash Drives
73
Formatting (Initializing) USB Flash Drives
73
Restoring USB Flash Drives
74
Basic Operations
74
Playing Recorded Clips
76
Deleting Recorded Clips
77
Advanced Operations
77
Recording Shot Marks
77
Setting OK Marks
78
Starting to Record from Pre-Stored Video (Picture Cache Function)
78
Recording Time-Lapse Video (Interval Rec Function)
79
Shooting Stop Motion Animations (Frame Rec Function)
81
Shooting with Slow & Quick Motion
82
Recording with the Clip Continuous Rec Function
83
Framing Shots with the Freeze MIX Function
84
Recording Proxy Data
85
Recording Proxy Data While Recording Clips
85
Recording Proxy Data for Existing Clips
86
Deleting All Proxy Data from a USB Flash Drive
86
Planning Metadata Operations
87
Loading a Planning Metadata File into Camcorder's Internal Memory
87
Defining Clip Names in Planning Metadata
88
Defining Shot Mark Names in Planning Metadata
90
Chapter 5 : Clip Operations
91
Clip Playback
91
Thumbnail Screen
91
Index Picture
92
Clip Name
92
File Format
92
Playing Clips
94
Using Thumbnails to Search Inside Clips
95
Thumbnail Operations
96
THUMBNAIL Menu Configuration
96
Basic THUMBNAIL Menu Operations
98
Changing the Thumbnail Screen Type
98
Displaying Clip Properties
100
Adding and Deleting OK, NG or KP Marks
101
Protecting Clips
102
Copying Clips
102
Deleting Clips
103
Displaying the Expand Thumbnail Screen
104
Displaying the Essence Mark Thumbnail Screen
105
Adding and Deleting Shot Marks
106
Changing Clip Index Pictures
106
Dividing Clips
106
Chapter 6 : Menu and Detailed Settings
107
Setup Menu Organization and Levels
107
Setup Menu Organization
107
Setup Menu Levels
107
Basic Setup Menu Operations
109
Menu List
111
USER Menu (Factory Default Configuration)
111
OPERATION Menu
112
PAINT Menu
129
MAINTENANCE Menu
135
FILE Menu
150
Assigning Functions to Assignable Switches
155
Functions that Can be Assigned to the ASSIGN. 0 Switch
155
Functions that Can be Assigned to the ASSIGN. 2 Switch
156
Functions that Can be Assigned to the ASSIGN. 1 and 3 Switches
156
Button
156
Functions that Can be Assigned to the RET Button on the Lens
159
Chapter 7 : Saving and Loading User Setting Data
160
Saving and Loading Settings
160
Saving Setting Data
160
Loading Setting Data
161
Resetting a File after Changing Its Contents
162
Saving and Loading Scene Files
162
Saving Scene Files
162
Loading Scene Files
163
Saving and Loading Lens Files
164
Setting Lens File Data
164
Saving Lens Files
164
Loading Lens Files
164
Loading Lens Files Automatically
165
Saving and Loading User Files
165
Saving User Files
165
Loading Setting Data
166
Chapter 8 : Connecting External Devices
167
Connecting External Monitors
167
Operating Clips with a Computer
169
Using the Expresscard Slot of a Computer
169
USB Connection with a Computer
169
Connecting an External Device (I.link Connection)
171
Recording the Camera Picture on an External Device
171
Nonlinear Editing
172
Recording External Input Signals
172
Configuring a Shooting and Recording System
173
Chapter 9 : Maintenance
174
Advertisement
Sony PMW-500 Operation Manual (179 pages)
SOLID-STATE MEMORY CAMCORDER
Brand:
Sony
| Category:
Camcorder
| Size: 7.55 MB
Table of Contents
Table of Contents
5
Foreword
10
Before Use
10
Mode Indications in this Manual
10
Chapter 1 : Overview
11
Features
11
Using the CD-ROM
12
Reading the CD-ROM Manuals
13
Locations and Functions of Parts and Controls
13
Power Supply
13
Accessory Attachments
14
Operating and Connectors Section
15
Gain Selector
17
Access Lamp
19
Prev Button
20
Stop Button
20
Next Button
20
Display Switch
20
Essence Mark Button
21
D Menu Button
21
Shift Button
22
Slot Cover
23
LCD Monitor
25
HDVF-20A Viewfinder (Optional)
26
Status Display on the Viewfinder Screen
27
Viewfinder Screen
28
Color Temperature
29
Video Format
30
Electric Color Temperature Filter
31
Filter Position
31
Gain Value
31
Chapter 2 : Preparations
32
Preparing a Power Supply
32
Using a Battery Pack
32
Using AC Power
33
Attaching the Viewfinder
34
Adjusting the Viewfinder Position
34
Using the BKW-401 Viewfinder Rotation Bracket
35
Detaching the Eyepiece
36
Adjusting the Viewfinder Focus and Screen
36
Setting the Area of Use
37
Setting the Date/Time of the Internal Clock
38
Mounting and Adjusting the Lens
39
Adjusting the Flange Focal Length
39
Preparing the Audio Input System
40
Connecting a Microphone to the MIC in Connector
40
Connecting Microphones to the AUDIO in Connectors
41
Attaching a UHF Portable Tuner (for a UHF Wireless Microphone System)
42
Connecting Line Input Audio Equipment
44
Tripod Mounting
45
Connecting a Video Light
46
Using the Shoulder Strap
46
Adjusting the Shoulder Pad Position
47
Chapter 3 : Adjustments and Settings
48
Setting the Video Format
48
Selecting the Recording Mode
50
Changing the Video Format
50
Adjusting the Black Balance and the White Balance
51
Adjusting the Black Balance
51
Adjusting the White Balance
52
Setting the Electronic Shutter
54
Shutter Modes
54
Selecting the Shutter Mode and Shutter Speed
54
Changing the Reference Value for Automatic Iris Adjustment
56
Adjusting the Audio Level
57
Manually Adjusting the Audio Levels of the Audio Inputs from the AUDIO in CH-1/CH-2 Connectors
57
Manually Adjusting the Audio Level of the MIC in Connector
57
Recording Audio on Channels 3 and 4
58
Setting the Time Data
59
Setting the Timecode
59
Setting the User Bits
60
Synchronizing the Timecode
60
Checking Camcorder Settings and Status Information (Status Screens)
62
Chapter 4 : Shooting
64
Handling S×S Memory Cards
64
About S×S Memory Cards
64
Loading and Ejecting S×S Memory Cards
65
Selecting the S×S Memory Card to Use
66
Formatting (Initializing) S×S Memory Cards
66
If You Load a Memory Card Formatted in the Different Recording Mode from the Mode Selected on the Camcorder
67
Checking the Remaining Recording Time
67
Restoring S×S Memory Cards
68
Basic Operations
69
Playing Recorded Clips
70
Deleting Recorded Clips
71
Advanced Operations
71
Recording Shot Marks
71
Setting OK Marks
72
Starting to Record from Pre-Stored Video (Picture Cache Function)
72
Recording Time-Lapse Video (Interval Rec Function)
73
Shooting Stop Motion Animations (Frame Rec Function)
75
Shooting with Slow & Quick Motion
76
Recording with the Clip Continuous Rec Function
77
Framing Shots with the Freeze MIX Function
78
Chapter 5 : Clip Operations
80
Clip Playback
80
Thumbnail Screen
80
Index Picture
81
Clip Name
81
File Format
81
Playing Clips
83
Using Thumbnails to Search Inside Clips
84
Thumbnail Operations
85
THUMBNAIL Menu Configuration
85
Basic THUMBNAIL Menu Operations
87
Changing the Thumbnail Screen Type
87
Displaying Clip Properties
89
Adding and Deleting OK, NG or KP Marks
90
Protecting Clips
91
Copying Clips
91
Deleting Clips
92
Displaying the Expand Thumbnail Screen
93
Displaying the Essence Mark Thumbnail Screen
94
Adding and Deleting Shot Marks
94
Changing Clip Index Pictures
95
Dividing Clips
95
Chapter 6 : Menu and Detailed Settings
96
Setup Menu Organization and Levels
96
Setup Menu Organization
96
Setup Menu Levels
96
Basic Setup Menu Operations
98
Menu List
100
OPERATION Menu
100
PAINT Menu
113
MAINTENANCE Menu
119
FILE Menu
132
Assigning Functions to Assignable Switches
136
Functions that Can be Assigned to the ASSIGN. 0 Switch
136
Functions that Can be Assigned to the ASSIGN. 2 Switch
137
Functions that Can be Assigned to the ASSIGN. 1 and 3 Switches
137
Button
137
Functions that Can be Assigned to the RET Button on the Lens
139
Chapter 7 : Saving and Loading User Setting Data
140
Saving and Loading Settings
140
Saving Setting Data
140
Loading Setting Data
141
Resetting a File after Changing Its Contents
141
Saving and Loading Scene Files
142
Saving Scene Files
142
Loading Scene Files
142
Saving and Loading Lens Files
143
Setting Lens File Data
143
Saving Lens Files
143
Loading Lens Files
143
Loading Lens Files Automatically
144
Chapter 8 : Connecting External Devices
145
Connecting External Monitors
145
Operating Clips with a Computer
147
Using the Expresscard Slot of a Computer
147
USB Connection with a Computer
147
Connecting an External Device (I.link Connection)
149
Recording the Camera Picture on an External Device
149
Nonlinear Editing
150
Recording External Input Signals
150
Configuring a Shooting and Recording System
151
Chapter 9 : Maintenance
152
Sony PMW-500 Operation Manual (176 pages)
solid-state memory
Brand:
Sony
| Category:
Other
| Size: 7.41 MB
Table of Contents
Table of Contents
4
Foreword
9
Before Use
9
Mode Indications in this Manual
9
Chapter 1 : Overview
10
Features
10
Using the Software
11
Reading the CD-ROM Manuals
12
Locations and Functions of Parts and Controls
12
Power Supply
12
Accessory Attachments
13
Operating and Connectors Section
14
LCD Monitor
24
HDVF-20A Viewfinder (Optional)
25
Status Display on the Viewfinder Screen
26
Chapter 2 : Preparations
31
Preparing a Power Supply
31
Using a Battery Pack
31
Using AC Power
32
Attaching the Viewfinder
32
Adjusting the Viewfinder Position
33
Using the BKW-401 Viewfinder Rotation Bracket
33
Detaching the Eyepiece
34
Adjusting the Viewfinder Focus and Screen
35
Setting the Area of Use
36
Setting the Date/Time of the Internal Clock
37
Mounting and Adjusting the Lens
37
Adjusting the Flange Focal Length
38
Preparing the Audio Input System
39
Connecting a Microphone to the MIC in Connector
39
Connecting Microphones to the AUDIO in Connectors
40
Attaching a UHF Portable Tuner (for a UHF Wireless Microphone System)
41
Connecting Line Input Audio Equipment
42
Tripod Mounting
43
Connecting a Video Light
44
Using the Shoulder Strap
45
Adjusting the Shoulder Pad Position
46
Chapter 3 : Adjustments and Settings
47
Setting the Video Format
47
Selecting the Recording Mode
49
Changing the Video Format
49
Adjusting the Black Balance and the White Balance
50
Adjusting the Black Balance
50
Adjusting the White Balance
51
Setting the Electronic Shutter
53
Shutter Modes
53
Selecting the Shutter Mode and Shutter Speed
53
Changing the Reference Value for Automatic Iris Adjustment
55
Adjusting the Audio Level
56
Manually Adjusting the Audio Levels of the Audio Inputs from the AUDIO in CH-1/CH-2 Connectors
56
Manually Adjusting the Audio Level of the MIC in Connector
56
Recording Audio on Channels 3 and 4
57
Setting the Time Data
58
Setting the Timecode
58
Setting the User Bits
59
Synchronizing the Timecode
59
Checking Camcorder Settings and Status Information (Status Screens)
61
Checking Camcorder Settings and Status Information (Status Screens
62
Chapter 4 : Shooting
63
Handling S×S Memory Cards
63
About S×S Memory Cards
63
Loading and Ejecting S×S Memory Cards
64
Selecting the S×S Memory Card to Use
65
Formatting (Initializing) S×S Memory Cards
65
If You Load a Memory Card Formatted in the Different Recording Mode from the Mode Selected on the Camcorder
66
Checking the Remaining Recording Time
66
Restoring S×S Memory Cards
67
Basic Operations
68
Playing Recorded Clips
69
Deleting Recorded Clips
70
Advanced Operations
70
Recording Shot Marks
70
Setting OK Marks
71
Starting to Record from Pre-Stored Video (Picture Cache Function)
71
Recording Time-Lapse Video (Interval Rec Function)
72
Shooting Stop Motion Animations (Frame Rec Function)
74
Shooting with Slow & Quick Motion
75
Recording with the Clip Continuous Rec Function
76
Framing Shots with the Freeze MIX Function
77
Chapter 5 : Clip Operations
79
Clip Playback
79
Thumbnail Screen
79
Playing Clips
82
Using Thumbnails to Search Inside Clips
83
Thumbnail Operations
84
THUMBNAIL Menu Configuration
84
Basic THUMBNAIL Menu Operations
86
Changing the Thumbnail Screen Type
86
Displaying Clip Properties
88
Adding and Deleting OK, NG or KP Marks
89
Protecting Clips
90
Copying Clips
90
Deleting Clips
91
Displaying the Expand Thumbnail Screen
92
Displaying the Essence Mark Thumbnail Screen
93
Adding and Deleting Shot Marks
93
Changing Clip Index Pictures
94
Dividing Clips
94
Chapter 6 : Menu and Detailed Settings
95
Setup Menu Organization and Levels
95
Setup Menu Organization
95
Setup Menu Levels
95
Basic Setup Menu Operations
97
Menu List
99
OPERATION Menu
99
PAINT Menu
112
MAINTENANCE Menu
118
FILE Menu
131
Assigning Functions to Assignable Switches
135
Functions that Can be Assigned to the ASSIGN. 0 Switch
135
Functions that Can be Assigned to the ASSIGN. 2 Switch
136
Functions that Can be Assigned to the ASSIGN. 1 and 3 Switches
136
Button
136
Functions that Can be Assigned to the RET Button on the Lens
138
Chapter 7 : Saving and Loading User Setting Data
139
Saving and Loading Settings
139
Saving Setting Data
139
Loading Setting Data
140
Resetting a File after Changing Its Contents
140
Saving and Loading Scene Files
141
Saving Scene Files
141
Loading Scene Files
141
Saving and Loading Lens Files
142
Setting Lens File Data
142
Saving Lens Files
142
Loading Lens Files
142
Loading Lens Files Automatically
143
Chapter 8 : Connecting External Devices
144
Connecting External Monitors
144
Operating Clips with a Computer
146
Using the Expresscard Slot of a Computer
146
USB Connection with a Computer
146
Connecting an External Device (I.link Connection)
148
Recording the Camera Picture on an External Device
148
Nonlinear Editing
149
Recording External Input Signals
149
Configuring a Shooting and Recording System
150
Chapter 9 : Maintenance
151
Testing the Camcorder
151
Cleaning the Viewfinder
151
Note about the Battery Terminal
152
Sony PMW-500 Supplement Manual (43 pages)
SOLID-STATE MEMORY CAMCORDER
Brand:
Sony
| Category:
Camcorder
| Size: 0.99 MB
Table of Contents
Table of Contents
2
Foreword
3
Using an External Hard Disk
3
Attaching/Removing the PHU-120R
3
Formatting the PHU-120R
4
Restoring the PHU-120R
5
Using a Media Adaptor
6
Formatting
6
Operating from the RM-B150/B750
7
Adjusting the Camcorder from the RM-B150/B750
7
Operating the Menu from the RM-B150
9
Operating the Menu from the RM-B750
9
Functions that Can be Controlled from the RM-B150/B750
11
Using a Wi-Fi Adapter
19
Fixing the CBK-WA01
19
Making a Wi-Fi Connection
20
Using the Web Menu
21
Using Live Logging Functions
23
Recording External Input (Pool Feed)
23
Editing the USER Menu
31
Inserting Items and Sub-Items
31
Adding Sub-Items to Existing Items
32
Deleting Items
33
Deleting Sub-Items
33
Output Formats and Limitations
34
Video Formats and Output Signals (for UDF Mode)
34
Video Formats and Output Signals (for FAT Mode)
35
Sony PMW-500 Operator's Manual (35 pages)
Brand:
Sony
| Category:
Camcorder
| Size: 1.4 MB
Table of Contents
Section 1: Set up and Preparation
3
Charging Batteries
3
Media Cards
7
User Menu
7
Clip Naming
11
System Time/Date
12
Section 2: Zoom
17
Zoom Speed
17
Section 3: Focus
17
Section 4: Exposure and Scene Files Exposure
19
Auto Iris
22
Section 5: White Balance
23
Colour Temperature
23
Manual White Balance
24
Black Balance
25
Section 6: Audio
25
Level Control
26
Monitoring Audio
27
Section 7: Assign Buttons
29
Section 8: Special Recording Modes
30
Slow & Quick Motion
31
Section 9: Playback
32
Playback on a Tv
33
Section 10: Pre Shoot Checklist
34
Sony PMW-500 Manual (13 pages)
Brand:
Sony
| Category:
Camcorder
| Size: 0.34 MB
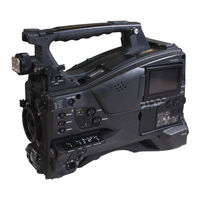
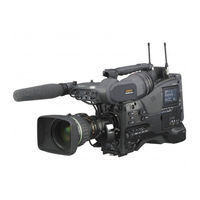
Sony PMW-500 Brochure (8 pages)
Product Brochure (PMW-500 Solid-State Memory Camcorder)
Brand:
Sony
| Category:
Camcorder
| Size: 2.18 MB
Sony PMW-500 Features (8 pages)
Solid State Memory Camcorder
Brand:
Sony
| Category:
Camcorder
| Size: 1.62 MB
Sony PMW-500 Getting Started (3 pages)
Brand:
Sony
| Category:
Camcorder
| Size: 0.06 MB
Sony PMW-500 Product Information (2 pages)
Product Information Document (DWX and WL800 Camcorder Combo Chart)
Brand:
Sony
| Category:
Camcorder
| Size: 0.49 MB
Advertisement
Related Products
Sony PMW500/HD02
Sony PMW-350
Sony PMW-350K
Sony HANDYCAM PMW-320K
Sony HANDYCAM PMW-320L
Sony PMW300K1
Sony PMW400L
Sony XDCAM PMW-1000
Sony PMW-F3
Sony PMW-EX280
Sony Categories
Laptop
TV
Camcorder
CD Player
Digital Camera
More Sony Manuals
Login
Sign In
OR
Sign in with Facebook
Sign in with Google
Upload manual
Upload from disk
Upload from URL