Sign In
Upload
Manuals
Brands
HP Manuals
Laptop
OmniBook 3100
HP OmniBook 3100 Manuals
Manuals and User Guides for HP OmniBook 3100. We have
11
HP OmniBook 3100 manuals available for free PDF download: Reference Manual, Service Manual, User Manual, Using Manual, Supplementary Manual
HP OmniBook 3100 Reference Manual (150 pages)
HP OmniBook 2100: Reference Guide
Brand:
HP
| Category:
Laptop
| Size: 16.4 MB
Table of Contents
Table of Contents
5
1 Introducing the Omnibook
9
Taking Inventory
11
Included in the Omnibook 2100/3100 Box
11
To Buy Omnibook Accessories
12
Omnibook Features
13
Setting up Windows
16
To Set up the Omnibook for the First Time
17
Configuring the Omnibook with the BIOS Setup Utility
18
To Run the BIOS Setup Utility
18
Security Menu
21
Power Menu
22
Exit Menu
23
Configuring the Omnibook with Toptools
24
To Install Toptools
24
To Run Toptools
24
To Get more Information about Toptools
24
2 Operating the Omnibook
25
Starting and Stopping the Omnibook
27
To Start and Stop the Omnibook
27
To Reset the Omnibook
28
Using the Omnibook Touch Pad
29
To Use the Touch Pad
29
To Configure the Touch Pad
30
Using the Omnibook Display
31
To Adjust the Display Brightness and Contrast
31
To Extend the Life of the Display
31
Adjusting the Audio System
32
To Adjust the Volume Manually
32
To Adjust the Volume in Windows
32
Using the Omnibook Keyboard
33
To Use the Fn Hot Keys
34
To Use the Windows Keys
35
To Use the Embedded Keypad
35
To Use the ALT GR Key
36
Checking the Status of the Omnibook
37
To Interpret the Status Lights
37
To Interpret the Status Panel Indicators
38
Protecting the Omnibook
40
To Set or Change a Password
41
To Delete a Password
42
To Install Mcafee Virusscan
42
To Attach a Security Cable
43
To Set PC Identification
44
To Enable Hard Disk Drive Lock
44
3 Managing Battery Power
45
Managing Battery Power
46
Monitoring Battery Power
47
To Check the Battery Status
48
To Respond to a Low-Battery Warning
49
To Recharge a Battery
49
To Replace the Main Battery
51
To Install a Secondary Battery
52
Conserving Battery Power
53
To Optimize Battery Life
53
To Set Time-Outs
54
To Get the most from Your Battery
55
4 Making Connections
57
Making Connections
58
Using Omnibook Plug-In Modules
59
To Replace a Plug-In Module
60
To Connect the Floppy Disk Drive Externally
61
To Insert or Eject a Floppy Disk
61
To Insert or Remove a CD
62
To Insert or Eject a Zip Disk
63
Connecting External Devices
64
To Indentify the External Ports
65
To Connect an External Display
66
To Enable the Built-In and External Displays
66
To Change Display Settings in the BIOS Setup Utility
66
To Connect a Parallel Device
67
To Connect a Serial Device
67
To Connect an External Keyboard or PS/2 Mouse
67
To Connect USB Devices
68
To Connect Audio Devices
69
To Make an Infrared Connection
70
Using PC Cards
71
To Insert a PC Card
71
To Remove a PC Card
72
To Find Tested PC Cards
72
Using Docking Products
73
To Install a Docking Tray
73
To Dock the Omnibook
74
To Undock the Omnibook
75
5 Expanding the Omnibook
77
Expanding the Omnibook
78
Installing a Hard Disk Drive
79
To Replace the Hard Disk Drive
79
To Replace the Hard Disk Drive Holder
80
To Create a Hibernate Partition
81
Installing a RAM Expansion Module
82
To Install a RAM Expansion Module
83
To Remove a RAM Expansion Module
84
6 Using the Recovery CD
85
Recovering a Factory Software Installation
87
To Recover the Windows 95 Factory Installation
88
To Recover the Windows NT Factory Installation
89
Installing Retail Windows 95
90
To Install a Retail Version of Windows 95
91
To Install Video Support for Retail Windows 95
93
To Install Audio Support for Retail Windows 95
94
To Install PC Card Support for Retail Windows 95
95
To Install Infrared Support for Retail Windows 95
96
To Install Touch Pad Support for Retail Windows 95
97
To Disable Automatic CD-ROM Detection
98
Installing Retail Windows NT 4.0
99
To Install a Retail Version of Windows NT 4.0
100
To Install Service Pack 3 for Retail Windows NT 4.0
101
To Install Video Support for Retail Windows NT 4.0
102
To Install Audio Support for Retail Windows NT 4.0
103
To Install APM for Windows NT 4.0
104
To Install Card Executive 2.X for Retail Windows NT 4.0
105
To Disable Automatic CD-ROM Detection
106
Recovering Omnibook Files
107
To Install the Online User's Handbook
107
To Replace a Damaged Recovery CD
107
To Update the Omnibook BIOS
108
7 Troubleshooting
109
Troubleshooting
110
Solving Problems
111
Accessory Module Problems
111
Audio Problems
113
Display Problems
114
Hard Disk Drive Problems
115
Infrared Problems
116
Keyboard and Pointing Device Problems
117
Memory Problems
118
PC Card (PCMCIA) Problems
119
Performance Problems
120
Power and Battery Problems
121
Printing Problems
123
Serial, Parallel, and USB Problems
124
Startup Problems
125
Testing the Operation
126
To Create a Diagnostic Floppy Disk
126
To Run the Diagnostic Test
127
8 Specifications and Regulatory Information
129
Hardware Specifications
131
Software System Resources
134
Safety Information
136
Regulatory Information
139
U.s.a
139
Canada
140
Japan
140
Europe
141
Advertisement
HP OmniBook 3100 Service Manual (107 pages)
Brand:
HP
| Category:
Laptop
| Size: 1.89 MB
Table of Contents
Service Manual
1
Table of Contents
4
1 Product Information
8
Table 1-1. Omnibook 2100/3000/3100 Models
8
Features and Operation
9
Figure 1-1. Omnibook - Front View
9
Figure 1-2. Omnibook - Side View
9
Figure 1-3. Omnibook - Back View
10
Table 1-2. Product Comparisons
10
Table 1-3. Activating Power Modes
11
Turning the Omnibook on and off
11
Checking the Status of the Omnibook
12
Table 1-4. Status Panel Indicators (Icon PCA)
12
Table 1-5. Indicator Lights (Icon PCA and Battery)
13
Table 1-6. Function Keys (F1-F12)
13
Using Functions Keys (F1 through F12)
13
Resetting the Omnibook
14
System Resources
15
Table 1-7. System Interrupts
15
Table 1-8. System Memory
15
Table 1-10. DMA Channels
16
Table 1-9. System Input/Output Addresses (100-3FF)
16
Specifications
17
Table 1-11. HP Omnibook 2100/3000/3100 Specifications
17
Table 1-12. HP Omnibook 2100/3000/3100 Accessories
19
Internal Design
21
Figure 1-4. Replaceable Module Diagram
21
Table 1-13. Functional Structure
22
2 Removal and Replacement
24
Table 2-1. Removal Cross-Reference
24
Table 2-2. Required Equipment
25
Table 2-3. Recommended Screw Torques
25
Figure 2-1. Removing the Main Battery
26
Removing the Main Battery (User-Replaceable)
26
Figure 2-2. Removing a Plug-In Module
27
Removing a Plug-In Accessory Module (User-Replaceable)
27
Figure 2-3. Removing the Hard Drive
28
Removing the Hard Disk Drive (User-Replaceable)
28
Table 2-4. Hard Disk Drive Replacement Part Numbers
28
Figure 2-4. Installing a Hard Drive in the Case
29
Removing a RAM Board (User-Replaceable)
30
Table 2-5. RAM Board Replacement Part Numbers and Compatibility
30
Figure 2-5. Removing the RAM Cover
31
Figure 2-6. Removing a RAM Board
31
Removing the Display Assembly (HP Authorized Service Providers Only)
32
Replacing Small Parts (User-Replaceable)
32
Table 2-6. Replacing Small Parts (User-Replaceable)
32
Figure 2-7. Removing the Hinge Covers and Icon Window Cover
33
Figure 2-8. Removing the Icon PCA and Display Assembly
34
Removing the LCD Module (HP Authorized Service Providers Only)
35
Table 2-7. Display Component Compatibility
35
Figure 2-9. Removing the Hinge Covers and Icon Window Cover
36
Figure 2-10. Removing the Display Bezel
37
Figure 2-11. Removing the 12" LCD Module
38
Figure 2-12. Removing the 13" LCD Module
38
Removing a 12" Display Case or Display Bracket (HP Authorized Service Providers Only)
39
Figure 2-13. Removing a 12" Display Case and Display Bracket
40
Removing a 13" Display Case or Display Bracket (HP Authorized Service Providers Only)
41
Figure 2-14. Removing a 13" Display Case and Display Bracket
42
Figure 2-15. Removing the Hinge Covers and Icon Window Cover
43
Removing the Keyboard (HP Authorized Service Providers Only)
43
Figure 2-16. Removing the Keyboard
44
Removing the Top Case (HP Authorized Service Providers Only)
44
Figure 2-17. Removing the Heatsink
45
Figure 2-18. Removing the Case Screws
46
Figure 2-19. Removing the Top Case
47
Figure 2-20. Two Types of CPU Modules and Thermal Kits
48
Removing the Motherboard or Bottom Case (HP Authorized Service Providers Only)
48
Figure 2-21. Removing the Motherboard
49
Figure 2-22. Installing Omnibook 3000 Regulatory and Serial Labels
52
Removing a BIOS IC (HP Authorized Service Providers Only)
52
Figure 2-23. Removing a BIOS IC
53
Removing Other Components (HP Authorized Service Providers Only)
54
Table 2-8. Removing Other Components (Authorized Providers)
54
3 Troubleshooting and Diagnostics
58
Troubleshooting
59
Troubleshooting the Problem
59
Figure 3-1. Basic Troubleshooting Steps
59
Verifying the Repair
60
Suggestions for Troubleshooting
61
Table 3-1. Scope of Diagnostic Tools
61
Table 3-2. Troubleshooting Suggestions
62
Diagnostic Tools
69
Omnibook Diagnostic Program
69
Figure 3-2. Omnibook Diagnostic Screens - Basic and Advanced
69
Figure 3-3. Serial and Parallel Loopback Connectors
71
Table 3-3. Omnibook Diagnostic Error Codes
71
Power-On Self-Test
74
Table 3-4. POST Terminal-Error Beep Codes
74
Table 3-5. POST Messages
75
Sycard Pcctest 450 Cardbus Card (Optional)
77
Desktop Management Interface (DMI)
78
Figure 3-4. DMI Components
79
BIOS Setup Utility
80
Table 3-6. BIOS Setup Menus and Parameters
80
4 Replaceable Parts
84
Figure 4-1. Exploded View
85
Table 4-1. Omnibook Replaceable Parts
86
Table 4-2. Assembly-Component Breakdown
89
Table 4-3. Accessory Replaceable Parts
90
Table 4-4. Part Number Reference
91
5 Reference Information
96
Password Removal Policy
96
Hewlett-Packard Display Quality Statement
97
Table 5-1. Omnibook 2100/3000/3100 LCD Guidelines (TFT)
98
Table 5-2. Omnibook 2100 LCD Guidelines (DSTN)
99
Service Notes and Obsolete Parts
100
Table 5-3. Service Notes
100
Table 5-4. Obsolete Repair Parts
100
HP OmniBook 3100 Service Manual (98 pages)
Brand:
HP
| Category:
Laptop
| Size: 2.8 MB
Table of Contents
Service Manual
1
Table of Contents
3
1 Product Information
7
Table 1-1. Omnibook 2100/3000/3100 Models
7
Features and Operation
8
Figure 1-1. Omnibook - Front View
8
Figure 1-2. Omnibook - Side View
8
Figure 1-3. Omnibook - Back View
9
Table 1-2. Product Comparisons
9
Table 1-3. Activating Power Modes
10
Turning the Omnibook on and off
10
Checking the Status of the Omnibook
11
Table 1-4. Status Panel Indicators (Icon PCA)
11
Table 1-5. Indicator Lights (Icon PCA and Battery)
12
Table 1-6. Function Keys (F1-F12)
12
Using Functions Keys (F1 through F12)
12
Resetting the Omnibook
13
System Resources
14
Table 1-7. System Interrupts
14
Table 1-8. System Memory
14
Table 1-10. DMA Channels
15
Table 1-9. System Input/Output Addresses (100-3FF)
15
Specifications
16
Table 1-11. HP Omnibook 2100/3000/3100 Specifications
16
Table 1-12. HP Omnibook 2100/3000/3100 Accessories
19
Internal Design
20
Figure 1-4. Replaceable Module Diagram
20
Table 1-13. Functional Structure
21
2 Removal and Replacement
23
Table 2-1. Removal Cross-Reference
23
Table 2-2. Required Equipment
24
Table 2-3. Recommended Screw Torques
24
Figure 2-1. Removing the Main Battery
25
Removing the Main Battery (User-Replaceable)
25
Figure 2-2. Removing a Plug-In Module
26
Removing a Plug-In Accessory Module (User-Replaceable)
26
Figure 2-3. Removing the Hard Drive
27
Removing the Hard Disk Drive (User-Replaceable)
27
Table 2-4. Hard Disk Drive Replacement Part Numbers
27
Figure 2-4. Installing a Hard Drive in the Case
28
Figure 2-5. Removing the RAM Cover
29
Removing a RAM Board (User-Replaceable)
29
Table 2-5. RAM Board Replacement Part Numbers
29
Figure 2-6. Removing a RAM Board
30
Replacing Small Parts (User-Replaceable)
30
Table 2-6. Replacing Small Parts (User-Replaceable)
30
Figure 2-7. Removing the Hinge Covers and Icon Window Cover
31
Removing the Display Assembly (HP Authorized Service Providers Only)
31
Figure 2-8. Removing the Icon PCA and Display Assembly
32
Removing the LCD Module (HP Authorized Service Providers Only)
33
Table 2-7. Display Component Compatibility
33
Figure 2-9. Removing the Hinge Covers and Icon Window Cover
34
Figure 2-10. Removing the Display Bezel
35
Figure 2-11. Removing the 12" LCD Module
36
Figure 2-12. Removing the 13" LCD Module
36
Removing a 12" Display Case or Display Bracket (HP Authorized Service Providers Only)
37
Figure 2-13. Removing a 12" Display Case and Display Bracket
38
Removing a 13" Display Case or Display Bracket (HP Authorized Service Providers Only)
39
Figure 2-14. Removing a 13" Display Case and Display Bracket
40
Figure 2-15. Removing the Hinge Covers and Icon Window Cover
41
Removing the Keyboard (HP Authorized Service Providers Only)
41
Figure 2-16. Removing the Keyboard
42
Removing the Top Case (HP Authorized Service Providers Only)
42
Figure 2-17. Removing the Heatsink
43
Figure 2-18. Removing the Case Screws
44
Figure 2-19. Removing the Top Case
45
Figure 2-20. Removing and Installing the CPU Module
46
Removing the Motherboard or Bottom Case (HP Authorized Service Providers Only)
46
Figure 2-21. Removing the Motherboard
47
Figure 2-22. Installing Omnibook 3000 Regulatory and Serial Labels
49
Removing a BIOS IC (HP Authorized Service Providers Only)
49
Figure 2-23. Removing a BIOS IC
50
Removing Other Components (HP Authorized Service Providers Only)
51
Table 2-8. Removing Other Components (Authorized Providers)
51
3 Troubleshooting and Diagnostics
55
Troubleshooting
56
Troubleshooting the Problem
56
Figure 3-1. Basic Troubleshooting Steps
56
Verifying the Repair
57
Suggestions for Troubleshooting
58
Table 3-1. Scope of Diagnostic Tools
58
Table 3-2. Troubleshooting Suggestions
59
Diagnostic Tools
65
Omnibook Diagnostic Program
65
Figure 3-2. Omnibook Diagnostic Screens - Basic and Advanced
65
Figure 3-3. Serial and Parallel Loopback Connectors
67
Table 3-3. Omnibook Diagnostic Error Codes
67
Power-On Self-Test
70
Table 3-4. POST Terminal-Error Beep Codes
70
Table 3-5. POST Messages
71
Sycard Pcctest 450 Cardbus Card (Optional)
73
Desktop Management Interface (DMI)
74
Figure 3-4. DMI Components
75
BIOS Setup Utility
76
Table 3-6. BIOS Setup Menus and Parameters
76
4 Replaceable Parts
81
Figure 4-1. Exploded View
82
Table 4-1. Omnibook Replaceable Parts
83
Table 4-2. Assembly-Component Breakdown
86
Table 4-3. Accessory Replaceable Parts
87
Table 4-4. Part Number Reference
88
5 Reference Information
93
Password Removal Policy
93
Hewlett-Packard Display Quality Statement
94
Table 5-1. Omnibook 2100/3000/3100 LCD Guidelines (TFT)
95
Table 5-2. Omnibook 2100 LCD Guidelines (DSTN)
96
Advertisement
HP OmniBook 3100 User Manual (53 pages)
HP OmniBook 2100: User Guide
Brand:
HP
| Category:
Laptop
| Size: 0.67 MB
Table of Contents
Table of Contents
1
Hp Omnibook 2100/3100 User's Handbook
4
Using this Online Handbook
4
Finding more Information
4
Notice
5
1 Introducing the Omnibook
6
Identifying the Parts of the Omnibook
7
Learning about Windows
9
Safety Information
9
Working in Comfort
10
2 Operating the Omnibook
11
Powering the Omnibook
11
To Connect Ac Power
11
Starting and Stopping the Omnibook
12
To Start and Stop the Omnibook
12
To Reset the Omnibook
13
To Transport the Omnibook
13
Using the Touch Pad
13
To Use the Touch Pad
13
To Configure the Touch Pad
14
Using the Omnibook Display
14
To Adjust the Display
14
To Extend the Life of the Display
15
Adjusting the Sound System
15
To Adjust the Volume Manually
15
To Adjust the Volume in Windows
15
Using the Omnibook Keyboard
16
To Use the Fn Hot Keys
16
To Use the Windows Keys
17
To Use the Embedded Keypad
17
To Use the Alt Gr Key
17
Checking the Status of the Omnibook
19
To Interpret Status Lights
19
To Interpret the Status Panel Indicators
19
Protecting the Omnibook
20
To Set or Change a Password
20
To Delete a Password
21
To Attach a Security Cable
22
To Install Mcafee Virusscan
22
3 Managing Battery Power
23
Recharging and Replacing Batteries
23
To Respond to a Low-Battery Warning
23
To Recharge the Battery
24
To Replace the Battery
24
Conserving Battery Power
25
To Optimize Battery Operating Time
25
To Get the most from Your Batteries
26
To Change a Time-Out Setting
26
4 Making Connections
28
Using Plug-In Modules and Storage Media
28
To Replace a Plug-In Module
28
To Install the Floppy Disk Drive Externally
29
To Insert or Eject a Floppy Disk
30
To Insert or Remove a CD
30
To Insert or Eject a Zip Disk
31
Connecting External Devices
31
To Connect an External Monitor
31
To Connect a Printer or Other Parallel Device
32
To Connect a Serial Mouse or Other Serial Device
32
To Connect an External PS/2 Keyboard or a PS/2 Mouse
33
To Connect a USB Device
33
To Connect an Audio Source, a Microphone, or Headphones
34
To Make an Infrared Connection
34
Using PC Cards
35
To Insert a PC Card
35
To Remove a PC Card
36
Using Docking Products
37
To Install a Docking Tray
37
To Dock the Omnibook
37
To Undock the Omnibook
39
Cleaning the Computer
40
To Clean the Case
40
To Clean the Display
40
Solving Common Problems
40
Accessory Problems
41
Audio Problems
42
Display Problems
42
Hard Disk Drive Problems
43
Infrared Problems
43
Keyboard and Pointing Device Problems
44
Memory Problems
44
PC Card (PCMCIA) Problems
44
Performance Problems
45
Power and Battery Problems
45
Printing Problems
47
Serial and Parallel Problems
47
Startup Problems
48
5 Maintenance and Troubleshooting
40
Index
49
HP OmniBook 3100 User Manual (44 pages)
OmniBook DiagTools version 2.x
Brand:
HP
| Category:
Software
| Size: 0.36 MB
Table of Contents
Table of Contents
3
Who Should Read this Book
5
What Is Omnibook Diagtools
5
Overview of Omnibook Diagtools
5
Compatibility
6
Where to Get the Diagnostics Software
6
1 Starting Omnibook Diagtools
7
Installing and Setting up Omnibook Diagtools
8
Downloading the Latest Version from the Web
8
Creating the Omnibook Diagtools Floppy Diskette Locally
9
Updating the Diagtools Files (for Network Administrators)
10
Before Running Omnibook Diagtools
11
Starting Omnibook Diagtools
12
The Welcome Screen
14
2 Hardware Detection
15
Overview of Hardware Detection
16
During Hardware Detection
17
Hardware Detection Results
18
What Is Detected
19
If a PC Component Is Not Detected
20
3 Basic System Test
21
Overview of the Basic System Test
22
How to Run the Basic System Test
22
Test Result: PASS
23
Test Result: FAIL
24
What Is Tested
26
4 Advanced System Tests
29
Overview of the Advanced System Tests
30
How to Enter the Advanced System Tests
30
Help on Advanced Tests
31
How to Run an Advanced System Test
32
Batch Tests
34
What to Do if a Test Fails
35
5 The Support Ticket
37
What Is the Support Ticket
38
Creating a Support Ticket
38
Retrieving a Support Ticket
39
Adding Comments to the Support Ticket
40
6 Hewlett-Packard Support and Information Services
41
Your HP Authorized Reseller
42
Hewlett-Packard Information Services
43
HP Omnibook World Wide Web
43
HP PC & Peripheral Self-Help and Direct-Help Tools
43
HP OmniBook 3100 User Manual (33 pages)
HP OmniBook Plug-in modules
Brand:
HP
| Category:
Computer Hardware
| Size: 0.22 MB
Table of Contents
Table of Contents
3
1 Using Omnibook Plug-In Modules
5
Replacing a Plug-In Accessory Module
7
To Replace a Plug-In Module
7
Using the Floppy Disk Drive
9
To Connect the Floppy Disk Drive Externally
9
To Insert or Eject a Floppy Disk
10
Using the CD-ROM Drive
11
To Insert or Remove a CD
11
To Open the CD-ROM Drive Manually
12
Using the Zip Drive
13
To Install the Zip Drive Software
13
To Insert or Eject a Zip Disk
14
To Eject a Zip Disk Manually
14
Using the DVD Drive
15
To Insert or Eject a DVD
15
To Eject a DVD Manually
16
Using the Second Battery
17
To Handle and Store the Battery Safely
17
To Maintain and Preserve Battery Life
18
2 Troubleshooting
19
Solving Problems with Plug-In Accessories
21
Floppy Disk Drive Problems
21
CD-ROM Drive Problems
22
Zip Drive Problems
22
DVD Drive Problems
23
Battery Problems
23
3 Specifications and Regulatory Information
25
Specifications and Regulatory Information
26
Hardware Specifications and Safety
27
To Use the CD-ROM and DVD Drive Safely
27
Regulatory Information
28
U.s.a
28
Canada
29
Japan
29
Europe
30
HP OmniBook 3100 User Manual (28 pages)
Encryption Smart Card Security System
Brand:
HP
| Category:
Laptop Accessories
| Size: 0.07 MB
Table of Contents
Before You Begin
2
Package Contents
2
System Requirements
2
Overview of the Setup Procedure
4
Smart Card Options
15
Troubleshooting
20
Getting Hp Omnibook Assistance
23
Customer Support Centers
24
Hp Limited Warranty Statement
26
HP Software License Agreement
27
HP OmniBook 3100 Service Manual (20 pages)
Brand:
HP
| Category:
Laptop
| Size: 0.32 MB
Table of Contents
Table of Contents
4
Table 1-1. Omnibook 2100/3000/3100 Models
7
Figure 1-1. Omnibook - Front View
8
Figure 1-2. Omnibook - Side View
8
Figure 1-3. Omnibook - Back View
9
Table 1-2. Product Comparisons
9
Table 1-3. Activating Power Modes
10
Table 1-4. Status Panel Indicators (Icon PCA)
11
Table 1-5. Indicator Lights (Icon PCA and Battery)
12
Table 1-6. Function Keys (F1-F12)
12
Table 1-7. System Interrupts
14
Table 1-8. System Memory
14
Table 1-9. System Input/Output Addresses (100-3FF)
15
Table 1-10. DMA Channels
15
Table 1-11. HP Omnibook 2100/3000/3100 Specifications
16
Table 1-12. HP Omnibook 2100/3000/3100 Accessories
18
Figure 1-4. Replaceable Module Diagram
20
HP OmniBook 3100 Using Manual (8 pages)
HP OmniBook 2100 - Recent HP OmniBook Information Windows 95 & Windows NT BIOS ver 1. xx
Brand:
HP
| Category:
Laptop
| Size: 0.02 MB
HP OmniBook 3100 Supplementary Manual (4 pages)
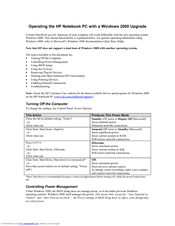
Operating the HP Notebook PC with a Windows 2000 Upgrade
Brand:
HP
| Category:
Laptop
| Size: 0.15 MB
Table of Contents
Turning off the Computer
1
Controlling Power Management
1
Using Bios Setup
2
Using Pointing Devices
3
HP OmniBook 3100 Reference Manual (2 pages)
HP OmniBook 3100 RAM expansion module
Brand:
HP
| Category:
Computer Hardware
| Size: 0.2 MB
Advertisement
Related Products
HP OMNIBOOK 3000
HP OmniBook 3000 - Notebook PC
HP OmniBook 300
HP Omnibook XT
HP OmniBook 510 - Notebook PC
HP OmniBook 7100
HP OmniBook 500 - Notebook PC
HP OMNIBOOK OmniBook 3000
HP Omnibook 430
HP OmniBook XE Series
HP Categories
Desktop
Laptop
Server
Monitor
Switch
More HP Manuals
Login
Sign In
OR
Sign in with Facebook
Sign in with Google
Upload manual
Upload from disk
Upload from URL