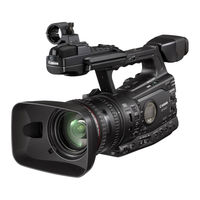
Sign In
Upload
Manuals
Brands
Canon Manuals
Camcorder
XF305
Canon XF305 Manuals
Manuals and User Guides for Canon XF305. We have
13
Canon XF305 manuals available for free PDF download: Instruction Manual, Brochure, White Paper, User Manual, Specifications, Instructions
Canon XF305 Instruction Manual (213 pages)
Brand:
Canon
| Category:
Camcorder
| Size: 9.41 MB
Table of Contents
Instruction Manual
1
Important Usage Instructions
2
Important Safety Instructions
3
Table of Contents
7
1 Introduction
11
About this Manual
11
Conventions Used in this Manual
11
Operating Modes
12
Supplied Accessories
13
Names of Parts
14
Names of Parts
15
2 Preparations
23
Preparing the Power Supply
23
Using a Battery Pack
23
Using a Household Power Outlet
26
Turning the Camcorder on and off
27
Date, Time and Language Settings
28
Setting the Date and Time
28
Changing the Time Zone
28
Displaying the Date and Time While Recording
29
Changing the Language
29
Using the Menus
30
Selecting an Option from the Menu
30
Preparing the Camcorder
32
Attaching the Lens Hood
32
Attaching and Detaching the Eye Cup
32
Dioptric Adjustment
33
Attaching the Viewfinder Cap
33
Using the LCD Panel
34
Using the Viewfinder and LCD Screen Simultaneously
34
Adjusting the Viewfinder/Lcd Screen
35
Setting the Screen to Black & White
35
Adjusting the Grip Belt
36
Attaching a Shoulder Strap
36
Removing and Attaching the Terminal Covers
37
Using the Wireless Controller
37
Using a Tripod
38
Preparing Recording Media
39
Inserting a CF Card
39
Checking the Status of the CF Card Slots
40
Removing a CF Card
40
Inserting and Removing an SD Card
41
Initializing the Recording Media
42
Switching between the CF Card Slots
43
Selecting the CF Card Recording Method
43
Checking the Available Recording Time
44
Recovering Data on the CF Card
44
3 Recording
45
Recording Video
45
Preparing to Record
45
Recording
46
Onscreen Displays
48
Side Panel Displays
50
Power Save Mode
52
Video Configuration: Bit Rate, Resolution and Frame Rate
53
Adjusting the Focus
54
Full Manual Focus Mode
54
Manual Focus Mode
55
Using the Focus Assistance Functions
57
Autofocus Mode
58
Push AF
59
Detecting and Focusing on Faces
60
Focus Limit and Macro Shooting
61
Image Stabilizer
62
Gain
63
Automatic Gain Control (AGC)
63
Manual Gain Control
64
Shutter Speed
66
Changing the Shutter Speed Mode
67
Flicker Reduction
68
Adjusting the Aperture
69
Automatic Aperture Control
69
Manual Aperture Control
69
Temporary Manual Aperture Control Override (PUSH AUTO IRIS)
70
Adjusting the AE Level
71
Setting the Light Metering Mode
71
Using the ND Filter
72
White Balance
73
Auto White Balance
73
Preset White Balance
74
Setting the Color Temperature
75
Custom White Balance
75
Zooming
77
Selecting the Zoom Controls
77
Using the Zoom Ring
77
Using the Zoom Rockers, Wireless Controller or an Optional Remote Controller
78
Onscreen Markers and Zebra Patterns
82
Displaying Onscreen Markers
82
Displaying Zebra Patterns
83
Setting the Time Code
85
Selecting the Running Mode
85
Selecting Drop or Non-Drop Frame
86
Putting the Time Code Display on Hold
86
Setting the User Bit
88
Synchronizing with an External Device
89
Connecting an External Device
89
Using a Reference Video Signal (Genlock Synchronization)
90
Using a Time Code Signal
90
Time Code Signal Output
91
Recording Audio
92
Using the Built-In Microphone
92
Using an External Microphone or Line Input
93
Adjusting the Audio Level
95
Monitoring the Audio with Headphones
97
Using Metadata
98
Setting a User Memo
98
Colors Bars/Audio Reference Signal
99
Recording Color Bars
99
Recording an Audio Reference Signal
99
Video Scopes
100
Displaying a Video Scope
100
Configuring the Waveform Monitor
100
Configuring the Vectorscope
101
Configuring the Edge Monitor
101
Adding Shot Marks While Recording
103
Reviewing a Recording
104
Special Recording Modes
105
Interval Recording Mode
105
Frame Recording Mode
107
Slow & Fast Motion Mode
108
Pre-Recording Mode
110
Optical Axis Shift
111
Using the Focal Length Guide
112
Using Optional Accessories
113
Using the GP-E2 GPS Receiver
113
Using the RC-V100 Remote Controller
114
4 Customization
117
Assignable Buttons
117
Changing the Assigned Function
117
Using an Assignable Button
118
Custom Picture Settings
119
Selecting Custom Picture Files
119
Editing a Custom Picture File's Settings
120
Renaming Custom Picture Files
121
Protecting Custom Picture Files
121
Transferring Custom Picture Files
121
Embedding Custom Picture Settings in a Recording
123
Available Custom Picture Settings
123
Customizing Functions and Onscreen Displays
131
Customizing Functions
131
Customizing Onscreen Displays
132
Saving and Loading Camera Settings
133
Saving Camera Settings to an SD Card
133
Loading Camera Settings from an SD Card
133
5 Playback
135
Clip Index Screen
135
Playback Playback
135
Playing Back Clips
137
Onscreen Displays
137
Playback Controls
139
Adjusting the Volume
140
Adding Shot Marks During Playback
140
Clip Operations
141
Using the Clip Menu
142
Displaying Clip Information
142
Adding E Marks or Z Marks
143
Deleting E Marks or Z Marks
144
Copying Clips
144
Deleting Clips
146
Deleting the User Memo and GPS Information from a Clip
146
Copying a Custom Picture File Embedded in a Clip
147
Displaying an Index Screen of Shot Marks
147
Displaying a Frame Index Screen of a Single Clip
148
Adding or Deleting Shot Marks from an Index Screen
149
Changing a Clip's Thumbnail
150
6 External Connections
151
Video Output Configuration
151
Video Output Configuration by Terminal
151
SD Output
152
Connecting to an External Monitor
153
Connection Diagram
153
Using the HD/SD SDI Terminal
154
Using the HDMI out Terminal
154
Using the HD/SD COMPONENT out Terminal
154
Using the AV or VIDEO 2 Terminal
155
Superimposing Onscreen Displays to Appear on an External Monitor
155
Audio Output
156
Embedded Audio
156
Synchronizing the Video with the Audio Being Monitored
156
Selecting the Audio Channel
157
Selecting the Output Level of the AV Terminal
157
Saving Clips to a Computer
158
Saving MXF Clips
158
Installing Canon XF Utility (Windows)
158
Installing Canon XF Utility (Mac OS)
160
Viewing the Software Instruction Manuals
161
Connection Diagram
162
7 Photos
163
Taking Photos
163
Taking Photos in CAMERA Mode
163
Capturing Photos in MEDIA Mode
163
Photo Playback
165
Displaying the [Photos] Index Screen
165
Viewing Photos
165
Photo Operations
166
Using the Photo Menu
166
Deleting Photos
166
Protecting Photos
167
Copying Custom Picture Files
168
Photo Numbering
169
8 Additional Information
171
Menu Options
171
Displaying the Status Screens
181
Troubleshooting
188
Power Source
188
Picture and Sound
189
List of Messages
191
Handling Precautions
195
Battery Pack
195
Recording Media
196
Lithium Button Battery
197
Maintenance/Others
198
Using the Camcorder Abroad
199
Optional Accessories
200
Specifications
204
Index
208
Advertisement
Canon XF305 Instruction Manual (211 pages)
HD Camcorder
Brand:
Canon
| Category:
Camcorder
| Size: 20.18 MB
Table of Contents
Instruction Manual
1
Important Usage Instructions
2
Important Safety Instructions
3
Table of Contents
7
1 Introduction
11
About this Manual
11
Conventions Used in this Manual
11
Operating Modes
12
Supplied Accessories
13
Names of Parts
14
2 Preparations
23
Preparing the Power Supply
23
Using a Battery Pack
23
Turning the Camcorder on and off
27
Date, Time and Language Settings
28
Setting the Date and Time
28
Changing the Time Zone
28
Displaying the Date and Time While Recording
29
Changing the Language
29
Using the Menus
30
Selecting an Option from the Menu
30
Preparing the Camcorder
32
Attaching the Lens Hood
32
Attaching and Detaching the Eye Cup
32
Dioptric Adjustment
33
Attaching the Viewfinder Cap
33
Using the LCD Panel
34
Using the Viewfinder and LCD Screen Simultaneously
34
Adjusting the Viewfinder/Lcd Screen
35
Setting the Screen to Black & White
35
Adjusting the Grip Belt
36
Attaching a Shoulder Strap
36
Removing and Attaching the Terminal Covers
37
Using the Wireless Controller
37
Using a Tripod
38
Preparing Recording Media
39
Inserting a CF Card
39
Checking the Status of the CF Card Slots
40
Removing a CF Card
40
Inserting and Removing an SD Card
41
Initializing the Recording Media
41
Switching between the CF Card Slots
42
Selecting the CF Card Recording Method
43
Checking the Available Recording Time
44
Recovering Data on the CF Card
44
3 Recording
45
Recording Video
45
Preparing to Record
45
Recording
46
Onscreen Displays
48
Side Panel Displays
50
Power Save Mode
52
Video Configuration: Bit Rate, Resolution and Frame Rate
53
Adjusting the Focus
54
Full Manual Focus Mode
54
Manual Focus Mode
55
Using the Focus Assistance Functions
56
Autofocus Mode
58
Push AF
59
Detecting and Focusing on Faces
60
Focus Limit and Macro Shooting
61
Image Stabilizer
62
Gain
63
Automatic Gain Control (AGC)
63
Manual Gain Control
64
Shutter Speed
66
Changing the Shutter Speed Mode
67
Flicker Reduction
68
Adjusting the Aperture
69
Automatic Aperture Control
69
Manual Aperture Control
69
Temporary Manual Aperture Control Override (PUSH AUTO IRIS)
70
Adjusting the Aperture
70
Adjusting the AE Level
71
Setting the Light Metering Mode
71
Using the ND Filter
72
White Balance
73
Auto White Balance
73
Preset White Balance
74
Setting the Color Temperature
75
Custom White Balance
75
Zooming
77
Selecting the Zoom Controls
77
Using the Zoom Ring
77
Using the Zoom Rockers, Wireless Controller or Optional Remote Control
78
Onscreen Markers and Zebra Patterns
81
Displaying Onscreen Markers
81
Displaying Zebra Patterns
82
Setting the Time Code
84
Selecting the Running Mode
84
Selecting Drop or Non-Drop Frame
85
Putting the Time Code Display on Hold
85
Setting the User Bit
87
Synchronizing with an External Device
88
Connecting an External Device
88
Using a Reference Video Signal (Genlock Synchronization)
89
Using a Time Code Signal
89
Time Code Signal Output
90
Recording Audio
91
Using the Built-In Microphone
91
Using an External Microphone or Line Input
92
Adjusting the Audio Level
94
Monitoring the Audio with Headphones
96
Using Metadata
97
Setting a User Memo
97
Colors Bars/Audio Reference Signal
98
Recording Color Bars
98
Recording an Audio Reference Signal
98
Video Scopes
99
Displaying a Video Scope
99
Configuring the Waveform Monitor
99
Configuring the Vectorscope
100
Configuring the Edge Monitor
100
Adding Shot Marks While Recording
102
Reviewing a Recording
103
Special Recording Modes
104
Interval Recording Mode
104
Frame Recording Mode
106
Slow & Fast Motion Mode
107
Pre-Recording Mode
108
Optical Axis Shift
110
Using the Focal Length Guide
111
4 Customization
113
Assignable Buttons
113
Changing the Assigned Function
113
Using an Assignable Button
114
Custom Picture Settings
115
Selecting Custom Picture Files
115
Editing a Custom Picture File's Settings
116
Renaming Custom Picture Files
116
Protecting Custom Picture Files
117
Transferring Custom Picture Files
117
Embedding Custom Picture Settings in a Recording
118
Available Custom Picture Settings
119
Customizing Functions and Onscreen
126
Displays
126
Customizing Functions
126
Customizing Onscreen Displays
127
Saving and Loading Camera Settings
128
Saving Camera Settings to an SD Card
128
Loading Camera Settings from an SD Card
128
5 Playback
129
Clip Index Screen
129
Playback Playback
130
Playing Back Clips
131
Onscreen Displays
131
Playback Controls
133
Adjusting the Volume
134
Adding Shot Marks During Playback
134
Clip Operations
135
Using the Clip Menu
136
Displaying Clip Information
136
Adding E Marks or Z Marks
137
Deleting E Marks or Z Marks
138
Copying Clips
138
Deleting Clips
140
Deleting the User Memo
140
Copying a Custom Picture File Embedded in a Clip
141
Displaying an Index Screen of Shot Marks
141
Displaying a Frame Index Screen of a Single Clip
142
Adding or Deleting Shot Marks from an Index Screen
143
Changing a Clip's Thumbnail
144
6 External Connections
145
Video Output Configuration
145
Video Output Configuration by Terminal
145
SD Output
146
Connecting to an External Monitor
147
Connection Diagram
147
Using the HD/SD SDI Terminal
148
Using the HDMI out Terminal
148
Using the HD/SD COMPONENT out Terminal
148
Using the AV or VIDEO 2 Terminal
149
Superimposing Onscreen Displays to Appear on an External Monitor
149
Audio Output
150
Embedded Audio
150
Synchronizing the Video with the Audio Being Monitored
150
Selecting the Audio Channel
151
Selecting the Output Level of the AV Terminal
151
Saving Clips to a Computer
152
System Requirements
152
Installing and Uninstalling Canon XF Utility (Windows)
153
Installing and Uninstalling Canon XF Utility (Mac OS)
156
Viewing the Software Instruction Manuals
159
7 Photos
161
Taking Photos
161
Taking Photos in CAMERA Mode
161
Capturing Photos in MEDIA Mode
161
Taking Photos
162
Photo Playback
163
Displaying the [Photos] Index Screen
163
Viewing Photos
163
Photo Operations
164
Using the Photo Menu
164
Deleting Photos
164
Protecting Photos
165
Copying Custom Picture Files
166
Photo Numbering
167
8 Additional Information
169
Menu Options
169
Displaying the Status Screens
179
Troubleshooting
185
Picture and Sound
186
List of Messages
188
Handling Precautions
192
Recording Media
193
Lithium Button Battery
194
Maintenance/Others
195
Using the Camcorder Abroad
196
Optional Accessories
197
Specifications
202
Index
206
Canon XF305 Instruction Manual (211 pages)
HD
Brand:
Canon
| Category:
Camcorder
| Size: 28.96 MB
Table of Contents
Instruction Manual
1
Important Usage Instructions
2
Important Safety Instructions
3
Table of Contents
7
1 Introduction
11
About this Manual
11
Conventions Used in this Manual
11
Operating Modes
12
Supplied Accessories
13
Names of Parts
14
2 Preparations
23
Preparing the Power Supply
23
Using a Battery Pack
23
Turning the Camcorder on and off
27
Date, Time and Language Settings
28
Setting the Date and Time
28
Changing the Time Zone
28
Displaying the Date and Time While Recording
29
Changing the Language
29
Using the Menus
30
Selecting an Option from the Menu
30
Preparing the Camcorder
32
Attaching the Lens Hood
32
Attaching and Detaching the Eye Cup
32
Dioptric Adjustment
33
Attaching the Viewfinder Cap
33
Using the LCD Panel
34
Using the Viewfinder and LCD Screen Simultaneously
34
Adjusting the Viewfinder/Lcd Screen
35
Setting the Screen to Black & White
35
Adjusting the Grip Belt
36
Attaching a Shoulder Strap
36
Removing and Attaching the Terminal Covers
37
Using the Wireless Controller
37
Using a Tripod
38
Preparing Recording Media
39
Inserting a CF Card
39
Checking the Status of the CF Card Slots
40
Removing a CF Card
40
Inserting and Removing an SD Card
41
Initializing the Recording Media
41
Switching between the CF Card Slots
42
Selecting the CF Card Recording Method
43
Checking the Available Recording Time
44
Recovering Data on the CF Card
44
3 Recording
45
Recording Video
45
Preparing to Record
45
Recording
46
Onscreen Displays
48
Side Panel Displays
50
Power Save Mode
52
Video Configuration: Bit Rate, Resolution and Frame Rate
53
Adjusting the Focus
54
Full Manual Focus Mode
54
Manual Focus Mode
55
Using the Focus Assistance Functions
56
Autofocus Mode
58
Push AF
59
Detecting and Focusing on Faces
60
Focus Limit and Macro Shooting
61
Image Stabilizer
62
Gain
63
Automatic Gain Control (AGC)
63
Manual Gain Control
64
Shutter Speed
66
Changing the Shutter Speed Mode
67
Flicker Reduction
68
Adjusting the Aperture
69
Automatic Aperture Control
69
Manual Aperture Control
69
Temporary Manual Aperture Control Override (PUSH AUTO IRIS)
70
Adjusting the Aperture
70
Adjusting the AE Level
71
Setting the Light Metering Mode
71
Using the ND Filter
72
White Balance
73
Auto White Balance
73
Preset White Balance
74
Setting the Color Temperature
75
Custom White Balance
75
Zooming
77
Selecting the Zoom Controls
77
Using the Zoom Ring
77
Using the Zoom Rockers, Wireless Controller or Optional Remote Control
78
Onscreen Markers and Zebra Patterns
81
Displaying Onscreen Markers
81
Displaying Zebra Patterns
82
Setting the Time Code
84
Selecting the Running Mode
84
Selecting Drop or Non-Drop Frame
85
Putting the Time Code Display on Hold
85
Setting the User Bit
87
Synchronizing with an External Device
88
Connecting an External Device
88
Using a Reference Video Signal (Genlock Synchronization)
89
Using a Time Code Signal
89
Time Code Signal Output
90
Recording Audio
91
Using the Built-In Microphone
91
Using an External Microphone or Line Input
92
Adjusting the Audio Level
94
Monitoring the Audio with Headphones
96
Using Metadata
97
Setting a User Memo
97
Colors Bars/Audio Reference Signal
98
Recording Color Bars
98
Recording an Audio Reference Signal
98
Video Scopes
99
Displaying a Video Scope
99
Configuring the Waveform Monitor
99
Configuring the Vectorscope
100
Configuring the Edge Monitor
100
Adding Shot Marks While Recording
102
Reviewing a Recording
103
Special Recording Modes
104
Interval Recording Mode
104
Frame Recording Mode
106
Slow & Fast Motion Mode
107
Pre-Recording Mode
108
Optical Axis Shift
110
Using the Focal Length Guide
111
4 Customization
113
Assignable Buttons
113
Changing the Assigned Function
113
Using an Assignable Button
114
Custom Picture Settings
115
Selecting Custom Picture Files
115
Editing a Custom Picture File's Settings
116
Renaming Custom Picture Files
116
Protecting Custom Picture Files
117
Transferring Custom Picture Files
117
Embedding Custom Picture Settings in a Recording
118
Available Custom Picture Settings
119
Customizing Functions and Onscreen Displays
126
Customizing Functions
126
Customizing Onscreen Displays
127
Saving and Loading Camera Settings
128
Saving Camera Settings to an SD Card
128
Loading Camera Settings from an SD Card
128
5 Playback
129
Clip Index Screen
129
Playback Playback
129
Playing Back Clips
131
Onscreen Displays
131
Playback Controls
133
Adjusting the Volume
134
Adding Shot Marks During Playback
134
Clip Operations
135
Using the Clip Menu
136
Displaying Clip Information
136
Adding E Marks or Z Marks
137
Deleting E Marks or Z Marks
138
Copying Clips
138
Deleting Clips
140
Deleting the User Memo
140
Copying a Custom Picture File Embedded in a Clip
141
Displaying an Index Screen of Shot Marks
141
Displaying a Frame Index Screen of a Single Clip
142
Adding or Deleting Shot Marks from an Index Screen
143
Changing a Clip's Thumbnail
144
6 External Connections
145
Video Output Configuration
145
Video Output Configuration by Terminal
145
SD Output
146
Connecting to an External Monitor
147
Connection Diagram
147
Using the HD/SD SDI Terminal
148
Using the HDMI out Terminal
148
Using the HD/SD COMPONENT out Terminal
148
Using the AV or VIDEO 2 Terminal
149
Superimposing Onscreen Displays to Appear on an External Monitor
149
Audio Output
150
Embedded Audio
150
Synchronizing the Video with the Audio Being Monitored
150
Selecting the Audio Channel
151
Selecting the Output Level of the AV Terminal
151
Saving Clips to a Computer
152
System Requirements
152
Installing and Uninstalling Canon XF Utility (Windows)
153
Installing and Uninstalling Canon XF Utility
156
Mac os
159
Viewing the Software Instruction Manuals
159
7 Photos
161
Taking Photos
161
Taking Photos in CAMERA Mode
161
Capturing Photos in MEDIA Mode
161
Photo Playback
163
Displaying the [Photos] Index Screen
163
Viewing Photos
163
Photo Operations
164
Using the Photo Menu
164
Deleting Photos
164
Protecting Photos
165
Copying Custom Picture Files
166
Photo Numbering
167
8 Additional Information
169
Menu Options
169
Displaying the Status Screens
179
Troubleshooting
185
Power Source
185
Picture and Sound
186
List of Messages
188
Handling Precautions
192
Battery Pack
192
Recording Media
193
Lithium Button Battery
194
Maintenance/Others
195
Optional Accessories
197
Specifications
202
Index
206
Advertisement
Canon XF305 Instruction Manual (204 pages)
HD Camcorder
Brand:
Canon
| Category:
Camcorder
| Size: 20.44 MB
Table of Contents
Instruction Manual
1
Important Usage Instructions
2
Table of Contents
6
1 Introduction
9
About this Manual
9
Conventions Used in this Manual
9
Operating Modes
10
Supplied Accessories
11
Names of Parts
12
Names of Parts
13
2 Preparations
21
Preparing the Power Supply
21
Using a Battery Pack
21
Turning the Camcorder on and off
25
Date, Time and Language Settings
26
Setting the Date and Time
26
Changing the Time Zone
26
Displaying the Date and Time While Recording
27
Changing the Language
27
Using the Menus
28
Selecting an Option from the Menu
28
Preparing the Camcorder
30
Attaching the Lens Hood
30
Attaching and Detaching the Eye Cup
30
Dioptric Adjustment
31
Attaching the Viewfinder Cap
31
Using the LCD Panel
32
Using the Viewfinder and LCD Screen Simultaneously
32
Adjusting the Viewfinder/Lcd Screen
33
Setting the Screen to Black & White
33
Adjusting the Grip Belt
34
Attaching a Shoulder Strap
34
Removing and Attaching the Terminal Covers
35
Using the Wireless Controller
35
Using a Tripod
36
Preparing Recording Media
37
Inserting a CF Card
37
Checking the Status of the CF Card Slots
38
Removing a CF Card
38
Inserting and Removing an SD Card
39
Initializing the Recording Media
39
Switching between the CF Card Slots
40
Selecting the CF Card Recording Method
41
Checking the Available Recording Time
42
Recovering Data on the CF Card
42
3 Recording
43
Recording Video
43
Preparing to Record
43
Recording
44
Onscreen Displays
46
Side Panel Displays
48
Power Save Mode
50
Video Configuration: Bit Rate, Resolution and Frame Rate
51
Adjusting the Focus
52
Full Manual Focus Mode
52
Manual Focus Mode
53
Using the Focus Assistance Functions
54
Autofocus Mode
56
Push AF
57
Detecting and Focusing on Faces
57
Focus Limit and Macro Shooting
58
Image Stabilizer
59
Gain
60
Automatic Gain Control (AGC)
60
Manual Gain Control
61
Shutter Speed
63
Changing the Shutter Speed Mode
64
Flicker Reduction
65
Adjusting the Aperture
66
Automatic Aperture Control
66
Manual Aperture Control
66
Temporary Manual Aperture Control Override (PUSH AUTO IRIS)
67
Adjusting the AE Level
68
Setting the Light Metering Mode
68
Using the ND Filter
69
White Balance
70
Auto White Balance
70
Preset White Balance
71
Setting the Color Temperature
72
Custom White Balance
72
Zooming
74
Selecting the Zoom Controls
74
Using the Zoom Ring
74
Using the Zoom Rockers, Wireless Controller or Optional Remote Control
75
Onscreen Markers and Zebra Patterns
78
Displaying Onscreen Markers
78
Displaying Zebra Patterns
79
Setting the Time Code
81
Selecting the Running Mode
81
Setting the Time Code
82
Putting the Time Code Display on Hold
83
Setting the User Bit
84
Synchronizing with an External Device
85
Connecting an External Device
85
Using a Reference Video Signal (Genlock Synchronization)
86
Using a Time Code Signal
86
Time Code Signal Output
87
Recording Audio
88
Using the Built-In Microphone
88
Using an External Microphone or Line Input
89
Adjusting the Audio Level
92
Monitoring the Audio with Headphones
93
Using Metadata
94
Setting a User Memo
94
Colors Bars/Audio Reference Signal
95
Recording Color Bars
95
Recording an Audio Reference Signal
95
Video Scopes
96
Displaying a Video Scope
96
Configuring the Waveform Monitor
96
Configuring the Vectorscope
97
Configuring the Edge Monitor
97
Adding Shot Marks While Recording
99
Reviewing a Recording
100
Special Recording Modes
101
Interval Recording Mode
101
Special Recording Modes
102
Frame Recording Mode
103
Slow & Fast Motion Mode
104
Pre-Recording Mode
106
Optical Axis Shift
107
Using the Focal Length Guide
108
4 Customization
109
Assignable Buttons
109
Changing the Assigned Function
109
Using an Assignable Button
110
Custom Picture Settings
111
Selecting Custom Picture Files
111
Editing a Custom Picture File's Settings
112
Renaming Custom Picture Files
112
Protecting Custom Picture Files
113
Transferring Custom Picture Files
113
Embedding Custom Picture Settings in a Recording
114
Available Custom Picture Settings
115
Customizing Functions and Onscreen Displays
122
Customizing Functions
122
Customizing Onscreen Displays
123
Saving and Loading Camera Settings
124
Saving Camera Settings to an SD Card
124
Loading Camera Settings from an SD Card
124
5 Playback
125
Clip Index Screen
125
Playback Playback
126
Playing Back Clips
127
Onscreen Displays
127
Playback Controls
129
Adjusting the Volume
130
Adding Shot Marks During Playback
130
Clip Operations
131
Using the Clip Menu
132
Displaying Clip Information
132
Adding E Marks or Z Marks
133
Deleting E Marks or Z Marks
134
Copying Clips
134
Deleting Clips
136
Deleting the User Memo
136
Copying a Custom Picture File Embedded in a Clip
137
Displaying an Index Screen of Shot Marks
137
Displaying a Frame Index Screen of a Single Clip
138
Adding or Deleting Shot Marks from an Index Screen
139
Changing a Clip's Thumbnail
140
6 External Connections
141
Video Output Configuration by Terminal
141
Video Output Configuration
142
Sd Output
142
Connecting to an External Monitor
143
Connection Diagram
143
B Using the Hd/Sd Sdi Terminal
144
Using the Hdmi out Terminal
144
Using the Av or Video 2 Terminal
145
Audio Output
146
B Embedded Audio
146
Selecting the Audio Channel
147
Selecting the Output Level of the Av Terminal
147
System Requirements
148
Saving Clips to a Computer
153
Viewing the Software Instruction Manuals
155
Taking Photos in Camera Mode
157
7 Photos 157
158
Taking Photos
158
Capturing Photos in Media Mode
158
Displaying the [Photos] Index Screen
159
Viewing Photos
159
Photo Operations
160
Using the Photo Menu
160
Deleting Photos
160
Protecting Photos
161
Copying Custom Picture Files
162
Photo Numbering
163
8 Additional Information
165
Menu Options
165
Displaying the Status Screens
175
Power Source
181
Picture and Sound
182
List of Messages
184
Troubleshooting
187
Battery Pack
188
Recording Media
189
Lithium Button Battery
190
Using the Camcorder Abroad
192
Canon XF305 Instruction Manual (38 pages)
Canon XF Utility (Windows) Version 1.0 Instruction Manual
Brand:
Canon
| Category:
Camcorder
| Size: 6.79 MB
Table of Contents
Table of Contents
2
Introduction
3
About Canon XF Utility
3
Conventions in the Manual
3
Running XF Utility
4
Starting up XF Utility
4
Exiting XF Utility
4
Overview of the Main Window
5
Media Panel
5
Clips Panel
6
Preview Panel
6
Checking Clips
7
Using CF Cards
7
Reading a CF Card with the Computer
7
Removing a CF Card from the Computer
7
Using the Camcorder Directly
8
Connecting the Camcorder to the Computer
8
Disconnecting the Camcorder from the Computer
8
Clip List View
9
Changing the Way Clips Are Displayed
9
Icons Displayed on Thumbnails
10
Sorting Clips in Detailed Information View
10
Selecting the Columns Shown in Detailed Information View
11
Displaying Additional Details about a Clip
12
Importing and Writing Back Clips
13
Importing Clips into the Computer
13
Importing All Clips at Once (Media Backup)
13
Importing Selected Clips
14
Writing Back Clips Onto the Camcorder or CF Cards
15
Exporting MXF Files to a Folder
16
Playing Back, Searching and Managing Clips
17
Playing Back Clips
17
Adjusting the Volume and Selecting Output Channels
18
Changing the Playback Position
18
Changing the Clip's Thumbnail
19
Searching for Clips
20
Displaying Relay Clips
21
Managing Clips
22
Copying Clips
22
Moving Clips
22
Deleting Clips
23
Managing Virtual Media
24
Creating Virtual Media
24
Renaming Virtual Media
24
Deleting Virtual Media
25
Editing Clips and Associated Metadata
26
Editing Marks
26
Adding a Shot Mark
26
Checking Marks
27
Editing Metadata
28
Editing the Metadata Associated with a Clip
28
Deleting All Embedded Custom Picture Files
29
Managing User Memo Profiles
30
Creating a User Memo Profile
30
Editing a User Memo Profile
31
Deleting a User Memo Profile
32
Reference and General Information
33
Menus and Keyboard Shortcuts
33
Menu Bar
33
Contextual Menus
35
Troubleshooting Error Messages
36
Canon XF305 Brochure (27 pages)
Professional Products 2010 Brochure
Brand:
Canon
| Category:
Digital Camera
| Size: 9.59 MB
Canon XF305 White Paper (17 pages)
Stereoscopic 3D
Brand:
Canon
| Category:
Camcorder
| Size: 1.9 MB
Table of Contents
Section 1: the Basics of 3D
2
Section 2: Shooting 3D with Pairs of Xf105 or Xf305
10
Other Menu Settings
12
Mounting the Cameras
15
Other Considerations
17
Canon XF305 User Manual (9 pages)
professional camcorder
Brand:
Canon
| Category:
Camcorder
| Size: 1.07 MB
Canon XF305 Specifications (6 pages)
PROFESSIONAL CAMCORDERS
Brand:
Canon
| Category:
Camcorder
| Size: 2.66 MB
Canon XF305 User Manual (2 pages)
User Guide
Brand:
Canon
| Category:
Digital Camera
| Size: 4.74 MB
Canon XF305 Instructions (2 pages)
Canon XF Plugin for Avid Media Access (Macintosh) Version 1.0 Instructions
Brand:
Canon
| Category:
Camcorder
| Size: 0.08 MB
Canon XF305 Instructions (2 pages)
Canon XF Plugin for Avid Media Access (Windows) Version 1.0 Instructions
Brand:
Canon
| Category:
Camcorder
| Size: 0.08 MB
Canon XF305 Instructions (2 pages)
Canon XF Plugin for Final Cut Pro (Macintosh) Version 1.0 Instructions
Brand:
Canon
| Category:
Camcorder
| Size: 0.07 MB
Advertisement
Related Products
Canon XF100
Canon XF105
Canon XF300
Canon XF200
Canon XF205
Canon XF400
Canon XF405
Canon XF4005
Canon XF705
Canon XF605
Canon Categories
Printer
Digital Camera
All in One Printer
Camcorder
Scanner
More Canon Manuals
Login
Sign In
OR
Sign in with Facebook
Sign in with Google
Upload manual
Upload from disk
Upload from URL