
Related Manuals for Gemini GMX


Summary of Contents for Gemini GMX
- Page 1 W W W. G E M I N I S O U N D . C O M OPERATIONS MANUAL | MANUAL DE INSTRUCCIONES MANUEL D’ INSTRUCTIONS | BEDIENUNGSHANDBUCH...
- Page 2 Insert the USB memory device into the USB input (H) on the top of the GMX. Upon loading the device, the LCD Display will show the folders and tracks on the USB memory device. USB memory devices on the GMX are hot swappable and can be removed or plugged in at any time.
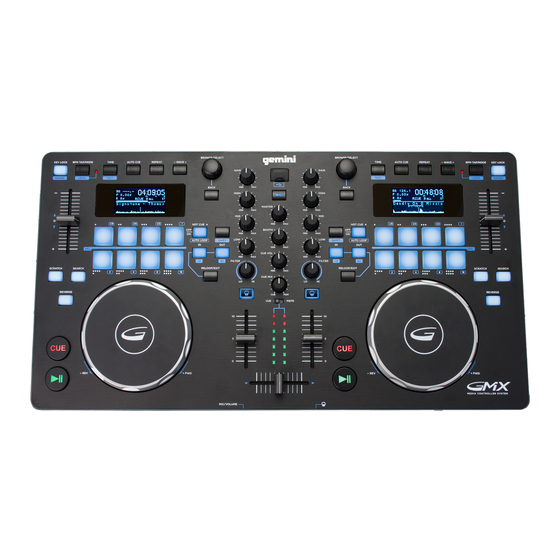
- Page 3 T O P V I E W D I S P L AY Time Remaining/ Elapsed Pitch Loop Points/ Range Track Progress Track Name Waveform R E A R V I E W F R O N T V I E W W W W.
- Page 4 USB memory device. H E A d p H o n E o u t p u t - The GMX contains a 1/8” HEADPHONE OUTPUT (G) allowing cueing of music before playback through the master outputs. M i c i n p u t - Plug a 1/4”...
- Page 5 ID3 tag. M I D I M O D E - Pressing MIDI (26) will switch the GMX into MIDI mode if it is connected to a computer. All playback will stop when switching between MIDI and standalone modes.
- Page 6 M I X E R S E C T I O N Each channel of the GMX has a rotary GAIN CONTROL (21), a 3-BAND EQUALIZER (22), and a TRACK FADER (25) to make tonal and volume adjustments to each channel. The GAIN CONTROL (21) adjusts the gain of the incoming signal on each channel.
- Page 7 DJ software. The GMX audio and MIDI drivers are compatible with PC and MAC. Connect the USB cable from the unit’s rear USB port (D) to the computer. Press the MIDI button (26) on the GMX.
- Page 8 A r G A / E X p u L s i Ó n d E u n i d A d E s u s B / s d - Inserte la memoria USB en la toma USB (H) de la parte superior del GMX. Tras cargar la memoria aparecerá en la pantalla táctil LCD las carpetas y pistas que contiene.
- Page 9 V I S TA S U P E R I O R PA N TA L L A Tiempo Restante/ Transcurrido Pitch Puntos Loop/ Rango Progreso Pista Nombre Pista Forma de Onda V I S TA T R A S E R A V I S TA T R A S E R A - V I S TA F R O N TA L W W W.
- Page 10 E n t r A d A u s B M E M o r Y - Inserte la memoria USB en la toma USB (H) de la parte superior del GMX. Tras cargar la memoria aparecerá en la pantalla LCD las carpetas y pistas que contiene.
- Page 11 M O D O B P M - Mantenga pulsado el botón BPM (11) para cambiar entre estos modos: BPM ID3 / AUTO BPM / MANUAL BPM. Cuando ajuste el modo BPM a ID3, aparecerá la información BPM del ID3. AUTO BPM Cuando ajuste el modo BPM a AUTO BPM, los tiempos musicales por minuto serán calculados de forma automática y la información correspondiente será...
- Page 12 S E C C I Ó N M E Z C L A D O R Cada canal del GMX tiene un CONTROL DE GANANCIA rotatorio (21), un ECUALIZADOR DE 3 BANDAS (22) y un VOLUMEN FADER (25) para hacer los ajustes tonales y de volumen para cada canal.
- Page 13 Los drivers de control audio y MIDI del GMX son compatible con PC y MAC. Conectar la salida USB del GMX a la entrada USB de tu ordenador. Después de conectar el controlador GMX, inicia tu software para DJ y dentro de la configuración/preferencias hacer lo siguiente:...
- Page 14 USB (I), sur le GMX. Lors du chargement, l’écran LCD affiche les dossiers et les pistes de la clef USB. Le GMX permet de brancher et débrancher à chaud les clefs USB. REMARQUE : Avant de placer le GMX hors tension, retirez la clef USB pour éviter toute corruption des données.
- Page 15 V U E D E D E S S U S A F F I C H A G E Time Remaining/ Elapsed Pitch Loop Points/ Range Track Progress Track Name Waveform V U E A R R I È R E V U E D E FA C E W W W.
- Page 16 E n t r É E c L E F u s B - Insérez la clef USB dans le port USB (I), sur le GMX. Après l’avoir chargée, l’écran LCD affiche les dossiers et les pistes de la clef USB.
- Page 17 Appuyez sur la touche SHIFT (19) + TEXT (12) afficher les informations ID3. M O D E M I D I - Appuyer sur la touche MIDI (26) pour placer le GMX en mode MIDI si l’appareil est connecté en USB à un ordinateur. Tout lecture s’arrête lorsqu’on passe du mode MIDI au mode indépendant.
- Page 18 S E C T I O N M É L A N G E U R Chaque voie du GMX possède un REGLAGE DE GAIN (21), une CORRECTION PARAMETRIQUE 3 BANDES (22) & un CURSEUR DE VOLUME (25) afin de procéder à tout réglage utile de volume &...
- Page 19 Plug and Play ne nécessitant aucune installation logicielle pour fonctionner avec votre ordi- nateur et votre logiciel DJ. Les pilotes audio et MIDI du GMX sont compatibles PC et MAC. Veuillez relier la sortie USB du contrôleur GMX à une prise USB de votre ordinateur. Après avoir relié...
- Page 20 USB-Anschluss (H) auf der Oberseite des GMX. Nach dem Laden des Sticks werden die darauf gespeicherten Ordner und Tracks auf dem LCD Touchdisplay angezeigt. *HINWEIS: Vor dem Ausschalten des GMX sollten Sie alle USB Memory Sticks entfernen, um eine Beschädi- gung der Daten zu vermeiden...
- Page 21 O B E R S E I T E A N Z E I G E Time Remaining/ Elapsed Pitch Loop Points/ Range Track Progress Track Name Waveform R Ü C K S E I T E - F R O N TA N S I C H T F R O N TA N S I C H T W W W.
- Page 22 E i n G A n G u s B M E M o r Y - Stecken Sie den USB Memory Stick in den USB-Anschluss (H) auf der Oberseite des GMX. Nach dem Laden des Sticks werden die darauf ges- peicherten Ordner und Tracks auf dem LCD display angezeigt.
- Page 23 Anfang an wiederholt oder es ist Cue-Punkt. B P M TA P/ M O D E - Halten Sie die BPM-Taste (11) gedrückt, um zwischen verschiedenen BPM-Modi umzuschalten: BPM ID3 / AUTO BPM / MANUAL BPM. Wenn der BPM-Modus auf ID3 eingestellt ist, wird die BPM-Information des ID3 angezeigt.
- Page 24 M I X E R S E C T I O N Jeder Kanal des GMX verfügt über einen GAIN-REGLER (21), einen 3-BAND EQUALIZER (22) sowie einen KANAL-FADER (25), um Pegel und Klang jedes Kanals individuell verändern zu können. Mit dem GAIN-REGLER (21) stellen Sie die Vorverstärkung (Gain) für das eingehende Signal im jeweiligen Kanal ein.
- Page 25 Wenn das Gerät in der DJ Software nicht aufgeführt ist, aktualisieren Sie Ihre • Version, indem Sie alle Updates für die DJ Software herunterladen. Wenn das GMX Mapping nicht in der Liste Ihrer DJ Software erscheint, finden Sie unter geminisound.
- Page 26 B. After receiving an RA#, include a copy of the original sales receipt, with defective product and a description of the defect. Send by insured freight to: Gemini and use the address provided by your customer service representative. Your RA# must be...
- Page 27 Information in this manual is subject to change without notice and does not represent a commitment on the part of the vendor. Gemini shall not be liable for any loss or damage whatsoever arising from the use of information or any error contained in this manual.