
Related Manuals for Magic Chef MAGIC CHEF MCD990ARS


Summary of Contents for Magic Chef MAGIC CHEF MCD990ARS
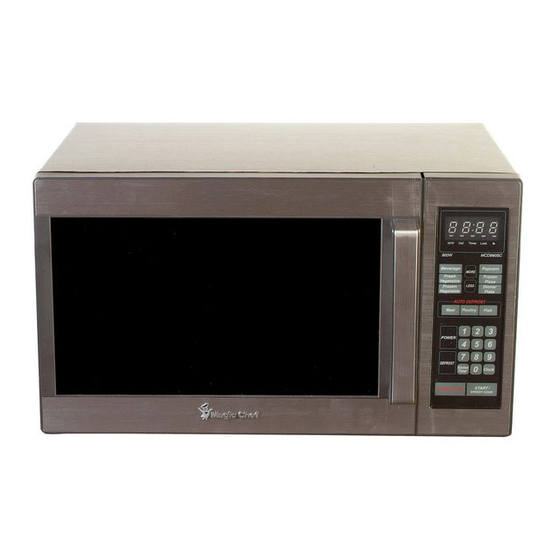
- Page 1 0.9 cu. ft. Stainless Steel Microwave Oven MCD990ARS Instruction Manual and Cooking Guide So Right at Home. Before operating this oven, please read these instructions completely.
-
Page 2: Table Of Contents
TO STOP THE OVEN WHILE THE OVEN IS OPERATING ... 16 UTENSIL TEST ... 17 MICROWAVE UTENSILS ... 17 COOKING GUIDE ... 18 CARE OF YOUR MICROWAVE OVEN ... 27 USE YOUR MICROWAVE OVEN SAFELY ... 28 BEFORE YOU CALL FOR SERVICE ... 29 QUESTIONS AND ANSWERS ... 29... -
Page 3: Important Safety Instructions
Do not use the cavity for storage purposes. Do not leave paper products, cooking utensils, or food in the cavity when not in use. 17. Do not use this microwave oven to heat corrosive chemicals (for example, sulfides and chlorides). Vapours from such corrosive... -
Page 4: Federal Communications Commission Radio Frequency Interference Statement(U.s.a. Only)
• Relocate the Microwave oven with respect to the receiver. • Move the microwave oven away from the receiver. • Plug the microwave oven into a different outlet so that microwave oven and receiver are on different branch circuits. THE MANUFACTURER is not responsible for any radio or TV interference caused by UNAUTHORIZED MODIFICATION to this microwave oven. -
Page 5: Installation
6. Power supply. This microwave oven requires a power supply of approximately 12 Amperes, 120 Volts, 60Hz and a grounded outlet. A short power cord is provided to reduce the risk of the user becoming entangled in or tripping over a longer cord. Longer cord sets or extension cords are available and may be used if care is exercised. -
Page 6: Specifications
SPECIFICATIONS POWER SUPPLY POWER CONSUMPTION MICROWAVE OUTPUT POWER FREQUENCY OUTSIDE DIMENSIONS (W X H X D) CAVITY DIMENSIONS (W X H X D) NET WEIGHT TIMER POWER LEVELS * Specifications are subject to change without notice. 120V AC 60 Hz SINGLE PHASE WITH GROUNDING 1350 W 900 W 2450 MHz... -
Page 7: Trim Kit Installation Guide
TRIM KIT INSTALLATION GUIDE 1. Turn a set upside down. Adhere three urethane foams(1,2) and tighten four screws(4) through the holes of four feet(3) to base plate. FRONT 2. Remove three screws(1) on cabinet back. 3. Install the trim kit(2) and mounting brackets(3). -
Page 8: Features Diagram
FEATURES DIAGRAM 1. Door latch-When the door is closed it will automatically shut off. If the door is opened while the oven is operating, the magnetron will automatically shut off. 2. Door seal-The door seal maintains the microwave within the oven cavity and prevents microwave leakage. - Page 9 FEATURES DIAGRAM (continued) 9. Time set pad-Used to set the cooking time and the present time. 10. Display-Cooking time, power level, indicators and present time are displayed. 11. One touch-Used to cook or reheat specific quantities of food. 12. More-Used to add time to cooking. 13.
-
Page 10: Operation Procedure
OPERATION PROCEDURE This section includes useful information about oven operation. 1. Plug power supply cord into a standard 3-pronged 12 Amp, 120V AC 60Hz power outlet. 2. After placing the food in a suitable container, open the oven door and put it on the glass tray. The glass tray and roller guide must always be in place during cooking. -
Page 11: Controls
CONTROLS SETTING THE CLOCK When the oven is first plugged in, the display will flash “:0” and a tone will sound. If the AC power ever goes off, the display shows “ : 0” when the power comes back on. 1. -
Page 12: Weight Defrosting
WEIGHT DEFROSTING AUTO DEFROST lets you easily defrost food by eliminating guesswork in determining defrosting time. Follow the steps below for easy defrosting. 1. Touch MEAT pad. MEAT 2. Select the desired defrosting weight. (Refer to the weight defrost chart below.) 3. -
Page 13: Cooking In One Stage
COOKING IN ONE STAGE 1. Touch POWER pad. (Select the desired power POWER level.) 2. Touch number pads for the cooking time. 3. Touch START pad. When you touch START pad, the M/W indicator starts blinking to show the oven is cooking. The display counts down the time to show how much cooking time is left. -
Page 14: Kitchen Timer Mode
KITCHEN TIMER MODE Timer operates as a minute timer, can be set to delay cooking and used to set a holding time after cooking. However delay cooking can not be programmed for defrost. Timer operates without microwave energy. HOW TO USE AS A MINUTE TIMER 1. -
Page 15: Speedy Cook
SPEEDY COOK SPEEDY COOK allows you to reheat for 30 seconds at 100% (full power) by simply touching the SPEEDY COOK pad. By repeatedly touching the SPEEDY COOK pad, you can also extend reheating time to 5 minutes by 30 second increments. 1. - Page 16 ONE TOUCH COOKING (continued) 1. Touch BEVERAGE pad once BEVERAGE for 1 cup, twice for 2 cups or three times for 3 cups. * BEVERAGE* (200ml/cup) • 1 cup (mug) : Touch BEVERAGE once. • 2 cups (mugs) : Touch BEVERAGE twice within 1.5 seconds. •...
-
Page 17: Less, More
LESS, MORE To alter one touch cooking or cooking time whilst oven is in operation, use LESS or MORE.(except for defrosting) Press LESS/MORE to decrease/increase the one touch cooking time in multiples of 10 seconds. The overall one touch cooking time can be increased to a maximum of 59 minutes 50 seconds. Press LESS/MORE to decrease/increase the cooking time in multiples of 1 minute. -
Page 18: Utensil Test
If you are not sure, try this utensil test to check. • Put the empty utensil in the microwave oven. • Put one cup of water in a glass measure next to the empty utensil. -
Page 19: Cooking Guide
COOKING GUIDE EGGS AND CHEESE Eggs and cheese are delicate foods requiring care in microwave cooking. Piercing the yolks of eggs helps to release steam during cooking. Stirring egg mixtures frequently helps distribute the heat evenly. Because the microwave energy cooks so quickly, always check to see if the eggs are done to your satisfaction after the standing time. - Page 20 VEGETABLES Vegetables are favorite foods when cooked in the microwave. Because they cook for a shorter time and require less water than conventional cooking, vegetables cooked by microwave energy retain more vitamins than when cooked by other methods. To cook better in the microwave, vegetables should be cut into evenly sized pieces.
- Page 21 BROCCOLI AND CAULIFLOWER SALAD 1 cup broccoli florets 1 cup cauliflower florets 1/2 cup mayonnaise 1 to 2 teaspoons prepared mustard 1/2 teaspoon dried basil, crushed 1/4 teaspoon salt HOT JALAPENO SALAD 11/2 cups shredded cabbage 1/2 cup shredded carrots 1/4 cup medium green bell pepper, cut into 1-inch long thin strips 1/2 cup sliced cherry tomatoes...
- Page 22 VEGETARIAN CHILI 1/2 cup celery, chopped 1 small onion, chopped (about 1/2 cup) 1/2 medium green bell pepper, chopped (1/4 cup) 1 tablespoon chili powder 1 teaspoon salt 1/4 teaspoon crushed red pepper flakes 1/8 teaspoon freshly ground black pepper 1 can (15 oz.) mild chili beans in sauce, undrained 1 can (15 oz.) Great Northern beans, drained...
-
Page 23: Fish And Seafood
FISH AND SEAFOOD Delicate, tender fish is the result when cooked in the microwave. Because it is moist cooking, the finished fish and seafood, if cooked for the appropriate time, will be opaque and flake with a fork with no signs of dryness. -
Page 24: Cooking Fish And Seafood
FISH FILLET AMANDINE 1/4 cup margarine or butter, divided 1/2 cup slivered almonds 1 teaspoon almond liqueur, optional 1 pound fresh or thawed frozen fish fillets 1 tablespoon lemon juice WINE-POACHED FISH 1 cup dry white wine 1/4 teaspoon rosemary leaves, crushed 1/4 teaspoon salt 1/8 teaspoon white pepper 1 pound fresh or defrosted fish fillets... - Page 25 POULTRY Juicy and moist describes poultry cooked by microwave energy. It is a superior method for cooking chicken to be used in casseroles, salads, or to have for sandwiches. See Poached Chicken recipe. Arrangement is very important with poultry and its uneven shapes.
- Page 26 MEATS Tender cuts of meat do well in the microwave, especially when cooked at lower power levels. Be sure meat is fully defrosted before cooking. Consult the meat cooking charts (pages 30-32) for details. The exact time to cook each piece of meat will depend on the shape of the meat, the weight, the starting temperature of the meat and the desired doneness.
- Page 27 PORK SAUSAGE CASSEROLE 1 medium red onion 3 green apples, seeded and cubed 2 tablespoons margarine or butter 1 package (12 oz.) bulk pork sausage, cooked, drained and crumbled 1 sweet potato (about 8 oz.) cooked, peeled and cubed 1 jar (12 oz.) pork gravy SWEET 'N' SOUR PORK 1 pound boneless pork cubes 3/4 cup apricot preserves...
-
Page 28: Care Of Your Microwave Oven
Control Panel. If steam accumulates inside or around the outside of the oven door, wipe with a soft cloth. This may occur when the microwave oven is operated under high humidity conditions and in no way indicates malfunction of the unit. -
Page 29: Use Your Microwave Oven Safely
Do not hit or strike the control panel with hard objects. This can damage the oven. Food Never use your microwave oven for home canning. The oven is not designed for proper home canning. Improperly canned food may spoil and be dangerous to consume. -
Page 30: Before You Call For Service
Warranty MC Appliance Corporation warrants each new electronic product manufactured by it to be free from defective material and workmanship and agrees to remedy any such defect or to furnish a new part (at the Company’s option) in exchange for any part of any unit of its manufacture which under normal installation, use, and service disclosed such defect, provided the unit is delivered by the owner to us or to our authorized distributor from whom purchased or authorized service station, intact, for our examination...