Table of Contents
Advertisement
SMART TEMP
INSTALLATION AND OPERATING INSTRUCTIONS
Installs Easily
IMPORTANT!
• Please read all instructions carefully before beginning
installation. Save them for future reference.
• Before removing any wiring from your existing thermostat,
its wires must be labeled with their terminal designations.
• Ignore the color of the wires since they may not comply
with any standard.
1.
FEATURES. . . . . . . . . . . . . . . . . . . . . . . . . . . . . . . . . . . . . . . . . . . . . . . . . .
2.
COMPATIBILITY . . . . . . . . . . . . . . . . . . . . . . . . . . . . . . . . . . . . . . . . . . . . .
3.
INSTALLATION . . . . . . . . . . . . . . . . . . . . . . . . . . . . . . . . . . . . . . . . . . . . . .
3.1. TOOLS REQUIRED . . . . . . . . . . . . . . . . . . . . . . . . . . . . . . . . . . . . . . . . .
3.2. LOCATION . . . . . . . . . . . . . . . . . . . . . . . . . . . . . . . . . . . . . . . . . . . . . . . . .
3.3. REMOVING THE OLD THERMOSTAT . . . . . . . . . . . . . . . . . . . . . . . .
3.4. MOUNTING THE TX9000TS. . . . . . . . . . . . . . . . . . . . . . . . . . . . . . . . .
3.5. CONNECTING THE WIRES . . . . . . . . . . . . . . . . . . . . . . . . . . . . . . . . . .
3.6. WIRING DIAGRAMS. . . . . . . . . . . . . . . . . . . . . . . . . . . . . . . . . . . . . . . . 9-11
3.7. COMPLETING YOUR INSTALLATION. . . . . . . . . . . . . . . . . . . . . . . .
4.
OPERATING INSTRUCTIONS. . . . . . . . . . . . . . . . . . . . . . . . . . . . . . . . . .
4.1. SYSTEM MODE SWITCH . . . . . . . . . . . . . . . . . . . . . . . . . . . . . . . . . . .
4.2. FAN MODE SWITCH . . . . . . . . . . . . . . . . . . . . . . . . . . . . . . . . . . . . . . .
4.3. UP/DOWN ARROW CHANGE KEYS. . . . . . . . . . . . . . . . . . . . . . . . . .
4.3.1. TEMPERATURE ADJUSTMENT . . . . . . . . . . . . . . . . . . . . . . . . . . . . . . . . . .
4.3.2. CHANGING OTHER SETTINGS . . . . . . . . . . . . . . . . . . . . . . . . . . . . . . . . . . .
4.4. NAVIGATION KEYS . . . . . . . . . . . . . . . . . . . . . . . . . . . . . . . . . . . . . . . . .
4.5. DISPLAY ILLUMINATION . . . . . . . . . . . . . . . . . . . . . . . . . . . . . . . . . . .
4.6. AUDIBLE BEEP. . . . . . . . . . . . . . . . . . . . . . . . . . . . . . . . . . . . . . . . . . . . .
4.7. ICONS . . . . . . . . . . . . . . . . . . . . . . . . . . . . . . . . . . . . . . . . . . . . . . . . . . . . .
4.7.1. FLAME ICON . . . . . . . . . . . . . . . . . . . . . . . . . . . . . . . . . . . . . . . . . . . . . . . .
4.7.2. SNOWFLAKE ICON . . . . . . . . . . . . . . . . . . . . . . . . . . . . . . . . . . . . . . . . . . . .
4.7.3. LOW BATTERY ICON . . . . . . . . . . . . . . . . . . . . . . . . . . . . . . . . . . . . . . . . . .
4.8. HARDWARE RESET . . . . . . . . . . . . . . . . . . . . . . . . . . . . . . . . . . . . . . . .
4.9. SOFTWARE RESET. . . . . . . . . . . . . . . . . . . . . . . . . . . . . . . . . . . . . . . . .
4.10. SETTING THE TIME AND DAY. . . . . . . . . . . . . . . . . . . . . . . . . . . . . . .
Mt. Laurel, New Jersey 08054, USA
© COPYRIGHT 2006 LUX PRODUCTS CORPORATION. ALL RIGHTS RESERVED
TX9000TS SERIES
ELECTRONIC THERMOSTAT
®
Set Day & Time
Choose Heat or Cool
2
2
2
2
2
3
3
3
3
4
4
4
4
4
4
4
4
4
4
4
4
4
4
5
5
www.luxproducts.com
●
Easy as
1–2–3
Thank you for your confidence in our product. To obtain the best
results from your investment, please read these instructions
thoroughly and acquaint yourself with your purchase before
installing your new thermostat. Then follow the installation
procedures, one step at a time. This will save you time and
minimize the chance of damaging the thermostat and the systems
it controls.
These instructions may contain information beyond that required
for your particular installation. Please save for future reference.
4.11. TEMPORARY TEMPERATURE OVERRIDE. . . . . . . . . . . . . . . . . . . .
4.12. TEMPERATURE HOLD. . . . . . . . . . . . . . . . . . . . . . . . . . . . . . . . . . . . . .
5.
PROGRAMMING . . . . . . . . . . . . . . . . . . . . . . . . . . . . . . . . . . . . . . . . . . . .
5.1. DEFAULT ENERGY STAR
®
TEMPERATURE PROGRAMS . . . . . .
5.2. PROGRAMMING THE UNIT . . . . . . . . . . . . . . . . . . . . . . . . . . . . . . . . .
5.2.1. COPY. . . . . . . . . . . . . . . . . . . . . . . . . . . . . . . . . . . . . . . . . . . . . . . . . . . . . .
6.
ADVANCED FEATURES. . . . . . . . . . . . . . . . . . . . . . . . . . . . . . . . . . . . . . .
6.1. FILTER USAGE MONITOR . . . . . . . . . . . . . . . . . . . . . . . . . . . . . . . . . .
6.2. SWING SETTING . . . . . . . . . . . . . . . . . . . . . . . . . . . . . . . . . . . . . . . . . . .
6.3. TEMPERATURE CALIBRATION . . . . . . . . . . . . . . . . . . . . . . . . . . . . . .
6.4. ENERGY USAGE MONITOR . . . . . . . . . . . . . . . . . . . . . . . . . . . . . . . . .
6.5. PROGRAM LOCK. . . . . . . . . . . . . . . . . . . . . . . . . . . . . . . . . . . . . . . . . . .
6.5.1. TO SET CODE . . . . . . . . . . . . . . . . . . . . . . . . . . . . . . . . . . . . . . . . . . . . . . . .
6.5.2 TO LOCK SETTINGS . . . . . . . . . . . . . . . . . . . . . . . . . . . . . . . . . . . . . . . . . . .
6.5.3. TO UNLOCK SETTINGS. . . . . . . . . . . . . . . . . . . . . . . . . . . . . . . . . . . . . . . . .
7.
SETUP OPTIONS . . . . . . . . . . . . . . . . . . . . . . . . . . . . . . . . . . . . . . . . . . . .
7.1. THE DISPLAY FORMAT 12/24 SWITCH #1. . . . . . . . . . . . . . . . . . .
7.2. SMART RECOVERY SWITCH #2 . . . . . . . . . . . . . . . . . . . . . . . . . . . .
7.3. TEMPERATURE DISPLAY FORMAT F°/C° SWITCH #3. . . . . . . .
7.4. 5 MIN/2 MIN MINIMUM RUN TIME SWITCH #4 . . . . . . . . . . . . .
7.5. REPOSITIONING SWITCHES. . . . . . . . . . . . . . . . . . . . . . . . . . . . . . . .
7.6. GAS/ELECTRIC JUMPER . . . . . . . . . . . . . . . . . . . . . . . . . . . . . . . . . . .
8.
BATTERIES AND MAINTENANCE. . . . . . . . . . . . . . . . . . . . . . . . . . . . . .
9.
TECHNICAL ASSISTANCE . . . . . . . . . . . . . . . . . . . . . . . . . . . . . . . . . . . .
10. WARRANTY . . . . . . . . . . . . . . . . . . . . . . . . . . . . . . . . . . . . . . . . . . . . . . . .
WARNING: Use Energizer
Alkaline Batteries Only.
Energizer
®
is a registered trademark of Eveready Battery Company, Inc.
DURACELL
®
is a registered trademark of The Gillette Company, Inc.
5
5
5
5
5
6
6
6
6
7
7
7
7
7
7
7
7
7
8
8
8
8
8
8
8
®
or DURACELL
®
52019
Advertisement
Table of Contents

Related Manuals for Lux Products TX9000TS


Summary of Contents for Lux Products TX9000TS
- Page 1 3.3. REMOVING THE OLD THERMOSTAT ......3.4. MOUNTING THE TX9000TS....... . .
-
Page 2: Product View
• The TX9000TS is protected against normal static electric discharges. However, in extremely dry weather you should touch a grounded metal object before the TX9000TS to minimize the risk of causing damage to the unit. • Your thermostat is a precision instrument. Please handle it with care. -
Page 3: Removing The Old Thermostat
"Setting the DAY and TIME" in the "OPERATING INSTRUCTIONS" section of this manual. 16. Install your TX9000TS on its base. To do this hang the top of the unit by the tabs on the base, then snap the bottom of the unit into place. Do not use unnecessary force. -
Page 4: Temperature Adjustment
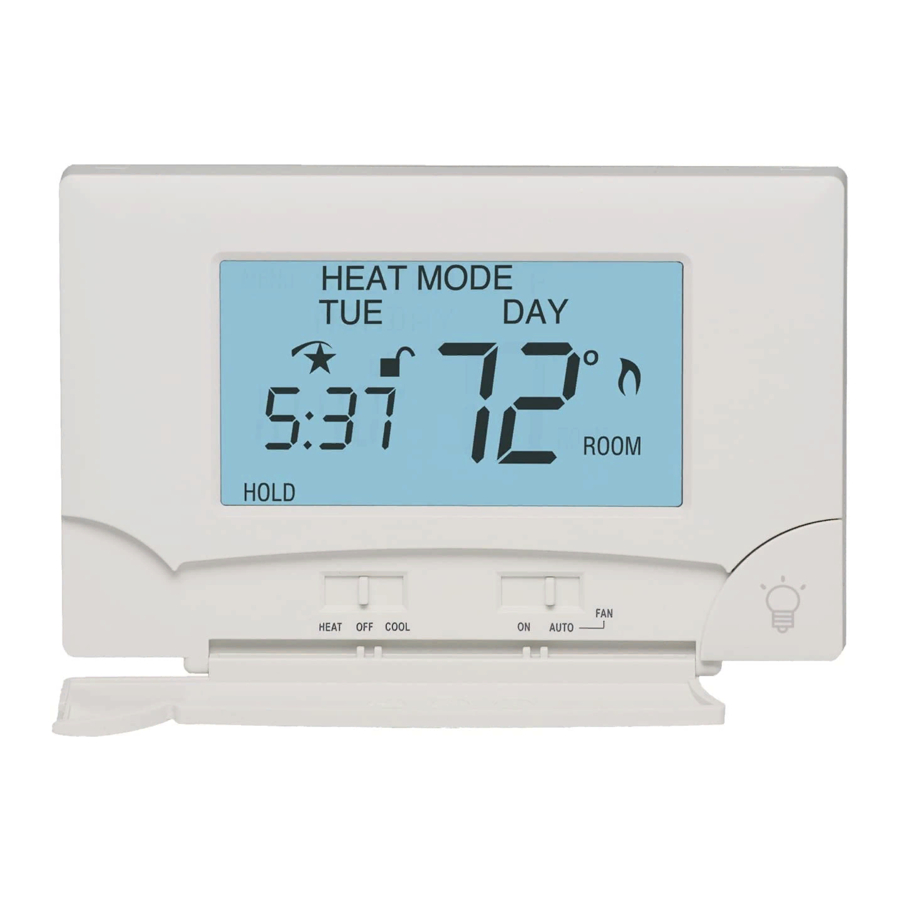
19. Your installation is now complete. 4. OPERATING INSTRUCTIONS The TX9000TS displays the current time and the room temperature. It also displays the day of the week and the current program period, MORN, DAY, EVE, or NITE. Temperature is indicated near the center of the display, and time is indicated on the left. -
Page 5: Software Reset
• Temperature settings will only change manually while HOLD is active. To clear hold, touch again. 5. PROGRAMMING The TX9000TS provides four independent programming periods per day. Heat and Cool are programmed separately. You can use the default programs or alter them to suit your schedule. -
Page 6: Advanced Features
5.2.1. COPY COPY will copy the previous days programs into the current day and advance the thermostat to the beginning of next day. 6. ADVANCED FEATURES 6.1. FILTER USAGE MONITOR The FILTER MONITOR is used to help determine when your filter should be changed. -
Page 7: Setup Options
Software Reset to reset the code to "000". See "Hardware Reset" and "Software Reset". 7. SETUP OPTIONS There are Installation Option switches located inside the thermostat on the rear of its circuit NEXT board. They control the following: 7.1. TIME DISPLAY FORMAT 12/24 SWITCH #1... -
Page 8: Batteries And Maintenance
See jumper and switch positions figure on Page 12. 8. BATTERIES AND MAINTENANCE The TX9000TS requires batteries to operate your heating/cooling system. Replace the batteries when the battery REPLACE indicator appears in the display or at least once a year. -
Page 9: Cooling Systems
* If a “B” wire in your system is a common, then connecting it to the “B” terminal may cause damage to your system. * If “Y” and “C” are both present, it is likely that “C” is a system common. * Use an optional common wire to allow the system to power your thermostat. COOLING SYSTEMS HEATING/COOLING SYSTEMS... - Page 10 “B” terminal may cause damage to your system. * If “Y” and “C” are both present, it is likely that “C” is a system common. * Use an optional common wire to allow the system to power your thermostat.
- Page 11 4 WIRE HEATING AND COOLING SYSTEM SYSTEM COMMON HEAT COMPRESSOR 5 WIRE SYSTEM HEATING AND COOLING - 2 TRANSFORMERS SYSTEM COMMON HEAT COOLING SINGLE STAGE HEAT PUMP SYSTEM SYSTEM COMMON JUMPER HEAT PUMP *"B" OR "O" BUT NEVER BOTH RC-RH JUMPER PROVIDED 24 VOLT SYSTEM...
-
Page 12: Programming
5.2. PROGRAMMING THE UNIT To ease reprogramming later, record your thermostat’s programs and settings in the table provided below. HEAT PERIOD TIME TEMP. TIME MORN NIGHT MORN TUES NIGHT MORN NIGHT JUMPER AND SWITCH POSITIONS C RH RC O B G...