Bissell little green 1400 series User Manual
Hide thumbs
Also See for little green 1400 series:
- User manual (25 pages) ,
- Manual (8 pages) ,
- User manual (12 pages)
Table of Contents
Advertisement
Quick Links
Advertisement
Table of Contents

Related Manuals for Bissell little green 1400 series


Summary of Contents for Bissell little green 1400 series
- Page 1 U S E R ’ S G U I D E 1400 / 1425 Series Thanks / Consumer Services Safety Instructions Product View Product Features Assembly Operation Maintenence and care Troubleshooting Replacement Parts Accessories Warranty...
- Page 2 BISSELL Little Green™ We’re glad you purchased a BISSELL Little Green. Everything we know about floor care went into the design and construction of this complete, high-tech home cleaning system. Your Little Green is well made, and we back it with a limited one-year warranty.
-
Page 3: Important Safety Instructions
Do not use for any purpose other than described ■ Do not modify the 3-prong grounded plug. ■ in this User’s Guide. SAVE THESE Use only BISSELL cleaning products intended for ■ use in this appliance. INSTRUCTIONS Use only manufacturer’s recommended ■... -
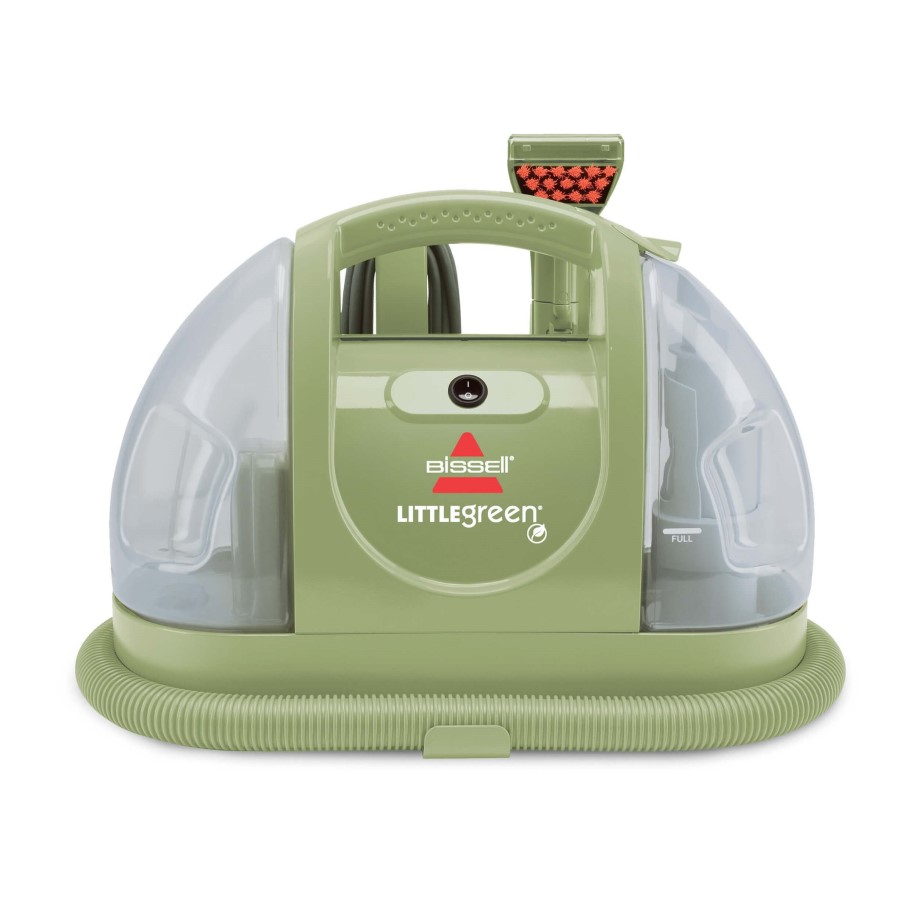
Page 4: Product View
roduct view Power Switch Dirty/Collection Tank PCV free Solution/Clean Tank PCV free Built-In Heater Switch *Select Models only Heat Indicator Light *Select Models only Vacuum flex Hose flex Hose Clip PCV free Tough Stain Brush Tool 2-in-1 Crevice Tool ™ Quick Release Cord Wrap ™... -
Page 5: Product Features
NOTE: Unwrap the Power Cord completely before surface while in use. operating the unit. WARNING: Use only BISSELL 2X Ultra Concentrated formulas for compact deep cleaners. Use of cleaning formulas which contain lemon or pine oil may damage this appliance and void the warranty. -
Page 6: Assembly
Slide tool clip into slit on flex hose storage bracket place tool on clip peration Getting ready To fill the clean/solution tank. A. R emove the tank by lifting it straight up and then away from the unit. B. U nscrew the black cap at the bottom of the clean/solution tank. C. A dd BISSELL 2X Little Green Formula to the FORMULA fill line on the clean/solution tank. Fill the clean/Solution tank with hot (NOT boiling) tap water to the WATER fill line. Replace and tighten the black cap. D. Replace the clean/solution tank by lining up the vertical guides on the left side of the unit with the indentations on the clean/solution tank and gently sliding it down into position. w w w . b i s s e l l . c a... -
Page 7: Pre-Treating
peration Getting ready (continued) Release vacuum flex hose by twisting the bracket latch clockwise. Unwrap vacuum flex hose com- pletely from around the unit. Attach your selected cleaning tool to the spray trigger unit by pressing tool onto spray trigger firmly until the button lock snaps into hole. Make certain the tool is securely attached. Twist the Quick Release cord wrap clockwise to unwrap the power cord completely from onboard cord storage and plug into 120 Volt, 60 Hz grounded outlet as described in Important safety Instructions, page 3. Press power switch to ON position. If your model has a heater switch then press the red heater switch to “ON”. Within 30 seconds, the heat indicator light will illuminate, indicating the heater has reached the proper temperature. -
Page 8: After Cleaning
peration Cleaning with your Little Green Hold the tool approximately 1” above the soiled surface. Press the spray trigger to apply the cleaning solution to the soiled area. Using the brush on the tool, gently scrub the area to be cleaned. Note: If using the TurboBrush, the switch should be in the “BRUSH” position. This IMPORTANT: activates the brush only. Check the manufacturer’s tag before For thorough cleaning, spray additional solution cleaning upholstery. “W” or “WS” on the while the brush and suction are in contact with tag means you can use your Little Green. -
Page 9: Machine Storage
aintenence and care Tip: After cleaning continued Before turning off the Little Green, suction up clean Disconnect the cleaning tool from the spray water to thoroughly rinse out trigger by pushing down on button lock and pulling straight off the interior of the flex hose. (DO NOT twist tools to remove them) Then, lift the cleaning tool and point it upwards to drain Once removed from the spray trigger, all tools any remaining water into the... -
Page 10: Troubleshooting
Thank you for selecting a BISSELL product. Please do not return this product to the store for any question or concern, BISSELL is happy to be of service. Contact us directly at 1-800-263-2535 w w w . b i s s e l l . c a... -
Page 11: Replacement Parts
203-7151 Tough Stain Brush Tool - Green 6 203-6652 TurboBrush - Dusk 7 79B9C BISSELL 2X Little Green ™ Formula 8 74R7C BISSELL 2X Pet Odor & Stain Removal Formula w w w . b i s s e l l . c a 1 - 8 0 0 - 2 6 3 - 2 5 3 5... - Page 12 BISSELL Representative at canada.custhelp@bissell.ca or at the phone number below will issue you a Return Authorization Number and a pre-paid mailing label to return the unit to BISSELL for warranty repair. The machine should be returned with a photocopy of your proof of purchase. (Your dated sales receipt is your warranty –...