Lorex LNE3003 Instruction Manual
Remote surveillance camera wireless, network ready, day/night, easy connect
Hide thumbs
Also See for LNE3003:
- Quick setup manual (2 pages) ,
- Instruction manual (143 pages) ,
- Instruction manual (114 pages)
Chapters
Table of Contents

Related Manuals for Lorex LNE3003


Summary of Contents for Lorex LNE3003
-
Page 1: Instruction Manual
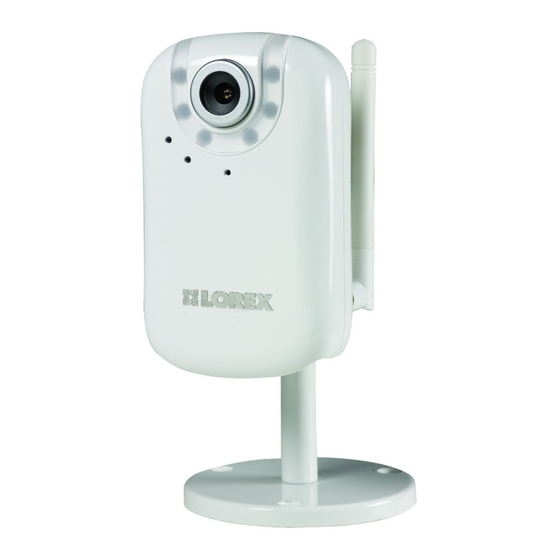
REMOTE SURVEILLANCE CAMERA WIRELESS, NETWORK READY, DAY/NIGHT, EASY CONNECT Instruction Manual English Version1.0 MODEL: LNE3003 www.lorexcctv.com Copyright © 2008 Lorex Technology Inc. - Page 2 Important Safeguards Thank you for purchasing the LNE3003 Remote Surveillance Camera. Lorex is committed to providing our customers with a high quality, reliable security product. To learn more about the Wireless Easy Connect Network Camera, and to learn about our complete...
-
Page 3: Important Safeguards
LNE3003 Surveillance Camera Important Safeguards In addition to the careful attention devoted to quality standards in the manufacture process of your video product, safety is a major factor in the design of every instrument. However, safety is your responsibility too. This sheet lists important information that will help to assure your enjoyment and proper use of the video product and accessory equipment. - Page 4 Service 19. Cleaning - Unplug the video product from the 13. Servicing - Do not attempt to service this wall outlet before cleaning. Do not use liquid video equipment yourself as opening or cleaners or aerosol cleaners. Use a damp removing covers expose...
-
Page 5: General Precautions
LNE3003 Surveillance Camera General Precautions 1. All warnings and instructions of this manual should be followed. 2. Remove the plug from the outlet before cleaning. Do not use liquid aerosol detergents. Use a water dampened cloth for cleaning. 3. Do not use this unit in humid or wet places. - Page 6 Internet connection or by using the Apple iPhone (mobile 3G). The LNE3003 is PC and Mac compatible, supporting Internet Explorer, Firefox, Opera, Safari, and Google Chrome browsers. It also provides superior low-light performance with night-vision LEDs.
-
Page 7: Table Of Contents
LNE3003 Surveillance Camera Table of Contents Getting Started .............................. 8 System Requirements........................... 9 Additional Requirements ........................... 9 About Yoics ..............................9 Camera Connections ..........................10 Basic Setup ..............................11 Network Connections ..........................12 Positioning the camera..........................13 Installation Warnings ..........................13 Camera Stand Installation ........................ -
Page 8: Getting Started
Getting Started Getting Started The system comes with the following components: 1 X NETWORK 1 X POWER ADAPTOR 1 X WIRELESS CAMERA ANTENNA 1 X QUICK START GUIDE 1 X MOUNTING 1 X ETHERNET 1 X SOFTWARE/MANUALS CD STAND (3 PIECES) CABLE CHECK YOUR PACKAGE TO CONFIRM THAT YOU HAVE RECEIVED THE COMPLETE CAMERA SYSTEM, INCLUDING ALL COMPONENTS SHOWN ABOVE. -
Page 9: System Requirements
LNE3003 Surveillance Camera System Requirements For setup and viewing, the LNE3003 Remote Surveillance Camera requires the following: • PC running Windows Vista / XP • Internet connection • Web browser: Internet Explorer 7 or later (with Active X), Mozilla Firefox, Opera (up to version 9.2), Safari, Google Chrome... -
Page 10: Camera Connections
Camera Connections Camera Connections 1. Power port – Connect AC adaptor to this port and then connect AC adaptor to electrical outlet. 2. LAN port – Local Area Network port. Connect one end of the included network cable to this port, and then connect the other end of the network cable to a network router, switch, or active wall port. -
Page 11: Basic Setup
LNE3003 Surveillance Camera Basic Setup Make the following connections prior to starting the camera for the first time. 1. Assemble the pedestal Attach the stand to the base. ii. Attach the mounting bracket to the stand. Figure 1.0 Assemble the pedestal 2. -
Page 12: Network Connections
Basic Setup Network Connections Network Cable COMPUTER (Not Included) UP PWR ROUTER / SWITCH / ACTIVE WALL PORT (Not Included) Figure 1.4 Network connectivity diagram... -
Page 13: Positioning The Camera
Positioning the camera Positioning the camera Before you install the camera, carefully plan where and how it will be positioned. Installation Warnings • Select a location for the camera that provides a clear view of the area you want to monitor, which is free from dust, and is not in line-of-sight to a strong light source or direct sunlight. -
Page 14: Using The Camera
Using the Camera Using the Camera With the camera setup and connected, you can now set up local viewing, remote viewing, and wireless connectivity. Before starting the installation, please ensure your computer is connected to the same local network as the camera and has access to the Internet. It is recommended to install the camera when your computer is wired to the local network. - Page 15 Using the Camera Figure 2.1 Find your camera from the list of devices 3. Click Find to discover Lorex cameras on your network. 4. Double-click the selected camera to launch DigiViewer in your default browser. Finding Your Camera as an UPnP Device (optional) You can also discover the camera as an UPnP (Universal Plug and Play) device by opening Network in Vista (My Network Places for Windows XP users).
-
Page 16: Setting Up Local Viewing
Setting up Yoics™ Remote Viewing Setting up local viewing With your camera now detected by DigiConsole, you can begin to view live images from your camera on your local network. When using Internet Explorer, you need to install Active X in order for DigiViewer to run properly;... -
Page 17: Setting Up Remote Viewing
Setting up Yoics™ Remote Viewing Setting up Yoics™ Remote Viewing By default, the LNE3003 IP Camera is enabled for Yoics™ easy-connect remote access. Yoics™ remote viewing allows you to easily connect to your camera without needing to configure your network gateway device. Sign-up with Yoics™ to view your camera from a remote location anywhere, anytime. -
Page 18: Registering Your Camera
1. In your browser go to lorex.yoics.com and login using your username and password (from the confirmation email). Click Yes in the subsequent security window. 2. From the Lorex pop-up window click Complete Registration. The Register New Devices page opens. TIP! If your camera does not appear in the under “My... -
Page 19: Remote Viewing Using A Web Browser
If you have an external (WAN) static IP address or you have registered with the Note: free LOREX DDNS service, you can configure your router to port-forward the incoming Internet connections to the camera. Use the static IP address or your customized lorexddns.net URL in the address field of your browser to access your camera. -
Page 20: Setting Up Wireless Connectivity
Setting up Wireless Connectivity Setting up Wireless Connectivity With initial setup of the camera complete, you can configure settings in DigiViewer to employ a wireless network connection. To setup wireless connectivity: 1. From DigiViewer, click Settings, and then click Wireless. DigiViewer automatically scans for any wireless networks. - Page 21 Setting up Wireless Connectivity Figure 6.2 Your device may need to reconnect with new wireless settings Note: Changing wireless settings may require devices to reconnect. 5. Close the browser window. 6. Return to DigiConsole. From the Find menu, right-click on your camera and select Refresh the list of devices (If DigiConsole was closed earlier, run the software again and click Find).
-
Page 22: Remote Viewing From Iphone™ Or Ipod Touch
Remote Viewing from iPhone™ or iPod touch™ Remote Viewing from iPhone™ or iPod touch™ To access your device remotely from iPhone™ or iPod touch™: 1. Using Safari, go to www.yoics.com and login using your Yoics username and password. 2. Click the name of the device you want to view. 3. -
Page 23: Additional Information
DigiViewer Software Manual included on the CD bundled with this package. Focusing the camera You can manually adjust the focus of the LNE3003 Remote Surveillance Camera. Note: Make sure the camera is powered on and connected to a network before attempting to adjust the focus. -
Page 24: Appendix 1: Camera Specifications
Appendix 1: Camera Specifications Appendix 1: Camera Specifications... - Page 25 Appendix 1: Camera Specifications (cont’d.) Appendix 1: Camera Specifications (cont’d.)
- Page 26 Appendix 1: Camera Specifications (cont’d.) It’s all on the Web! Product Information Specification Sheets Software Upgrades User Manuals Firmware Upgrades Quick Start Guides VISIT www.lorexcctv.com www.lorexcctv.com Lorex Technology Inc.
- Page 27 CAMÉRA SURVEILLANCE À DISTANCE SANS FIL, RÉSEAU DISPONIBLE, JOUR/NUIT, FACILE A CONNECTER Manuel d'instruction Version française 1.0 MODÈLE: LNE3003 www.lorexcctv.com Copyright © 2008 Lorex Technology Inc.
- Page 28 Merci pour votre achat la Caméra Surveillance À Distance LNE3003. Lorex est engagé à fournir un produit de sécurité fiable et de haute qualité à ses clients. Pour apprendre plus sur notre gamme complète de produits accessoires, veuillez visiter notre site Web au: http://www.lorexcctv.com...
-
Page 29: Lne3003 Surveillance Camera
LNE3003 Surveillance Camera Sauvegardes Importantes En plus de l'attention soigneuse consacrée pour obtenir des normes de qualité dans le processus de fabrication de votre produit vidéo, la sécurité est un facteur principal dans la conception de tout instrument. Cependant, la sécurité est aussi votre responsabilité. Cette fiche énumère l'information importante qui vous aidera à... - Page 30 Sauvegardes Importantes Entretien Utilisation Entretien N'essayez d'entretenir 18. Nettoyage - Débranchez le produit vidéo de la prise équipement vidéo vous-même, car ouvrir ou retirer du mur avant le nettoyage. N'utilisez pas des les couvercles pourrait vous exposer à une tension nettoyants liquides ou des nettoyants de bombe dangereuse ou à...
- Page 31 LNE3003 Surveillance Camera Précautions générales Tous les avis et toutes les instructions de ce guide doivent être suivis. Retirez la prise de la prise du mur avant le nettoyage. N'utilisez pas les détersifs liquides à bombe aérosol. Utilisez un tissu humide pour le nettoyage.
- Page 32 Caractéristique de LNE3003 Caractéristique de LNE3003 La nouvelle caméra Lorex sans fils avec réseau facile a connecté (LNE3003) vous permettent de surveiller à distance votre maison ou commerce par une connexion protégée par mot de passe et sure qui n'exige aucune connaissance de gestion de réseau. Connectez simplement la caméra à...
- Page 33 LNE3003 Surveillance Camera Tableau de contenus Commencer..............................8 Exigences Supplémentaires ........................9 Connexions de Caméra ..........................10 Organisation Fondamentale........................11 Connexions de Réseau ........................... 12 Positionnement de la caméra........................13 Avertissements D'installation........................13 Installation de support de la Caméra....................... 13 Vision nocturne............................
-
Page 34: Commencer
Commencer Commencer Le système vient avec les composantes suivantes: 1 X CAMÉRA DE 1 X ADAPTATEUR 1 X ANTENNE SANS RÉSEAU D'ALIMENTATION 1 X GUIDE DE DÉBUT RAPIDE 1 X SUPPORT DE 1 X CÂBLE 1 X LOGICIEL/CD DE MONTAGE (3 PIECES) D'ETHERNET MANUELS VÉRIFIEZ VOTRE PAQUET POUR CONFIRMER QUE VOUS AVEZ REÇU LE SYSTÈME... -
Page 35: Exigences Supplémentaires
Internet, c'est-à-dire. Firefox, l'Opéra, le Safari et le Chrome. Information sur Yoics Yoics™ est sûr, réseau immédiat et facile. La caméra de Surveillance Lointain LNE3003 est permise pour connexion facile de Yoics™ accès lointaine, vous permettant de communiquer à... -
Page 36: Connexions De Caméra
Connexions de Caméra Connexions de Caméra 1. Port d'alimentation – Connecte l'adaptateur de courant alternatif à ce port et Connecte ensuite l'adaptateur de courant alternatif à l'issue électrique. 2. Port de LAN – port de Réseau local. Connectez une fin du câble de réseau inclus à ce port et Connectez ensuite l'autre fin du câble de réseau à... -
Page 37: Organisation Fondamentale
LNE3003 Surveillance Camera Organisation Fondamentale Faites les connexions suivantes avant de commencer la caméra pour la première fois. Rassembler le socle i. Attachez le support à la base. ii. Attachez le crochet de fixation au support. Image 1.0 Rassembler le socle 2. -
Page 38: Connexions De Réseau
Organisation Fondamentale Connexions de Réseau Câble de Réseau ORDINATEUR (Non Inclus) UP PWR ROUTEUR / COMMUTATEUR / PORT MURAL ACTIF (Non Inclus) Image 1.4 Le diagramme de connectivité de Réseau... -
Page 39: Positionnement De La Caméra
Positionnement de la caméra Positionnement de la caméra Avant que vous installez la caméra, planifiez soigneusement où et comment il sera placé. Avertissements D'installation • Choisissez un endroit pour la caméra qui fournit une vue claire de la région que vous voulez contrôler, qui est libre de la poussière et n'est pas dans la ligne de visée à... -
Page 40: Utilisation De La Caméra
Utilisation de la Caméra Utilisation de la Caméra Avec la configuration de caméra et raccordé, vous pouvez maintenant configurer l'observation locale, l'observation lointaine et la cohérence sans fil. Avant le fait de commencer l'installation, garantissez s'il vous plaît que votre ordinateur est raccordé au même réseau local que la caméra et a l'approche à... -
Page 41: Trouver Votre Caméra Comme Un Artifice Upnp (Optionnel)
Utilisation de la Caméra Image 2.1 Trouver votre caméra de la liste d'appareils 3. Cliquez find pour découvrir des caméras Lorex sur votre réseau. 4. Cliquez deux fois sur la caméra choisie pour lancer DigiViewer dans votre navigateur implicite. Trouver Votre Caméra comme un Artifice UPnP (optionnel) Vous pouvez aussi découvrir la caméra comme un UPnP (la Prise de courant Universelle et le... -
Page 42: Configuration D'observation Locale
Configuration de Yoics™ l'Observation Lointaine Configuration d'observation locale Avec votre caméra maintenant découverte par DigiConsole, vous pouvez commencer à voir des images réelles de votre caméra sur votre réseau local. En utilisant l'Explorateur Internet, vous devez installer Active X pour DigiViewer pour téléchargement correcte; d'autres navigateurs soutenus exigeront la QuickTime. -
Page 43: Configuration De Yoics™ L'observation Lointaine
Configuration de Yoics™ l'Observation Lointaine Configuration de Yoics™ l'Observation Lointaine Par défaut, la Caméra LNE3003 IP est permis pour Yoics™ Connexion facile - accès lointaine. Yoics™ l'observation lointaine vous permet de facilement communiquer à votre caméra sans avoir besoin de configurer votre artifice de passage de réseau. Inscrivez-vous avec Yoics ™... -
Page 44: Enregistrement De Votre Caméra
Dès que vous avez créé un compte avec Yoics™, vous devez enregistrer votre caméra pour permettre Yoics™ l'observation lointaine. Pour enregistrer la caméra: 1. Dans votre navigateur allez à lorex.yoics.com et signez en utilisant votre nom d'utilisateur et mot de passe (du courrier électronique de confirmation). Cliquez Yes dans la fenêtre de sécurité ultérieure. -
Page 45: Observation Lointaine En Utilisant Un Navigateur De Web
Observation Lointaine en utilisant un navigateur de Web Pour accéder à votre artifice au loin d'un navigateur de web: Dans votre navigateur, allez à http: // lorex.yoics.com et signez dans en utilisant votre nom d'utilisateur et mot de passe. Cliquez Oui dans l'écran surgissant de sécurité... -
Page 46: Configuration De Connectivite Sans Fil
Configuration de connectivite Sans fil Configuration de connectivite Sans fil Avec la configuration initiale de la caméra complète, vous pouvez configurer des cadres dans DigiViewer pour employer une connexion de réseau sans fil. Pour configurer la connectivité sans fils: De DigiViewer, cliquez Settings et claquez ensuite Wireless. DigiViewer lit automatiquement pour n'importe quels réseaux sans fil. - Page 47 Configuration de connectivite Sans fil Image 6.2 Votre appareil peut devoir être reconnecté avec les nouveaux cadres sans fil Note: Changeant les cadres sans fil peuvent exiger des artifices d'être reconnecter. Fermez l'écran de navigateur. Revenez à DigiConsole. Du menu Find, cliquez a droit sur votre caméra et sélectez Refresh the list of devices (si DigiConsole a été...
-
Page 48: Observation Lointaine D'iphone ™ Ou D'ipod Touche
Observation Lointaine d'iPhone ™ ou d'iPod touche ™ Observation Lointaine d'iPhone ™ ou d'iPod touche ™ Pour accéder à votre artifice au loin d'iPhone ™ ou iPod touche ™ : En Utilisant Safari, allez à www.yoics.com et signez en utilisant votre nom d'utilisateur Yoics et mot de passe. -
Page 49: Renseignements Supplémentaires
Mettre la caméra à point Vous pouvez manuellement régler la concentration de la Caméra de Surveillance Lointaine LNE3003. Note: Assurez-vous que la caméra est alimenter et raccordée à un réseau avant d'essayer de régler le point. Pour ajuster la concentration: 1. -
Page 50: Annexe 1 : Spécifications De La Caméra
Annexe 1 : Spécifications de la Caméra Annexe 1 : Spécifications de la Caméra Modèle LNE3003 Capteur d'image Sensor ¼ CMOS progressive Format vidéo Pixeles efficace VGAÑ640H x 480V (307K) Système de balayage Progressive Système de chronométrage Intérieur Signal / Bruit... - Page 51 Annexe 1 : Spécifications de la Caméra...
- Page 52 Mises à jour du logiciel Guías del usuario Actualizaciones del programa Quick Start Guides Firmware Upgrades Guides de démarrage rapide Mises à jour du micro-logiciel Guías de arranque rápido Actualizaciones del microprograma VISIT / VISITEZ / VISITE www.lorexcctv.com www.lorexcctv.com Lorex Technology Inc.