Table of Contents
Advertisement
RETURN TO MAIN MENU
IM10038
POWER WAVE
C300 CE
August, 2010
®
11624
For use with machines having Code Numbers:
Safety Depends on You
Lincoln arc welding and cutting
equipment is designed and built
with safety in mind. However,
your overall safety can be
increased by proper installation ...
and thoughtful operation on your
part.
DO
NOT
INSTALL,
OPERATE OR REPAIR THIS
EQUIPMENT
WITHOUT
READING THIS MANUAL AND
THE SAFETY PRECAUTIONS
CONTAINED THROUGHOUT.
And, most importantly, think
before you act and be careful.
IEC 60974-1
N 8 0
N80
OPERATOR'S MANUAL
Copyright © Lincoln Global Inc.
• World's Leader in Welding and Cutting Products •
• Sales and Service through Subsidiaries and Distributors Worldwide •
Cleveland, Ohio 44117-1199 U.S.A. TEL: 216.481.8100 FAX: 216.486.1751 WEB SITE: www.lincolnelectric.com
Advertisement
Table of Contents
Troubleshooting

Related Manuals for Lincoln Electric POWER WAVE C300 CE


Summary of Contents for Lincoln Electric POWER WAVE C300 CE
- Page 1 RETURN TO MAIN MENU IM10038 POWER WAVE C300 CE August, 2010 ® 11624 For use with machines having Code Numbers: Safety Depends on You Lincoln arc welding and cutting equipment is designed and built with safety in mind. However, your overall safety can be increased by proper installation ...
- Page 2 351040, Miami, Florida 33135 or CSA Standard W117.2-1974. A Free copy of “Arc Welding Safety” booklet E205 is available from the Lincoln Electric Company, 22801 St. Clair Avenue, Cleveland, Ohio 44117-1199. BE SURE THAT ALL INSTALLATION, OPERATION, MAINTENANCE AND REPAIR PROCEDURES ARE PERFORMED ONLY BY QUALIFIED INDIVIDUALS.
-
Page 3: Electric Shock Can Kill
ELECTRIC SHOCK can kill. 3.a. The electrode and work (or ground) circuits are electrically “hot” when the welder is on. Do not touch these “hot” parts with your bare skin or wet clothing. Wear dry, hole-free gloves to insulate hands. - Page 4 WELDING and CUTTING SPARKS can cause fire or explosion. 6.a. Remove fire hazards from the welding area. If this is not possible, cover them to prevent the welding sparks from starting a fire. Remember that welding materials from welding can easily go through small cracks and openings to adjacent areas.
- Page 5 PRÉCAUTIONS DE SÛRETÉ Pour votre propre protection lire et observer toutes les instructions et les précautions de sûreté specifiques qui parraissent dans ce manuel aussi bien que les précautions de sûreté générales suiv- antes: Sûreté Pour Soudage A LʼArc 1. Protegez-vous contre la secousse électrique: a.
- Page 6 EN 60974-10 Electromagnetic Compatibility (EMC) Product Standard for Arc Welding Equipment. It is for use with other Lincoln Electric equipment. It is designed for industrial and professional use. All electrical equipment generates small amounts of electromagnetic emission. Electrical emission may be transmitted through power lines or radiated through space, similar to a radio transmitter.
- Page 7 SAFETY The size of the surrounding area to be considered will depend on the structure of the building and other activities that are taking place. The surrounding area may extend beyond the boundaries of the premises. Welding equipment should be connected to the mains supply according to the manufacturer’s recommenda- tions.
- Page 8 Electric for advice or information about their use of our products. We respond to our customers based on the best information in our posses- sion at that time. Lincoln Electric is not in a position to warrant or guarantee such advice, and assumes no liability, with respect to such infor- mation or advice.
-
Page 9: Table Of Contents
viii Installation...Section A Technical Specifications ...A-1, A-2 Safety Precautions ...A-3 Location, Lifting ...A-3 Stacking ...A-3 Tilting...A-3 Input and Ground Connections ...A-3 Machine Grounding ...A-3 High Frequency Protection...A-3 Input Connection ...A-4 Input Fuse and Supply Wire ...A-4 Input Voltage Selection ...A-4 Power Cord Replacement ...A-4 Recommended Work Cable Sizes ...A-5 Remote Sense Lead Specifications, Semi Automatic Welding ...A-5... -
Page 10: Table Of Contents
Maintenance ...Section D Safety Precautions ...D-1 Routine Maintenance ...D-1 Periodic Maintenance...D-1 Calibration Specification...D-1 ________________________________________________________________________________ Troubleshooting ...Section E Safety Precautions...E-1 How to Use Troubleshooting Guide...E-1 Using Status LED and Error Fault Codes ...E-2, E-4 Troubleshooting Guide...E-2 thru E-5 Error Fault Codes ...E-6, E-7 ________________________________________________________________________________ Wiring Diagram and Dimension Print ...Section F ________________________________________________________________________... -
Page 11: Installation
TECHNICAL SPECIFICATIONS - POWER WAVE® C300 CE POWER SOURCE-INPUT VOLTAGE AND CURRENT Model Input Voltage ± 10% Duty Cycle 40% rating 208/230/400*/460/575 K2865-1 100% rating (* includes 380V to 415V) Process Duty Cycle GMAW GMAW-Pulse FCAW 100% SMAW 100% GTAW-DC 100% RECOMMENDED INPUT WIRE AND FUSE SIZES INPUT... - Page 12 WIRE FEED SPEED RANGE-WIRE SIZE WFS RANGE 50 – 700 ipm (1.3 – 17.8 m/min) PROCESS GMAW GMAW-Pulse FCAW GTAW-DC SMAW Wire Speed MODEL HEIGHT K2865-1 18.80in (478mm) OPERATING TEMPERATURE RANGE Environmentally Hardened: -4°F to 104°F (-20°C to 40°C) IP23 155º(F) Insulation Class Weight does not include input cord.
- Page 13 National Electrical Code, all local codes and the information in this manual. The frame of the welder must be grounded. A ground terminal marked with a ground symbol is located next to the input power connection block.
-
Page 14: Input Connection
Using input wire sizes, fuses or cir- cuit breakers smaller than recommended may result in "nuisance" shut-offs from welder inrush currents, even if the machine is not being used at high currents. INPUT VOLTAGE SELECTION The POWER WAVE®... -
Page 15: Recommended Work Cable Sizes
RECOMMENDED WORK CABLE SIZES FOR ARC WELDING A work cable is provided with the POWER WAVE® C300 CE. This cable is appropriately sized for all of the POWER WAVE® C300 CEʼs welding procedures. If the work cable needs to be replaced a similar quality of cable should be used as excessive voltage drops caused by undersized welding cables can result in unsatisfactory welding performance. -
Page 16: Cable Connections
CABLE CONNECTION There is one circular connection on the front of the machine. (See Figure A.2---Table A.1) FIGURE A.2 CABLE INDUCTANCE AND ITS EFFECTS ON WELDING Whenever possible always weld in a direction away from the work (ground) connection. Excessive cable inductance will cause the welding performance to degrade. -
Page 17: Shielding Gas Connections
• Keep cylinder away from areas where it may be damaged. • Never lift welder with cylinder attached. • Never allow welding electrode to touch cylinder. • Keep cylinder away from welding or other live electrical circuits. -
Page 18: Loading Spool Wire
LOADING SPOOLS OF WIRE WARNING • Keep hands, hair, clothing and tools away from rotating equipment. • Do not wear gloves when threading wire or changing wire spool. • Only qualified personnel should install, use or service this equipment. ------------------------------------------------------------------------ Loading 10 to 15 lb. -
Page 19: Feeding Electrode And Brake Adjustment
FEEDING ELECTRODE AND BRAKE ADJUSTMENT DRIVE ROLL PRESSURE SETTING ELECTRIC SHOCK can kill. • Turn the input power OFF at the weld- ing power source before installation or changing drive rolls and/or guides. • Do not touch electrically live parts. •... -
Page 20: Tig Welding
A-10 TIG WELDING (Figure A.7) When TIG (GTAW) welding with the Power Wave C300CE, a torch with an integral gas valve is required. T I G T O R C H P O W E R C A B L E ( O P T I O N A L ) G A S H O S E W O R K P I E C E... -
Page 21: Operation
SAFETY PRECAUTIONS READ AND UNDERSTAND ENTIRE SECTION BEFORE OPERATING MACHINE. WARNING • ELECTRIC SHOCK CAN KILL. Unless using COLD FEED fea- ture, when feeding with gun trig- ger, the electrode and drive mechanism are always electri- cally energized and could remain energized several sec- onds after the welding ceases. -
Page 22: Product Description
PRODUCT DESCRIPTION The POWER WAVE® C300 CE is a high performance multi-process machine with GMAW, FCAW, SMAW, DC TIG, and pulse capability. It will offer a premier welding performance solution for specific areas such as aluminum, stainless, nickel where size and weight are an issue. -
Page 23: Design Features
DESIGN FEATURES Loaded with Standard Features • Multiple process DC output range: 5 - 300 Amps. • 208 – 575 VAC, 3 phase, 50-60Hz input power. • New and Improved Line Voltage Compensation holds the output constant over wide input voltage fluctuations. -
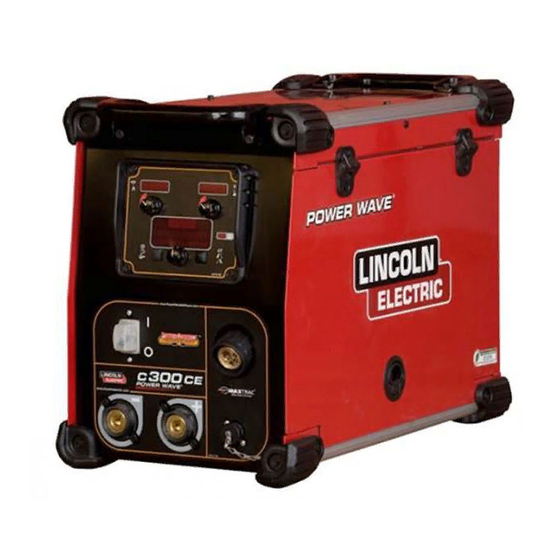
Page 24: Case Front Controls
CASE FRONT CONTROLS All operator controls and adjustments are located on the case front of the Power Wave. (See Figure B.1) 1. LEFT DISPLAY- Shows wire feed speed or amper- age, 2. LEFT KNOB- Adjusts value in left display. 3. MAIN DISPLAY- Shows detailed welding and diag- nostic information. -
Page 25: Case Back Controls
CASE BACK CONTROLS 1. ETHERNET CONNECTOR 2. POWER CORD 3. GAS CONNECTION 4. CIRCUIT BREAKER OPERATION FIGURE B.2 POWER WAVE® C300 CE... -
Page 26: Internal Controls
OPERATION INTERNAL CONTROLS FIGURE B.3 1. SPINDLE BRAKE 2. WIRE DRIVE PRESSURE ARM 3. COLD INCH / GAS PURGE SWITCH POWER WAVE® C300 CE... -
Page 27: Making A Weld With Waveform Technology Power Sources
Many variables beyond the control of The Lincoln Electric Company affect the results obtained in applying these programs. These variables include, but are not limited to, welding procedure, plate chemistry and tem- perature, weldment design, fabrication methods and ser- vice requirements. - Page 28 W e l d M o d e M e m o r i e s A r c C o n t r o l S t a r t O p t i o n s E n d O p t i o n s T r i g g e r O p t i o n s W i r e F e e d S p e e d ( W F S ) A M P S...
- Page 29 OPERATION SMAW (STICK) WELDING SMAW is most often used for outdoor construction, pipe welding and general repairs. The POWER WAVE® C300 CE controls Amperage, Output Control and Arc Force during SMAW welding. During SMAW welding the wire drive remains idle. BASIC OPERATION CONTROL OPTIONS START OPTIONS...
- Page 30 B-10 NON-SYNERGIC GMAW AND FCAW WELDING In non-synergic modes, the WFS control is similar to a conventional CV power source where WFS and volt- age are independent adjustments. Therefore to main- tain the arc characteristics, the operator must adjust the voltage to compensate for any changes made to the WFS.
- Page 31 B-11 GMAW (MIG) SYNERGIC WELDING In synergic welding modes, WFS is the dominant control parameter. For each wire feed speed, a corresponding volt- age is programmed into the machine at the factory. The user adjusts WFS according to factors such as wire size, material thickness, penetration requirements, etc.
- Page 32 B-12 STEEL AND STAINLESS SYNERGIC GMAW-P (PULSED MIG) WELDING When pulse welding, the power source primarily regu- lates the arc current, not the arc voltage. During a pulsing cycle, arc current is regulated from a low background level to a high peak level and then back down to the low background level.
- Page 33 B-13 STEEL AND STAINLESS GMAW-P (PULSED MIG) WELDING WELD MODE ELECTRODE AND Steel(Crisp) Ar(Mix) Steel(Rapid Arc) Ar(Mix) Steel(Vert Up) Ar(Mix) Stainless Stainless Stainless Ar/He/CO Stainless(Vert Up) Ar(Mix) EFFECT / RANGE DESCRIPTION ARC FOCUS Arc Focus adjusts the arc from a wide, soft arc good for out of -10.0 (SOFT to position work to a narrow, stiff 10.0 (STIFF)
- Page 34 B-14 ALUMINUM SYNERGIC GMAW-P (PULSED MIG)AND GMAW-PP (PULSE ON PULSE) WELDING The POWER WAVE® C300 CE can produce top qual- ity aluminum welds with excellent appearance, little spatter and good bead shape. Push-pull guns are available for consistent feeding when welding a long distance away from the wire feeder.
- Page 35 B-15 ALUMINUM GMAW-P (PULSED MIG) AND GMAW-PP (PULSE ON PULSE) WELDING AMPS Less Deposition WELD MODES ELECTRODE AND GAS ALUMINUM 4043 Pulse ALUMINUM 4043 Pulse -on-Pulse Ar ALUMINUM 5356 ALUMINUM 5356 Pulse -on-Pulse Ar UltimArc™ Control EFFECT / RANGE DESCRIPTION PULSE For Pulse modes, Arc Control FREQUENCY:...
-
Page 36: Weld Mode Searching
B-16 GTAW (TIG) WELDING The POWER WAVE® C300 CE is excellent for (Touch Start TIG) welding. AMPS WELD MODE MODE TOUCH START UltimArc™ Control UltimArc™ Control active for Touch Start TIG. WELD MODE SEARCHING The Weld Mode Search feature allows the selection of a welding mode based on certain criteria (wire size, process type, etc.). - Page 37 B-17 SAVING A MEMORY: To save the current machine settings to the selected memory, press and hold the center knob for (2 sec- onds). After two seconds, the alphanumeric displays will show “Memory # Save Memory” at which time the center knob should be released. After saving to a memory, a message will briefly appear indicating that the selected memory has been saved.
- Page 38 B-18 LIMITS Limits allow the welder to adjust the welding proce- dure only within a defined range. Each user memory may have a different set of limits. For example, memory 1 can be set to limit the WFS to 200 through 300 in/min, and memory 2 can be set to limit the WFS to 275 through 310 in/min, while memo- ry 3 may not have any WFS limits.
- Page 39 B-19 1. Rotate center knob to select parameter to be set (WFS, Voltage, Trim). L o w 0 . 7 6 W e l d W F S H i = 2 1 . 9 9 5 . 0 0 5.00 Hi=21.99 Low 0.76...
- Page 40 4-Step Trigger 4-Step trigger operation gives the welder additional control in the welding sequence. 4-Step trigger allows the welder to choose the arc start, weld and arc end time. It may also be set-up to work as a trigger inter- lock.
- Page 41 B-21 EXAMPLE 1 - 2 STEP TRIGGER: Simple operation The simplest trigger operation occurs with a 2 Step trigger and the Start, Crater and Burnback functions all set to OFF. (See Figure B.11) For this sequence, PREFLOW: Shielding gas begins to flow immediately when the gun trigger is pulled.
- Page 42 B-22 EXAMPLE 2 - 2 STEP TRIGGER: Improved Arc Start and Arc End. Tailoring the arc start and arc end is a common method for reducing spatter and improving weld quality. This can be accomplished with the Start and Burnback functions set to a desired values and Crater set to OFF.
- Page 43 B-23 EXAMPLE 3 - 2 STEP TRIGGER: Customized Arc Start, Crater and Arc End. Sometimes it is advanta- geous to set specific arc start, crater and arc ending parameters for the ideal weld. Many times when welding aluminum crater control is necessary to make a good weld.
- Page 44 EXAMPLE 4 – 4 STEP TRIGGER: Trigger Interlock The 4 step trigger can be configured as a trigger inter- lock. Trigger interlock adds to the welderʼs comfort when making long welds by allowing the trigger to be released after an initial trigger pull. Welding stops when the trigger is pulled a second time and then released, or if the arc is interrupted.
- Page 45 Start and less heat desired during crater. With 4 step trigger, the welder chooses the amount of time to weld at the Start, Weld and Crater settings by using the gun trigger. Burnback...
-
Page 46: Cold Feed/Gas Purge Switch
B-26 B-26 OPERATION COLD FEED/GAS PURGE SWITCH COLD FEED Cold Feed and Gas Purge are com- bined into a single spring centered tog- gle switch. To activate Cold Feeding, hold the GAS PURGE switch in the UP position. The wire drive will feed electrode but neither the power source nor the gas solenoid will be energized. -
Page 47: Set-Up Feature Menu
B-27 The Setup Menu gives access to the Setup Configuration. Stored in the setup configuration are user parameters that generally only need to be set at installation. The parameters are grouped as shown in the following table. PARAMETER P.1 through P.99 P.101 through P.199 P.501 through P.599 SET-UP FEATURES MENU... - Page 48 B-28 Parameter Exit Setup Menu This option is used to exit the setup menu. When P.0 is displayed, press the Left Button to exit the setup menu. Wire Feed Speed Units This option selects which units to use for displaying wire feed speed. English = inches/minute wire feed speed units (default).
- Page 49 B-29 Parameter Procedure Change Method Selects how remote procedure selection (A/B) will be made. The selected procedure can be changed locally at the user interface by pressing the 'A-Gun-B' button. The following methods can be used to remotely change the selected procedure: •...
- Page 50 B-30 Parameter Gun Offset Adjustment This option adjusts the wire feed speed calibration of the pull motor of a push-pull gun. This should only be performed when other possible corrections do not solve any push-pull feeding problems. An rpm meter is required to perform the pull gun motor offset calibration. To perform the calibration procedure do the following: 1.
- Page 51 All Mode Remote = This setting allows the remote control to function in all weld modes which is how most machines with 6-pin and 7-pin remote control connections operate. This setting was provided so that customers with a mix of Lincoln Electric equipment can have consistent remote control behavior across all of their equipment. (N. American default) Joystick MIG Gun = Use this setting while MIG welding with a push MIG gun with a joystick control.
- Page 52 B-32 Parameter P.22 Arc Start/Loss Error Time This option can be used to optionally shut off output if an arc is not established, or is lost for a specified amount of time. Error 269 will be displayed if the machine times out. If the value is set to OFF, machine output will not be turned off if an arc is not established nor will output be turned off if an arc is lost.
- Page 53 B-33 Parameter P.102 View Fatal Logs Used for viewing all the system fatal logs. Press the Right Button to enter the option. Rotate Control Knob to select the desired fatal log to read. Press the Right Button again to enter that log.
- Page 54 B-34 Parameter P.503 Memory Button Disable Disables the specified memory button(s). When a memory is disabled, welding procedures can- not be restored from or saved to that memory. If an attempt is made to save or restore a dis- abled memory, a message will be displayed on the lower display indicating the memory number is disabled.
- Page 55 B-35 Parameter P.507 UI Clear All Memories Allows the operator to quickly set all memories to the default weld mode and welding parame- ters. Presently, this option does not exist in any setup menu. P.509 UI Master Lockout Locks all user interface controls, preventing the operator from making any changes. This para- meter can only be accessed using Power Wave Manager.
-
Page 56: Accessories
Consists of a 6-pin Amphenol connector which plugs into the remote control Amphenol. 25 foot cable length. TIG OPTIONS Lincoln Electric offers a full line of TIG Torches. Contact your local Lincoln Electric sales office for more information. K870 FOOT AMPTROL Depress pedal to increase current. -
Page 57: Routine Maintenance
SAFETY PRECAUTIONS ELECTRIC SHOCK can kill. • Turn the input power to the welding power • Only qualified personnel should install, use or ------------------------------------------------------------------------ ROUTINE MAINTENANCE Routine maintenance consists of periodically blowing out the machine, using a low-pressure air stream, to remove accumulated dust and dirt from the intake and outlet louvers, and the cooling channels in the machine. -
Page 58: How To Use Troubleshooting Guide
HOW TO USE TROUBLESHOOTING GUIDE Service and Repair should only be performed by Lincoln Electric Factory Trained Personnel. Unauthorized repairs performed on this equipment may result in danger to the technician and machine operator and will invalidate your factory warranty. For your safety and to avoid Electrical Shock, please observe all safety notes and precautions detailed throughout this manual. - Page 59 USING THE STATUS LED TO TROUBLESHOOT SYSTEM PROBLEMS Not all of the Power Wave C300 CE errors will be displayed on the user interface. There are three status lights that con- tain error sequences that may not show up on the user inter- face.
- Page 60 Observe all Safety Guidelines detailed throughout this manual ERROR CODES FOR THE POWER WAVE® The following is a partial list of possible error codes for the POWER WAVE® C300 CE. For a complete listing consult the Service Manual for this machine. Error Code # Thermal error 54 Secondary (Output) over current error...
- Page 61 Observe all Safety Guidelines detailed throughout this manual Error Code # Peak input current limit Under-voltage lockout Thermal Fault Pre-charge timeout Transformer primary over current Other If for any reason you do not understand the test procedures or are unable to perform the tests/repairs safely, contact your Local Lincoln Authorized Field Service Facility for technical troubleshooting assistance before you proceed.
-
Page 62: Troubleshooting
2. Reduce output current, duty cycle, or both. 3. Contact your local authorized Lincoln Electric Field Service facility for technical assistance. 1. Make sure input supply discon- nect has been turned ON. Check input fuses. Make certain that the Power Switch (SW1) on the power source is in the “ON”... - Page 63 Observe all Safety Guidelines detailed throughout this manual PROBLEMS (SYMPTOMS) Thermal LED is ON Thermal LED is ON “Real Time Clock” no longer func- tioning General degradation of weld perfor- mance If for any reason you do not understand the test procedures or are unable to perform the tests/repairs safely, contact your Local Lincoln Authorized Field Service Facility for technical troubleshooting assistance before you proceed.
- Page 64 Observe all Safety Guidelines detailed throughout this manual PROBLEMS (SYMPTOMS) Weld and Arc Quality Problems (Continued) Wire burns back to tip at the end of the weld. Machine output shuts down during a weld. Machine wonʼt produce full output. Excessively long and erratic arc. If for any reason you do not understand the test procedures or are unable to perform the tests/repairs safely, contact your Local Lincoln Authorized Field Service Facility for technical troubleshooting assistance before you proceed.
- Page 65 Observe all Safety Guidelines detailed throughout this manual PROBLEMS (SYMPTOMS) Cannot Connect Connection Drops while welding If for any reason you do not understand the test procedures or are unable to perform the tests/repairs safely, contact your Local Lincoln Authorized Field Service Facility for technical troubleshooting assistance before you proceed. TROUBLESHOOTING POSSIBLE CAUSE...
- Page 66 WIRING DIAGRAM Enhanced Diagram POWER WAVE® C300 CE...
- Page 67 DIMENSION PRINT POWER WAVE® C300 CE...
- Page 68 NOTES POWER WAVE® C300...
- Page 69 NOTES POWER WAVE® C300...
- Page 70 WARNING Spanish AVISO DE PRECAUCION French ATTENTION German WARNUNG Portuguese ATENÇÃO Japanese Chinese Korean Arabic...
- Page 71 Spanish PRECAUCION French ATTENTION German WARNUNG Portuguese Japanese Chinese Korean Arabic WARNING AVISO DE ATENÇÃO...
- Page 72 • World's Leader in Welding and Cutting Products • • Sales and Service through Subsidiaries and Distributors Worldwide • Cleveland, Ohio 44117-1199 U.S.A. TEL: 216.481.8100 FAX: 216.486.1751 WEB SITE: www.lincolnelectric.com...