Advertisement
Alton Industries Ltd. Group
1 year Limited Warranty
Alton Industries Group will repair or replace any defective materials
due to craftsmanship of the product. This warranty does not cover
any problem caused by misuse, abuse, accidents or acts of God,
such as floods or hurricanes. Consequential and incidental
damages are not covered under this warranty. Coverage
terminates if you sell or otherwise transfer the ownership.
Replacement parts and service are available from your nearest
authorized Service Center. If the need arises, contact Service
Center as listed below. When consulting with a Service Center,
refer to the model number and serial number located on the
serial label of the generator. Proof of purchase is required for all
transactions and a copy of your sales receipt may be requested.
Record the model number, serial number, and date purchased
in the spaces provided below. Retain your sales receipt and this
manual for future reference.
Model No.
Serial No.
When needing service or replacement parts, please call
In U.S.A.
Toll Free
Fax 1-817-442-5402
We reserve the right to repair or replace the product at our discretion.
However, if the product is no longer available due to discontinuation, we
may replace the product with one of similar but not exact features.
This warranty gives you specific legal rights. You may have other
rights which vary from state to state.
-24-
Date Purchased
1-866-393-3968
IMPORTANT: READ MANUAL BEFORE USING!
Made in China
Toll-Free-Helpline: 1-866-393-3968
Coleman
and
R
The Coleman Company, Inc. used under license.
Coleman Company, Inc.
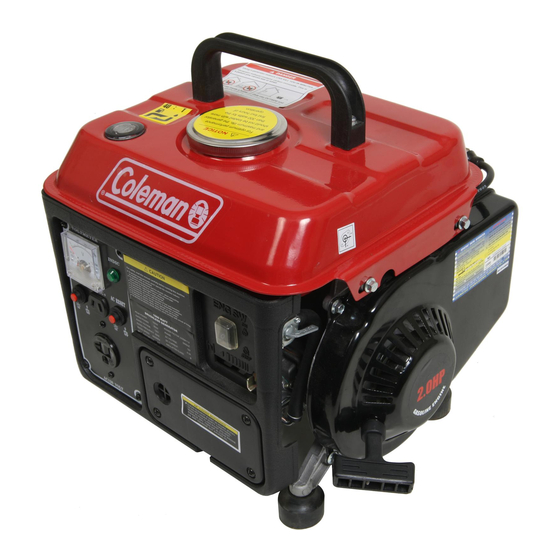
GENERATOR
1000W 120V AC & 12V DC
ITEM# CM04101
are registered trademarks of
2010 The
C
Advertisement
Table of Contents

Related Manuals for Coleman CM04101


Summary of Contents for Coleman CM04101
- Page 1 This warranty gives you specific legal rights. You may have other The Coleman Company, Inc. used under license. 2010 The rights which vary from state to state.
- Page 2 (X) APPLICABILITY TABLE OF CONTENTS MODEL 04101 Brushless, Revolving Field, Self-exciting, Type 2-poles, Single phase SAFETY GUIDELINES&INFORMATION --------------- 2~7 Voltage Regulator Condenser Type PRE-OPERATION PREPARATION ------------ 8 Max. Output 1000W Rated Output 900W STARTING THE ENGINE -------------------- 9 thru 10 AC Voltage 120V Rated Current...
-
Page 3: Safety Rules
Observe them carefully. Their definitions are as If any portion of this manual is not understood, follows: contact the toll free Coleman® Customer Service line at 1-855-900-2653 for starting, Indicates a hazardous situation or action operating and servicing procedures. -
Page 4: Exhaust & Location Hazards
EXHAUST & LOCATION HAZARDS • Never operate in an enclosed area or FIRE HAZARDS indoors! NEVER use in the home, or • Gasoline is highly FLAMMABLE and in partly enclosed areas such as its vapors are EXPLOSIVE. Do not garages, even if doors and windows permit smoking, open flames, sparks are open! ONLY use outdoors and far or heat in the vicinity while handling... - Page 5 NOTE: Do not use any gasoline containing more than 10% Ethanol. NEVER fill the fuel tank with E85 or a mixture of oil and gasoline designated for two-cycle engines. Do not light a cigarette or smoke when filling the fuel tank. Gasoline is highly FLAMMABLE and its vapors are EXPLOSIVE.
-
Page 6: (I) Safety Information
(IX) SCHEMATIC (I) SAFETY INFORMATION NEVER operate this power generator indoors or anywhere airflow is restricted. NEVER To prevent fire or carbon monoxide poisoning, point the generator’s exhaust towards combustible materials or in the direction of open windows or doors. NEVER refuel the engine while it is running;... - Page 7 (II) PRE-OPERATION PREPARATION FIG. J GENERATOR NOTE: The following checks should be PART DESCRIPTION Q'TY SPEC made each time the generator is used. Tapping screw ST4.2 13 To prevent electric shock, Voltmeter 91L4 ALWAYS ground the generator DC outlet V type before starting, see Picture 1.
- Page 8 (III) STARTING THE ENGINE DO NOT plug any device into the power generator before starting the engine, see Picture 5. Shake fuel tank before starting the engine. Picture 5 2. Turn the fuel petcock to "ON" position. See Picture 6. Picture 6 Turn the choke lever to Position 1.
- Page 9 4. Turn the engine switch to the FIG. I GENERATOR "ON" position. See Picture 8. PART DESCRIPTION Q'TY SPEC Stator Assy Rotor Assy Diode Tray Bearing 6203 Picture 8 Flange Bolt M8 155 5. Pull slowly on the recoil starter until it is engaged, then pull Rear Cover it briskly.
- Page 10 (VIII) EXPLODED VIEW-MAIN UNIT (IV) CONNECTION 1.To prevent the power cord of the apparatus from inadvertently becoming unplugged, wind the power cord 2 or 3 Picture 11 turns around the handle of the generator. See Picture 11. 2.Plug the power cord into the AC receptacle.
-
Page 11: Generator Troubleshooting
(V) STOPPING THE ENGINE z Generator Troubleshooting 1. Before stopping engine, turn off electrical device being Problem Possible Cause Corrective Action powered and unplug it from Tripped circuit breaker Reset the generator. See Picture Poor connection or faulty Check and repair Indicator light ON lead No AC output... -
Page 12: (Vii) Troubleshooting
(VII) TROUBLESHOOTING (VI) PERIODIC MAINTENANCE SPARK PLUG (Once per month) z Engine Troubleshooting Corrective Problem Possible Cause 1.Remove the spark plug, see Action Tighten plug Picture 17. Loose spark plug properly Insufficient Tighten bolt Loose cylinder head bolt compression properly Damaged gasket Replace gasket Insufficient pulling... - Page 13 AIR FILTER (Once per month) FUEL FILTER (Once every three months) 1. Remove air filter. (See Picture 20 2. Wash air filter in solvent. (See Picture 20 3.Coat filter with motor oil. (See Picture 20 4.Gently, squeeze motor (See Picture 20 oil out.