Desa VVSR18 Owner's Operation And Installation Manual
Vented decorative natural gas logs
Hide thumbs
Also See for VVSR18:
- Owner's operation and installation manual (32 pages) ,
- Owner's operation and installation manual (28 pages) ,
- Owner's operation and installation manual (25 pages)
Table of Contents
Advertisement
VENTED DECORATIVE NATURAL GAS LOGS
OWNER'S OPERATION AND INSTALLATION MANUAL
RGA 2-72
APPROVED
VVSR18, VVSR24, VVDR18, VVDR24, AND VVDR30
FOR USE WITH LOG SET MODELS VSLR18, VSLR24, VDLCR18,
FVSR18, FVSR24, FVDR18, FVDR24, AND FVDR30 FOR USE
WITH LOG SET MODELS FSLR18, FSLR24, FDLCR18, FDLCR24,
COMFORT GLOW LOG SET AND BURNER MODELS
CVSR18, CVSR24, CPVSR18, CPVSR24, CVDR18, CVDR24,
CVDR30, LBFL18, LBFL24, LVDR18, LVDR24, LVDR30, BFLT18,
BFLT24, HVSR18, HVSR24, HCVDR18 AND HCVDR24
WARNING: If the information in these instructions is
not followed exactly, a fire or explosion may result
causing property damage, personal injury or death.
— Do not store or use gasoline or any other flammable
vapors or liquids in the vicinity of this or any other
appliance.
— WHAT TO DO IF YOU SMELL GAS :
• Do not try to light any appliance.
• Do not touch any electrical switch;
• Do not use any phone in your building.
• Immediately call your gas supplier from a neighbor's
phone. Follow the gas supplier's instructions.
• If you cannot reach your gas supplier, call the fire
department.
— Installation and service must be performed by a quali-
fied installer, service agency or the gas supplier.
For more information, visit www.desatech.com
VANGUARD BURNER MODELS
VDLCR24 (SHOWN) AND VDLCR30
FMI BURNER MODELS
FDLCR30, FA18, FA24 AND FA30
FOR YOUR SAFETY
Save this manual for future reference.
TESTED AND
LISTED BY
Advertisement
Table of Contents

Related Manuals for Desa VVSR18


Summary of Contents for Desa VVSR18
- Page 1 RGA 2-72 TESTED AND APPROVED LISTED BY VANGUARD BURNER MODELS VVSR18, VVSR24, VVDR18, VVDR24, AND VVDR30 FOR USE WITH LOG SET MODELS VSLR18, VSLR24, VDLCR18, VDLCR24 (SHOWN) AND VDLCR30 FMI BURNER MODELS FVSR18, FVSR24, FVDR18, FVDR24, AND FVDR30 FOR USE...
-
Page 2: Table Of Contents
WARNING: Improper installation, adjustment, altera- tion, service or maintenance can cause injury or prop- erty damage. Refer to this manual for correct installation and operational procedures. For assistance or addi- tional information consult a qualified installer, service agency or the gas supplier. WARNING: This is a gas-fired appliance. -
Page 3: Safety Information
SAFETY INFORMATION WARNING: This appliance is equipped for natural gas. An WARNING: This product con- optional propane/LP conversion tains and/or generates chemicals kit must be installed for use with known to the State of California propane/LP gas. to cause cancer or birth defects or other reproductive harm. -
Page 4: Local Codes
SAFETY INFORMATION Continued 1. If you smell gas • shut off gas supply • do not try to light any appliance • do not touch any electrical switch; do not use any phone in your building • immediately call your gas supplier from a neighborʼs phone. -
Page 5: Optional Product Features
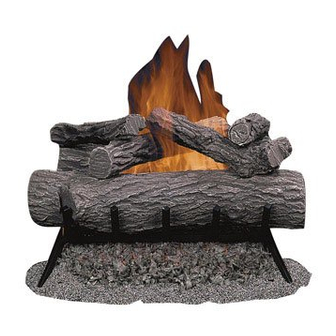
OPTIONAL PRODUCT INSTALLATION FEATURES CAUTION: Do not remove ON/OFF SAFETY VALVE/PILOT KIT the data plates attached to the AND PROPANE/LP CONVERSION burner pan. The data plates An optional valve/safety pilot kit with a piezo contain important warranty and ignitor is available for this appliance. This system safety information. - Page 6 INSTALLATION MINIMUM FIREBOX SIZES Continued Models: VVSR18, FVSR18, HVSR18, CPVSR18, CVSR18, CVDR18, VVDR18, FVDR18, HCVDR18, LVDR18 Front Width* Back Width** Depth Height 28" 16" 14" 18" Models: VVSR24, FVSR24, HVSR24, CPVSR24, CVSR24, CVDR24, VVDR24, FVDR24, HCVDR24, VVSR18 LVDR24 FVSR18 Front Width* Back Width**...
-
Page 7: Check Gas Type
INSTALLATION Continued CHECK GAS TYPE Use only natural gas. If your gas supply is not natural gas, you must install ON/OFF Safety Valve/Pilot Kit (see Accessories, page 19). Call dealer where you bought log set. If the fireplace does not have a gas supply shutoff valve, one must be installed. - Page 8 INSTALLATION Continued We recommend that you install a sediment trap in supply line as shown in Figure 4. Locate sediment trap where it is within reach for cleaning. Install in piping system between fuel supply and heater. Locate sediment trap where trapped matter is not likely to freeze.
- Page 9 INSTALLATION Continued HEARTH KIT ASSEMBLY AND INSTALLATION Kit Assembly - Single and Dual-Flame Only 1. Determine which side the gas line will be coming into the fireplace. NOTICE: Triple-burner models CBL18/24 or BFLT18/24 come preassembled with gas inlet on right side of burner pan. DO NOT attempt to reposition burner on triple-burner models.
- Page 10 INSTALLATION Continued Installation and Gas Connection 1. Place the burner pan assembly in the center of the fireplace floor. Make sure the front of pan faces forward. 2. Thread the gas supply fitting to the fireplace gas supply pipe. Use thread sealant. 3.
- Page 11 INSTALLATION Continued 6. Install the gas connector tube to the gas supply fitting. Carefully shape tube to attach to adapter fitting. Be careful not to cause kinks in tube. 7. Test for leaks following instructions under Testing Burner for Leaks, page 12. 8.
- Page 12 INSTALLATION Continued Changing Pilot Orifice The pilot is provided with a natural gas orifice installed. For propane/LP gas you must remove it and replace it with an propane/LP orifice. The accessory hardware kit contains an propane/LP orifice with a red stripe for converting the pilot. 1.
-
Page 13: Operating Appliance
INSTALLATION INSTALLING DECORATIVE GRATE The decorative grate enhancer accessory (see Continued Accessories, page 19) comes standard with the Berkshire Oak (CVDR) models. Install enhancer by placing it over the grate fingers on the front of the grate after your logset has been installed. Grate Enhancer Kingston Split Oak Logs... - Page 14 OPERATING APPLIANCE OPERATING INSTRUCTIONS Continued FOR GA9050A LIGHTING Note: Operation instructions for GA9150A INSTRUCTIONS Remote Ready Valve/Pilot Kit will be included 1. STOP! Read the safety information, with the kit. page 14. 1. STOP! Read the safety information, 2. Turn the gas shutoff valve to OFF. page 14.
-
Page 15: Cleaning And Maintenance
1-866-672-6040. When calling please have your model and serial numbers of your heater Pilot ready. Burner You can also visit DESAʼs technical services web site at www.desatech.com. REPLACEMENT PARTS Figure 20 - Thermocouple and Pilot Note: Use only original replacement parts. This... -
Page 16: Troubleshooting
TROUBLESHOOTING WARNING: Turn off log set and let cool before servicing. Only a qualified service person should service and repair log set. Note: All troubleshooting items are listed in order of operation. OBSERVED PROBLEM POSSIBLE CAUSE REMEDY Log set is smoking/sooting 1. - Page 17 TROUBLESHOOTING Continued OBSERVED PROBLEM POSSIBLE CAUSE REMEDY When ignitor button is pressed, 1. Gas supply turned off or equip- 1. Turn on gas supply or open there is spark at pilot but no igni- ment shutoff valve closed equipment shutoff valve tion (GA9050A Only) 2.
- Page 18 TROUBLESHOOTING Continued WARNING: If you smell gas • Shut off gas supply. • Do not try to light any appliance. • Do not touch any electrical switch; do not use any phone in your building. • Immediately call your gas supplier from a neighbor’s phone. Fol- low the gas supplier’s instructions.
-
Page 19: Accessories
LIMITED WARRANTY - VENTED GAS LOGS DESA warrants this product to be free from defects on burner system for four (4) years and logs for a lifetime from the date of first purchase, provided that the product has been properly installed, operated and maintained in accordance with all applicable instructions.