
Related Manuals for Lifescan One Touch ll


Summary of Contents for Lifescan One Touch ll
- Page 1 ® BLOOD GLUCOSE MONITORING SYSTEM SYSTÈME DE CONTRÔLE DE LA GLYCÉMIE OWNER’S BOOKLET MANUEL DU PROPRIÉTAIRE...
- Page 2 ® Blood Glucose Monitoring System OWNER’S BOOKLET...
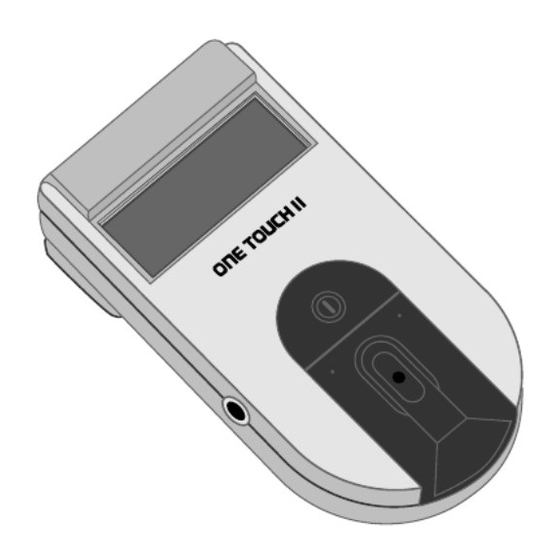
- Page 3 “J” size Battery (installed) Memory Button “M” 6-VOLT Display On/Off Button Data Port Test Area ONE TOUCH ® Normal Glucose Control Solution — Blue Formula Check Strip Code Button “C” Test Strip PENLET ® II with Cap Test Spot Lancet Test Strip Holder...
- Page 4 If you would like a helpful/instructional audio cassette tape of the ONE TOUCH II test procedure, please call LifeScan Canada Customer Service at 1 800 663-5521. Blood glucose monitoring plays an important part in controlling your diabetes. The...
- Page 5 CAUTION: Before using any product to test your blood glucose (sugar), read all instructions and practice the test. Consult your diabetes healthcare professional for advice regarding selection of equipment, testing times, and procedures. These recommendations apply to all blood glucose monitoring systems and are supported by the Diabetes Educator section of the Canadian Diabetes Association.
-
Page 6: Table Of Contents
TABLE OF CONTENTS 1. Tips for Getting Good Results 2. Getting Started 3. Checking the System 4. Coding the Meter 5. Getting a Drop of Blood 6. Testing Your Blood 7. Troubleshooting 8. Cleaning and Maintaining the Meter 9. Setting Date, Time, and Other Special Functions 10. -
Page 7: Tips For Getting Good Results
1. TIPS FOR GETTING GOOD RESULTS Carefully read this Owner’s Booklet and all other instructional material provided with your blood glucose monitoring system and test supplies. Clean your Meter regularly (at lease once a week) by following the instructions in Chapter 8, Cleaning and Maintaining the Meter. -
Page 8: Getting Started
2. GETTING STARTED Before you read about the test procedure, please study this diagram to become familiar with the various parts of your ONE TOUCH ® Meter. Memory Button "M" Battery Compartment (on back) Display On/Off Button Data Port Test Area with Protective Coating •... - Page 9 ON/OFF BUTTON. This button turns the Meter on and off. DISPLAY. This is where you read your test results and the simple messages that help guide you through the test procedure. BATTERY COMPARTMENT. Holds one J-size battery. The battery is already installed in your Meter.
- Page 10 LifeScan Technical Service Department via the toll-free numbers listed below: Canada 1 800 663-5521 U.S.A. 1 800 227-8862 MEASUREMENT CONVERSION. The ONE TOUCH II Meter can display units either in mmol/L or mg/dL. To select the unit measurement of...
- Page 11 Check code Insert Test Strip Apply Blood sample IMPORTANT: Read detailed instructions in your ONE TOUCH II Owners Booklet before doing a test. LifeScan Technical Service - U.S.A. 1 800 227-8862 Canada 1 800 663-5521 Cleaning instructions on reverse side...
-
Page 12: Checking The System
3. CHECKING THE SYSTEM Normal Check Strip Control Solution There are two ways to make sure your ONE TOUCH ® System is working properly. Check Strip is used to check that the Meter is operating properly. ONE TOUCH Normal ® Glucose Control Solution —... - Page 13 Owner’s Booklet. If you cannot resolve the problem, contact the LifeScan Technical Service Department via the toll-free numbers listed below: Canada 1 800 663-5521 U.S.A. 1 800 227-8862...
- Page 14 ONE TOUCH ® Normal Glucose Control Solution — Blue Formula from your Authorized LifeScan Distributor or retail pharmacy. To do a Control Solution test, follow the same procedure you would if you were testing your blood, (as described in Chapter 6,...
- Page 15 Checking the Meter with the Check Strip A plastic (purple and white) Check Strip is included with your ONE TOUCH ® Meter. The Check Strip is used to check that your Meter is operating properly. You must use the Check Strip: At least once a day.
- Page 16 How to use the Check Strip Step 1: Press On/Off code 7 Button. code 7 (example) will appear on the display. (The code number does not need to be set to do a Check Strip test.) insert strip strip appears. Slide the Check Strip into...
- Page 17 Step 3: When side 2 insert side 2 appears, turn the Check Strip over and with Side 2 (white) facing up, insert it back into the Test Strip Holder, notched end first. The Meter counts down from 4 to 0, then A 3 .
- Page 18 Chapter 8, Cleaning and Maintaining the Meter. For further assistance, call the LifeScan Technical Service Department toll-free. Canada 1 800 663-5521 U.S.A. 1 800 227-8862 The next time you turn on your Meter code 7 redo A (example) will appear, indicating your Check Strip was out of range at the last reading.
- Page 19 Do not expose the Check Strip to direct sunlight for extended periods of time. If you lose or damage the Check Strip, call the LifeScan Technical Service Department for a free replacement. • •...
-
Page 20: Coding The Meter
4. CODING THE METER CAUTION: You must match the code number on the Meter display to the code number on the Test Strip package you’re using. If the code number on the Meter display does not match the number on the Test Strip package, you will get an inaccurate result. - Page 21 Step 2: Match the code number Press code 7 the Code Button (C). code 7 (example) will reappear on the display for several seconds. With code 7 (example) on the display, press and release the Code Button again, and the number will advance by one.
-
Page 22: Getting A Drop Of Blood
5. GETTING A DROP OF BLOOD IMPORTANT: Getting a good drop of blood is one of the most important steps in getting an accurate blood glucose result. The PENLET II Automatic ® Blood Sampler is an easy, safe way to get a good drop of blood. - Page 23 3. Remove the Lancet Protective Disk by holding the Lancet firmly and gently twisting off the Disk. 4. Replace the PENLET ® cap. Note: The PENLET II includes two caps so that you may control the punc- ture depth. The cap which comes attached to the PENLET II has a single line •...
- Page 24 Step 2: Cock the PENLET ® Holding the lower portion of the body of the PENLET II, pull out the dark gray sliding barrel until a click is heard. If you do not hear a click, the PENLET II may have been cocked when the Lancet was inserted.
- Page 25 Choose a spot on the side of a different finger each time you take a blood sample. Repeated punctures in the same spot can make your finger sore and calloused. 2. Hold the PENLET ® firmly on the side of the finger to be punctured, with the cap resting on the finger.
- Page 26 Step 4: Remove the Lancet Always use caution when re- moving the Lancet. After the blood glu- cose test, remove the PENLET II cap. Grip the ® dark gray T-shaped prongs. Point the Lancet downward and away from you. Pull back on the dark gray sliding barrel until the Lancet drops out.
-
Page 27: Testing Your Blood
6. TESTING YOUR BLOOD You can test your blood glucose by following these three simple steps: Step 1: Press On/Off Button code10 Step 2: Insert Test Strip insert • • Step 3: Apply blood sample sample Be sure to read the following section carefully... - Page 28 Step-by-step “M” Button “C” Button instructions Choose a clean, dry work surface. Gather together all the materials you will need for a test: ONE TOUCH ® Meter ONE TOUCH ® Test Strips PENLET ® Automatic Blood Sampler (with choice of caps) Sterile Lancet CODE: TEST FOR GLUCOSE...
- Page 29 IMPORTANT: Before testing, the Test Strip Holder and Test Area of the Meter must be clean and lint-free. (See Chapter 8, Cleaning and Maintaining the Meter, for more information.) Check the expiration date on the Test Strip package. If the date has passed, discard the Test Strips and use a new package of Test Strips.
- Page 30 Step 2: Insert Test Strip 1. Remove a Test Strip from the package. Do not touch the white Test Spot (a small white circle in the center of the Strip). If using Strips from a vial, replace the vial cap immediately. If using foil-wrapped Test Strips, be careful not to tear the Strip when opening the foil.
- Page 31 wait will appear on the display for a few moments. Then, apply sample appears on the display, and remains for five minutes or until you apply blood to the Test Spot on the Test Strip. Step 3: sample Apply blood sample 1.
- Page 32 it is pushed back to its original position as quickly as possible. Do not smear the blood on the Test Spot or apply a second drop after the test has begun. Do not remove the Test Strip from the Meter to apply blood.
- Page 33 with MM before the result (or 0–600 mg/dL, the unit of measure used in the United States). Results above 33.3 mmol/L (600 mg/dL) are displayed as high. To select an Event number now, follow the instructions in Chapter 10, Recalling Tests from Meter Memory.
- Page 34 2. Look at the Test Front Side Spot where you applied the blood sample. It should still have a wet, shiny drop which completely fills the circle. If the blood sample has a dull, dry appearance, you may have smeared the sample or not applied enough blood.
-
Page 35: Troubleshooting
7. TROUBLESHOOTING Special display messages during testing If at any time during the test procedure the display reads error or not ok, there is a problem which needs to be corrected: Your blood or Control Solution sample was too small or smeared. enough the test, using a larger, round and shiny drop. - Page 36 The sample was applied error1 before apply sample appeared on the display. retest (See Chapter 6, Testing Your Blood.) There has been an error in error2 the test procedure. Some examples are: retest 1. The Test Strip moved out of the correct position during the test and was not repositioned before the end of the test.
- Page 37 Your Blood, and start over with a new Test Strip. Make sure you are following the instructions carefully. There may be an electronic not ok problem with your Meter. Call the LifeScan Technical Service Department. Canada 1 800 663-5521 U.S.A. 1 800 227-8862...
- Page 38 (See Chapter 3, Checking the System.) If the message continues, clean the Meter. 8, Cleaning and Maintaining the Meter.) For further assistance, call the LifeScan Technical Service Department for more information. Usually indicates a test c 3. 8 done with Control Solution.
- Page 39 What to do if you feel your test result may be wrong: If you follow the instructions in this booklet, you will find that it is easy to get accurate results. If you suspect that you are not getting accurate results, you should do a Check Strip Test and a Control Solution Test to check the Meter operation, Test Strips, and your...
- Page 40 number displayed on the Meter by repeatedly pressing Code Button “C” or holding it down until the correct code appears in the display. (See Chapter 4, Coding the Meter, for more information.) The Test Strips have expired. the expiration date on the Test Strip package.
- Page 41 You may have a special physical condition, such as extreme dehydration, which is affecting your results. Chapter 12, Questions and Answers, for more information.) The Test Strips were stored in an extremely high temperature (above 30°C or 86°F). (See • •...
-
Page 42: Cleaning And Maintaining The Meter
PENLET II cap for each person. For disinfecting information, or an additional Test Strip Holder or PENLET II cap, please call the LifeScan Technical Service Department. Canada 1 800 663-5521 U.S.A. 1 800 227-8862 Your ONE TOUCH II Meter ®... - Page 43 Avoid exposing the Meter or the Test Strips to extremes of temperature or humidity for extended periods of time. For example, avoid leaving the Meter or Test Strips in your car for long periods. Never let your Meter get wet. The Meter could be permanently damaged if water or other liquids get...
- Page 44 3. Perform a Check Strip test by following the instructions in Chapter 3, Checking the System. Cleaning the Meter The Test Strip Holder must be removed for a complete cleaning: • At least once a week, • Whenever the Test Area looks dirty, and •...
- Page 45 Step 2: Clean Test Strip Holder 1. Wash the Test Strip Holder with soap and water. 2. Clean the underside of the Test Strip Holder and check the small hole for any debris. 3. Dry completely with a soft cloth or tissue. Remove any lint.
- Page 46 1. Check the clear protective coating over the Meter optics to make sure it is not scratched or damaged. 2. Use a cotton swab or soft cloth dampened with water to remove all blood, dirt, or lint from the Test Area. If necessary, a mild, liquid dishwashing detergent mixed with water may also...
- Page 47 Step 4: Replace Test Strip Holder 1. Hook the bottom of the Test Strip Holder onto the square notch on the Meter. 2. Place each thumb on the raised dots and push down on top of the Holder until it snaps firmly into place.
- Page 48 Battery Replacement The Meter comes with one J- size (6v) 6-VOLT Duracell ® brand alkaline battery already installed. The battery should last about one year with typical home use. When the battery needs to be replaced, use only a Duracell brand alkaline ®...
- Page 49 When battry appears on the display, the Meter will no longer give results, and you must replace the battery before you can perform another test. A dead battery or battery removal will not affect the information stored in the Meter’s memory, as long as the battery is replaced within 30 days.
- Page 50 3. With your thumb, firmly push the left side of the battery door to the right until it is released from the clasp, as indicated on the door. 4. Completely remove the battery door. • • 5. Remove the old battery and discard properly.
- Page 51 6. To replace the battery door, insert the tab on the right side of the door into the slot in the battery compartment. 7. Swing the left side of the door over the battery, and insert the tab on the left side of the battery door into the slot, by applying pressure with your thumb...
-
Page 52: Setting Date, Time, And Other Special Functions
9. SETTING DATE, TIME, AND OTHER SPECIAL FUNCTIONS Your ONE TOUCH II Meter ® has special functions which enable you to customize the Meter to meet your own special needs. The Meter allows you to: • Set the clock in your Meter so that your blood glucose results will be stored in memory along... - Page 53 • Select AM/PM or 24:00 time. The Meter is set at the factory in AM/PM time. •Select the type of data management system that the Meter will communicate with (described on the fol- lowing pages). The Meter is set at the factory to com- municate in the RS-232 Data Management Mode.
- Page 54 You may also want to customize some of the other features mentioned above, based on your own needs. The following pages de- scribe how to set the date and time, as well as other custom features. To enter the date and time mode: code10...
- Page 55 Using the “M” and “C” Buttons on the top of your Meter, follow the instructions in the chart to set the clock in your Meter. How the Chart Works The “C” Button changes settings. For example, press “C” to change the year from 6.11.93 to 6.11.94. The “M”...
-
Page 56: Setting Date And Time
Setting Date and Time Press and With the Meter release turned off, press (ON/OFF) and hold (C) Month Press (C) flashes to change hold and advance month Press (C) to Hour change hour and hold and advance flashes AM or PM setting mode to minute Release Year... - Page 57 There are several special features you may choose to personalize your ONE TOUCH II Meter. ® The following section will tell you how to set the beep feature, the international options (including language, unit of measure, and date format), and the data management interface.
- Page 58 The Meter is set at the factory to display messages in English. If you wish to change the display to another language, follow the instructions on the chart on page 60. Once a language is selected, all of the Meter messages will be displayed in that language.
- Page 59 Setting the date format (Date Format Mode) Your Meter is set at the factory to display the month, day, and year (in that order) with each blood glucose result stored in the Meter memory (for example: (9 . 2 3 . 9 4). You can set the Meter to display the day, month, and year (23 .
- Page 60 • You may connect the ONE TOUCH II Meter to ® the Data Manager from ™ LifeScan by using the DTA MGR mode. For information on other data management options, call the LifeScan Technical Service Department. Canada 1 800 663-5521 U.S.A.
- Page 61 Using the “M” and “C” Buttons located on top of your meter, follow the directional arrows through the following chart. How the Chart Works The “M” Button advances you from one mode to the next. For example press “M” to advance from the Beep Mode to the Language Mode.
- Page 62 Options, and Data Management Interface Unit of Measure Decimal Point/ Date Format Mode Comma Mode DISPLAYS MONTH-DAY- YEAR DISPLAYS DAY-MONTH- DISPLAYS YEAR DISPLAYS AM/PM/24:00 Data Management Mode Mode Mode 24 HR DISPLAY DISPLAYS 12 HR DISPLAY • • Baud Rate Mode RETURNS BAUD RATE...
-
Page 63: Recalling Tests From Meter Memory
10. RECALLING TESTS FROM METER MEMORY Your ONE TOUCH II Meter ® automatically stores up to 250 test results, the date and time of those results, plus an Event code, if selected. The Meter will not display correct date and time until you set the clock. - Page 64 3. The word memory appears briefly, followed by av 6 . 2 (example) This number is the average of your blood glucose results for the past 14 days. Check Strip and Control Solution results are NOT included in the average. Results above 33.3 mmol/L will read as high and will be calculated into the...
- Page 65 6. Press “M” again, and the result of your most recent test appears, for example: mm 5 . 2 (example) 3 . 9 (example) indicates a Check Strip result. 5 . 8 (example) indicates a Control Solution result. 7. Press “M” again, and - - - - appears indicating the end of the test result record...
- Page 66 Selecting Event numbers You may choose to mark the blood glucose reading with an Event number (1–9). This allows you or your healthcare professional to analyze the trends in your blood glucose readings more easily. You can set up the Event categories to meet your own needs.
- Page 67 Event 7. Readings during illness Event 8. Readings during hypoglycemia symptoms Event 9. Readings during hyperglycemia symptoms You may select an Event number: • After doing a blood test • While reviewing your results from the memory. To enter an Event number: Suppose you want to mark a high test result of 19.2 mmol/L as event9.
- Page 68 A LifeScan Logbook can be obtained from your Authorized LifeScan Distributor, retail pharmacy, or directly from LifeScan.
-
Page 69: Summary Of Display Messages
Other Special Functions.) appears when the On/Off Button is pressed and held. All segments of the display should appear. If any por- tion is missing, call the LifeScan Technical Service Department. Canada 1 800 663-5521 U.S.A. 1 800 227-8862 apply... - Page 70 Recalling Tests from Meter Memory.) battry appears when the battery is too low to perform another test. (See Battery Replace- ment in Chapter 8, Cleaning and Maintaining the Meter.) clean test area appears when the Meter detects that there is dirt, lint, or blood on the Test Area, indicating that it must be cleaned.
- Page 71 error1 retest appears if the sample was applied before apply sample appeared on the display. (See Chapter 6, Testing Your Blood.) error2 retest appears if you made a mistake in the test procedure or if there is a problem with the Meter. (See Chapter 7, Troubleshooting.) enough...
- Page 72 high appears when a test result is above 33.3 mmol/L or 600 mg/dL. (See Chapter 12, Questions and Answers.) Important: a HIGH result indicates severe hyper- glycemia (blood sugar too high); contact your physician immediately. insert strip appears on the display when the Meter is ready for you to insert a Test Strip.
- Page 73 Memory M Button when there are no results stored. not ok appears when there is an electronic problem with your Meter. Call the LifeScan Technical Service Department. Canada 1 800 663-5521 U.S.A. 1 800 227-8862 remove strip...
- Page 74 wait appears while the Meter is performing some internal checks. Wait until apply sample appears to continue. (See Chapter 6, Testing Your Blood.) 45 . . . 0 mm 6 . 3 (example) The Meter counts down from 45 seconds until your result appears.
- Page 75 The second message is the time the test was done (3:21PM). The third message is the result 5.9 mmol/L (MM 5.9) as shown here in mmol/L. The fourth message means an Event number was selected for this particular result (Event 6). (See Chapter 10, Recalling Tests from Meter Memory.) 3 .
-
Page 76: Questions And Answers
In the following pages, we’ve provided answers to some of the most common questions people have about home blood glucose monitoring and the ONE TOUCH have a question that isn’t covered here, consult your healthcare professional or call the LifeScan Technical Service Department. Canada U.S.A. - Page 77 What clinical information should a healthcare professional be aware of when using the ONE TOUCH II Meter? ® For use in hospitals, institutions, and clinics, refer to the ONE TOUCH ® Blood Glucose Monitoring System Manual-Hospital Programs. The ONE TOUCH II Meter is not intended for monitoring neonatal whole blood samples.
- Page 78 Test results can also indicate whether your diabetes is changing in ways that might require an adjustment in your treatment program. Always consult your healthcare professional before making changes in your diabetes control plan. How often should I test my blood glucose? This is best decided by you and your healthcare professional.
- Page 79 blood. Touch the drop of blood lightly to the middle of the Test Spot to fill the entire spot. The drop of blood should have a shiny surface over the entire spot. Do not smear the blood or touch the Test Spot with your finger.
- Page 80 What should I do if test results seem unusually low or high? First, troubleshoot by eliminating any of these potential problems: Clean your Meter Test Strip Holder and most importantly, the Test Area. (See Chapter 8, Cleaning and Maintaining the Meter.) Inspect the Test Spot on the Test Strip to be sure the drop of blood covered it...
- Page 81 “How do I feel?” “Do I have symptoms of low blood sugar (hypoglycemia) or high blood sugar (hyperglycemia)?” “What have I eaten?” “How much exercise have I had?” “Am I ill?” (i.e., common cold, flu, etc.) In addition to the common factors listed above which cause real variations in blood glucose results, there...
- Page 82 factors which could lead to severe dehydration: • Vomiting and diarrhea • Prescription drugs, e.g., diuretics • Inability to recognize or respond to “thirst” sensations • Sustained uncontrolled diabetes Whenever inadequate fluid intake or excessive water loss occurs, CONSULT A PHYSICIAN IMMEDIATELY.
- Page 83 glucose values for your individual treatment plan should be determined with your healthcare professional. If your blood glucose test results remain consistently high, contact your health- care professional. What are the expected blood glucose values associated with well- controlled diabetes? Fasting: 3.3–7.2 mmol/L (60–130 mg/dL).
- Page 84 4:311–318. 5 Clarke WL, et al: Diabetes Care (1987) 10:622–628. 6 Gadsen RH: Challenges in Diabetes Management. Milpitas CA., LifeScan, Inc. (1988) 63–66. 7 Caraway WT: Carbohydrates, in Tietz NW (ed). Fundamentals of Clinical Chemistry. Philadelphia, WB Saunders Company (1976) 242–244.
-
Page 85: Specifications
13. SPECIFICATIONS Performance Characteristics: See ONE TOUCH Test ® Strip package insert for ONE TOUCH II System ® accuracy and precision. Power Supply: One Duracell brand ® alkaline battery, (J-size, 6 volts, part #7K67) included with Meter. Use only a Duracell battery ®... -
Page 86: Guarantee And Warranty
If, at any time during the first five years after you buy the Meter, it does not work for any reason (except for obvious abuse), LifeScan will replace it with a new Meter or equivalent product free of any charge. - Page 87 Meter or Test Strips are changed or modified in any way. 5. Before you return your Meter for warranty replacement, call your LifeScan Technical Representative at the toll- free number listed on the back of this booklet for detailed instructions. AW 051-568-53A...