
Related Manuals for Life Fitness X7


Summary of Contents for Life Fitness X7
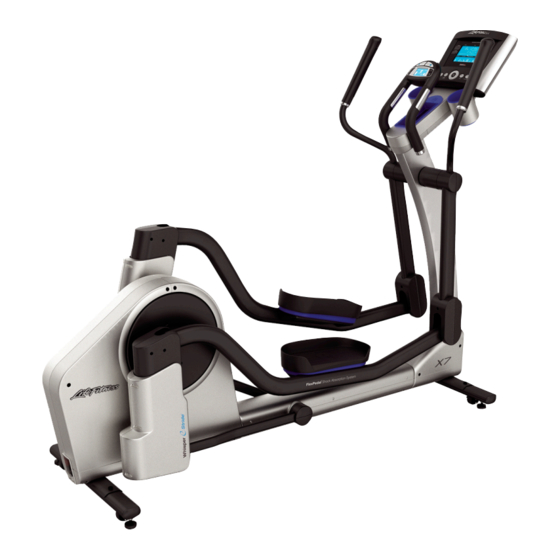
- Page 1 X7 T O T A L - B O D Y E L L I P T I C A L C R O S S - T R A I N E R A S S E M B L Y a n d U S E R...
- Page 2 LIFE FITNESS ASIA PACIFIC LTD Room 2610, Miramar Tower 132 Nathan Road Tsimshatsui, Kowloon HONG KONG LIFE FITNESS ATLANTIC BV LIFE FITNESS BENELUX Bijdorpplein 25 - 31 2992 LB Barendrecht THE NETHERLANDS LIFE FITNESS DO BRAZIL Av. Dr. Dib Sauaia Neto 1478...
-
Page 3: Introduction
ELCOME AFETY Thank you for purchasing a Life Fitness Cross-Trainer. Before using this product, please read this user manual in its entirety to ensure that you have the knowledge to safely and properly operate all of the features of your Cross-Trainer. - Page 4 See Section 9, titled Specifications page in this manual for product-specific features. Statement of Purpose: The Life Fitness Cross-Trainer is an exercise machine that combines low-impact elliptical pedal- ing with push/pull arm motion to provide an efficient, effective total body workout.
-
Page 5: Table Of Contents
ABLE OF ONTENTS Introduction ................2 Welcome/Safety/Caution . - Page 6 Not Authorized // Effect Of U.S. State Laws // Warranty Periods © 2007 Life Fitness, a division of Brunswick Corporation. All rights reserved. Life Fitness is a registered trademark of Brunswick Corporation. Any use of these trademark, without the express written consent of Life Fitness is forbidden.
-
Page 7: Important Safety Instructions
Use caution when mounting or dismounting the Cross-Trainer. While exercising, always hold onto the user arms or sta- tionaary handle-bar. • Never operate a Life Fitness product if it has been dropped, damaged, or even partially immersed in water. Contact Life Fitness Customer Support Services. •... - Page 8 Keep hands and feet away from all moving parts. • To ensure proper functioning of this product, do not install attachments or accessories that are not provided or rec- ommended by Life Fitness. • Use this product in a well-ventilated area.
- Page 9 • Close supervision is necessary when this appliance is used by, on, or near children, invalids, or disabled persons. • Use this appliance only for its intended use as described in this manual. Do not used attachments not recommended by the manufacturer. •...
- Page 10 ROUNDING NSTRUCTIONS This product must be grounded. If it should malfunction or breakdown, grounding provides a path of least resistance for electric current to reduce the risk of electric shock. This product is equipped with a cord having an equipment- grounding conductor and a grounding plug.
-
Page 11: Assembly Instructions
SSEMBLY NSTRUCTIONS Parts List:... - Page 13 Tools Needed: 6mm Allen Wrench (Included), 17mm Socket Wrench, Phillips Screwdriver Step 1 Packaging Parts: None Remove all packaging and place main components to the side of the box. Break box down in each of the four corners. Step 2 Assemble the Stabilizers Parts: Hardware Bag #1 Tools: 6mm Allen Head Wrench (Included)
- Page 14 Step 3 Assemble the Console Upright Parts: Hardware Bag #2 Tools: 17mm Socket Wrench The console upright tube (C) is pre-assembled with one bolt so that you can simply lift the upright into place by pivoting upward. Hold the upright in place and install three 74mm Long Hex Head Bolts (2) into the side of the main bracket (D).
- Page 15 Step 5 Assemble the Rocker Arms; Moving Arm Pivot Covers Parts: Hardware Bag #3 Tools: 17mm Socket Wrench, Phillips Screwdriver Slide one large flat washer (4) and one wave washer (5) onto the user right pivot shaft (F). Slide the washers fully over the pivot shaft until seated against the pre-installed stop ring (G).
- Page 16 Step 6 Assemble Moving Arms to Pedal Arms; Pedal / Moving Arm Joint Pivot Covers Parts: Hardware Bag #4 Tools: 17mm Socket Wrench, Phillips Screwdriver Lift the front end of the user left pedal lever (K) to meet the left rocker arm clevis (L).
- Page 17 Step 7 Assemble Front Base Shroud; Console Bracket to the Upright Parts: Hardware Bag #5 Tools: Phillips Screwdriver, 17mm Socket Wrench Position the left side base shroud (N) over the metal bracket (O) and screw in with four 12mm Long Black Phillips Head Screws (12). Repeat for the right side base shroud.
- Page 18 Step 8 Connect all Console Wiring; Console to Console Bracket; Back Plastic Shell Parts: Hardware Bag #6 Tools: Phillips Screwdriver Position the console (Q) close to the console bracket (P) and follow the below instructions to connect all wiring. Plug cables into the back of the display console: Plug the 10-pin connector at the end of the upper wire harness into the 10-pin connector (10P) in the back of the display console.
-
Page 19: Initial Setup
NITIAL ETUP Read the entire User Manual before setting up the exercise bike. HERE TO LACE THE ROSS After following all safety instructions move the cross-trainer to the place where it will be used. See specifications for full dimensions if needed. The cross-trainer is equipped with front and rear wheels so that it is simple to push or pull the cross-trainer to its final desti- nation. - Page 20 ROSS RAINER Your Life Fitness cross-trainer may come with either a U.S. power supply or one of several international power supplies. Insert the appropriate power adapter jack into the connector (B) on the back of the cross-trainer. Then insert the plug into the wall outlet.
-
Page 21: Main Features
IFFERENT The X7 has 7 different stride lengths from 18 inches to 24 inches. While it is fine for all size users to utilize any of the stride lengths, research has shown that shorter users may prefer a shorter stride length while taller users may prefer a longer stride length. -
Page 22: Flexpedal™ Shock Absorption System
EART The X7 includes hand pulse sensors on the stationary handle bar that are a built-in heart rate monitoring system. During a workout grasp the hand pulse sensors to monitor your heart rate. If your console comes equipped with a heart rate chest strap we recommend using it during workouts and using the hand pulse sensors to only to occasionally monitor your heart rate when not using the chest strap. -
Page 23: Activity Zone
CTIVITY The X7 activity zone places the most used keys and display attributes closer to the user so that it is more convenient to make adjustments during a workout. Think of the activity zone as cruise control settings on your car's steering wheel. -
Page 24: Stride Length Functionality
TRIDE ENGTH UNCTIONALITY RESS The stride up and down keys can be pressed any time the machine is on. The stride up and down keys are used to adjust the length of the stride from 18 inches to 24 inches. The stride length can be adjusted in one inch increments so there are 7 total adjustments (18", 19", 20", 21", 22", 23", 24"). -
Page 25: Key Press // Display Changes 5.2 Resistance Level & Intensity Level Functionality
& I ESISTANCE EVEL RESS The resistance level up and down keys will ONLY function after a workout has been selected and started on the main console. The level keys control the actual brake resistance level (1-20) during a quick start or manual workout and an overall difficulty level (1-20 with corresponding ranges for each level) when in the programs random, hill, ez incline, &... -
Page 26: Leg Sculptor Mode Functionality
CULPTOR RESS The Leg Sculptor Mode key is used to turn the mode on or off. It can be pressed at any time; although it is recommend- ed to use Leg Sculptor mode after a workout has been selected. See the Leg Sculptor Mode section for more detailed information. -
Page 27: Leg Sculptor Mode
CULPTOR Leg Sculptor is a mode designed to work all lower body leg muscle groups by automatically adjusting the stride length. The Leg Sculptor Mode key is located on the upper-left portion of the activity zone. Press the Leg Sculptor mode key once to activate the mode and twice to deactivate the mode. Leg Sculptor mode can be overlaid on any workout. -
Page 28: Settings Menu
ETTINGS The settings menu contains setup options to customize the use of your machine. The options included within the set- tings menu are Contrast (CO), Units (Un), Language (LA), and Audio (AU). Since the display does not have any mes- saging capability the abbreviations CO, Un, LA, and AU are used in the digital stride display area. - Page 29 XITING THE ETTINGS The settings menu is exited upon scrolling past the last settings option. Press the Leg Sculptor key on the final settings menu option, Sleep (SL), to exit the settings menu. In addition, if there is no key press after 20 seconds in the Sleep (SL) option the settings menu will be exited.
-
Page 30: Settings Menu Options
In summary if you would like to turn all sound on/off make sure to turn the audio on/off on the main console and X7 activity zone display. See the main console user manual for steps on turning audio on/off on the main console. - Page 31 LEEP Sleep mode turns the activity zone backlight off. When sleep mode is turned ON the display lighting is programmed to turn off after 5 minutes with no pedaling or no key press. Once you decide to use the machine you can simply begin pedaling or press the stride up or stride down keys to wake the display and turn the LCD backlight on.
- Page 32 ONTRAST Contrast is the difference between the appearance of the on and off graphics of the LCD display. If the illuminated graphics are difficult to see or read the contrast can be adjusted in the settings menu. There are three contrast adjust- ments, LOW, MID, &...
- Page 33 NITS The unit option allows you to change the stride length units from inches to centimeters or vice versa. Follow the below instructions to adjust units. UNIT ADJUSTMENT INSTRUCTIONS Step 1. Press and hold the Leg Sculptor Key for three plus seconds then press the Stride Down Key. Step 2.
- Page 34 ANGUAGE The language option allows you to change the text for INTENSITY and STRIDE to the same translated terms in the German language. Follow the below instructions to adjust the language. LANGUAGE ADJUSTMENT INSTRUCTIONS Step 1. Press and hold the Leg Sculptor Key for three plus seconds then press the Stride Down Key. Step 2.
-
Page 35: Service & Product Maintenance
& P ERVICE RODUCT ROUBLESHOOTING OWER Check to see that the power cord is fully plugged into the back of the cross-trainer and into the wall. Make sure the power switch is turned on and that the power cord is fully seated into the back of the cross-trainer. ULSE ENSORS Hand pulse sensors can work differently with different body types. - Page 36 TRIDE ENGTH DJUSTMENT Turn the power off on the cross-trainer. Turn the power back on after 30 seconds and try the stride adjustment again. TRIDE ENGTH IS UTOMATICALLY Check to see if the Leg Sculptor mode is turned on. When on, the Icon Leg Sculptor key is illuminated. Leg Sculptor automatically adjusts the stride every 2 minutes during a workout.
- Page 37 CTIVITY AKES When the activity zone wakes up from sleep mode the stride length adjust to the last stride position used before sleep mode was entered. Sleep mode is a setting that turns the display backlight off to save power and LCD life. It is preset to 5 minutes.
- Page 38 TART ESISTANCE EEMS Turn the unit off and then on again. EEL A ESISTANCE The resistance curve of the cross-trainer is designed so that you can feel a greater difference in resistance at higher levels. E1 - E4 RRORS Error codes E1 through E4 indicate an issue with the stride motor reaching the home position. Turn the unit off and then back on again to return the motors to their home position.
-
Page 39: Preventative Maintenance Tips
REVENTATIVE AINTENANCE The safety of the cross-trainer can be maintained only if the equipment is examined regularly for damage or wear. If maintenance is required, keep the equipment out of use until defective parts are repaired or replaced. Pay special atten- tion to parts that are subject to wear outlined in the Preventative Maintenance Schedule. -
Page 40: How To Obtain Product Service
FAX: (+44) 1353.666018 Telephone: (+43) 1615.7198 FAX: (+43) 1615.7198.20 Life Fitness Atlantic BV Life Fitness Benelux Life Fitness Asia Pacific Ltd Telephone: +31 (0) 180 64 66 66 Telephone: (+852) 2891.6677 FAX: +31 (0) 180 64 66 99 FAX: (+852) 2575.6001... -
Page 41: Specifications
PECIFICATIONS Designed Use: Max User Weight: Resistance System: Stride Length: Activity Zone User Controls: Contact Heart Rate: FlexPedal™ Shock Absorption System: Accessories: Power Supply: ASSEMBLED DIMENSIONS Length 83 inches / 211 centimeters Width 26 inches / 66 centimeters Height 63 inches / 160 centimeters Weight 250 pounds / 113 kilograms SHIPPING DIMENSIONS:... -
Page 42: Warranty Information
WHO PAYS SHIPPING & INSURANCE FOR SERVICE: If the Product or any warranted part must be returned to a service facility for repairs, Life Fitness will pay all shipping and insurance charges during the warranty period (within the United States only). The purchaser is responsible for shipping and insurance charges after the warranty has expired. - Page 43 Product as specified in the Manual; notify Customer Service of any defect within 10 days after discov- ery of the defect; if instructed, return any defective part for replacement or, if necessary, the entire Product for repair. Life Fitness reserves the right to decide whether or not a product is to be returned for repair.
- Page 44 CHANGES IN WARRANTY NOT AUTHORIZED: No one is authorized to change, modify or extend the terms of this limited warranty. EFFECT OF U.S. STATE LAWS: This warranty gives you specific legal rights and you may have other rights which vary from state to state. WARRANTY PERIODS:MODEL LIFETIME...
- Page 45 Life Fitness offers a full line of premier fitness equipment for the home. T O T A L - B O D Y E L L I P T I C A L C R O S S - T R A I N E R S | T R E A D M I L L S | L I F E C Y C L E E X E R C I S E B I K E S ®...