
Related Manuals for Black & Decker Spacemaker SCM1000BD


Summary of Contents for Black & Decker Spacemaker SCM1000BD
- Page 1 SPACEMAKER 1 2 -C UP P R OG R A MMA B L E U NDER T H E C A B I N E T CO FF E E MA KE R Use & Care Manual S C M10 0 0 BD...
- Page 2 Should you have any questions or concerns with your new product, please call our Customer Service Line at 1-800-231-9786 (US and Canada). Please do not return to the store.
-
Page 3: Important Safeguards
PLEASE READ AND SAVE THIS USE AND CARE BOOK. IMPORTANT SAFEGUARDS. When using electrical appliances, always follow basic safety precautions to reduce the risk of fire, electric shock, and/or injury, including the following: • Do not use this appliance for anything other •... -
Page 4: Table Of Contents
WELCOME! Congratulations on your purchase of the Black+Decker SpaceMaker™ 12 Cup Programmable Coffeemaker. We have developed this guide to ensure optimal product performance and your complete satisfaction. Save this use and care manual and be sure to register your appliance online at www.prodprotect.com/applica. -
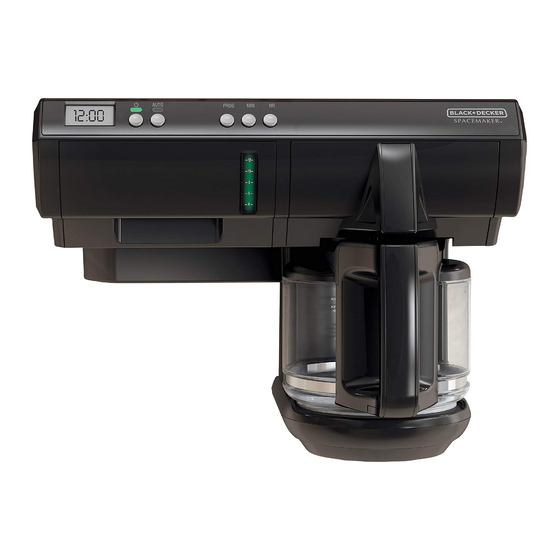
Page 5: Getting To Know Your Coffeemaker
G E T T ING TO KN OW YO UR SPACEMAKER 12 CUP PROGRAMMABLE COFFEEMAKER ™ Brew basket (not shown) Sneak-A-Cup™ interrupt feature Digital display Glass carafe with lid Control panel Keep hot carafe plate Cord management hook (not shown) Illuminated water reservoir with water-level markings 10. -
Page 6: Installation Hardware
MOU NT ING SCREWS SPACERS WASHERS • Mounting Parts You will also need: (Part # SDC-MOUNTING KIT) • Tape 16 Spacers • Ruler ⁄ " ⁄ " • Electric drill with a ⁄ ” drill bit and ⁄ " ⁄ ”... -
Page 7: Installing Your Spacemaker
IN STAL L I N G YOUR SPAC EMA KER ™ G E T T I NG STARTE D • Carefully unpack your coffeemaker, removing all packaging materials, labels and/or stickers, and the plastic band around the power plug. • Register your product at www.prodprotect.com/applica •... -
Page 8: Standard Installation For Flat Cabinets
STANDARD INSTALLATION FOR FLAT CABINETS ONLY Important: Always wear protective glasses or goggles to prevent injury when drilling. Important: Do not align screw holes on the template directly under the partition between cabinets, as this will prevent you from installing the appliance properly. - Page 9 Important: Always ensure you are drilling straight up or straight down through the marked mounting holes on the template. Drilling at an angle may prevent proper installation and may damage cabinets if the drill bit pierces the partition. 8. Using a ⁄...
-
Page 10: Programming Your Coffemaker
15. Pull out cord from cord storage behind the appliance and plug into a standard electrical outlet. Extra cord can be fed back into storage or hung over cord management hook behind the appliance. (L) Note: If you are connecting this appliance to the receptacle of another SpaceMaker ™... -
Page 11: Auto Brew Delay
AC TI VATI N G THE AUTO BREW D ELAY Ensure the Auto Brew delay time has been set (see “SETTING THE AUTO BREW DELAY” section for assistance). Press the AUTO button once. The word “AUTO” will appear and the LED light above the AUTO button will illuminate. -
Page 12: Brewing Coffee
BR E W I NG COFF E E Fill water reservoir with desired amount of fresh, cool water using water markings on water reservoir window. Do not exceed the maximum marked level. Replace water reservoir into coffeemaker. Be sure it snaps into place securely. Remove the brew basket and place an empty 8-12 cup basket style paper filter into it. -
Page 13: Care And Cleaning
CA RE A N D C LEA N IN G CLEANING: Follow the directions below to clean your coffeemaker after each use. 1. Make sure your coffeemaker is unplugged and cool. 2. Open your coffeemaker’s filter basket lid and remove the brew basket. 3. -
Page 14: Troubleshooting
TR OU B L E SHOOTI N G PROBLEM POSSIBLE CAUSE SOLUTION Coffeemaker Coffeemaker is Check to be sure appliance is does not turn on. not plugged in. plugged into a working outlet and the ON/OFF (I/O) button has been pressed. Coffeemaker is Water reservoir Make sure the water reservoir... -
Page 15: Warranty And Customer Service Information
NE ED H EL P? For support or any questions regarding your appliance, call the appropriate 800 number listed within this section. Please DO NOT return the product to the place of purchase. Also, please DO NOT mail product back to manufacturer, nor bring it to a service center. - Page 16 © 2014 The Black & Decker Corporation and Spectrum Brands, Inc., Middleton, WI 53562 Made in People’s Republic of China T22-5001377 BLACK+DECKER and the BLACK+DECKER logo are trademarks of 2014/9/16/119 The Black & Decker Corporation and are used under license. All rights reserved.