Table of Contents
Advertisement
Advertisement
Table of Contents

Related Manuals for La Crosse Technology WS-7014U


Summary of Contents for La Crosse Technology WS-7014U
- Page 1 WS-7014U Wireless 433 MHz Radio-controlled Weather Station Instruction Manual...
-
Page 2: Table Of Contents
TABLE OF CONTENTS Topic Inventory of Contents/Additional Equipment About WWVB Quick Set-Up Guide Detailed Set-Up Guide Battery Installation Program Mode Function Keys 12/24 hour Time Setting Time Zone Setting Daylight Saving Time Setting Time Setting (WWVB & Manual) Setting Day, Date, and Year Selecting °F or °C Setting the LCD Contrast Features... -
Page 3: Inventory Of Contents/Additional Equipment
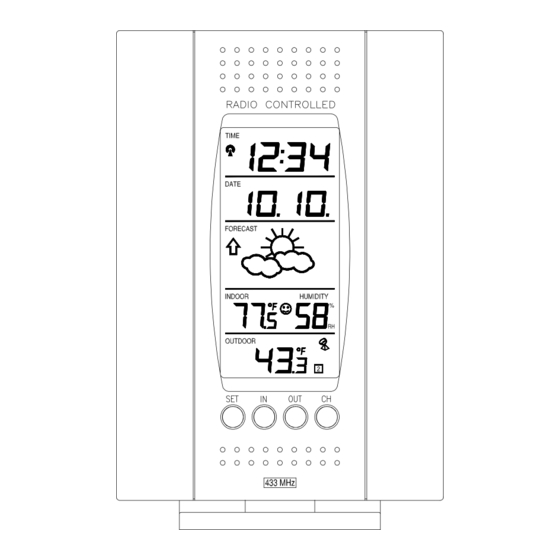
INVENTORY OF CONTENTS 1. The Weather Station (Figure 1). 2. One TX6U Remote Control Sender with mounting bracket (Figure 2). 3. Three each, ½” Philips screws. 4. One strip double-sided adhesive tape. 5. Instruction Manual and Warranty Card. Time LCD Date LCD Forecast LCD Indoor LCD... -
Page 4: Quick Set-Up Guide
QUICK SET-UP GUIDE Hint: Use good quality Alkaline Batteries and avoid rechargeable batteries. 1. Have the indoor station and outdoor remote 3 to 5 apart. 2. Batteries should be out of both units for 10 minutes. 3. Place the batteries into the outdoor remote first then into the indoor station. -
Page 5: Detailed Set-Up Guide
DETAILED SET-UP GUIDE I. BATTERY INSTALLATION A. REMOTE CONTROL SENDER 1. Remove the mounting bracket. bracket snaps on and off easily. 2. Remove the battery cover, by sliding the cover down. 3. Observing the correct polarity install 2 AA batteries. The batteries will fit tightly (to avoid start-up problems make sure they do not spring free). - Page 6 correct time (default time-zone is Eastern). You will need to adjust the time zone to match your local time.
-
Page 7: Program Mode
PROGRAM MODE Programming Note: If 30 seconds is allowed to pass, or either the IN or the OUT buttons are pressed during programming modes the unit will confirm/set the last information entered—the display will stop flashing and return to normal time-date readings. If you don’t leave the program mode during the programming of sections III through VIII, you can advance to step 3 of the next program setting. -
Page 8: Daylight Saving Time Setting
3. Select your appropriate time zone using the CH button. During selection of the Time Zone, the 3 letter abbreviations for the time zones found in North America will flash across the top of the TIME LCD. Observe the chart below, showing the corresponding abbreviations, time zones, and codes. -
Page 9: Time Setting (Wwvb & Manual)
5. Press and release the SET button to confirm and advance to the Time setting mode. V. TIME There are two methods by which the time and date can be set: A) Automatically via WWVB reception, or B) Manually. A. WWVB (Remote Control Time) This method requires you to do nothing, except wait for the signal to be received, and to select a time zone. -
Page 10: Setting Day, Date, And Year
5. The minute digits should be flashing. Press the CH button to change the minutes—increasing the minutes by increments of 1 with each press of the CH button. 6. Press and release the SET button to confirm the minutes and to advance to the Day, Date, and Year setting mode. -
Page 11: Selecting °F Or °C
7. The numeric-day will be flashing, use the CH button to set the current day. 8. Press and release the SET button to confirm and to enter the year setting mode. 9. The default-year will be flashing, use the CH to set the appropriate year. -
Page 12: Weather Forecast Icons
The weather forecasting feature is estimated to be 75% accurate. The weather forecast is based solely upon the change of air pressure over time. The WS-7014U averages past air-pressure readings to provide an accurate forecast—creating a necessity to disregard all weather forecasting for 12-24 hours after the unit has been set-up, reset, or moved from one altitude to another (i.e. -
Page 13: Indoor Temperature, Humidity, & Comfort
Sunny—indicates that the weather is expected to improve (not that the weather will be sunny). Sun with Clouds—indicates that the weather is expected to be fair (not that the weather will be sunny with clouds). Clouds with Rain—indicates that the weather is expected to get worse (not that the weather will be rainy). -
Page 14: Outdoor Temperatures
VI—Adding Outdoor Remote Control Senders). IV. MINIMUM AND MAXIMUM TEMPERATURE RECORDS The WS-7014U keeps a record of the MINIMUM and MAXIMUM temperature, and the time and date of their occurrence—for both the indoor and outdoor modes. -
Page 15: Adding Outdoor Remote Control Senders
V. ADDING OUTDOOR REMOTE CONTROL SENDERS (OPTIONAL) The WS-7014U is able to receive signals from 3 different Remote Control Senders. The Remote Control Sender model(s) that you choose will come with their own set of instructions—follow these instructions for a complete guide to setting up. - Page 16 Note: When setting up multiple units it is important to remove the batteries from all existing units in operation, then to insert batteries first into all the Remote Control Sender units, and in numeric sequence. Second install batteries into the Indoor Temperature Station. Transmission problems will arise if this is not done correctly and if the total time for set-up exceeds 6 minutes.
-
Page 17: (Set-Up, Viewing, & Operation) Mounting
MOUNTING Note: Before permanently mounting ensure that the Indoor Temperature Station is able to receive WWVB signals from the desired location. Also, extreme and sudden changes in temperature will decrease the accuracy of the Weather Station, and changes in elevation will result with inaccurate weather forecasting for the next 12 to 24 hours. - Page 18 B. MOUNTING WITH ADHESIVE TAPE 1) With a nonabrasive solution, clean and dry the back of the mounting bracket and the mounting surface to ensure a secure hold. The mounting surface should be smooth and flat. 2) Remove the protective strip from one side of the tape.
-
Page 20: Troubleshooting
TROUBLESHOOTING NOTE: For problems not solved, please contact La Crosse Technology. Problem: No reception of WWVB time signal. Solution: 1) Wait overnight for signal. 2) Be sure Weather Station is at least 6 feet from any electrical devices, such as televisions, computers, or other radio-controlled clocks. - Page 21 • Do not submerge in water. • Immediately remove all low powered batteries to avoid leakage and damage. • Opening the casings invalidates the warranty. Do not try to repair the unit. Contact La Crosse Technology for repairs.
-
Page 22: Maintenance & Care
SPECIFICATIONS Temperature measuring range: Indoor: Outdoor: Indoor relative humidity measuring range: Indoor Temperature checking interval: Indoor Humidity checking interval: Outdoor Temperature checking interval (Remote Control Sender): Outdoor Temperature reception (Weather Station): Transmission Range: Power Supply: Weather Station: Temperature Sensor: Battery life cycle: Recommended battery type: Dimensions (L x W x H) Weather Station (without... - Page 23 La Crosse Technology, Ltd or La Crosse Technology, Ltd’s authorized service center. La Crosse Technology, Ltd will repair or replace this product, at our option and at no charge as stipulated herein, with new or reconditioned parts or products if found to be defective during the limited warranty period specified above.
-
Page 24: Warranty Information
State. Some States do no allow the exclusion of consequential or incidental damages therefore the above exclusion of limitation may not apply to you. For warranty work, technical support, or information contact: La Crosse Technology 2809 Losey Blvd. S. La Crosse, WI 54601 Phone: 608.782.1610...