Table of Contents
Advertisement
Quick Links
Configuring General Settings for
the EN-4000
T
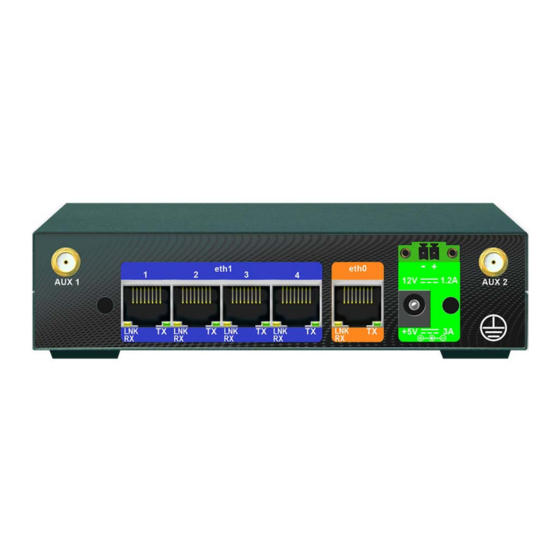
he EN-4000 is the newest member of Encore Networks' family of routers. It
provides wireless and cabled connections to a local area network (LAN) and to
peripheral devices and remote devices.
Follow the procedures in this discussion to configure the EN-4000:
•
Using the EN-4000's Management System
•
Navigating the EN-4000's Management System
•
Basic Configuration
•
Configuration for the Network
Also see the following documents:
•
Configuring Chassis Ports in the EN-4000
•
Configuring the EN-4000's Serial Ports
•
Configuring a MultiWAN for the EN-4000
4.1
Using the
See the following discussions in this document:
•
Connecting to the EN-4000
•
Logging In
•
Ending the Session
4.1.1 Connecting to the EN-4000
The EN-4000's management system displays in a browser window. A management
terminal (a computer) connects to the EN-4000. That management terminal can run
on any platform (for example, a Windows, Mac, or Linux platform) that supports a
web browser.
For information on trademarks, safety, limitations
of liability, and similar topics, see
http://www.encorenetworks.com/disclaimer.htm.
EN-4000
's Management System
EN-4000™ Reference Manual
Document 4
Version A.3, August 2014
© 2014 Encore Networks, Inc.
All rights reserved.
Go to Table
of Contents
Advertisement
Table of Contents

Related Manuals for Encore EN-4000


Summary of Contents for Encore EN-4000
- Page 1 Document 4 Configuring General Settings for the EN-4000 he EN-4000 is the newest member of Encore Networks’ family of routers. It provides wireless and cabled connections to a local area network (LAN) and to peripheral devices and remote devices. Follow the procedures in this discussion to configure the EN-4000: •...
- Page 2 LAN ports. Devices connected to those LAN ports see the gateway address 192.168.1.1 representing the EN-4000. The EN-4000’s WAN port (also on the rear panel) is on a separate network from its LAN ports. The EN-4000’s WAN port is a DHCP client, by default.
- Page 3 ❖ The EN-4000 Log-In Screen is redisplayed, without a message to enable JavaScript. Type your user name and password in the appropriate fields of the EN-4000 Log-In Screen. Use the default log-in values: • The default user name is root.
- Page 4 (Figure 4-5). This screen provides an overview of the EN-4000’s status. Note: If the EN-4000’s WAN port is connected to a network, you may see the WAN port’s assigned IP address. (The WAN port is a DHCP client.) In Figure 4-5, the IP address assigned to the WAN port is 192.168.101.109.
- Page 5 You can select this button to turn automatic screen refreshment on or off. To manage your EN-4000, do the following: a To set values for the EN-4000’s IP address and other parameters, see Navigating the EN-4000’s Management System.
-
Page 6: Saving Or Discarding Changes
EN-4000 configuration screens. You can use them as described below: • Select the Save & Apply button to save changes that take effect immediately. • Select the Save button to save changes that will take effect after the EN-4000 is rebooted. - Page 7 EN-4000 chassis has been restarted. 4.2.2 Restarting (Rebooting) the EN-4000 There may be times when the EN-4000 needs to be restarted. We recommend using the menu system to restart the EN-4000, because that provides a controlled approach to restarting.
-
Page 8: Ending The Session
Contents Figure 4-12. EN-4000 Log-In Screen 4.2.3 Ending the Session When you wish to log out, select the Logout tab. ❖ The system logs out, and the EN-4000 Log-In Screen is redisplayed (recall Figure 4-12). Basic Configuration Basic configuration includes assigning the EN-4000 its IP address, device name, and similar items. - Page 9 Configuring General Settings for the EN-4000 Page 4-9 of Contents 4.3.2 Configuring the Management System Language To set the language used for the EN-4000 management system, do the following: a Select the System management area tab. b Then select the System configuration area tab.
- Page 10 On the System Screen for General Settings, you can set a unique name for this EN-4000. You can also set its local time, and you can set a hierarchy of network time protocol (NTP) servers for synchronizing the EN-4000’s time of day.
-
Page 11: Configuring System Logging
Select the arrow on the right of the Timezone field to pull down a list of major cities in each time zone. In the pulldown menu, select the time zone the EN-4000 will use (usually the closest city in your time zone). Then select the Save & Apply button. - Page 12 ◆ Note: To set time-of-day synchronization, see Synchronizing the EN-4000’s Time of Day. 4.3.5 Synchronizing the EN-4000’s Time of Day Do both of the following, in the order listed here: • Configure the time-of-day options by Configuring Time-of-Day Synchronization. • Select one of the configured options by Selecting Time-of-Day Synchronization.
- Page 13 Under Hostname, type a name for an NTP server. Note: This entry can be an IP address or a website URL. ii Under Port, type the port number the EN-4000 will use to reach the NTP server. b If you need to add an NTP server, click on the Add button.
- Page 14 Select Save & Apply if you want the settings to take effect immediately. b Select Save if you want the settings to take effect after the EN-4000 reboots. c Select Reset if you want to discard the screen’s configuration and use the previous settings.
- Page 15 (substep a If the EN-4000 will provide the time of day, select the box to Provide NTP Server. b In most cases, the EN-4000 will receive the time of day. In those cases: i Select the box to Enable NTP Client.
- Page 16 If you wish to save the configuration and use it immediately, select Save and Apply. ii If you wish to save the configuration, but not to use it until the EN-4000 is restarted, select Save. iii If you wish to discard the configuration, select Reset.
- Page 17 Go to Table Configuring General Settings for the EN-4000 Page 4-17 of Contents Figure 4-22. DHCP and DNS General Settings Screen When you have finished configuring the fields on this screen, select the Save button. Then select the tab for Resolv and Hosts Files.
- Page 18 Go to Table Page 4-18 EN-4000™ Reference Manual, Document 4 of Contents Figure 4-23. DHCP and DNS Resolv and Hosts Files Screen When you have finished configuring the fields on this screen, select the Save button. Then select the tab for TFTP Settings.
-
Page 19: Network Hosts
If you wish to save the configuration and use it immediately, select Save and Apply. b If you wish to save the configuration, but not to use it until the EN-4000 is restarted, select Save. c If you wish to discard the configuration, select Reset. - Page 20 If you wish to save the configuration and use it immediately, select Save and Apply. ii If you wish to save the configuration, but not to use it until the EN-4000 is restarted, select Save. iii If you wish to discard the configuration, select Reset.
- Page 21 If you wish to save the configuration and use it immediately, select Save and Apply. b If you wish to save the configuration, but not to use it until the EN-4000 is restarted, select Save. c If you wish to discard the configuration, select Reset.
-
Page 22: Firewall Configuration
Go to Table Page 4-22 EN-4000™ Reference Manual, Document 4 of Contents 4.4.4 Firewall Configuration Get all firewall configuration settings from your network administrator. Select the Network tab. Then select the Firewall tab. If necessary, select the General Settings tab. - Page 23 Go to Table Configuring General Settings for the EN-4000 Page 4-23 of Contents Figure 4-31. Firewall General Settings Screen to Add Record After configuring the fields on the screen, select the Save & Apply button. Then select the tab for Port Forwards.
- Page 24 Go to Table Page 4-24 EN-4000™ Reference Manual, Document 4 of Contents Figure 4-33. Firewall Traffic Rules Screen After configuring the fields on the screen, select the Save & Apply button. Then select the tab for Custom Rules. ❖ The Firewall Custom Rules Screen is displayed (Figure 4-34).
- Page 25 If you wish to save the configuration and use it immediately, select Save and Apply. b If you wish to save the configuration, but not to use it until the EN-4000 is restarted, select Save. c If you wish to discard the configuration, select Reset.
-
Page 26: Configuring Traffic Priority
If you wish to save the configuration and use it immediately, select Save and Apply. b If you wish to save the configuration, but not to use it until the EN-4000 is restarted, select Save. c If you wish to discard the configuration, select Reset.