Kodak ESP 9 User Manual
Kodak all in one printer user manual
Hide thumbs
Also See for ESP 9:
- Start here manual (17 pages) ,
- User manual (141 pages) ,
- Start here manual (164 pages)

Related Manuals for Kodak ESP 9


Summary of Contents for Kodak ESP 9
- Page 1 Kodak ESP 9 All-in-One Printer All-in-One Printer print copy scan User Guide User Guide...
- Page 2 Eastman Kodak Company Rochester, NY 14650 © Eastman Kodak Company, 2010 Kodak is a trademark of Eastman Kodak Company. The Bluetooth® word mark and logos are owned by the Bluetooth SIG, Inc., and any use of such marks is under license.
-
Page 3: Table Of Contents
Contacting Kodak Customer Service & Support...2 Support at Kodak.com...2 2 Printer Overview All-in-One Printer features... 3 Major components of the ESP 9 All-in-One printer... 3 Support for connecting digital memory devices to the printer ...5 Memory card slots ...5 Memory cards supported...5 USB host port...6... - Page 4 Setting up the fax... 34 Telephone service delivery systems and All–in–One fax features ... 34 Using cordless telephones with the ESP 9 All–in–One fax ...36 Using voice–messaging services with the ESP 9 All–in–One fax ...36 Using an answering machine with the ESP 9 All–in–One fax...37 Connecting the phone and fax ...37...
- Page 5 Editing an existing Fax Phonebook entry... 72 Deleting an existing Fax Phonebook entry... 72 Preparing a fax for transmission ... 72 Printing a fax cover page ...73 Changing send fax settings ...73 Fax reports... 75 Printing a fax report ... 75 www.kodak.com/go/aiosupport Table of contents...
- Page 6 Picture will not print... 98 Poor print quality ... 98 Print skewed or slanted ... 99 Print spotted ... 99 Print too dark ... 100 Print too light ... 100 Printing slow ... 100 Printing stops... 100 White edges on borderless prints...101 www.kodak.com/go/aiosupport...
- Page 7 FCC and Industry Canada...121 IC Radiation Exposure Statement...121 Canadian DOC Statement...121 European Compliance Statement...121 German Compliance Statement ...121 Waste Electrical and Electronic Equipment Labeling...122 Declaration of Conformity...123 Glossary Appendix A: If You Need to Call Customer Support www.kodak.com/go/aiosupport Table of contents...
-
Page 9: Getting Help
This user guide helps you learn to operate your All-in-One printer from the control panel. Kodak also provides online help in the Home Center software installed when you set up your printer, and helpful information about common tasks from the LCD screen on the printer control panel. -
Page 10: Getting Answers To Frequently-Asked Questions
Getting answers to frequently-asked questions Chapter 10 , Troubleshooting printing, copying, scanning, and configuring the wireless service on your printer. Contacting Kodak Customer Service & Support Kodak provides several resources to help you answer questions about your printer. Support at Kodak.com Support All-in-One printer... -
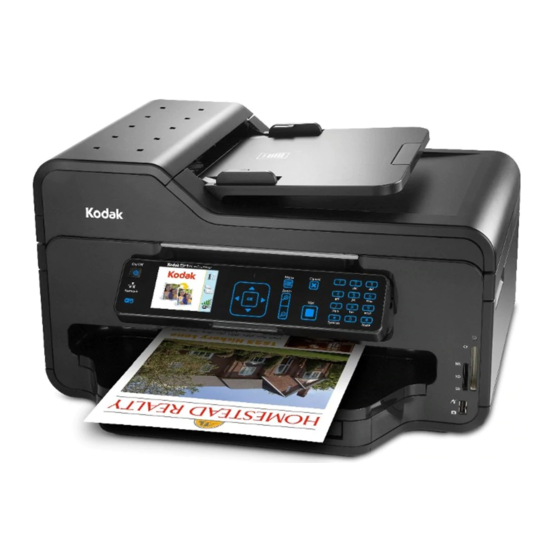
Page 11: Printer Overview
Printer Overview The Kodak ESP 9 All-in-One printer allows you to print, copy, scan, and fax images and documents. Although many functions can be operated directly from the control panel, you may also print, store, and manage digital images from a Windows or Macintosh computer connected to the printer via Kodak’s All-in-One printer Home... - Page 12 Automatic document feeder (ADF) Power cord connection port Ports for connecting printer to the computer or Ethernet Two-sided printing accessory Scanner glass Paper output tray extender Rear-access cleanout area Printer access door Recessed handle for printer access door Printhead www.kodak.com/go/aiosupport...
-
Page 13: Support For Connecting Digital Memory Devices To The Printer
A blue light, located above the memory card slots, blinks while the card is being accessed and stays lit while the card remains in the slot and the printer is on. Memory cards supported The Kodak ESP 9 All-in-One printer supports the following memory cards, used in most digital cameras: – XD xD-Picture Card –... -
Page 14: Usb Host Port
NOTE: This printer can read only one memory card OR one portable USB drive OR Control panel layout The legend describing the numbered parts of the control panel illustration is in the table below. one Kodak Bluetooth dongle at a time. www.kodak.com/go/aiosupport... - Page 15 Starts the following operations: copy, scan, print, fax, maintenance tasks, and file transfer. Adjusting the control panel position, page 9 and lowering the control panel so that it is easier to use. www.kodak.com/go/aiosupport Kodak ESP 9 All-in-One printer Description for instructions on raising...
-
Page 16: Lcd Screen
The Start Up screen also displays the current level of black and color ink. The first time you use your Kodak ESP 9 All-in-One printer and press the Menu button (described in menu displays on the LCD screen. -
Page 17: Using The Control Panel
About the “touch-sense” buttons on the control panel The ESP 9 All–in–One printer features flat-panel buttons that do not depress when pushed, as in a traditional keyboard or calculator keypad. Each button on the control panel responds to the pressure of your finger and performs a specific action based on the task you are working on. -
Page 18: Using The 4-Way Navigation Buttons
Using this feature does not change the number of files stored on your camera or portable USB drive, however. on the control panel scrolls through the choices. www.kodak.com/go/aiosupport Using the OK button, page causes the visible page to be replaced... -
Page 19: Using The Ok Button
(Images already selected will not be affected.) Press and hold OK again to deselect all images. www.kodak.com/go/aiosupport Kodak ESP 9 All-in-One printer Using or the button allows you to scroll... -
Page 20: Using The Zoom Buttons
Using the number keypad buttons The number keypad is used primarily as a resource for sending faxes from the ESP 9 All–in–One printer. It is also used to enter a quantity for making copies. -
Page 21: Using The On-Screen Keyboard
As on a telephone dial pad, which the number keypad resembles, each key on the ESP 9 number keypad (except for the 1 key and the zero key) is associated with both a numerical value and with either three or four alphabetic characters, with typographic symbols, or with symbols and a space (used to separate two alphanumeric characters). -
Page 22: Using The All-In-One Printer Menus
Use the menus on the LCD screen to select stand-alone tasks (that is, tasks that can be performed without your computer), such as copying documents or photos; printing photos stored on memory cards, USB drives, Kodak Bluetooth adapter (“dongle”), or digital cameras plugged into the printer; or sending a fax. -
Page 23: Menu Structure
You can review details about each menu available in your All-in-One printer using the information below: Description or the symbols indicates the active setting only when Using the 4-way navigation buttons, page www.kodak.com/go/aiosupport Kodak ESP 9 All-in-One printer button on the control panel. See are pressed, the selected menu Using the... -
Page 24: Status Lights
Most power supplies used with this ESP All-in-One printer are equipped with a status light which illuminates when electricity is applied. If you cannot determine if the power supply is working properly, contact Kodak Service & Support for assistance. When you press... - Page 25 A memory card is properly inserted in the card slot. www.kodak.com/go/aiosupport Kodak ESP 9 All-in-One printer Action / Solution Reconnect the printer power cord plug to the printer. Reconnect the cord to the electrical outlet.
- Page 26 The Wi-Fi radio is turned on and there is a working connection between the printer and a wireless network. www.kodak.com/go/aiosupport Action / Solution None. None, unless you want to stop the connection process. If so, turn the Wi-Fi radio off.
-
Page 27: All-In-One Printer Home Center Software
Wi-Fi network, the light will resume blinking, and the error message will display again. All-in-One printer Home Center software Kodak Home Center software is installed on your computer during the setup process. The software functionality for Windows or Macintosh users is described below. -
Page 28: Home Center For Macintosh
• Run a printhead nozzle correction • Clean the printhead • Click About this Printer to view the printer model number, its Kodak Service Number, and the version of printer firmware used to operate the printer From both the Setup and Maintenance and tabs you can: •... -
Page 29: Setting Up Your Printer
Setting Up Your Printer Use this chapter to set up and start using your Kodak All-in-One printer. Selecting a printer location Place your printer on a clean, flat surface in a dry, well-ventilated location, away from direct sunlight. Avoid areas with high levels of dust and debris. Do not expose the printer and paper to ventilation ducts, open doors, or high traffic, as airborne particles can affect picture quality. -
Page 30: Printer Settings Options
English (U.S.) English (International) Deutsch Français Français (Canada) Italiano Español Castellano Português Nederlands www.kodak.com/go/aiosupport Settings 2007 - 2099 January - December 1 - 31 0 - 12 or 0 - 23 00 - 59 1-4 hours, in .5 hour increments... - Page 31 Setting the date and time via the control panel is a separate task from stamping the date and time on photo prints. You can also synchronize the printer's date and time using the Home Center software. www.kodak.com/go/aiosupport Kodak ESP 9 All-in-One printer Options Settings...
-
Page 32: Setting Your Kodak Printer As The Default
For Windows XP 1. Click Start , point to Settings , and then double-click Printers and Faxes . 2. Right-click the icon for the Kodak ESP 9 printer, and then select Set as the Default Printer on the shortcut menu. -
Page 33: Configuring A Wireless Network Connection
The LED has a repetitive cycle of blinking, then resting for 15 seconds, followed by blinking again. The Wi-Fi radio will continue to attempt connection to the network until a connection is established. www.kodak.com/go/aiosupport Kodak ESP 9 All-in-One printer Description... -
Page 34: What You Need To Know Before You Connect
Setting Up Your Printer What you need to know before you connect To connect your ESP 9 All-in-One printer to a wireless network, you will need the following: • A laptop or desktop computer equipped with a network interface card or wireless networking support, and the Kodak software installed •... -
Page 35: Wi-Fi Setup Wizard
As appropriate, press on the control panel until you locate the network you want to use. www.kodak.com/go/aiosupport Kodak ESP 9 All-in-One printer Settings / Action (page up) on the control... - Page 36 OK . Security String 5 or 13 ASCI characters; case-insensitive 10 or 26 Hexidecimal digits; case-insensitive 8-63 printable ASCI characters; case-sensitive www.kodak.com/go/aiosupport to select a key. Press OK . Description...
- Page 37 Select <BKSP> to erase any incorrect characters. Then select DONE and press OK . www.kodak.com/go/aiosupport Kodak ESP 9 All-in-One printer Description to select a key. Enter the alphanumeric...
-
Page 38: Setting Up An Ip Address
Under Internet and Network , click Network . Select the Wireless Network . Your IP address will be shown. Address or Subnet Mask Format 149.89.138.149 149.2.40.149 Tip : Your Gateway Address is usually the router address. www.kodak.com/go/aiosupport Printer Entry Format 149. 089 .138.149 149. 002 . 040 .149... -
Page 39: Verifying Network Configuration
Verifying network configuration You can verify that you are connected to a network from your ESP 9 All-in-One printer menu. 1. Press 2. Press you select this menu item, the printer displays the configuration settings for both Ethernet and Wi-Fi networks on the LCD screen. -
Page 40: Switching The Printer Connection Type
5. Press 6. Select View Network Configuration and confirm you have an IP address. 7. Run the Kodak Printer Network Setup Utility. This is located on the Start > All Programs > Kodak > Kodak Printer Network Setup Utility. 8. Select Connect via Network - Wireless / Wi-Fi , then click Next to proceed. The printer should be detected and driver installations begin. -
Page 41: For Macintosh
Network printers are labeled “Bonjour” under “Kind”. 7. The printer will be named Kodak ESP 9-XXXX, where XXXX is a number unique to your printer. 8. Select your printer and click Add . -
Page 42: Setting Up The Fax
Setting Up Your Printer 4. The printer will be named Kodak ESP 9-XXXX, where XXXX is a number unique to your printer. 5. Select your printer and click Add . Wi-Fi to Ethernet To convert the Wi-Fi connection from a Macintosh to an Ethernet connection: 1. - Page 43 By connecting the telephone cable that came with your printer to the computer or cable modem and also to the ESP 9, your printer can successfully send and receive faxes over this type of telephone system.
-
Page 44: Using Cordless Telephones With The Esp 9 All-In-One Fax
Setting Up Your Printer Your telephones will not work without the installation of the DSL filter. Using cordless telephones with the ESP 9 All–in–One fax Cordless telephones, which connect to a digital, standard, or DSL telephone system, can be used with your All-in-One printer. To do so, you must connect the base station of your telephone (i.e., the cradle which connects your phone to the wall... -
Page 45: Using An Answering Machine With The Esp 9 All-In-One Fax
Using an answering machine with the ESP 9 All–in–One fax If you use an answering machine to retrieve and record messages from telephone callers when you are not available to pick up the handset, you can set up your telephone to work with both the answering machine and the printer. - Page 46 Rings to Answer settings on your All-in-One printer. If you are using a dedicated telephone line to send or receive faxes over your digital telephone service. www.kodak.com/go/aiosupport Specifying rings to...
- Page 47 1. Obtain a DSL filter from your DSL provider. 2. Connect the one end of the phone cord supplied with your Kodak ESP 9 All–in–One printer to the open port on the DSL filter, and the other to the printer port labeled Line-In .When the phone rings your printer is set to answer...
-
Page 48: Specifying Rings To Answer
Set the number of rings-to-answer for the printer to exceed the number rings set for the answering machine. NOTE: This ESP 9 All–in–One printer allows you to specify the rings–to–answer Setting fax auto–answer When set to On , the All–in–One printer accepts incoming fax transmissions automatically, based on the number set in rings–to–answer (see... -
Page 49: Manually Receiving Fax
By using the distinctive ring feature on the ESP 9 All-in-One printer, when the printer detects the ring pattern specified for incoming faxes, it will automatically answer the call and receive the fax. -
Page 50: Configuring Fax Settings
Always After Failure Only Press OK , then press Start Press OK , then press Start Press OK , then press Start Press to switch setting between Tone/Pulse Press to switch setting On/Off www.kodak.com/go/aiosupport All-in-One printer Home Center Fax Phonebook... - Page 51 OK . 4. As needed, press sender name and telephone numbers. 5. As needed, press 6. Press OK to save the setting(s). www.kodak.com/go/aiosupport Kodak ESP 9 All-in-One printer to set the desired sub-setting, as in configuring your to change the setting.
-
Page 52: Handling Paper
T-shirt transfers, envelopes, cards, and labels. It automatically detects the size and whether or not photo paper is loaded into the paper tray. Kodak photo paper contains barcodes that allow your All-in-One printer to detect the paper type that optimizes your photo prints. -
Page 53: Loading Plain Paper
Loading plain paper NOTE: Review The automatic document feeder (ADF) on the ESP 9 only accepts plain paper. 1. Pull the bottom paper tray toward you. NOTE: To load media that is more than A4 size, such as 4X12 inch panoramic photo a. -
Page 54: Loading Photo Paper
Loading photo paper NOTE: Review The automatic document feeder (ADF) on the ESP 9 only accepts plain paper. If you try to run photo paper through it, the printer displays an error message on the LCD screen, and the printer will not complete the job. -
Page 55: Loading Envelopes
2. Press and hold the paper tray extension-release, located on the inside of the front of the bottom paper tray. WARNING: Do not load envelopes with cutouts or cellophane windows in this printer. Things to keep in mind, page www.kodak.com/go/aiosupport Kodak ESP 9 All-in-One printer... -
Page 56: Loading Originals
Loading an original for copying or scanning To copy or scan a document or photo, place your original directly on the scanner glass, print side-down, against the silver arrow on the right-front corner or in the automatic document feeder (ADF). www.kodak.com/go/aiosupport... -
Page 57: Loading An Original For Faxing
Do NOT use the automatic document feeder for scanning. paper, you can place the original on the scanner glass. See original for copying or scanning, page www.kodak.com/go/aiosupport Kodak ESP 9 All-in-One printer Loading an... -
Page 58: Viewing And Printing Photos
Never load photo paper into the automatic document feeder (ADF) on the ESP 9; the ADF only accepts plain paper. If you load photo paper in the ADF, the printer displays a warning on the LCD screen and will not complete the job. -
Page 59: Configuring Photo Print Settings
OK . to change the setting. until View Photos is selected in the Print Photos menu, www.kodak.com/go/aiosupport Kodak ESP 9 All-in-One printer Configuring printer Printing tagged images, page 53, as... -
Page 60: Print Photos Options
USB connected devices. The default is On . The default setting does not print the date on the photo print. View Settings / Select www.kodak.com/go/aiosupport Settings 1- 99 Top Tray Bottom Tray 3.5x5... -
Page 61: Printing Photos
Use your computer to explore the files stored on the flash drive while it is still plugged in. Navigate to and open the file in the computer, or transfer the file(s) to the computer hard drive. Then, print the file from your computer. www.kodak.com/go/aiosupport Kodak ESP 9 All-in-One printer... - Page 62 If a to select the value you want. until you view another photo you want to print. www.kodak.com/go/aiosupport until a photo you want to print is displayed until the number you symbols in the row, press until View Photos is selected.
-
Page 63: Printing Tagged Images
When you select photos with your camera, the camera creates a DPOF file that identifies which photos have been tagged for printing. Your Kodak All-in-One printer can read the DPOF file from the memory card so you do not have to re-select the photos to print. -
Page 64: Printing Multiple Photos
Bluetooth device to the printer. Your printer supports connectivity to one Bluetooth device at a time. For the highest transfer speed, Kodak recommends keeping a maximum distance of 10 meters (32.8 feet) between Bluetooth devices, as they may not work reliably beyond this range. - Page 65 Press OK . 9. Press until you view another photo you want to print. www.kodak.com/go/aiosupport Kodak ESP 9 All-in-One printer navigation buttons on the control panel to display the Transferring images to a computer, symbols in the row, press until View Photos is selected.
-
Page 66: Transferring Images To A Computer
Transferring images to a computer You can transfer .jpg, .mov, or .wav files to your Windows or Macintosh computer from a digital camera, memory card, device connected to your printer via a Kodak Bluetooth dongle, and portable (USB) thumb drive connected to this All-in-One printer. -
Page 67: Copying
NOTE: Before using your All-in-One printer to copy a document or photo for the Simple copying NOTE: Copy Document is the first setting on your Kodak All–in–One printer. This 1. Place the original (document or photo) face down at the right front corner of the scanner glass or face up in the automatic document feeder (ADF). -
Page 68: Copy Document Options
Produces the highest quality for all paper and eliminates the banding (striping) effect that sometimes occurs in Draft and Normal modes. Best is the slowest print speed. If Kodak photo paper is loaded in the paper tray, this setting is used. -
Page 69: Copy Photo Options
Automatic setting. To review the settings for plain paper copying, see “Plain Paper Quality” under Copy Document options, page View Settings / Select www.kodak.com/go/aiosupport Kodak ESP 9 All-in-One printer Settings 1- 99 4x7 (High Def) 4x12 (Panoramic) 8x10 8.5x11... -
Page 70: Scanning
Scanning converts text and images from documents and pictures placed on the scanner glass into electronic data, and then sends the data to your computer. To scan using the ESP 9 All-in-One printer, the printer must be connected to a computer. You can scan to the following destinations: •... -
Page 71: Simple Scanning
5. Note that the default Scan What setting is Document . 6. Press which application on the computer will open the file. Kodak Home Center software appears on the list by default. 7. Press Start . 8. When the Scanner dialog window displays on your computer, follow the prompts to finish the scanning process. -
Page 72: Scanning Multiple Originals Simultaneously
6. Press Start to initiate the scan. The available scan settings are in the following table: CAUTION: until Scan is selected. until the option you want to adjust is selected. If a value www.kodak.com/go/aiosupport symbols in the row, press until Save as Defaults is to select... -
Page 73: Scan Options
Scan Destination settings. Each application will appear as a separate setting in the display. (Kodak Home Center software is displayed by default; you do not need to configure your destinations to include it.) In addition, before using a Scan Destination setting of File , familiarize yourself with the location where the files will be saved and with the file naming setting. -
Page 74: Faxing
Faxing Introduction Your Kodak ESP 9 All-in-One printer allows you to send and receive faxes (including color faxes), assign and use quick dial settings for frequently used fax recipients, and select a number of fax options from the control panel. -
Page 75: Dialing A Fax Number On The Control Panel
For example, if you press 123 , the LCD screen displays all entries starting with 123 . to select Send Fax and then press OK . www.kodak.com/go/aiosupport Kodak ESP 9 All-in-One printer Preparing a fax for transmission, until the... -
Page 76: Using Quick Dial To Select A Fax Phonebook Entry
Using quick dial to select a fax phonebook entry By assigning up to ten contacts in your Fax Phonebook with a number between 0 (zero) and 9, the Quick Dial feature in your ESP 9 All-in-One printer allows you to create shortcuts for quickly sending Faxes to them NOTE: To configure a fax recipient as a Quick Dial entry, review There are two ways to use the Quick Dial feature for sending faxes. - Page 77 Send Fax and then press OK . example, press 8 to specify the entry assigned the Quick Dial value of “08.” See the illustration below. www.kodak.com/go/aiosupport Kodak ESP 9 All-in-One printer Preparing a fax for transmission, until the...
-
Page 78: Canceling Faxes
NOTE: If the phone used to receive faxes uses a voice-messaging service provided Fax reports, page Setting up the fax, page by your telephone service provider, you may not be able to receive faxes automatically. Review Setting up the fax, page company for additional information as needed. www.kodak.com/go/aiosupport 34. Contact your telephone... -
Page 79: Fax Phonebook Entries
Use the BKSP key to erase an incorrect entry. Select the Done key when you are finished, and then press OK . to select DONE when the entry is complete, and press OK . www.kodak.com/go/aiosupport Kodak ESP 9 All-in-One printer to select highlight Quick... -
Page 80: Editing An Existing Fax Phonebook Entry
Settings menu. to select Delete Entry and press OK . to select the desired Phonebook entry and press OK . entry displayed or cancel to go back to select an entry to delete. www.kodak.com/go/aiosupport Loading an original for faxing, page... -
Page 81: Printing A Fax Cover Page
Never load photo paper into the automatic document feeder (ADF) on the ESP 9; the ADF only accepts plain paper. If you load photo paper in the ADF, the printer displays a warning on the LCD screen, and will not send the Fax. - Page 82 Selecting a fax recipient from the fax phonebook, page 67 Using quick dial to select a fax phonebook entry, page 68 Menu Options View Settings / Select www.kodak.com/go/aiosupport Fax Phonebook entries, page 71 to select Save as 73. Otherwise, use one of the following...
-
Page 83: Fax Reports
4. Press 5. As appropriate, press setting. NOTE: This report cannot be run from the control panel; the ESP 9 will output this 6. Press only) is selected. NOTE: The option to Print Fax Cover Page is also available in the Fax Settings menu;... -
Page 84: Maintaining Your Printer
Maintaining Your Printer Your Kodak ESP 9 All-in-One printer requires little maintenance. However, Kodak recommends cleaning the scanner glass and lid backing regularly to remove dust and fingerprints. Fingerprints and other debris on the glass or lid backing could slow down the printer’s performance, and affect the quality and accuracy of scanning. -
Page 85: Cleaning The Scanner Lid
Cleaning the scanner lid Minor debris can accumulate on the document backing located underneath the scanner lid of the Kodak printer. 1. Unplug the printer and raise the lid. 2. Clean the underside with a soft cloth or sponge, slightly moistened with a mild soap and warm water. -
Page 86: Monitoring And Adjusting The Printer's Performance
For example, you can check the status of the printer’s inkjet nozzle to ensure high-quality prints. Kodak recommends that you run a nozzle check if you are experiencing changes in image quality. You can also use the Printhead Alignment function if you see degradation in print quality. -
Page 87: Replacing Ink Cartridges
Replacing ink cartridges Your Kodak printer uses separate black and color ink cartridges. The ink levels are shown on the control panel and in the printer software. For the best quality prints, store ink cartridges in locations where the temperature does not exceed 85°F (30°C). - Page 88 NOTE: You can take your used ink cartridges to most office supply or electronics 4. Open the box containing the new ink cartridge. stores for safe disposal. www.kodak.com/go/aiosupport 1 Printhead 2 Color ink cartridge 3 Black ink cartridge...
- Page 89 Insert the ink cartridge immediately to prevent any drying of the ink. 6. Remove the orange cap from the cartridge by grasping the top edge and pulling/rotating it off the ink cartridge. Discard the orange cap. 7. Insert the ink cartridge into the printhead. www.kodak.com/go/aiosupport Kodak ESP 9 All-in-One printer...
-
Page 90: Replacing The Printhead
The printhead moves to an accessible position for handling the ink cartridges. The ink cartridges are seated in the printhead. into place in the printhead. This seats the cartridges properly, and prevents ink from being dispensed incompletely during your print or copy jobs. www.kodak.com/go/aiosupport... - Page 91 Remove both ink cartridges. CAUTION: Insert the ink cartridges into the newly installed printhead as soon as possible to prevent any drying of the ink. www.kodak.com/go/aiosupport Kodak ESP 9 All-in-One printer 1 Printhead 2 Color ink cartridge 3 Black ink cartridge...
- Page 92 Maintaining Your Printer 4. Unlatch the printhead by lifting the rectangular latch on the top of the printhead. 5. Remove the old printhead from the carriage. 6. Remove the new printhead from its bag. www.kodak.com/go/aiosupport...
- Page 93 Kodak ESP 9 All-in-One printer CAUTION: Do not touch copper contacts on the printhead, as this may damage it. 7. Remove and discard the black plastic casing and the orange protective cap. 8. Place the new printhead into the carriage.
- Page 94 10. Reinstall the ink cartridges. As needed, see 11. Close the printer access door. The printer should now complete a printhead calibration to ensure that it is ready to for normal operation. www.kodak.com/go/aiosupport Replacing ink cartridges, page Listen carefully during this step;...
-
Page 95: Upgrading The Printer Software - For Windows
3. A pop-up window appears at the bottom right corner of your computer monitor stating “Found New Hardware KODAK ESP 9 AIO,” then it will change to “Found New Hardware. Your new hardware is installed and ready to use.”... -
Page 96: Upgrading The Printer Software - For Macintosh
17. Download the firmware. 18. Double-click on the *.dmg file. 19. Double-click on Kodak AiO Updater . 20. Upon completion of the install, click Quit . The printer firmware is updated. connected via a network or Wi-Fi. Your All-in-One printer must be connected to the computer with a USB cable in order to perform a firmware upgrade. -
Page 97: Troubleshooting
Use the Help window to view troubleshooting topics. (Windows users can also select Troubleshoot from the Help panel on the main Home Center window.) • You can also get troubleshooting help at the Kodak Web site. Visit www.kodak.com/go/support NOTE: Many issues with degradation in performance or print quality can be... -
Page 98: Device Not Recognized
If none of the above corrects the problem, contact Kodak support. Device not recognized Probable Cause Any of the following can prevent your Kodak All-in-One printer from reading a connected device (digital camera, USB drive, or memory card). • The camera is turned OFF. -
Page 99: Ink Cartridge Not Recognized
4. Press OK . Multiple pictures not scanned properly When scanning or copying, the Kodak printer can detect multiple images on the scanner glass, straighten them, and create individual files. If you are having trouble with this feature, check the following: Probable Cause Your photos are not placed optimally on the scanner glass. -
Page 100: No Communication With Computer
Scan the photos again in the appropriate format. No communication with computer Probable Cause Your Kodak printer is not connected to your computer. Corrective Action • Make sure your printer is plugged in and turned on. • Make sure you are using the proper USB cable (USB 2.0). -
Page 101: No Paper Feed
CAUTION: One or more of the colors on the calibration sheet is missing, page 93 illustrated instructions for performing this procedure. If this does not resolve your printing issue, contact Kodak Service and Support. www.kodak.com/go/aiosupport Kodak ESP 9 All-in-One printer... -
Page 102: Printer Not Responding
Troubleshooting Kodak Inkjet paper is recommended for your Kodak All-in-One printer. Corrective Action 1. Remove the paper from the tray you used when the jam occurred. 2. Turn off the printer. 3. Open the rear access area and pull the paper out from the rollers without tearing If the paper tears while removing it, make sure you remove all the torn pieces. -
Page 103: User Guide On The Cd Is Obsolete
Probable Cause The User Guide has been updated since the software CD was released. Corrective Action • Download the most recent version of the User Guide from Kodak.com. Wrong paper size Probable Cause The print size or paper size you selected may be larger or smaller than the paper found in the paper tray. -
Page 104: Home Center Software On Windows Works Incorrectly Following Software Upgrade
2. Straighten the stack of envelopes against a flat surface. Reload the stack into the paper tray print side down, with the envelope flap aligned to the left. 3. Squeeze the paper guide and slide it to the right until it touches the edge of the envelopes. www.kodak.com/go/aiosupport... -
Page 105: Pictbridge Camera Not Detected
2. In the Control Panel window, open Printers or Printers and Faxes. order 3. In the Windows Explorer window, right-click on the Kodak All-in-One printer in the Name column, and then select Printing Preferences . 4. On the Printing Preferences window, select Print last page first on the General tab. -
Page 106: Picture Cropped
Probable Cause 2 The image file may not be in JPEG format. Corrective Action The Kodak printer can print only JPEG files in stand-alone mode. Connect the printer to a computer and use software to print other image formats. Poor print quality Probable Cause Low resolution image file or the printer may need maintenance. -
Page 107: Print Skewed Or Slanted
Print skewed or slanted Probable Cause 1 The paper is not properly loaded in the tray. Kodak Inkjet paper is recommended for your Kodak All-in-One printer. Corrective Action Realign the paper in the paper tray. 1. Remove paper and check for wrinkles and tears. -
Page 108: Print Too Dark
• Adjust the exposure compensation on your camera and try taking the picture again. Refer to your camera user’s guide for details. • Edit the picture using Kodak Home Center (Windows only) or other image editing software. • Make sure the printer is not placed in direct sunlight or is not operating in a high-temperature environment. -
Page 109: White Edges On Borderless Prints
Copy cut off Probable Cause The original is larger than the paper loaded. Corrective Action When the original is larger than the paper loaded, reduce copy size to fit the size of the paper loaded. www.kodak.com/go/aiosupport Kodak ESP 9 All-in-One printer... -
Page 110: Scan Troubleshooting
Turn on your computer. Probable Cause 2 Your Kodak printer is not connected to your computer. Corrective Action Connect your Kodak printer to your computer with a standard USB cable. Probable Cause 3 The Kodak Home Center software is not installed. Corrective Action Insert the Kodak printer installation CD and install the software. -
Page 111: Network Troubleshooting
Check the two Ethernet indicator lights on the top and bottom of the RJ-45 Ethernet To see if you have an jack on the back of the printer. The lights indicate the following: active network connection www.kodak.com/go/aiosupport Kodak ESP 9 All-in-One printer... - Page 112 If this light is a solid green, the device is properly connected to the network, and communications have been established. If the top light is off, there is no network connection. This yellow light flashes when data is being sent or received by the device over the network. www.kodak.com/go/aiosupport...
- Page 113 (C:\Program Files\Kodak\Printer\Center\AiOHomeCenter.exe) Please visit www.kodak.com/go/inkjetnetworking adding these firewall permissions for the Kodak printer network services for 20 of the top rated firewall security programs on the market. Please also visit your firewall Manufacturer’s online help Web site if necessary. More advanced network users may also choose to allow inbound and outbound port...
- Page 114 DHCP or router, you must use AutoIP to assign IP addresses to the other computers and to the printer. until Network Settings is highlighted, and then press OK . until Print Network Configuration is highlighted, and then press OK . www.kodak.com/go/aiosupport...
-
Page 115: Wireless Troubleshooting
2.4 GHz. You can verify this on your wireless desktop or laptop computer by viewing sporadic signal bars in your Wi-Fi status utility. Repositioning your computer away from these sources of signal interference can improve your computer network performance. For example: wireless computer. www.kodak.com/go/aiosupport Kodak ESP 9 All-in-One printer... - Page 116 Corrective Action • If there is a long distance between your computer or access point and the printer, move them closer together. Wi-Fi All-in-One printer. to scroll to the bottom of the list. Infrastructure entries are listed first and www.kodak.com/go/aiosupport...
- Page 117 Change either the device or access point settings so that both the printer and the access point have matching wireless settings. Probable Cause 6 You entered the wrong mode (ad hoc or infrastructure) or security type. page 111. www.kodak.com/go/aiosupport Kodak ESP 9 All-in-One printer...
- Page 118 Unsupported authentication or encryption type Probable Cause Your network is configured with an authentication protocol not supported by the Kodak All-in-One printer. Corrective Action Open the Embedded Web Server of your access point and change the security settings. Use one of the supported protocol types.
- Page 119 Another device in the vicinity connected to your access point before the All-in-One printer was able to connect. Corrective Action Cancel the setup and start over. first WEP key (index 1) when setting up your wireless network. www.kodak.com/go/aiosupport Kodak ESP 9 All-in-One printer...
-
Page 120: Product And Safety Specifications
Product and Safety Specifications Specifications for this Kodak ESP All-in-One printer are described in the tables below. Print Performance Black print speed Color print speed Print technology Print quality modes Photo Printing Features Quantity Print sizes Quality Auto-detect media Image enhancement... -
Page 121: Copy Document Features
US Letter (8.5 x 11 inch) (22 x 28 cm) A4 (21 x 30 cm) Normal, Best, and Draft – 3 to + 3 Scanning Features Contact Image Sensor (CIS) type scanner 8.5 × 11.7 in. (21.6 × 29.7 cm) Segmentation scanning Auto-destination www.kodak.com/go/aiosupport Kodak ESP 9 All-in-One printer... -
Page 122: Paper Tray Features
(MS, XD, SD, SDHC, and CF), PictBridge-enabled digital still cameras, and Bluetooth® Technology-enabled imaging devices JPEG (EXIF V2.2) (progressive JPEG format not supported) AVI, MOV and WAV (transfer only) One front host port (full speed), one rear device port (high speed) www.kodak.com/go/aiosupport... -
Page 123: Software Support
Full IQ environmental range Warranty Product Printhead Software Support Third-party image management applications or Kodak EasyShare Software for photos; optical character reader (OCR) support for documents Plain paper, photo paper, envelopes, greeting cards, transparencies, labels, t-shirt transfers TWAIN and WIA import, including EasyShare Software,... -
Page 124: System Requirements
PowerMac or Powerbook G3, G4; iMac; eMac; or iBook 2 GHz 512 MB RAM 200 MB available USB 2.0 CD-ROM Internet access capability www.kodak.com/go/aiosupport Recommended Microsoft Windows Vista 32- or 64-bit processor 2 GHz 1024 MB RAM 500 MB available USB 2.0... -
Page 125: Papers Supported
C6 (4.49 x 6.38 in.) (114 x 162 mm) A2 (4.37 x 5.75 in.) (111 x 146 mm) DL (designated long) (4.33 x 8.66 in.) (110 x 220 mm) US #10 (4.12 x 9.5 in.) (105 x 241 mm) www.kodak.com/go/aiosupport Kodak ESP 9 All-in-One printer... -
Page 126: Safety Specifications
Product and Safety Specifications Photo Greeting card Safety Specifications • Read and follow these cautions and warnings before using Kodak products. • Always follow basic safety procedures. • Follow all warnings and instructions marked on the Kodak All-in-One printer. Parts Do not disassemble this product;... -
Page 127: Location
CAUTION: WARNING: Pushing objects through the equipment openings can result in an electric shock or fire. CAUTION: WARNING: The use of an accessory not recommended by Kodak could cause fire, an electric shock, or injury. CAUTION: CAUTION: WARNING: Do not place your printer on an unstable cart, stand, bracket, or table;... -
Page 128: Regulatory Compliance
When using the Bluetooth interface with a Kodak printer, the transmitter must not be collocated or operated in conjunction with any other antenna or transmitter. -
Page 129: Fcc And Industry Canada
Observation des normes-Class B—Cet appareil numérique de la classe B est conforme à la norme NMB-003 du Canada. European Compliance Statement Hereby, Eastman Kodak Company declares that this KODAK all-in-one wireless printer is in compliance with the essential requirements and other relevant provisions of Directive 1999/5/EC. -
Page 130: Waste Electrical And Electronic Equipment Labeling
Product and Safety Specifications Waste Electrical and Electronic Equipment Labeling Contact your local Kodak representative or refer to additional information on the collection and recovery programs available for this product. Caution: There is a risk of explosion if the battery is replaced by an incorrect type. -
Page 131: Declaration Of Conformity
Kodak ESP 9 All-in-One printer Declaration of Conformity See www.kodak.com/go/declarationofconformity. www.kodak.com/go/aiosupport... -
Page 132: Glossary
Glossary Ad hoc The Kodak All-in-One printer communicates directly with each device on the network. No wireless access point is used. This is also called a peer-to-peer network. On an Apple Macintosh, ad hoc is called computer-to-computer. All-in-One. Bluetooth An industrial specification for wireless personal area networks (PANs). Bluetooth... - Page 133 JPEG is a compressed image file format. JPEG is a “lossy” format, which means some quality is lost when the image is compressed. Kodak Perfect Touch Automatically corrects for common image flaws and “mistakes,” such as shadows, and backlighting. Kodak Perfect Touch technology also enhances the desirable qualities of pictures, for vibrant color and richer detail.
- Page 134 (DHCP) server on the network. On small networks, this could be a router. Manual : The configuration parameters are set manually, such as a static IP address. Not Specified : The mode used when the Kodak All-in-One printer is initializing. Optical character recognition.
- Page 135 Service Set Identifier: A unique identifier (up to 32 characters) that differentiates one wireless local area network (WLAN) from another. The SSID is also known as the network name. The name of the network to which the Kodak All-in-One printer is connected is called its SSID.
-
Page 136: Appendix A: If You Need To Call Customer Support
If you can have ready access to it, it may save you time. Useful for the Kodak service technician: • Kodak Service Number (located inside or on the outside of the printer) • Printer model number (located on back of the printer) • Control panel error message, if any •... - Page 137 1111 See Personal identification number, 56 2.0 USB See USB 234. See Fax Auto-Answer 4-way navigation buttons, 7, 10 8-in-1 card reader See Kodak Aborting See Cancel Ad hoc, definition, 124 Add Date to Prints, 52 Add Fax Phonebook entry, 71...
- Page 138 HFS Plus See Mac OS Standard HFS See Mac OS Standard Home Center software Macintosh, 20 Maintenance options, 79 Ordering supplies through, 19 Scanning with, 62 Troubleshooting, 96 troubleshooting the printer, 89 Windows, 19 Host port, 3 Hostname, definition, 125 Hub See USB www.kodak.com/go/aiosupport...
- Page 139 Kodak Bluetooth dongle, 6 Ink cartridges, 79 Support Center, 2 Web site, 2 Kodak 8-in-1 USB card reader, 50 Kodak Bluetooth dongle Kodak Perfect Touch, 112, 125 Kodak Service Number, 128 Locate in Home Center (Macintosh) software, 20 Kodak.com, 2 Download printer updates from, 2 Tips &...
- Page 140 Print too dark, troubleshooting, 100 Print too light, troubleshooting, 100 Printer Configuring network settings, 24 Ethernet, 24 Wireless, 25 Personal identification number, 56 Updates from Kodak.com, 2 Printer access door, 79, 82 Printer fails to power on, troubleshooting, 89 Printer location, selecting, 21 www.kodak.com/go/aiosupport...
- Page 141 Printer model number, 128 Printer not responding, troubleshooting, 94 Printer performance, monitoring and adjusting, 78 Printer Settings, 22 Printer status lights, 6 Printer supplies, 19 at Kodak.com, 2 Maintaining, 76 Ordering from Home Center, 19 Recycling, 76 Printhead, 4 Alignment, 20, 78...
- Page 142 Status lights, 6, 16 Status Monitor, 19 Storing ink cartridges, 79 Subnet, definition, 127 Supplies, ordering, 19 Support, 1, 89 at Kodak.com, 2 Telephone numbers Web site, 2 System requirements, 116 Tagged images, 55 Printing, 55 Technical Support See Support Telephone company, when to contact, 41 Telephone ring pattern.
- Page 143 Home Center software, 19 System requirements, 116 Windows Vista troubleshooting, 95 WIA error, 95 Wireless network status light, 7 Wireless network, configuring, 25 Wireless printing, Bluetooth WPA, definition, 127 WPS, definition, 127 Zoom buttons, 7 Zooming photos, 56 www.kodak.com/go/aiosupport Index...