Yaesu FT-991 Operating Manual
Hf/vhf/uhf all mode transceiver
Hide thumbs
Also See for FT-991:
- Operating manual (96 pages) ,
- Reference book (21 pages) ,
- Instruction manual (20 pages)
Table of Contents
Advertisement
Quick Links
HF/VHF/UHF A
M
T
ll
ode
rAnsceiVer
FT-991
o
M
perATing
AnUAl
YAESU MUSEN CO., LTD.
Tennozu Parkside Building
2-5-8 Higashi-Shinagawa, Shinagawa-ku, Tokyo 140-0002 Japan
YAESU USA
6125 Phyllis Drive, Cypress, CA 90630, U.S.A.
YAESU UK
Unit 12, Sun Valley Business Park, Winnall Close
Winchester, Hampshire, SO23 0LB, U.K.
Advertisement
Chapters
Table of Contents

Related Manuals for Yaesu FT-991


Summary of Contents for Yaesu FT-991
- Page 1 HF/VHF/UHF A rAnsceiVer FT-991 perATing AnUAl YAESU MUSEN CO., LTD. Tennozu Parkside Building 2-5-8 Higashi-Shinagawa, Shinagawa-ku, Tokyo 140-0002 Japan YAESU USA 6125 Phyllis Drive, Cypress, CA 90630, U.S.A. YAESU UK Unit 12, Sun Valley Business Park, Winnall Close Winchester, Hampshire, SO23 0LB, U.K.
- Page 2 Before using your FT-991 , be sure to read and follow the instructions in the “Before You Begin” section of this manual.
- Page 3 The 30.225 MHz standard oscillator provides exceptional frequency stability. It is temperature compensated and The FT-991 is equipped with a 3.5 inch full-color TFT boasts an enhanced ±0.5 ppm stability from −10°C to display. Functions, including the receiving band, the noise +50°C.
- Page 4 eneral escription Microphone Amplifier that includes Parametric Equalizer (see page 63.) The microphone amplifier equalizer feature is equipped with a three-stage parametric equalizer that can alter the Low, Mid, and High frequencies of the audio separately; this feature permits the bandwidth and gain for each part of the audio spectrum to be precisely adjusted independently.
-
Page 5: Table Of Contents
able of ontents General Description ............. 1 Interference Rejection ..........45 Table of Contents ............3 ATT (Attenuator) ............ 45 Accessories & Options ..........5 IPO (Intercept Point Optimization) ......46 Supplied Accessories ..........5 IF Noise Blanker (NB) Operation ......47 Available Options ............. - Page 6 able of ontents Operation on Alaska Emergency Frequency: 5167.5 khz (U.S. Version Only) ....... 106 VFO and Memory Scanning ........107 VFO Scanning ............107 Memory Scan ............108 PMS (Programmable Memory Scanning) ..... 109 Using the GPS Function .......... 110 What is GPS? ............
-
Page 7: Supplied Accessories
& o ccessories ptions upplied cceSSorieS Hand Microphone ( MH-31 DC Power Cord Spare Fuse (25A) Operating Manual Warranty Card World Map Sticker The illustrations above may vary slightly from the actual accessories. F T-991 O Page 5 peraTing anual... -
Page 8: Available Options
& o ccessories ptions vAilAble ptiOns For details, see “Installation of Optional Accessories” on page 139 or the catalog. Ultra-High-Fidelity Desktop Lightweight Stereo Headphone Remote Control Keypad Microphone YH-77STA FH-2 MD-200 Linear Amplifier/AC Power Supply External Automatic Antenna Tuner FC-40 VL-1000/VP-1000 Others... - Page 9 The heavy wire stand on the bottom of the transceiver allows the transceiver to be tilted upward for better viewing. Sim- ply fold the stand forward to raise the front of the transceiver, and fold it back against the bottom case to lower the front of the FT-991. djuSting the...
-
Page 10: Before You Begin
efore eGin djuSting the lock Use the following procedure to adjust the clock shown at the top right of the LCD display. 1. Press and hold the MENU(SETUP) button. MENU(SETUP) button 2. Touch [ TIME/DATE ] on the LCD. 3. Enter the present time with the number keys on the LCD, then touch [ ENT ] . -
Page 11: Inputting The Call Sign
efore eGin nputting the When turning on the power for the first time after purchase, or after resetting the transceiver, enter your own call sign. The call sign will be displayed on the start screen when turning on the power and will be used to identify the station when sending messages during digital communication. -
Page 12: Resetting The Microprocessor
ON/OFF switch to turn the trans- ceiver on. Once the transceiver comes on, you may release the buttons. The FT-991 cannot erase the memory channels “01” (and “5-01” through “5-10”: U.S. version). eSetting Use this procedure to restore the Menu settings to their... -
Page 13: Antenna Considerations
Any antenna to be used with the FT-991 must be fed from the transceiver with 50 Ohm coaxial cable. Therefore, when using a “balanced” antenna such as a dipole, remember that a balun or other matching/balancing device must be used to ensure proper antenna performance. -
Page 14: Grounding
The FT-991 transceiver, like any other HF communications apparatus, requires an effective ground system for maxi- mum electrical safety and best communications effectiveness. A good ground system can contribute to station efficiency in a number of ways: ... -
Page 15: Connection Of Antenna And Power Cables
Ensure adequate ventilation around the FT-991, to prevent heat build-up and possible reduction of performance due to high heat. Do not install the FT-991 on an unstable desk or table. Do not place it in a location where objects may fall onto it from above. -
Page 16: Installation And Interconnections
If the FH-2 plug is removed from the jack while the FT-991 is in operation, the FT-991 may be switched to the transmit mode. Turn off the power of the FT-991 before connecting or disconnecting the FH-2. Page 14 F T-991 O... -
Page 17: Key, Keyer, And Computer-Driven Keying Interconnections
The FT-991 includes many features for the CW operator. These functions will be detailed in the “Operation” section later. Besides the built-in Electronic Keyer, two key jacks are provided, one on the front and one on the rear panel, for convenient connection to keying devices. -
Page 18: Vl-1000 Linear Amplifier Interconnections
MpliFier nterconnectionS Be sure that both the FT-991 and VL-1000 are turned off, and then follow the installation recommendations contained in the illustration. Refer to the VL-1000 Operating Manual for details regarding amplifier operation. Do not attempt to connect or disconnect coaxial cables when your hands are wet. - Page 19 nstallatIon and nterconnectIons onneCtor inout iagrams GPS/CAT ① DCD ② SERIAL OUT/RXD DOWN ⑨ ⑧ ⑦ ⑥ (GPS DATA IN) ③ SERIAL IN ④ DTR MIC GND ⑤ GND ⑥ DSR ⑤...
-
Page 20: Key Jack
(grounded) shaft of the switch for one second to turn the transceiver off. plug, resulting in a constant “key-down” condi- Connect the FT-991 transceiver to a commercial- tion. ly available DC power supply. Turn the DC sup- Key-up voltage is +3.3 V, and key-down current... -
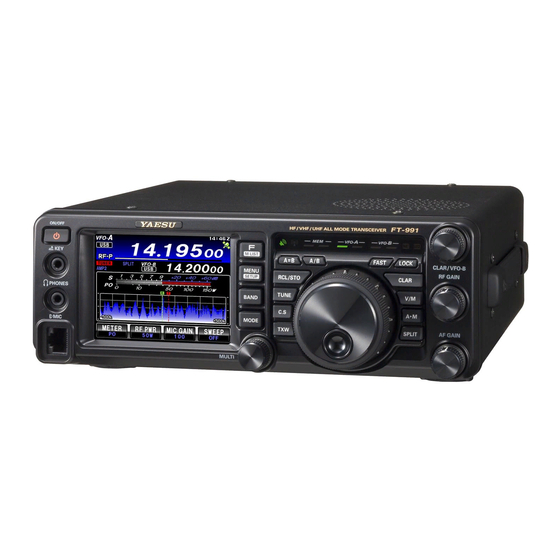
Page 21: Front Panel Controls & Switches
& s ront anel ontrols witChes F(M-LIST) Button MODE Button Press the button briefly to display the function menu Switch the radio modulation form (operating mode). screen where the operation settings for a variety of Press this button to display the radio modulation functions may be configured. form selection screen, then touch and select your de- Press this button again to close the function menu sired modulation form. - Page 22 (QMB) one by one. lected Menu item as the short cut. TUNE Button TXW Button This is the on/off switch for the FT-991 Automatic During a split operation, press and hold the TWX Antenna Tuner. button to listen on the transmitter frequency while m Press the [ TUNE ] button briefly to display the holding the button.
-
Page 23: Rf Gain Knob
& s ront anel ontrols witches Main Tuning Dial Knob V/M Button This large knob adjusts the operating frequency of This button toggles frequency control between VFO- VFO-A. A and the memory system. Rotate clockwise to increase the operating frequency Pressing this button alternately recalls the VFO and rotate counter-clockwise to decrease the operat- frequency data and the frequency data saved in a... - Page 24 bout the isplaY tFt l iquid ryStAl iSplAy A variety of information such as VFO-A/VFO-B frequencies, mode, S-meter will appear on the LCD. Operating mode Operation frequency Clock Mode (radio modulation form) GPS signal capturing HI-SWR MULTI knob operation VFO-B data Icons Clarifier operation S-meter...
-
Page 25: Menu List
bout the isplaY tFt l iquid ryStAl iSplAy Clock The voice memory/contest memory keyer func- PLAY Indicates the current time. tions are in use. PLAY: Playing, REC: Recording When receiving a GPS signal, the time is set automati- cally. S-Meter Displays the reception signal strength. -
Page 26: About The Display
bout the isplaY led i ndicAtorS Displays the transmit/receive status of the transceiver, and the main dial “FAST” and “LOCK”. RX Indicator LOCK Indicators TX Indicator FAST Indicators Memory Mode Main Band Sub Band RX/TX RX/TX RX/TX Indicators Indicators Indicators RX Indicator (Green) Sub Band RX/TX Indicators This indicator illuminates when the squelch opens. -
Page 27: Rear Panel
anel GPS/CAT Jack Use this terminal to connect the transceiver to a good This is the RS-232C jack for connecting a computer earth ground, for safety and optimum performance. or a commercially available external GPS device. Use a large diameter, short braided cable to make This is the RS-232C jack for connecting a comput- the ground connections. -
Page 28: Cooling Fan
To control the transceiver remotely from the computer, a USB driver is required. For details on the USB driver, visit the Yaesu WDXC web- site. When using a USB cable connected to a com- ... - Page 29 Mh-31a8J M icrophone witches PTT Switch TONE Switch Switches transmission/reception. Switches transmission sound quality. Press to transmit and release to receive. Slide to the “1” side to make the transmit audio flat. Slide to the “2” side to emphasize transmit audio. DWN Button Press the DWN (Down) button to scan the frequency downward.
- Page 30 fh-2 r ptional eMote ontrol witches With the optional remote control keypad FH-2, you can record and transmit your voice (Voice Memory) and control the Contest Memory Keyer during CW operation. m On SSB/AM/FM modes, five channels of storage and playback of voice memory (20 seconds each), using your own voice for recording (see page 68).
-
Page 31: Optional Mh-36E8J Microphone Switches
Mh-36e8J M ptional icrophone witches The optional MH-36E8J is a handheld microphone equipped with the DTMF function that enables DTMF (Dual Tone Multi Frequencies) transmission. A lamp switch illuminates the DTMF keypad for easy viewing in the dark. DWN Button DTMF Keypad Press to tune down, hold to start scanning. - Page 32 Do you have your antenna(s) connected to the rear-panel Antenna jack(s)? See page 13 for details. Is your microphone (and/or key or paddle) connected? See pages 14, 15 for details. If using a linear amplifier, have all interconnections been successfully completed? See pages 16 for details. Please rotate the AF GAIN control to the fully counter-clockwise position, to avoid a loud blast of audio when the transceiver turns on. See page 21 for details. Page 30 FT-991 O peraTing anual...
- Page 33 One-touch selection of each Amateur band be- tween 1.8 and 50 MHz, 144 MHz, and 430 MHz is provided. The FT-991 utilizes a triple band-stack VFO selection technique, which permits storing up to three favorite frequencies and modes onto each VFO band register. For example, you may store...
- Page 34 FM/DATA-FM/C4FM 100 H (200 Numbers in parentheses indicate steps when the FAST button is On. If you want to make rapid frequency changes, there are several techniques available: Direct keyboard entry of the frequency. Use the microphone UP/DWN scanning keys, if your microphone is so equipped. Page 32 FT-991 O peraTing anual...
-
Page 35: Operation On 60-Meter
5-08 5.358500 MHz 5-09 5.373000 MHz 4. To exit from 60-meter operation and return to the 5-10 5.405000 MHz VFO mode, just press the V/M button. The frequencies and operating mode for 5 MHz band operation are fixed, and may not be changed. FT-991 O Page 33 peraTing anual... - Page 36 Mateur anDs clAr ( c lAriFier perAtion The CLAR button and CLAR/VFO-B knob are used to offset the receive frequency, the transmit frequency, or both, from their settings on the VFO-A frequency. Four small numbers on the TFT Display show the current Clarifier offset. The Clarifier controls on the FT-991 are designed to allow setting a preset offset (up to ±9.99 kHz) without actually re- tuning, and then to activate it via the Clarifier CLAR button. This feature is ideal for following a drifting station, or for setting the small frequency offsets sometimes utilized in DX “Split” work. Here is the technique for utilizing the Clarifier: CLAR/VFO-B Knob 1. Press the CLAR button. The “RX” notation will ap- CLAR Button pear in the TFT Display, and the programmed offset will be applied to the receive frequency.
-
Page 37: Lock
MULTI Knob 4. Touch [ ENTER ] on the LCD, then touch [ BACK ] on the LCD or press the MENU button to save the new setting and exit to normal operation. FT-991 O Page 35 peraTing anual... -
Page 38: Vfo Color
4. Touch [ ENTER ] on the LCD, then touch [ BACK ] on the LCD or press the MENU button to save the MULTI Knob new setting and exit to normal operation. Page 36 FT-991 O peraTing anual... -
Page 39: Convenience Features
The FT-991 utilizes a triple band-stack VFO selection technique that permits storing of up to three favorite frequencies and modes onto each band VFO register. For example, one frequency each on 14 MHz CW, RTTY, and USB may be stored and then recalled by successive, momentary touches of [ 14 ] on the screen displayed by the BAND button. Each Amateur band key may similarly have up to three frequency/mode settings applied. Note that only the VFO-A system has the band stacks. A typical setup, for the 14 MHz band, might be arranged like this: 1. Program 14.025 MHz, CW Mode, then press the BAND Button BAND button, and then touch [ 14 ] on the LCD. 2. Program 14.080 MHz, RTTY Mode, then press the BAND button, and then touch [ 14 ] on the LCD. - Page 40 In the V/D mode (“DN” displayed), the position infor- switched to “ON” and the communication mode will mation is included in the transmitted signal during the conversation, but in the Voice FR mode (“VW” dis- be switched to match the received signal. played), the position information is not included. Page 38 FT-991 O peraTing anual...
- Page 41 VW (FR Mode): Digital voice data is transmit- it becomes more difficult for conversa- ted using the entire 12.5 kHz bandwidth. tions to be cut off. A basic digital mode of High quality voice communication is pos- C4FM FDMA. sible. FT-991 O Page 39 peraTing anual...
-
Page 42: Scope
Scope The SCOPE function provides a spectrum display of the band conditions. Both strong and weak signals can be clearly displayed on the TFT screen. In the MANUAL mode, the scope frequency spectrum is scanned one time and displayed. In the “Continuous Sweeping mode”, the scope spectrum is repeatedly swept and displayed. When operating in the “ASC (Automatic Spectrum-Scope Control) mode” the sweep is automatically carried out in conjunction with the movement and operation of the main dial. The scope sweep and span may be optimized according to your preferences and purpos- Note: Since the FT-991 has only one receiver the audio will be muted while the spectrum scope is scanning. Touch [ SWEEP ] on the LCD to display the band condi- Reception frequency Transmission frequency tions (spectrum). The transceiver is equipped with three types of sweeping mode: “MANUAL mode”, “Continuous sweeping mode” and “ASC (Automatic Spectrum- Scope Control) mode”. Refer to the advice below to... -
Page 43: Manual Mode
To stop sweeping, touch [ SWEEP ] on the LCD again. ASC (Automatic Spectrum-Scope Control) Mode Quickly rotate the main dial to mute the reception sound. The spectrum scope will automatically start sweeping and continue sweeping until you completely stop rotating the main dial. While observing the display, move the dial close to the desired frequency. Stop turning the main dial to stop the spectrum scope completely, and then you can hear the received signal. Now you may slowly rotate the main dial to tune in the received signal while listening to the receiver audio and the sweeping is disabled. You can change the rotation speed of the main dial to switch to sweeping motion in the Menu item “119 ASC DIAL SPEED”. FT-991 O Page 41 peraTing anual... -
Page 44: Keyboard Frequency Entry
3. Rotate the MULTI knob to change the frequency in will ignore the attempt, and will return to the previ- the selected frequency steps. ous operating frequency. If this happens, please try again, taking care not to repeat the error in the fre- quency entry process. Page 42 FT-991 O peraTing anual... -
Page 45: More Frequency Navigation Techniques
CW/RTTY/ DATA-LSB/ +5 Hz −5 Hz +100 Hz −100 Hz DATA-USB LSB/USB/AM +10 Hz −10 Hz +100 Hz −100 Hz FM/C4FM/ +5 kHz −5 kHz +50 kHz −50 kHz DATA-FM FT-991 O Page 43 peraTing anual... - Page 46 The FT-991 includes a wide range of special features to suppress the many types of interference that may be encoun- tered on the HF bands. However, real world interference conditions are constantly changing, so optimum setting of the controls is somewhat of an art, requiring familiarity with the types of interference and the subtle effects of some of the controls. Therefore, the following information is provided as a general guideline for typical situations, and a starting point for your own experimentation. The FT-991 interference-fighting circuitry begins in its “RF” stages, and continues throughout the entire receiver sec- tion. FT-991 allows configuration of the features described below. CONTOUR Filter IF NOTCH...
-
Page 47: Interference Rejection
2. To restore full signal strength through the Attenuator circuit, touch [ ATT ] on the LCD to return the ATT display to the “OFF” position. dvice If the noise level is high or the received signal is extremely strong, the incoming signal level can be suppressed with the IPO/ATT settings. If the S-meter fluctuates S-3 or more in the noise level, or the received signal is extremely strong and it causes a high S- meter indication (+20dB or more), activate the attenuator. Since IPO does not only attenuate the incoming signal, but also improves the cross modulation characteristic, try to ac- tivate the IPO first. If the signal is still strong, also use the ATT. In this way, you can attenuate the incoming signal and noise effectively. FT-991 O Page 45 peraTing anual... -
Page 48: Ipo (Intercept Point Optimization)
On the 10 MHz and lower bands, it is generally not necessary to use any preamplifier at all; selecting the About 10dB About 10dB “IPO” position as described above will increase the 1.8 MHz ~ 56 MHz strong-signal-handling capability of the receiver, and generally result in more pleasant reception due to the reduced ambient noise level. If you can hear band noise with the preamplifiers disengaged, then a pre- amplifier is generally not needed. Page 46 FT-991 O peraTing anual... - Page 49 ( nb ) o iF n oiSe lAnker perAtion The FT-991 includes an effective IF Noise Blanker, which can significantly reduce noise caused by automotive ignition systems. 1. Press the F(M-LIST) button to display the function F(M-LIST) Button menu list. Touch the [ NB ] function icon briefly to reduce short duration pulse noise like that from switching transients, automobile ignitions and power lines. The Noise Blanker will be set to “ON”.
- Page 50 The Contour function attenuation and bandwidth can be set in Menu items “114 CONTOUR LEVEL” and “115 CONTOUR WIDTH” (refer to the instruction IF BANDWIDTH IF BANDWIDTH IF BANDWIDTH on the right). MULTI MULTI MULTI uick oint By judicious use of the Contour filter, the “shoulder” of the passband response may be altered, or components may be removed from within the passband, allowing the desired signal to rise above the background noise and interference in a manner not obtainable with other filtering systems. Page 48 FT-991 O peraTing anual...
-
Page 51: If Shift Operation (Ssb/Cw/Rtty/Pkt Modes)
In Figure “C”, you can see the effect of rotating the MULTI knob. The interference level is reduced by moving the filter passband so that the interference is outside of the passband. Desired Signal Desired Signal Desired Signal IF BANDWIDTH IF BANDWIDTH IF BANDWIDTH MULTI MULTI MULTI FT-991 O Page 49 peraTing anual... -
Page 52: Width (If Dsp Bandwidth) Tuning
SSB Mode: 1.8 kHz - 3.2 kHz (default: 2.4 kHz). CW Mode: 500 Hz - 3 kHz (default: 2.4 kHz) RTTY/DATA (LSB, USB) Modes: 500 Hz - 3 kHz (default: 500 Hz) MULTI MULTI MULTI AM Mode: Fixed at 9 kHz FM/DATA-FM/C4FM Modes: Fixed at 16 kHz Page 50 FT-991 O peraTing anual... - Page 53 (Figure “C”), vantage. the interference on the opposite side can be re- moved, without re-introducing the interference previously eliminated in Figure “B”. Desired Signal Desired Signal Desired Signal IF BANDWIDTH IF BANDWIDTH IF BANDWIDTH FT-991 O Page 51 peraTing anual...
- Page 54 IF bandwidth by touching [ WIDTH ] on the TFT display and rotating the MULTI knob. The IF SHIFT may also be operated. When in the FM mode, touching [ NAR/WIDE ] on the TFT display will narrow both transmit and re- ceive bandwidths. Page 52 FT-991 O peraTing anual...
- Page 55 The bandwidth of the NOTCH filter (either narrow IF BANDWIDTH IF BANDWIDTH or wide) may be adjusted using Menu item “116 IF NOTCH WIDTH”. The factory default setting is “WIDE”. MULTI FT-991 O Page 53 peraTing anual...
- Page 56 2. Touch [ DNR ] on the LCD. The DNR function will be set to “ON”. DNR indicator DNR level indicator MULTI Knob 3. Rotate the MULTI knob to choose one of 15 algo- rithms that best reduces the noise level. 4. To cancel the DNR filter, touch [ DNR ] on the LCD, “OFF” will appear in the display, confirming that the DNR system is no longer in operation. Page 54 FT-991 O peraTing anual...
-
Page 57: Tools For Comfortable And Effective Reception
The IPO generally should be the first feature engaged when dealing with a high noise level, or a crowded, high-level signal environment. Also, the IPO generally should be the first feature engaged, if the frequency is low enough to allow the preamplifier to be bypassed. Thereafter, the RF Gain and Attenuator features may be employed to provide precise, delicate adjustment of the receiver gain to fully optimize performance. FT-991 O Page 55 peraTing anual... -
Page 58: Audio Peak Filter
The APF bandwidth can be selected from NAR- ROW/MEDIUM/WIDE via the Menu item “113 APF WIDTH”. 4. To cancel the APF action, touch [ APF ] on the LCD. The “OFF” will appear in the display, confirming that the APF system is no longer in operation. dvice The APF may only be activated while the transceiver is in CW mode. Page 56 FT-991 O peraTing anual... -
Page 59: Agc (Automatic Gain Control)
AGC the AGC column of the Key Function Display glows Menu selections until you are thoroughly familiar with green (Normally it glows blue). the performance of the FT-991. Touching [ AGC ] on the LCD allows selection of the erMinology desired receiver-recovery time constant. Normally, Automatic Gain Control, or AGC, is a circuit that senses the “AUTO” selection is satisfactory for most situ-... - Page 60 The FT-991 includes an adjustable receiver audio filter, that provides precise, independent control of the low; and upper audio ranges. 1. Press the MENU button to enter the Menu mode. MENU Button 2. Rotate the MULTI knob to find Menu items “041” through “044” these parameters apply to the adjust- ment of the receiver audio filter in the AM mode, Menu items “050” through “053” apply to the...
-
Page 61: Ssb/Am Mode Transmission
6. Release the PTT switch at the end of the transmis- mum (carrier) power output of 25 Watts by press- sion. The transceiver will return to the receive mode. ing [ RF PWR ] , then rotate the MULTI knob. FT-991 O Page 59 peraTing anual... - Page 62 Four techniques to implement Transmit/Receive con- dvice ALC meter deflection may be caused by excessive trol are provided on the FT-991. You may choose drive power, but also by reflected power detected the technique(s) that best suit your operating needs: in the antenna system.
-
Page 63: Atu Operation
Because the ATU of the FT-991 is located inside the station, it only adjusts the impedance presented to the trans- ceiver at the station end of your coaxial cable feedline. It does not “tune” the SWR at the antenna feed point itself. -
Page 64: About Atu Operation
SWR (After tuning) Greater than 3:1 The “HI-SWR” icon will light up, and the tuner settings, if achieved, will not be memorized. Please investigate the high SWR condition and resolve the problem before attempting further operation using this antenna. Page 62 FT-991 O peraTing anual... - Page 65 Mode The FT-991 includes a unique Three-Band Parametric Microphone Equalizer that provides precise, independent con- trol over the low, mid and treble ranges in the voice waveform. You may utilize one group of settings when the speech processor is off and use an alternate group of settings when the speech processor is on. The speech processor feature is described in the next chapter.
-
Page 66: Enhancing Transmit Signal Quality
“3”, and then put an 8 dB peak centered on 2100 Hz with a bandwidth of “1.” These are starting recommendations; each microphone and user’s voice will be different, often requiring different settings. Page 64 FT-991 O peraTing anual... -
Page 67: Parametric Microphone Equalizer (Ssb/Am/Fm Mode)
( Low ) “1” - “10” Q ( Bandwidth ) “132 P-PRMTRC EQ1 BWTH” ( Mid ) “1” - “10” “135 P-PRMTRC EQ2 BWTH” ( High ) “1” - “10” “138 P-PRMTRC EQ3 BWTH” Parametric Gain FT-991 O Page 65 peraTing anual... - Page 68 The FT-991 Speech Processor is designed to increase “talk power” by increasing the average power output (via a so- phisticated compression technique) and adjusting the audio quality to the menu settings (“130 P-PRMTRC EQ1 FREQ”, “133 P-PRMTRC EQ2 FREQ”, “136 P-PRMTRC EQ3 FREQ”). The result is improved intelligibility when conditions are difficult.
- Page 69 The higher fidelity associated with wide bandwidth will be particularly enjoyable on the low bands during local rag-chew QSOs. 5. Press the MENU(SETUP) button or touch [ BACK ] on the TFT display to exit to normal operation. FT-991 O Page 67 peraTing anual...
- Page 70 20 seconds. Voice Memory Operation You may also utilize the Voice Memory capability of the FT-991 by operating from the display or the optional FH-2 Remote Control Keypad, which plugs into the rear panel REM/ALC jack. 7. Touch [ MEM ] on the LCD or press the FH-2 [ MEM ] Recording Your Own Voice in Memory 1.
- Page 71 A “PLAY” icon will appear in the display and the message will be transmitted. dvice The transmit (audio) level of the recording may be ad- justed via Menu item “011 DVS TX OUT LEVEL”. FT-991 O Page 69 peraTing anual...
-
Page 72: Vox (Ssb/Am/Fm Modes: Automatic Tx/Rx Switching Using Voice Control)
5) When you are satisfied with the setting, touch [ ENTER ] on the TFT LCD display to save the new setting. Page 70 FT-991 O peraTing anual... - Page 73 Menu item “147 ANTI VOX GAIN”. VOX operation may be engaged on either Voice modes (SSB/AM/FM) or on AFSK-based Data modes. Use Menu item “144 VOX SELECT” (the se- lections are “MIC” and “DATA”). FT-991 O Page 71 peraTing anual...
-
Page 74: Monitor (Ssb/Am/Fm Modes)
Because the Monitor feature samples the transmit- ter IF signal, it can be very useful for checking the adjustment of the Speech Processor or Parametric Equalizer on SSB, and for checking the general sig- nal quality on AM and FM. Page 72 FT-991 O peraTing anual... - Page 75 Yaesu transceivers with ca- uick oint pability similar to that of your FT-991. On the DX side The Clarifier is frequently used for receiver offset of the pile-up, everyone calling precisely on the same tuning.
-
Page 76: Quick Split Operation
A powerful capability of the FT-991 is its flexibility in Split Frequency operation using the VFO-A and VFO-B fre- quency registers. This makes the FT-991 especially useful for high-level DX-peditions. The Split operation capability is very advanced and easy to use. - Page 77 4. Touch [ ENTER ] button to save the new setting. 5. Press the MENU(SETUP) button or touch [ BACK ] on the LCD to exit to normal operation. FT-991 O Page 75 peraTing anual...
-
Page 78: Cw Mode Operation
M peration The powerful CW operating capabilities of the FT-991 permit operation using an electronic keyer paddle, a “straight key”, or a computer-based keying device. etup For trAight trAight ey eMulAtion perAtion Before starting, connect your key line(s) to the front panel KEY jack. Be sure [ BK-IN ] displayed by pressing the F(M- button is turned off for now. - Page 79 This allows you to hear a station that sud- denly starts transmitting on your frequency, while you are in the midst of a transmission. FT-991 O Page 77...
- Page 80 Menu item “060 PC KEYING”. The electronic keyer operation mode can be changed via the Menu item “012 KEYER TYPE”. 6. CW operation utilizing the CW paddle may now commence. Page 78 FT-991 O peraTing anual...
- Page 81 Full Break-in (QSK) Operation As shipped from the factory, the FT-991 TX/RX system for CW is configured for “Semi-break-in” operation. However, this setup may be changed to full break-in (QSK) operation by setting Menu item “056 CW BK-IN TYPE”. With full break-in QSK, the TX/RX switching is quick enough to hear incoming signals in the spaces be- tween the dots and dashes of your transmission.
- Page 82 The configuration of the Electronic Keyer may be customized independently for the front panel KEY jack of the FT-991. This permits utilization of Automatic Character Spacing (ACS), if desired. This allows the use of an electronic keyer via the front jack and a straight key or computer-driven keying line via the rear panel jack.
- Page 83 ELEKEY and ACS keyers can be changed. 4. Touch [ ENTER ] on the LCD to save the new setting. 5. Press the MENU(SETUP) button or touch [ BACK ] on the LCD to exit to normal operation. FT-991 O Page 81 peraTing anual...
-
Page 84: Using The Auto Zeroing System
700 Hz offset, the “zero beat” fre- quency of that CW carrier would be 14.100.70 MHz; the latter frequency is what the FT-991 displays, by default. However, you can change the display to be identical to what you would see on SSB by using Menu item “059 CW FREQ DISPLAY”... - Page 85 Hz (typically), to produce a beat tone that can be heard. The BFO offset associated with this tuning (that produces the comfort- able audio tone) is called the CW Pitch. FT-991 O Page 83 peraTing anual...
-
Page 86: Message Memory
The CW message capability of the FT-991 may be utilized from the optional FH-2 Remote Control Keypad, which plugs into the rear panel REM/ALC jack. Message Memory Five memory channels capable of retaining 50 characters each are provided (using the PARIS standard for characters and word length). -
Page 87: Cw Convenience Features
Touch [ BACK ] on the LCD to cancel the setting. 4. Touch [ ENTER ] on the LCD to save the new set- ting. 5. Press the MENU(SETUP) button or touch [ BACK ] on the LCD to exit to normal operation. FT-991 O Page 85 peraTing anual... -
Page 88: Contest Memory Keyer
“Text Memory technique” on a particular memory register (the Menu Mode Setting is set to “TEXT”). Page 86 FT-991 O peraTing anual... -
Page 89: Text Memory
The following texts are programmed to the MEM- ORY 4 and MEMORY 5 in factory default. MEMORY 4: DE FT-991 K} MEMORY 5: R 5NN K} 3. Touch [ SELECT ] on the LCD, then rotate the MULTI Knob MULTI knob to set the selected CW Memory Regis- ter to “TEXT”. - Page 90 [ ] on the LCD to erase a letter at the left of the cursor. 7. When you have completed the creation of the text, touch [ ENT ] on the LCD. Page 88 FT-991 O peraTing anual...
- Page 91 4. Touch a key on the LCD to enter the letters, num- bers, or symbols of the desired text. 7. Press the MENU(SETUP) button to save the new setting and return to normal operation. FT-991 O Page 89 peraTing anual...
- Page 92 Menu item “056 CW BK-IN TYPE”. 2. Touch [ CH1 ] - [ CH5 ] on the LCD or press an FH-2 [ 1 ] - [ 5 ] key. Repetitive transmission of the Beacon message will begin. Page 90 FT-991 O peraTing anual...
- Page 93 GAIN ] on the LCD. Rotate the MULTI knob func- tion as the microphone gain adjustment knob. Rotate the MULTI knob to adjust the microphone gain. MIC GAIN (Microphone Gain) indicator MIC GAIN (Microphone Gain) level indicator FT-991 O Page 91 peraTing anual...
-
Page 94: Fm Mode Operation
M peration epeAter perAtion The FT-991 may be utilized on 29 MHz, 50 MHz, 144 MHz and 430 MHz repeaters. 1. Rotate the Main Tuning Dial knob to set the FT-991 F(M-LIST) Button to the desired repeater’s output frequency (downlink from the repeater). -
Page 95: Repeater Operation
Automatic Repeater Shift (ARS) The FT-991 ARS feature causes the appropriate repeater shift to be automatically applied whenever it is tuned into the designated repeater sub-bands. If the ARS feature does not appear to be working, you may have accidentally disabled it. -
Page 96: Tone Squelch Operation
5. Touch [ FWD ] to switch the screen, and then touch [ TONE ] . Rotate the MULTI knob to select the de- sired CTCSS Tone to be used. A total of 50 standard CTCSS tones are provided (see the CTCSS Tone Chart). Page 94 FT-991 O peraTing anual... -
Page 97: C4Fm Mode (Digital Mode) Operation
The FT-991 transceiver is capable of using 2, C4FM digital modes: the “V/D mode” which communicates voice and data simultaneously, and the “Voice FR mode” which transmits digital voice data using the full 12.5 kHz bandwidth. 1. Press the MODE button, and then touch the corre-... - Page 98 MULTI Knob 4. Touch [ ENTER ] on the LCD to save the new set- ting. 5. Press the MENU(SETUP) button or touch [ BACK ] on the LCD to exit to normal operation. Page 96 FT-991 O peraTing anual...
-
Page 99: Qmb (Quick Memory Bank)
FunctionS The FT-991 contains ninety-nine regular memories, labeled “01” through “99”, nine special programmed band edge memory pairs, labeled “P-1L/P-1U” through “P-9L/P-9U”, and five QMB (Quick Memory Bank) memories. Each memory stores various settings, in addition to the VFO-A frequency and mode (See below). By default, the 99 regular memories are contained in one group;... -
Page 100: Memory Storage
The Standard Memory of the FT-991 allows storage and recall of up to 99 memories, each storing frequency, mode, and a wide variety of status information, detailed previously. Memories may be grouped into as many as six Memory Groups. Additionally there are nine pairs of band-limit (PMS) memories along with five QMB (Quick Memory Bank) -
Page 101: Recalling The Home Channel
LCD to exit to normal operation. 2. Press the BAND button, then touch [ ENT ] . When the writing to the home channel is completed, the updated home channel frequency will be dis- played. FT-991 O Page 99 peraTing anual... -
Page 102: Standard Memory Operation
6. When you have completed the creation of the label, touch [ ENT ] on the LCD. 7. Press the F(M-LIST) button to save the new setting and return to normal operation. Page 100 FT-991 O peraTing anual... -
Page 103: Erasing Memory Channel Data
3. Touch [ ERASE ] on the LCD. MULTI Knob dvice The FT-991 cannot erase memory channel “01” (and channels “5-01” through “5-10”: U.S. version). If you make a mistake and wish to restore the memo- ry contents, just repeat steps (1) through (3) above. -
Page 104: Memory Tune Operation
“Mem- ing. ory Tune” mode so closely resembles the VFO mode. dvice Be sure that you have the FT-991 operating in a control During Memory Tune operation, you may change mode compatible with the software’s requirements. Use operating modes, and engage the offset Clarifier, the VFO mode if you’re not sure. -
Page 105: Split Memory
M button. A double beep will confirm that the A M button was held in long enough and the data is registered. When the memory writing is completed, the receive frequency will be shown in the display. FT-991 O Page 103 peraTing anual... -
Page 106: Memory Groups
To cancel Memory Group operation, repeat steps (1) through (4) above, choosing “DISABLE” in step (3). dvice To avoid confusion, note that the PMS memory group and the PMS memories “P-1L” through “P-9U” will be so designated. Page 104 FT-991 O peraTing anual... -
Page 107: Choosing The Desired Memory Group
5. Rotate the MULTI knob to select the desired Memo- ry Channel within the Selected Memory Group. dvice If no channels have been assigned to a particular Memo- ry Group, that Group cannot be accessed. FT-991 O Page 105 peraTing anual... - Page 108 The FT-991 includes the capability for transmission and reception on 5167.5 kHz under such emergency conditions via the Menu system. To activate this feature: 1.
-
Page 109: Vfo Scanning
S cAnning Either the VFO or the memory channels of the FT-991 may be scanned, and the receiver will halt scanning on any fre- quency with a signal strong enough to open the receiver squelch. 1. Set the VFO-A to the frequency on which you would F(M-LIST ) Button like to begin scanning. -
Page 110: Memory Scan
If you have no interest in scanning, and wish to prohibit the microphone UP/DWN buttons from initiating scan- ning, you may disable scanning control from the mi- crophone using Menu item “037 MIC SCAN” (set it to “DISABLE”). Page 108 FT-991 O peraTing anual... -
Page 111: Pms (Programmable Memory Scanning)
7. Press and hold in the microphone UP or DWN but- PTT button during scanning will not cause transmis- ton for one second, or press the F(M-LIST) button sion. followed by [ SCAN ] to start scanning in the speci- fied direction. FT-991 O Page 109 peraTing anual... -
Page 112: What Is Gps
Connecting a YAESU FT1DR, FTM-400DR or a commercially available GPS receiver/antenna to the FT-991 will per- mit the transceiver to constantly receive and display the station location information. By utilizing the GPS location information, you can register stations with which you frequently communicate and use the GM function to confirm whether they are within communication range. - Page 113 Sing Positioning Using an External GPS Device A YAESU FT1DR/DE, FTM-400DR/DE or a commercially available GPS receiver/antenna may be connected to the GPS/CAT jack on the rear panel. The GPS/CAT jack connector is illustrated below. Ft1dr/de onnecting to the...
-
Page 114: Displaying The Position Information
4. Enter the latitude, then touch [ ENT ] followed by [ BACK ] . 6. Enter the longitude, then touch [ ENT ] followed by [ BACK ] . 7. Press the MENU(SETUP) button to exit to nor- mal operation. Page 112 FT-991 O peraTing anual... - Page 115 The GM (group monitor) function automatically inquires to find if there are any stations with the GM function in opera- tion on the same frequency within communication range. The FT-991 can then display the position and distance and other information for each group member call sign on the screen. Besides letting you know who is within your sphere of communications, the GM function is also a convenient method to instantly note the relative positions of all the members in the group.
- Page 116 Stations outside the sphere of communications are displayed in grey. 4. Touch [ BACK ] on the LCD. The GM function will be turned off and the display will return to the previ- ous screen. Page 114 FT-991 O peraTing anual...
- Page 117 5. Touch the screen to select the group. Up to 24 group members with the GM function in operation at the same frequency will be displayed. FT-991 O Page 115 peraTing anual...
- Page 118 Menu item “101 RTTY OUT LEVEL”. RTTY/DATA JACK DATA IN (Pin 1) GND (Pin 2) DAKY (Pin 3) SHIFT (Pin 4) RTYO (Pin 5) BUSY (Pin 6) To USB port Commercially available USB cable Page 116 FT-991 O peraTing anual...
- Page 119 Installation Manual.) 1. Use a commercially available USB cable to connect the USB jack on the rear panel of the FT-991 and the computer. 2. Press the MODE button, and then touch the corre- sponding key on the LCD to select the RTTY-LSB operating mode.
-
Page 120: Example Of Data Communications Device
DviCE The FT-991 allows for PSK, Olivia, Contestia, etc. digital mode to be sent by the Data method or SSB. The conven- tional method is to use USB, except RTTY, however the Data method allows for more accurate carrier frequency con- trol, which is helpful in a Contest or DX environment. -
Page 121: Data Mode
PerATiOn xamplE of ommuniCations EviCE Software Settings Connect a USB Cable from the FT-991 USB port and your computer There are many good Data Mode Operating Software DviCE programs available on the internet. Each of these pro- Before connecting the USB cable you must down load grams will have their own Setup instructions, therefore the SCU-17 Drivers. -
Page 122: Using The Menu
The Menu system of the FT-991 provides extensive customization capability; the transceiver may be setup to comple- ment personal operating preferences. Menu items are grouped by general utilization categories, and are numbered from “001 AGC FAST DELAY” to “151 EMERGENCY FREQ TX”. - Page 123 AM PORT SELECT DATA/USB DATA AM DATA GAIN 0 - 100 CW LCUT FREQ OFF/100Hz - 1000Hz(50Hz/step) 250Hz CW LCUT SLOPE 6dB/oct / 18dB/oct 18dB/oct CW HCUT FREQ 700Hz - 4000Hz(50Hz/step) / OFF 1200Hz FT-991 O Page 121 peraTing anual...
- Page 124 RTTY HCUT SLOPE 6dB/oct / 18dB/oct 18dB/oct RTTY SHIFT PORT SHIFT/DTR/RTS SHIFT RTTY POLARITY-RX NOR/REV RTTY POLARITY-TX NOR/REV RTTY OUT LEVEL 0 - 100 RTTY SHIFT FREQ 170/200/425/850 (Hz) 170Hz RTTY MARK FREQ 1275/2125 (Hz) 2125Hz Page 122 FT-991 O peraTing anual...
- Page 125 30 - 3000 (msec) 500msec ANTI VOX GAIN 0 - 100 DATA VOX GAIN 0 - 100 DATA VOX DELAY 30 - 3000 (msec) 100msec ANTI DVOX GAIN 0 - 100 EMERGENCY FREQ TX DISABLE/ENABLE DISABLE FT-991 O Page 123 peraTing anual...
-
Page 126: Display Color
Function: Sets the background color of the VFO-A fre- quency display field. Available Values: BLUE/GRAY/GREEN/ORANGE/ PURPLE/RED/SKY BLUE Default Setting: BLUE Description: Sets the background color of the VFO-A frequency display field. The color may be previewed before the selection is confirmed. Page 124 FT-991 O peraTing anual... -
Page 127: Keyer Type
Function: Enters the contest number using Morse code. Default Setting: 3.0 Available Values: 0 - 9999 Description: Sets the “Dot”:“Dash” ratio for the built-in Default Setting: 1 electronic keyer. Description: Enters the contest number using Morse code (page 84). FT-991 O Page 125 peraTing anual... -
Page 128: Beep Level
UTC (Coordinated Universal Time) in 30 minute in- TEXT: crements. Use the optional FH-2 or the touch panel to enter text (page 87). MESSAGE: Use the keyer to register text to the contest mem- ory keyer (page 84). Page 126 FT-991 O peraTing anual... -
Page 129: Gps/232C Select
(frequency). If there is no Available Values: ENABLE/DISABLE signal, the scanner continues scanning automati- Default Setting: DISABLE cally. Description: Set this setting to “ENABLE” to divide the memory channels into 6 groups. FT-991 O Page 127 peraTing anual... -
Page 130: Ref Freq Adj
The cutoff frequency can be set at 50 Hz increments Inputs from the RTTY/DATA jack on the rear between 700 Hz and 4000 Hz. panel. USB: Inputs from the USB jack on the rear panel. Page 128 FT-991 O peraTing anual... -
Page 131: Cw Wave Shape
Available Values: 2ms/4ms the RTTY/DATA jack. Available Values: 0 - 100 Default Setting: 4ms (msec) Description: Sets the rise and fall times of the keying Default Setting: 50 envelope in CW mode (transmit waveform). FT-991 O Page 129 peraTing anual... -
Page 132: Cw Freq Display
064 OTHER DISP (SSB) panel. Function: Sets the displayed frequency offset in DATA REAR: mode. Inputs signals from the USB jack or RTTY/ Available Values: −3000 - 0 - 3000Hz (10Hz/step) DATA jack on the rear panel. Page 130 FT-991 O peraTing anual... -
Page 133: Data Ptt Select
Disables the microphone circuit on the front Default Setting: 100kHz panel and inputs from the USB jack or PACKET Description: Sets the repeater offset frequency on the 28 jack on the rear panel. MHz band. FT-991 O Page 131 peraTing anual... -
Page 134: Using The Gm Function
OFF: Description: Sets the repeater offset frequency on the Outputs the audio whenever the transceiver 144 MHz band. receives a digital signal from another YAESU transceiver. 083 RPT SHIFT 430MHz CODE: Function: Sets the RPT offset frequency on the 430 The audio is output only when the SQL code of MHz band. -
Page 135: Ams Tx Mode
Available Values: OFF/700Hz - 4000Hz (50Hz/step) Default Setting: 3000Hz Description: This is the high-frequency cutoff audio fil- ter in RTTY mode. The cutoff frequency can be set at 50 Hz increments between 700 Hz and 4000 Hz. FT-991 O Page 133 peraTing anual... -
Page 136: Menu Mode
Function: Sets the slope of the high-frequency cutoff au- dio filter in SSB mode. Available Values: 6dB/oct / 18dB/oct Default Setting: 6dB/oct Description: Selects the slope setting of the high-fre- quency cutoff audio filter in SSB mode. Page 134 FT-991 O peraTing anual... -
Page 137: Ssb Tx Bpf
Description: Selects the value of the width (Q) for the SPECTRUM: low range for the 3 band parametric microphone Enables the spectrum display. equalizer between “1” and “10”. WATER FALL: Enables the waterfall display. FT-991 O Page 135 peraTing anual... -
Page 138: Prmtrc Eq2 Freq
3 band parametric microphone equalizer Description: Selects the width (“Q”) setting for the high between “−20 dB” and “+10 dB” when the speech range of the 3 band parametric microphone equalizer processor is activated. between “1” and “10”. Page 136 FT-991 O peraTing anual... -
Page 139: Vox Gain
“1” represents the minimum sensitivity and Default Setting: 100 “100” represents the maximum sensitivity. The Description: Adjusts the setting of the 50 MHz band VOX operation sensitivity may be adjusted while transmitter power output. transmitting the signal. FT-991 O Page 137 peraTing anual... -
Page 140: Vox Delay
VOX. Increase the setting to a value that the VOX circuit does not engage due to the received data (the higher the value the greater the operation sensitivity). Page 138 FT-991 O peraTing anual... - Page 141 Please see the FC-40 Operating Manual for detailed information. Interconnections to FT-991 After mounting the FC-40, connect the cables from the FC-40 to the ANT and TUNER jacks on the rear panel of the FT-991 Transceiver. Antenna Terminal Antenna Cable (5 m) Install the supplied ferrite core as close to the con- nector as possible.
-
Page 142: Installation Of Optional Accessories
The optional FC-40 Automatic Antenna Tuner provides automatic tuning of a coaxial line to present nominal 50-ohm impedance to the FT-991’s ANT jack. Before operation can begin, the FT-991 microprocessor must be setup to accommodate the FC-40 automatic tuner. This is done using the Menu Mode: 1. -
Page 143: Active-Tuning Antenna System Operation
ATAS-120A is a multi-band auto-tuning antenna that can be used in the amateur bands from the HF band to the UHF band (7/14/21/28(29) /50/144/430) Using the active tuning mechanism, tuning can be carried out automatically by the control signal from FT-991. Please refer to the ATAS-120A Operating Manual for the assembly and installation of ATAS-120A. - Page 144 Check the grounding and installation conditions if “HI-SWR” is flashing (tuning cannot be carried out). r As transmit signals are emitted during tuning, take note not to interfere with any communication that is already in progress on the frequency. Page 142 FT-991 O peraTing anual...
-
Page 145: Installation Procedure
MMb-90 i ounting rAcket nStAllAtion MMB-90 is a mobile bracket used to mount the FT-991 series in an automotive vehicle. Installation Procedure 1. Use the enclosed double-sided tape to temporarily mount the bracket at the installation location and then fasten the bracket securely with the enclosed... -
Page 146: Specifications
Bandwidth: 3 kHz (LSB/USB), 500 Hz (CW), 6 kHz (AM), 16 kHz (FM/C4FM) Audio Response (SSB): Not more than –6 dB from 300 to 2700 Hz Microphone Impedance: 600 Ohms (200 to 10 kOhms) Page 144 FT-991 O peraTing anual... - Page 147 4 to 8 Ohms (4 Ohms: nominal) Conducted Radiation: Less than 4 nW Specifications are subject to change, in the interest of technical improvement, without notice or obligation, and are guaranteed only within the amateur bands. FT-991 O Page 145 peraTing anual...
-
Page 148: Index
Clock ................23 Connection of Antenna and Power Cables ....13 HI-SWR Indicator ............22 Connection of Headphone .......... 14 Home Channel ............99 Connection of Microphone ........14 Connection of Remote Control Keypad ..... 14 Page 146 FT-991 O peraTing anual... - Page 149 Sub Band RX/TX Indicators ........24 More Frequency Navigation Techniques ....42 Supplied Accessories ........... 5 Mounting Bracket MMB-90 ........143 Sweep Mode ............... 41 MULTI Knob ............. 19 MULTI Knob Operations ........... 22 FT-991 O Page 147 peraTing anual...
- Page 150 VFO-B Data ............... 23 VFO COLOR ............. 36 VFO Scanning ............107 VL-1000 Linear Amplifier Interconnections ..... 16 V/M Button ..............21 Voice Memory ............68 VOX ................70 WIDTH ..............50 Zero-Beating .............. 82 Page 148 FT-991 O peraTing anual...
- Page 151 FT-991 O Page 149 peraTing anual...
- Page 152 Connect the equipment into an outlet on a circuit different from that to which the receiver is connected. r Consult the dealer or an experienced radio/TV technician for help. 1. Changes or modifications to this device not expressly approved by YAESU MUSEN could void the user’s authorization to operate this device.
- Page 154 Copyright 2014 YAESU MUSEN CO., LTD. All rights reserved No portion of this manual may be reproduced without the permission of YAESU MUSEN CO., LTD. 1412X-AO Printed in Japan...