
Related Manuals for Polaroid IS536


Summary of Contents for Polaroid IS536
- Page 1 S536 ANUAL © 2012 All Rights Reserved. Windows and the Windows logo are registered trademarks of Microsoft Corporation. All other trademarks are the property of their respective companies.
- Page 2 User Manual ANUAL...
-
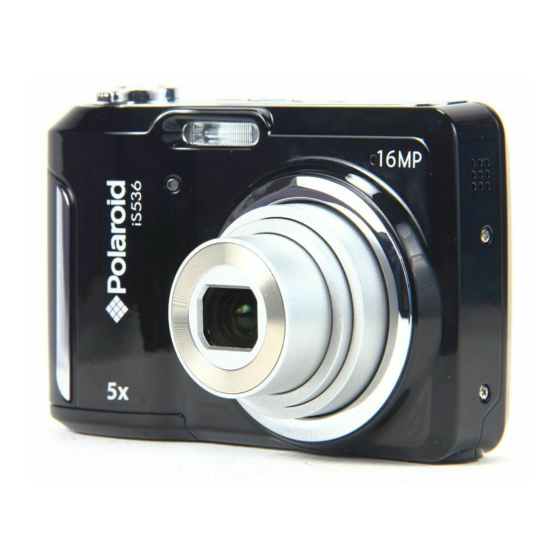
Page 3: Front View
Product features Front view Shutter button Flash button Zoom Mode button Power button Microphone Flash Beeper Lens Self-timer/Video light... -
Page 4: Back View
Product features Back view Delete button Menu button Info button Strap post USB port Review button Tripod socket SD/SDHC Card slot Battery compartment SD/SDHC Card (Optional accessory) -
Page 5: Table Of Contents
Table of contents 1 Setting up your camera .................1 Attaching the wrist strap ................1 Loading the batteries ................... 1 Turning on the camera .................. 2 Setting the language and date/time............2 Storing pictures on an optional SD or SDHC Card....... 3 2 Taking pictures/videos ................4 Taking pictures................ - Page 6 Table of contents Displaying pictures/videos on a television............. 20 Using the menu button in review..............21 Cropping pictures....................21 Rotating pictures..................... 22 Editing videos ......................23 5 Doing more with your camera ..............25 Using the menu button to change settings...........25 Using the Setup menu ...................29 6 Connecting the Camera to the Computer ..........31 Transferring photos and videos: Windows............
-
Page 7: Setting Up Your Camera
Setting up your camera Attaching the wrist strap Loading the batteries All batteries lose power over time–even if they’re not being used. Watch the battery level See page 6... -
Page 8: Turning On The Camera
Setting up your camera Turning on the camera Press the Power button. Setting the language and date/time Language: to change. to accept. Date/Time: At the prompt, press to change current eld. for previous/next eld. to accept. NOTE: To change language in the future, use the Setup Menu ( see page 29... -
Page 9: Storing Pictures On An Optional Sd Or Sdhc Card
Setting up your camera Storing pictures on an optional SD or SDHC Card Your camera has internal memory. We strongly recommend purchasing an SD or SDHC Card to conveniently store more pictures/videos. CAUTION: A card can only be inserted one way; forcing it may cause damage. Inserting or removing a card while the camera is on may damage the pictures, the card, or the camera. -
Page 10: Taking Pictures/Videos
Taking pictures/videos Taking pictures To get clear, focused pictures: 1 The camera turns on in Smart Capture mode. Mode button (If it’s in a di erent mode, press the Mode button, then until the LCD displays Smart Capture mode , then press OK.) 2 Compose the picture. -
Page 11: Taking A Video
Taking pictures/videos Taking a video Press the Mode button, then until the LCD displays Video , then press OK 2 Press the Shutter button completely down then release it. To stop recording, press and release the Shutter button again. To review and work with videos, see page 15 NOTE: Audio is captured during video recording. -
Page 12: Understanding The Picture-Taking Icons
Taking pictures/videos Understanding the picture-taking icons Focus mode Self timer Exposure compensation Flash mode Pictures/time remaining Capture mode Zoom indicator Battery level Watch the battery level Don’t miss out on great pictures and videos—watch the battery level. Full Three quarters Half Critical AC Power... -
Page 13: Using The Optical Zoom
Taking pictures/videos Using the optical zoom 1 Use the LCD to frame your subject. 2 To zoom in, turn the lever right toward T (Telephoto). To zoom out, turn the lever left toward W (Wide Angle). 3 Take the picture or video. NOTE: For focus distances, see Speci cations starting on page Using digital zoom... -
Page 14: Using The Ash
Taking pictures/videos Using the ash Press the Flash button repeatedly until the LCD displays the desired ash mode. Flash button Flash modes Flash res Auto When the lighting conditions require it. Fill (Flash On) Every time you take a picture, regardless of the lighting conditions. -
Page 15: Using Di Erent Modes
Taking pictures/videos Using di erent modes Press the Mode button, then until the LCD displays the mode that best suits your subjects and surroundings, then press OK Mode button Use this mode General picture taking—it o ers excellent image quality and ease of use. - Page 16 Taking pictures/videos Using Scene (SCN) modes Choose a Scene mode—for great pictures in practically any situation. 1 Press the Mode button, then until the LCD displays SCN, then press OK . 2 Press to choose a mode and read its description. 3 Press OK to enter that Scene mode.
-
Page 17: Using Shortcuts
Taking pictures/videos Using shortcuts Your camera has a clean, uncluttered interface. For quick access to the most popular capture and review functions: Press the Info button. The shortcuts appear. To hide the shortcuts again, press 2 Press to access functions like Exposure Compensation, Self-timer, and Auto focus in Capture mode. -
Page 18: Using The Self-Timer
Taking pictures/videos Using the self-timer Use the self-timer when you want to be included in a picture, or to ensure a steady Shutter button press. For best results, place the camera on a tripod or steady surface. Use the mirror on the camera front to help compose portraits. You can turn on the self-timer using a shortcut (see page 11) or these steps:... -
Page 19: Taking Panoramic Pictures
Taking pictures/videos Taking panoramic pictures Use panorama to “stitch” up to 3 pictures into a panoramic scene. NOTE: Only the panoramic picture is saved; individual pictures are not. (Exposure and white balance are set with the rst picture. The ash is set to O .) Press the Mode button, then until the LCD displays SCN, then press OK . -
Page 20: Sharing And Tagging Pictures
Tagging pictures Tagging with keywords Press the Review button, then to nd a picture to tag. Press the Menu button. Press to choose Keyword Tag, then press OK. You can also access Keyword Tag using a shortcut ( see page 11). -
Page 21: Reviewing And Editing
Reviewing and editing Reviewing pictures/videos Press the Review button. 2 Press for previous/next picture/video. To exit, press the Review button or press the Shutter button halfway down. To view pictures/videos as thumbnails, press the Wide Angle (W) button. (For more information, page 17 Review Playing a video... -
Page 22: Deleting Pictures/Videos
Reviewing and editing Deleting pictures/videos Press the Review button. 2 Press for previous/next picture/video. 3 Press the Delete button. 4 Follow the screen prompts. NOTE: To delete protected pictures/videos, remove protection before deleting. (See Protecting pictures/videos from deletion.) Using the undo delete picture feature If you accidentally delete a picture, you may be able to use Undo Delete to retrieve it. -
Page 23: Magnifying A Picture
Reviewing and editing Viewing pictures/videos in di erent ways Magnifying a picture 1 Turn the lever toward T (Telephoto) to magnify 2X–8X. 2 Press to view other parts of a picture. Press OK to return to 1X. Viewing pictures/videos as thumbnails (multi-up) Press the Review button. -
Page 24: A Smarter Way To Nd And Enjoy Your Pictures
Reviewing and editing A smarter way to nd and enjoy your pictures Tag pictures—by keywords—to make them easy to nd, later. For example, the camera can nd all pictures that contain “Mary” or “Dad’s 60th Birthday.” (See Tagging with keywords, page 14 You can also nd pictures by date taken or if it’s marked as a favorite. -
Page 25: Understanding The Review Icons
Reviewing and editing Understanding the review icons Protected Video duration Picture/Video number Select picture/video Shortcuts* Edit tags View thumbnails Play video Battery level Favorite Keyword * For more about shortcuts, see page... -
Page 26: Displaying Pictures/Videos On A Television
Reviewing and editing Displaying pictures/videos on a television You can display pictures/videos on a television, computer monitor, or any device equipped with a video input. To connect the camera directly to a television, use an A/V cable (may be sold separately). NOTE: Ensure that the camera Video Out setting (NTSC or PAL) is correct ( see page 29). -
Page 27: Using The Menu Button In Review
Reviewing and editing Using the menu button in review Press the Review button, then the Menu button. 2 Press to choose a tab: Review Edit Setup 3 Press to choose a setting, then press OK. 4 Choose an option, then press OK. Cropping pictures You can crop a picture so that only the desired portion of the picture remains. -
Page 28: Rotating Pictures
Reviewing and editing Rotating pictures You can rotate a picture to portrait or landscape orientation. Press the Review button, then to nd the previous/next picture. Press the Menu button. Press to highlight the Edit tab. 3 Press to highlight Rotate Picture, then press OK. 4 Press to highlight an option: Rotate Right—rotates the picture 90 degrees clockwise. -
Page 29: Editing Videos
Reviewing and editing Editing videos Trimming a video You can remove the start or end from a video, saving only the desired portion. Press the Review button, then to nd a video. Press the Menu button, then to choose the Edit tab. -
Page 30: Making A Video Action Print
Reviewing and editing Making a video action print From a video, you can make a 9-up picture, suitable for a 4 x 6-inch (10 x 15 cm) print. Press the Review button, then to nd a video. Press the Menu button, then to choose the Edit tab. -
Page 31: Doing More With Your Camera
Doing more with your camera Using the menu button to change settings You can change settings to get the best results from your camera. NOTE: Some modes o er limited settings. Some settings remain until you change them; others, until you change modes or turn o the camera. - Page 32 Doing more with your camera Settings More information Exposure Compensation See Speci cations, starting on page Make a picture lighter or darker. (Available in Program and Panorama modes.) To access this feature with a shortcut, see page ISO Speed Auto—For general picture taking. Control the sensitivity of ISO 80, 100, 200, 400, 800, 1250 the camera to light.
- Page 33 Doing more with your camera Settings More information White Balance Auto—Automatically corrects white balance. Ideal for general picture taking. Choose your lighting condition. (Available only Daylight—For pictures in natural lighting. in Program and Panorama Tungsten—Corrects the orange cast of incandescent light modes.) bulbs.
- Page 34 Doing more with your camera Settings More information Preset Keyword Tag New Keyword Create keyword names and Delete Keyword assign them to the pictures/videos you take next. See page Sharpness See Speci cations, starting on page 32 Control picture sharpness or softness.
-
Page 35: Using The Setup Menu
Doing more with your camera Using the Setup menu Use Setup to customize other camera settings. Settings More information Date & Time Set date and time. LCD Brightness Auto—LCD brightness is automatically adjusted according to environment. Choose LCD brightness during picture/video capture. - Page 36 Doing more with your camera Settings More information Format Memory Card—Deletes everything on the card; formats the card. CAUTION: Exit—Exits without making a change. Formatting deletes all Internal Memory—Deletes everything in pictures/videos, including those internal memory keyword tags; that are protected. Removing a formats the internal memory.
-
Page 37: Connecting The Camera To The Computer
Connecting the Camera to the Computer 1) Use the USB cable that came with your camera to connect your camera to your computer. 2) Power the camera ON. 3) The rst time you connect the device to the computer you will have to wait a few seconds until the computer recognizes the device. -
Page 38: Appendix
Appendix Speci cations CCD—1/2.33-type E ective pixels— 16 MP (4656 x 3480) LCD—3 in. (7.62 cm) LCD; 230K pixels; 4:3 aspect ratio Image storage— Optional SD/SDHC Card (The SD logo is a trademark of the SD Card Association.) Maximum supported card size: 32 GB Internal storage capacity—... - Page 39 Appendix-Speci cations Electronic Flash—Auto ash; Auto, Fill, Red Eye, O ; Guide No. 5.7; working range @ ISO 400 with red-eye reduction o : 0.3–2.85 m (1–9.4 ft) @ wide; 0.5–1.68 m (1.6–5.5 ft) @ telephoto Self-timer mode—2 seconds, 10 seconds, 2 picture timer Burst mode—Maximum 3 pictures @ 1.5 fps Capture modes—Smart Capture, Scene modes, P-mode, Video Image le format—...
-
Page 40: Troubleshooting
Troubleshooting Troubleshooting Status Solution Camera does not Make sure the batteries are fresh and installed correctly. turn on Camera does not turn Camera buttons and controls do not function LCD is too dark. Adjust the LCD Brightness setting Pictures remaining Continue taking pictures. - Page 41 Troubleshooting Status Solution You cannot take a Turn the camera o , then on again. picture Depress the Shutter button all the way. Insert a new/charged battery . Memory is full. Transfer pictures to the computer delete pictures , or insert another card. Computer/connectivity problems Status Solution...
- Page 42 Troubleshooting Troubleshooting Picture quality problems Status Solution Picture is not clear To automatically set exposure and focus, press the Shutter button halfway. When the framing marks turn green, press the Shutter button completely down to take the picture. Clean the lens . Make sure the camera is not in Macro mode if you are more than 27.6 in.
-
Page 43: Warranty & Support Information
TO OBTAIN WARRANTY SERVICE AND TROUBLESHOOTING INFORMATION Call 877 0033 or Visit our website at www.polaroid.com. To receive Warranty service along with the name and address of an authorized product service center, the original consumer purchaser must contact us for problem determination and service procedures. - Page 44 This product is manufactured, distributed and sold by SAKAR International, Inc. Polaroid, Polaroid & Pixel, Made in Polaroid and Polaroid Classic Border Logo are trademarks of PLR IP Holdings, LLC, used under license. All other trademarks are the property of the respective owner, who has not sponsored, endorsed or approved this product.
-
Page 45: Technical Support
Please check with local authorities or the retailer where you purchased this product to determine a location where you can appropriately dispose of the product. You may also go to www.polaroid.com and reference Social Responsibility to learn more about the speci c laws in your area and to locate a collection facility near your home. -
Page 46: Fcc Statement
Warranty and Support Information NOTE: This equipment has been tested and found to comply with the limits for a Class B digital device, pursuant to Part 15 of the FCC Rules. These limits are designed to provide reasonable protection against harmful interference in a residential installation. This equipment generates.