Table of Contents
Advertisement
Quick Links
Advertisement
Table of Contents
Troubleshooting

Related Manuals for Fujitsu LIFEBOOK T734


Summary of Contents for Fujitsu LIFEBOOK T734
- Page 1 System Operating manual FUJITSU LIFEBOOK T734...
- Page 2 Contact address in North America FUJITSU AMERICA INC: 1250 East Arques Avenue Sunnyvale CA 94085-3470, U.S.A. Telephone: 800 831 3183 or 408 746 6000 "http://solutions.us.fujitsu.com" "http://solutions.us.fujitsu.com/contact" Have a question? Email us at: "AskFujitsu@us.fujitsu.com" Copyright © 2014 Fujitsu America, Inc. All rights reserved. B5FK-2331-01ENZ0...
- Page 3 FUJITSU LIFEBOOK T734 Operating manual Fujitsu Contact Information Notational conventions Ports and controls Important notes First-time setup of your device Working with the notebook Security functions Connecting external devices Removing and installing components during servicing Settings in BIOS Setup Utility...
- Page 4 Copyright and Trademark Information Fujitsu America, Incorporated has made every effort to ensure the accuracy and completeness of this document; however, as ongoing development efforts are continually improving the capabilities of our products, we cannot guarantee the accuracy of the contents of this document.
-
Page 5: Table Of Contents
Fujitsu Contact Information ........ - Page 6 Connecting an external monitor ............78 Fujitsu...
- Page 7 Error messages on the screen ............98 Fujitsu...
- Page 8 Index ................. . 109 Fujitsu...
-
Page 9: Fujitsu Contact Information
Fujitsu Software Download Manager (FSDM) utility. The FSDM utility is available from the Fujitsu Support site. FSDM will allow you to view a list of the most current drivers, utilities, and applications to determine whether you have the latest versions. If you have a Windows 7 or Windows 8/8.1 operating system, you will need to go to the Support Site to download... -
Page 10: Notational Conventions
"Safety information" • cross-references to an external source, e.g. a web address: For more information, go to "http://solutions.us.fujitsu.com/" • names of CDs, DVDs and titles or designations for other materials, e.g.: "CD/DVD Drivers & Utilities" or "Safety/Regulations" manual Indicates a key on the keyboard, e.g:... -
Page 11: Ports And Controls
14 = Speakers 6 = Status indicators 15 = Microphone jack 7 = Windows button 16 = Headphone port 8 = Tablet buttons 17 = Memory card slot 9 = ON/OFF button 18 = ON/OFF button for wireless components Fujitsu... - Page 12 1 = DC input connector (DC IN) 3 = USB port with charging function (Anytime USB charge, USB 3.0) 2 = HDMI port Rear 1 = Security Lock device 3 = USB ports (USB 2.0) 2 = VGA monitor port 4 = LAN port Fujitsu...
- Page 13 5 = Battery charge status indicator 2 = Memory service compartment 6 = Port for port replicator 3 = Attachment eye for the pen cord 7 = Removable dust filter 4 = Battery with SIM card slot under the battery Fujitsu...
-
Page 14: Important Notes
California to cause birth defects or other reproductive harm. Wash hands after handling. This notebook complies with the relevant safety regulations for data processing equipment. If you have questions about using your notebook in a particular area, please contact your sales outlet or our Hotline/Service Desk. Fujitsu... -
Page 15: Additional Safety Notes For Devices With Radio Components
Energy saving under Windows ► Make use of the power management features (see ""Using the power-management features", Page 57"). Travelling with your notebook Mobile operation Notes Transportation Notebook Please observe the points listed below when travelling with your notebook. Fujitsu... -
Page 16: Before You Travel
Russia and the Commonwealth of Independent States (CIS), much of Europe, parts of Latin America, the Middle East, parts of Africa, Hong Kong, India, much of south-east Asia United Kingdom, Ireland, Malaya, Singapore, parts of Africa China, Australia, New Zealand Fujitsu... -
Page 17: Notebook: Transporting
The surface can be cleaned with a dry cloth. If particularly dirty, use a cloth which has been moistened in mild domestic detergent and then carefully wrung out. To clean the keyboard and the touchpad, if available, you can use disinfectant wipes. Ensure that no liquid enters the device. Fujitsu... -
Page 18: First-Time Setup Of Your Device
► Unpack all the individual parts. Packaging Transport ► Check your device for any visible damage which may have occurred during transportation. You may need the packaging in the future, if you need to transport your device. Fujitsu... -
Page 19: Selecting A Location
► Connect the power cable (1) to the AC adapter. ► Plug the AC cable (2) into a AC outlet. ► Connect the AC adapter cable (3) to the DC jack (DC IN) of the device. Fujitsu... -
Page 20: Switching On The Device For The First Time
► Slide the ON/OFF button (1) to the right to switch on the notebook. The ON/OFF button returns automatically to its original position. ► During installation, follow the instructions on screen. You can find information and help on the Windows operating system functions on the Internet at "http://windows.microsoft.com". Fujitsu... -
Page 21: Installing Bonus Apps
There are also cases in which if multiple applications are selected to install but one of them needs a reboot, the system will reboot and continue installing the rest of the selected applications. Fujitsu... -
Page 22: Working With The Notebook
Please refer to the notes in "Important notes", Page Status indicators Statusindicators Symbols The status indicators provide information about the status of the power supply, the drives and the keyboard functions, etc. Fujitsu... - Page 23 Scroll Lock indicator Indicator is lit: The key combination has been pressed. The effect that this key has varies between applications. Lock Workstation indicator The indicator is illuminated: The security functions of the notebook have locked your workstation. Fujitsu...
-
Page 24: Opening The Notebook
Working with the notebook Opening the notebook ► Open the LCD screen. Fujitsu... -
Page 25: Switching On The Notebook
Windows 7 Security - Power Options If you have assigned a password, you must enter this when requested to do so in order to start the operating system. Detailed information can be found in the chapter "Security functions", Page Fujitsu... -
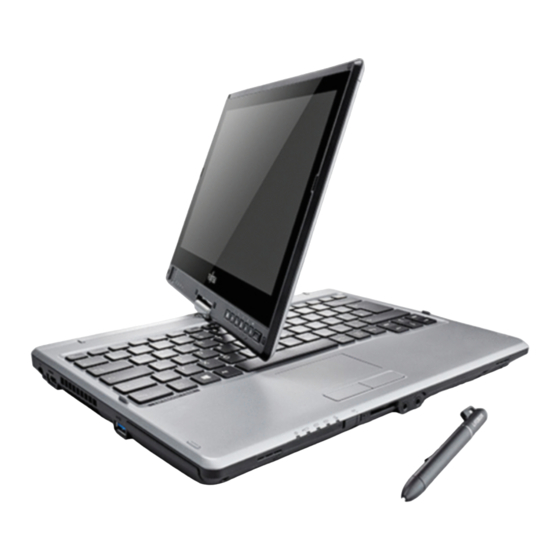
Page 26: Different Ways To Use Your Notebook
You must note that the display cannot be turned completely on its own axis! From notebook to Tablet PC ► Raise the LCD display into a vertical position. Fujitsu... - Page 27 ► Hold the screen as low as possible on both sides. Turn the screen to the left or right in the direction of the arrow. At first you will feel some slight resistance, then it will turn easily and without friction. ► Turn the display further until it has turned 180° and the hinge latches in. Fujitsu...
-
Page 28: Select Display Orientation (Portrait Or Landscape Orientation)
Windows 7 You can change these settings in the Fujitsu menu or under Start - (Settings -) Control Panel - Hardware and Sound - Display - Settings. Profiles for operating with various different screen modes can be selected via the Fujitsu Tablet Control option in the Fujitsu menu. -
Page 29: From Tablet Pc To Notebook
Working with the notebook From Tablet PC to notebook ► Raise the LCD screen into a vertical position. Fujitsu... -
Page 30: Switching Off The Notebook
Switching off the notebook Notebook ► Close all applications and then shut down the operating system (please see the "Operating System Manual"). ► Slide the ON/OFF button towards the right. The ON/OFF button returns automatically to its original position. Fujitsu... -
Page 31: Closing The Notebook
Portuguese, Spanish, Brazilian, Norwegian (Bokmål and Nynorsk), Swedish, Finnish, Danish, Polish, Rumanian, Serbian (Cyrillic and Latin script), Catalan, Russian, Czech and Croatian. Under Windows 8 you can set the required language under Control Panel – Time, Language and Region – Language. Fujitsu... -
Page 32: Lcd Screen
LCDscreen Notes High-quality LCD screens (TFT) are installed in notebooks from Fujitsu. For technical reasons, TFT monitors are manufactured for a specific resolution. An optimal, clear picture can only be ensured with the correct resolution intended for the relevant TFT monitor. A monitor resolution which differs from the specification can result in an unclear picture. -
Page 33: Using A Device As A Tablet Pc
Please note: There are separate calibration programs available for calibrating the stylus and for calibrating finger-based operation. In each case, use the calibration tool described in the supplementary sheet. Do not use the calibration tool for the stylus to calibrate finger-based operation. Fujitsu... - Page 34 ► Touch the desired item once with your finger mouse button) tip. Keep the finger tip pressed against the touchscreen. The context menu appears. Moving the cursor ► Position one finger on the touchscreen and move the finger in the desired direction. Fujitsu...
- Page 35 ► Position two fingers on the touchscreen. ► Move your fingers upwards to scroll up. ► Move your fingers downwards to scroll down. Rotating ► Position the thumb on the touchscreen, then turn the picture clockwise or counter-clockwise using your index finger. Fujitsu...
- Page 36 ► Position two fingers on the touchscreen and move them apart to increase the view. ► Position two fingers on the touchscreen and move them together to decrease the view. Blocking context-sensitive menus ► With two fingers, tap twice briefly in quick succession on the touchscreen. Fujitsu...
-
Page 37: Using The Stylus
Replace the stylus tip if it is worn. The warranty does not cover a scratched screen. While writing, you should take care not to scratch the surface of the display (e.g. with a wristwatch or bracelet). Fujitsu... - Page 38 Place the pen tip directly on the screen. Setting the pen Operating system Menu Windows 7 Under Hardware and Sound – Pen and Input Devices in the Control Panel you can change various settings for the pen (assignment and function of the pen button). Fujitsu...
-
Page 39: Calibrating The Pen
You should attach the pen with a pen cord to prevent accidentally dropping or losing it. ► Attach the end of the pen cord with the smaller loop to your pen. ► Attach the end of the pen cord with the larger loop to your notebook. Fujitsu... -
Page 40: Using The Device As A Notebook
This shortcut works on both Windows 7 and Windows 8. Selecting an item ► Move the pointer to the item you wish to select. Touchpad ► Tap the touchpad once or press the left button once. The item is selected. Fujitsu... -
Page 41: Executing Commands
► Press and hold the left button and drag the item to the desired position with the finger on the touchpad. The item will be moved. Switching the Touchpad on and off You can switch the Touchpad on and off using a key combination, "Key combinations", Page Fujitsu... -
Page 42: Keyboard
The figure below shows how to access the different characters on keys with overlaid functions. The example applies when the Caps Lock key has not been activated. The illustrations shown below may differ from your actual device. Alt Gr Fujitsu... -
Page 43: Key Description
The cursor keys move the cursor in the direction of the arrow, i.e. up, down, left, or right. Cursor keys Cursor controlkeys Start key The Start key opens the Windows Start menu. Startkey Menu key The Menu key invokes the menu for the marked item. Fujitsu... -
Page 44: Virtual Numeric Keypad
Further information about the status indicators can be found in chapter "Status indicators", Page Country and keyboard settings If you want to change the country and keyboard settings, proceed as described in the documentation concerning your operating system. Fujitsu... -
Page 45: Key Combinations
This key combination increases the brightness of the screen. Fn+F7 Screenbrightness Decrease volume This key combination reduces the volume of the internal speakers. Fn+F8 Volume Increase volume This key combination increases the volume of the internal speakers. Fn+F9 Volume Fujitsu... - Page 46 Halt current operation This key combination can be used to halt an operation instantly Ctrl without clearing the keyboard buffer. Back tab This key combination moves the cursor back to the previous tab stop. Shift+Tab Tabback Fujitsu...
-
Page 47: Tablet Buttons
The tablet buttons have different uses in different modes. In addition, you can still individually program some of the tablet buttons, "Programming the tablet buttons", Page Fujitsu... -
Page 48: Programming The Tablet Buttons
Windows 7: This button locks and unlocks the automatic rotation of the display. Button "A" This button starts the Fujitsu Menu application. You can use this application to change certain system settings. The button is freely programmable. Button "B"... -
Page 49: Webcam
LCD screen may flicker while the light level is adjusted. Further information on using the webcam and on the additional settings which are possible for your webcam can be found in the help function of the program which uses the webcam. Fujitsu... -
Page 50: Rechargeable Battery
Never store the batteries in the device. Removing and installing the battery Only use rechargeable batteries approved by Fujitsu for your notebook. Never use force when fitting or removing a battery. Make sure that no foreign bodies get into the battery connections. -
Page 51: Removing The Battery
► Prepare for removal, see chapter "Preparing to remove components", Page ► Slide the release button (1) in direction of the arrow. ► Slide the release button (2) in direction of the arrow. ► Lift the battery out of the battery compartment (3). Fujitsu... - Page 52 ► Place the battery on the lower edge of the battery compartment (1). ► Slide the battery into the battery compartment until you feel it engage (2). ► Slide the release button into its locked position (3). ► Complete the removal, see chapter "Finishing component removal", Page Fujitsu...
-
Page 53: Battery Charge Status Indicator
LED indicator State of charge Green The battery is between 50% and 100% charged. Orange The battery is between 11% and 49% charged. The battery is between 1% and 10% charged. LED not lit The battery is fully discharged. Fujitsu... -
Page 54: Module
The module can now be removed without any further actions being necessary. Removing a module Module Drive WeightSaver ► Slide the release lever in the direction of the arrow (1). ► Now pull the module out of the module bay (2). Fujitsu... -
Page 55: Installing A Module
Avoid storing a optical disk in areas subject to high temperatures or humidity. You may use both 3.15 and 4.7-inch optical disks in the optical drive. When using a optical disk of lesser quality, vibrations and reading errors may occur. Fujitsu... -
Page 56: Cd/Dvd Indicator
► Gently pull the drive tray (2) completely out. ► Place the optical disk in the drive tray with the printed side facing upwards. ► Remove a optical disk that has been inserted. ► Push in the drive tray until you feel it lock into place. Fujitsu... -
Page 57: Manual Removal (Emergency Removal)
filter when the device is switched on. ► Prepare for removal, see chapter "Preparing to remove components", Page ► Press and hold the lock of the removable dust filter (1) and remove it from its slot (2). ► Clean the dust chamber. Fujitsu... - Page 58 Working with the notebook ► Insert the removable dust filter into the slot (1) at an angle as shown, and ensure that you feel it click into place. ► Complete the removal, see chapter "Finishing component removal", Page Fujitsu...
-
Page 59: Using The Power-Management Features
If you do not intend to use your notebook for a long period of time: ► Exit power saving mode if necessary via the mouse or keyboard or by switching on the notebook. ► Close all opened programs and completely shut down the notebook. Fujitsu... -
Page 60: Memory Cards
(see the documentation for your operating system). ► On devices with card locking: Press on the storage card (1). Memory card The storage card is released and can now be removed. ► Pull the storage card out of the slot (2). Fujitsu... -
Page 61: Expresscards
► Gently push the card into the slot until you feel it click into place. Do not use any force. Depending on the particular type used, the card may protrude slightly from the slot. Please see the documentation relating to the card for driver installation instructions. Fujitsu... -
Page 62: Removing The Card
If you attach an external microphone, the built-in microphone is disabled. When you connect headphones or external speakers, the built-in speakers are disabled. Information on connecting headphones and a microphone can be found "Connecting external devices", Page Fujitsu... -
Page 63: Sim Card
► Press on the edge of the SIM card so that it jumps up slightly out of the slot. ► Pull the SIM card out of the slot in the direction of the arrow (1). ► Complete the removal, see chapter "Finishing component removal", Page Fujitsu... -
Page 64: Optional Wireless Lan / Bluetooth / 4G Wireless Components
Working with the notebook Optional wireless LAN / Bluetooth / 4G wireless components The installation of radio components not approved by Fujitsu will invalidate the certifications issued for this device. Depending on the device configuration you ordered, your device will be equipped with wireless LAN, Bluetooth and/or 4G. -
Page 65: Further Information On Wlan And Bluetooth
For further information about WLAN or Bluetooth, see "Appendix page 109". Access via Wireless WAN You can purchase the accessories for Wireless WAN reception from your Fujitsu dealer. If you have ordered a Wireless WAN module, your device will already be prepared when you receive it. -
Page 66: Ethernet And Lan
Your port replicator is a device that enables you to quickly connect your notebook to your peripherals, such as a monitor, printer etc. The features offered by the port replicator include standard ports for monitor, audio, mouse and keyboard. You need only dock the notebook in order to use your peripheral devices. Fujitsu... -
Page 67: Ports On The Port Replicator
With the ability of running three monitors you will have enough real-estate to cut from one document and paste to another and keep track of email without closind one app so you can see another. This is the key to beingt efficient in today’s business environments. Fujitsu... -
Page 68: Setting Up The Port Replicator
Before connecting the notebook to the port replicator, check if the setting lever of the port replicator is in the right position. If necessary, adjust the setting lever to the correct position. ► Disconnect the AC adapter cable from the DC socket (DC IN) of the notebook. Fujitsu... - Page 69 ► Connect the AC adapter cable to the DC jack (DC IN) of the port replicator (1). ► Connect the power cable to the AC adapter (2). ► Plug the power cable into the power outlet (3). Power outlets will vary from country to country, see chapter "When travelling in other countries ", Page Fujitsu...
-
Page 70: Switching On The Notebook Via The Port Replicator
If the notebook cannot be shut down properly, press the ON/OFF button on the port replicator for approx. four seconds. The notebook will switch off. Any unsaved data may however be lost. Fujitsu... -
Page 71: Disconnecting The Notebook From The Port Replicator
Problems may occur if the notebook is removed from the port replicator during operation. We recommend that you switch off the notebook beforehand or use the Windows function Start (arrow icon) – Undock. ► Pull the release button in the direction of the arrow (1). ► Pick up the notebook (2). Fujitsu... -
Page 72: Security Functions
Brief overview of security functions Detailed information about the security equipment of your device can be found in the "Professional Notebook" manual, on the "Drivers & Utilities" CD/DVD or on the Internet at "http://solutions.us.fujitsu.com". Security functions Type of protection Preparation... -
Page 73: Configuring The Fingerprint Sensor
Kensington Lock Cable, a sturdy steel cable, to help protect your notebook from theft. The Kensington Lock Cable is available as an accessory. Fujitsu recommends the use of a combination lock. ► Fit the Kensington Lock Cable on the device on your notebook. -
Page 74: Configuring Password Protection In Bios Setup Utility
The notebook will be rebooted and the new password will come into effect. It will now be necessary to first enter your supervisor or user HDD password in order to open the BIOS Setup Utility. Please note that the user HDD password only provides access to a few of the BIOS settings. Fujitsu... -
Page 75: Password Protection For Booting Of The Operating System
► Select the Disabled option and press the Enter key. If you do not want to change any other settings, you can exit BIOS Setup Utility. ► Select the Save Changes & Exit option under Exit. The notebook will reboot. The system is no longer password-protected. Fujitsu... -
Page 76: Password Protection For The Hard Disk
► To cancel the password for the second hard disk (Drive1), go to the Drive1 area and select the field Set Master Password, then proceed in exactly the same way as for cancelling the password for the first hard disk (Drive0). Fujitsu... -
Page 77: Using The Security Function Of The Tablet Keys
Setting the Supervisor password ► Select Start - Run. ► Enter the following at the command line: C:\Program Files\Fujitsu\Security Panel Application\Supervisor\FJSECS.EXE. ► Confirm with Enter ►... -
Page 78: Trusted Platform Module (Tpm) (Device-Dependent)
► Mark the TPM Security Chip Setting field and press the Enter key. ► Select Disabled to deactivate the TPM. ► From the Exit menu, choose the option Exit Saving Changes. ► Press the Enter key and select Yes. Your notebook will now restart and TPM will be disabled. Fujitsu... -
Page 79: Connecting External Devices
Peripheraldevices Disconnecting devices from the notebook 1. Turn off your notebook and all external devices. 2. Unplug your notebook and all devices from the power outlets. 3. Disconnect the cables for your external devices following the instructions. Devices Peripheraldevices Fujitsu... -
Page 80: Connecting An External Monitor
► First switch on the external monitor and then the notebook. You can also switch back and forth between the external monitor and the notebook’s LCD monitor, see chapter "Key combinations", Page You can display the same picture on the external monitor and the notebook LCD screen simultaneously. Fujitsu... -
Page 81: Connecting An External Monitor To The Displayport
The HDMI port on your notebook can be used to connect an external amplifier, LCD TV or a plasma TV with an HDMI connection. ► Connect the data cable to the external device. ► Connect the data cable to the HDMI port of the notebook. Fujitsu... -
Page 82: Connecting Usb Devices
Additional information can be found in the documentation for the USB devices. ► Connect the data cable to the external device. ► Connect the data cable to a USB port of the notebook. Device drivers USB devices will be automatically recognized and installed by your operating system. Fujitsu... -
Page 83: Usb Port With Charging Function (Anytime Usb Charge)
► Left click on the icon to safely remove hardware, located in the taskbar. ► Select the device which you want to shut down and remove. ► Press the Enter key. Wait for the dialog box which tells you that it is now safe to remove the device. Fujitsu... -
Page 84: Connecting External Audio Devices
If you purchase a cable from a retailer, please note the following information: The headphone port on your notebook is a "3.5 mm jack socket". If you want to connect headphones or a speaker you will need a "3.5 mm jack plug". Fujitsu... -
Page 85: Removing And Installing Components During Servicing
The equipment and tools you use must be free of static charges. • Remove the power plug from the AC supply before inserting or removing boards containing ESDs. • Always hold boards with ESDs by their edges. • Never touch pins or conductors on boards fitted with ESDs. Fujitsu... -
Page 86: Preparing To Remove Components
Otherwise, there is a risk of suffering burns! As some components are exposed that are sensitive to static electricity, please take note of chapter "Notes on installing and removing boards and components", Page Fujitsu... -
Page 87: Removing A Cover
Removing memory modules ► Carefully push the two mounting clips outwards (1). Memory expansion Memory module The memory module snaps upwards (2). ► Pull the memory module out of its slot in the direction of the arrow (3). Fujitsu... -
Page 88: Installing A Memory Module
► Fasten the cover with the screw (2). ► Install the battery again (see "Removing and installing the battery", Page 48). ► Turn the notebook the right way up again and place it on a flat surface. ► Reconnect the cables that were previously disconnected. Fujitsu... -
Page 89: Removing And Installing The Hard Disk
If you install the wrong screws, components may be damaged. ► Slide the cover in direction of the arrow (2). ► Lift the cover off the notebook (3). Fujitsu... -
Page 90: Removing A Hard Disk
Removing and installing components during servicing Removing a hard disk ► To release the hard disk from the contacts, pull it in the direction of the arrow (1). ► Remove the hard disk from the hard disk compartment (2). Fujitsu... -
Page 91: Installing A Hard Disk
Removing and installing components during servicing Installing a hard disk ► Place the hard disk into the hard disk compartment (1). ► Push the hard disk in the direction of the arrow (2) until the contacts of the hard disk engage. Fujitsu... -
Page 92: Attaching The Cover
► Install the battery again (see "Inserting battery", Page 50). ► Turn the notebook the right way up again and place it on a flat surface. ► Reconnect the cables that you disconnected before. Fujitsu... -
Page 93: Settings In Bios Setup Utility
► Select the option you want to change with the cursor keys ↑ ↓ ► Press the Enter key. ► Press the key to exit the selected menu. ► For future reference, make a note of the changes you have made (for example, in this manual). Fujitsu... -
Page 94: Exiting Bios Setup Utility
► If you want to exit BIOS Setup Utility with these settings, choose Exit Saving Changes and Yes. Save Changes and Power Off ► To save the changes and switch off your device, select Save Changes and Power Off and Yes. The changes are saved. Your device is shut down. Fujitsu... -
Page 95: Troubleshooting And Tips
► Note the ID number of your device. The ID number is found on the type rating plate on the back or underside of the casing. ► For further clarification of the problem, contact the Fujitsu Service Desk. When you do this, please have ready the ID number and serial number of your system. -
Page 96: The Notebook's Date Or Time Is Incorrect
The notebook’s LCD screen remains blank LCDscreen LCDscreenistoodark Cause Troubleshooting Monitor is switched off. ► Press a key or touch the touchpad. External monitor or television set connected. ► Press the key combination to switch the screen output, see "Key combinations", Page Fujitsu... -
Page 97: The Lcd Screen Is Difficult To Read
Change the following setting: ► Set the screen resolution: Set the screen resolution as described in the documentation for your operating system. ► Select monitor: Select monitor 1 or 2 as described in the documentation for your operating system. Fujitsu... -
Page 98: The Cursor Does Not Correctly Follow The Pen Movements
► Charge the battery. ► Insert a charged battery. ► Connect the AC adapter to the notebook. The power adapter is not connected correctly. ► Check whether the AC adapter is connected correctly to the notebook. ► Switch the notebook on. Fujitsu... -
Page 99: The Notebook Stops Working
The wireless component is enabled. Despite ► Check whether the radio connection is this, the wireless connection to a network does switched on via the software. not work. ► Further information on using the radio component can be found in the help files. Fujitsu... -
Page 100: The Battery Discharges Too Quickly
The system configuration information is ► Press the function key to access the incorrect. BIOS Setup. ► In the BIOS Setup, select the Exit menu. ► Select the entry Load Setup Defaults. ► Select OK and press the Enter key. Fujitsu... - Page 101 ► Contact your sales outlet or our customer service centre. System cache error - Cache disabled ► Contact your sales outlet or our customer service centre. System timer error ► Contact your sales outlet or our customer service centre. Fujitsu...
-
Page 102: Technical Data
Width x depth x height 315.6 mm x 233 mm x 37.5-33.5 mm / 19.99 in x 14.76 in x 1.48–1.32 in with rubber feet Weight depending on configuration from 1.8 kg / 3.97 lbs Input devices Keyboard 85 buttons, splash-protected Fujitsu... - Page 103 (Anytime USB charge), 2 x USB 2.0) Security Lock Ambient conditions Environment class DIN IEC 721 Mechanism class DIN IEC 721 Operating temperature 5℃ ..35℃ / 41°F ..95°F Transport temperature (2K2) –15°C ..60°C / 5°F ..140°F Fujitsu...
-
Page 104: Port Replicator (Optional)
Rechargeable battery You will find information on the batteries used in your device on the Internet at "http://solutions.us.fujitsu.com/www/content/support/contact/index.php". In addition to the main battery, you can order an optional battery which is inserted in the module slot. All rechargeable batteries are 6-cell batteries. -
Page 105: Ac Adapter For Use With The Notebook And Port Replicator
50 Hz to 60 Hz (automatic) Max. rated current 0.7 A to 1.2 A Secondary Nominal power 80 W Rated voltage 19 V Max. rated current 4.22 A An additional AC adapter or power cable can be ordered at any time. Fujitsu... -
Page 106: Manufacturer's Notes
Remember – protecting the environment is a cooperative effort, and you should make every effort to protect it for current and future generations. * To order a new battery for your Fujitsu mobile computer, go to the Fujitsu shopping site "www.shopfujitsu.com"... -
Page 107: Regulatory Notices
FCC Notices Regulatoryinformation NOTICE: Changes or modifications not expressly approved by Fujitsu could void this user’s authority to operate the equipment. Notice to Users of Radios and Television These limits are designed to provide reasonable protection against harmful interference in a residential installation. -
Page 108: Doc (Industry Canada) Notice
This device complies with Part 15 of FCC Rules. Operation is subject to the following two conditions: (1) this device may not cause interference, and (2) this device must accept any interference, including interference that may cause undesired operation of this device. Fujitsu... - Page 109 In cases in which the policy regarding use of radio devices in specific environments is not clear (e.g., airports, hospitals, chemical/oil/gas industrial plants, private buildings), obtain authorization to use these devices prior to operating the equipment. Fujitsu...
-
Page 110: Energy Star Compliance
ENERGY STAR Compliance Your Fujitsu system is an ENERGY STAR qualified mobile PC. By choosing a computer with the latest energy-saving technology, you’re helping to preserve our environment for future generations. ENERGY STAR is a joint program of the U.S. Environmental Protection Agency, U.S. Department of Energy, Natural Resources Canada, and other governments around the world helping us save money while protecting the environment through energy efficient products and practices. -
Page 111: Index
Appendix: T734 Information This appendix contains a variety of information that you will find useful in operating your Fujitsu LIFEBOOK. The appendix consists of three sections, as follows: Fingerprint Sensor Device The fingerprint sensor is a handy device that lets you avoid having to enter a username and password every time you want to: •... -
Page 112: Introducing The Optional Fingerprint Sensor Device
Fingerprint Sensor Device Introducing the Optional Fingerprint Sensor Device With a fingerprint sensor, you can avoid having to enter a username and password every time you want to: • Log onto Windows • Resume from sleep mode • Cancel a password-protected screen saver •... -
Page 113: Getting Started
PBA. PBA ERTAIN MODELS SUPPORT PRE BOOT AUTHENTICATION OR ALLOWS THE USER TO LOG . A PBA IN PRIOR TO INDOWS OWN AUTHENTICATION MECHANISM ENVIRONMENT SERVES AS BIOS AN EXTENSION OF THE OR BOOT FIRMWARE AND ALLOWS FOR A MORE SECURE ENVIRONMENT EXTERNAL TO THE OPERATING SYSTEM Getting Started This section guides you through the preparation of your system for the OmniPass... - Page 114 Installing the OmniPass Application If OmniPass is already installed on your system, go to “User Enrollment” on page 5 Otherwise continue with this section on software installation. OR INSTALLATION ASS REQUIRES THAT THE USER INSTALLING ASS HAVE ADMINISTRATIVE PRIVILEGES TO THE SYSTEM AND THE SYSTEM SHOULD HAVE THE FINGERPRINT DEVICE F YOUR CURRENT USER DOES NOT HAVE ADMINISTRATIVE PRIVILEGES LOG OUT AND THEN LOG IN WITH AN ADMINISTRATOR...
-
Page 115: User Enrollment
Windows 7: Click the Start button, select Programs, and from the submenu select the Softex program group, from that submenu click OmniPass Control Center. 2. Version information is listed on the left side of OmniPass Control Center window. Uninstalling OmniPass OR UNINSTALLATION ASS REQUIRES THAT THE USER UNINSTALLING ASS HAVE ADMINISTRATIVE... - Page 116 Example: A user, John, installs OmniPass on his system (his home computer) and enrolls an OmniPass user with username “John_01” and password “freq14”. He then goes to his webmail site to log onto his account. He inputs his webmail credentials as usual (username “John_02”...
- Page 117 1. Next, choose how OmniPass notifies you of various events. We recommend you keep Taskbar Tips on Beginner mode taskbar tips and Audio Tips on at least Prompt with system beeps only until you get accustomed to how OmniPass operates. Click [Next] to proceed with user enrollment. You will then see a Congratulations screen indicating your completion of user enrollment.
- Page 118 3. Once OmniPass has successfully acquired the fingerprint, the Verify Fingerprint screen will automatically appear. To verify your enrolled fingerprint, place your fingertip on the sensor and hold it there as if you were having a fingerprint captured. Successful fingerprint verification will show a green fingerprint in the capture window and the text Verification Successful under the capture window.
- Page 119 The Logon Authentication window indicates what OmniPass-restricted function you are attempting. Icons in the lower left (fingerprint and key) show what authentication methods are available to you. Selected methods are highlighted while unselected methods are not. When you click the icon for an unselected authentication method, the authentication prompt associated with that method is displayed.
- Page 120 Less secure is the option to Automatically enter this password protected site when it is activated. Do not prompt for authentication. Check the upper box to get this setting, and each time you navigate to this site OmniPass will log you into the site without prompting you to authenticate HIS SETTING IS MORE CONVENIENT IN THAT WHENEVER YOU GO TO A SITE REMEMBERED WITH THIS SETTING...
- Page 121 Logging into Windows with a Fingerprint Device When logging into Windows with a fingerprint device, the fingerprint capture window will now appear next to the Windows Login screen. Place your enrolled fingertip on the sensor to authenticate. You will be simultaneously logged into Windows and OmniPass.
- Page 122 OmniPass User Identities Identities allow OmniPass users to have multiple accounts to the same site (e.g., bob@biblomail.com boballen@biblomail.com ). If OmniPass did not provide you identities, you would be limited to remembering one account per site. To create and manage identities, double-click the OmniPass key in the system tray. Click Vault Management;...
-
Page 123: Identities And Password Management
Identities and Password Management On the Manage Passwords interface of the Vault Management tab of the OmniPass Control Center, there is a pull- down selection box labeled, Identity. This field lets you choose which identity you are managing passwords for. When you select an identity here, only those password protected dialogs that are associated with that identity are shown. - Page 124 Exporting an OmniPass User Profile To export a user, open the OmniPass Control Center, and click Import/Export User under Manage Users. Click Exports an OmniPass user profile. OmniPass will prompt you to authenticate. Upon successfully authentication, you must name the OmniPass user profile and decide where to save it.
- Page 125 • If you export an OmniPass-only user, you can import that user to any computer running OmniPass, provided that a user with that name is not already enrolled in OmniPass. • If you attempt to import a user profile who has the same name as a user already enrolled in OmniPass, the OmniPass import function will fail.
- Page 126 User Settings The User Settings tab has four interfaces: Audio Settings, Taskbar Tips, and Enrollment. User settings allow users to customize OmniPass to suit their individual preferences. Under User Settings (Audio Settings and Taskbar Tips) you can set how OmniPass notifies the user of OmniPass events (e.g., successful login, access denied, etc.).
- Page 127 Cannot add Windows users to OmniPass If you experience difficulties adding a Windows user to OmniPass, you may need to adjust your local security settings. You can do this by going to Start, Control Panel, Administrative Tools, and Local Security Settings. Expand Local Policies, expand Security Options, and double-click Network Access: Sharing Classic - and Security Model for Local Accounts.
- Page 128 Restoring Your System Image and Software Depending upon which operating system you are using (Windows 7 or Windows 8), there are slight differences in the restoration procedures. The following procedure is for Windows 7 systems. Equivalent information for Windows 8 configurations can be found at “Windows 8: Restoring Your System Image and Software”...
- Page 129 Saving your Factory Image When you purchased your new system, a copy of the pre-installed Factory Image was loaded into a hidden partition on your hard disk drive. Having a copy of the original Factory Image available to you means that in the event of system failure, you will be able to restore it to its original state.
- Page 130 Recovery and Utility from hard disk” on page 23. Creating a System Backup Image Optional Step: Launch the Fujitsu Bonus Apps utility from your desktop, and select the components you wish to install. User-Configured System Backups: On your desktop, there is a...
- Page 131 Create a backup image of the C: drive! A backup image will be created on D: drive (default). My Recovery immediately restores the computer to the point of time when the backup image is created. There is no need to go through the complicated settings and reinstallation of drivers and applications.
- Page 132 6. An image appears showing you graphically how the image will be stored. Click the [Next] button. 7. Click [Execute] to start the backup. Managing Your Backup Images With the MyRecovery tool you can also make copies of backup images, archive them on DVD, or delete them from your hard drive.
- Page 133 Determining whether Recovery and Utility is pre-loaded 1. Turn on or reboot your system. When the Fujitsu logo appears, press [F12] key. The Boot Menu will appear. 2. Press the Tab key to select Application menu. 3. Check whether the <Recovery and Utility> option is present. If it is not present, it means that the utility must be used from the disc.
- Page 134 3. Insert the bootable disc into the drive tray. 4. Click [OK]. While the files are being loaded from the disc, a progress bar will appear at the bottom of the screen. 5. When the System Recovery Options dialog opens, select a new keyboard layout, if necessary, then click [Next].
- Page 135 Note that first you will need to create new partitions on the hard drive, then restore the Factory Image: 1. Power on your system. When the Fujitsu logo appears on the screen. press the [F12] key. 2. Highlight the CD/DVD option.
- Page 136 6. When the Operating System dialog appears, click [Next]. 7. If necessary, enter your password, then click [OK]. 8. When System Recovery Options window appears, click on Recovery and Utility. Restoring the 9. Click the Recovery tab in the Recovery and Utility window, then click Factory Image icon.
- Page 137 Click [OK] to reboot the computer.” Click [OK]. Downloading Driver Updates The Fujitsu Software Download Manager (FSDM) utility is available to allow you to download the latest drivers, utilities, and applications from the Fujitsu Support site. If you have a Windows 8 or Windows 7 operating system, you will need to go to the Support Site (http://support.fujitsupc.com/CS/Portal/support.do?srch=DOWNLOADS).
-
Page 138: Saving Your Factory Image
Windows 8: Restoring Your System Image and Software Equivalent information for Windows 7 configurations can be found at “Restoring Your System Image and Software” on page 18. It is very important that you create DVD copies of your Factory Image and Bootable Disc before beginning to use your system. - Page 139 To make a copy of the Factory Image to DVD discs, you will need four or five blank discs (DVD-R or DVD+R discs are recommended) to create the copy. After creating the copy, be sure to label the discs and keep them in a safe place to ensure they do not get damaged.
- Page 140 Recovery and Utility from hard disk” on page 33. Backing Up a System Image Optional Step: Launch the Fujitsu Bonus Apps utility from your desktop, and select the components you wish to install. User-Configured System Backups: On your desktop, there is a [System...
- Page 141 6. On the “Step 2: Name your backup images” screen that appears, you can enter up to 300 characters of information about the backup file. This information will help you to identify the image at a later date. 7. On “Step 3: Backup the entire C: drive image” verify your backup settings and click [Next].
- Page 142 c. On “Step 3: Start to copy the following information” confirm the information and click [Start]. d. “Step 4: Processing backup data copying” screen displays the progress bar. e. Click [Finish] on “Step 5: Copy completed. Confirm the results” screen. Selecting “Delete”...
- Page 143 Utility Tools, but you will still be able to boot from the Bootable Disc. Determining whether Recovery and Utility is pre-loaded 1. Turn on or reboot your system. When the Fujitsu logo appears, press [F12] key. 2. From the Boot Menu that appears, check whether the <Recovery and Utility>...
- Page 144 To verify/change the boot-up priority (rather than booting-up from the hard drive or an external floppy disk drive), perform the following steps: 1. Power on your system. When the Fujitsu logo appears on the screen. press the [F12] key. 2. Highlight the CD/DVD option from the Boot menu, then press [Enter].
- Page 145 Recovery tool: The Recovery tool contains three options. User System Backups: Recovering C: Drive from D: Drive or external storage device), Restore C: Drive: Restore factory image (only C: drive), and Restore Full Hard Drive: Restore factory image (full hard drive).You can use these tools to restore the Factory Image from the hidden partition, restore backup image(s) created by you or images stored on DVD discs, and perform a full hard drive recovery.
- Page 146 If you have installed a new hard drive or your hard drive is not bootable, perform the following steps. 1. Power on your system. When the Fujitsu logo appears on the screen, press the [Enter] key. 2. Highlight the CD/DVD option from the Boot Menu and press [Enter].
- Page 147 5. Choose your language ([English or French). 6. Three tool options appear: Diagnostics, Recovery and Utility. Select [Recovery]. 7. Select [Restore full hard drive]. 8. Click [Next] to confirm full hard drive restoration. (All data on HDD will be deleted). 9.
- Page 148 10. Exit the BIOS Setup via Exit Saving Changes. Downloading Driver Updates The Fujitsu Software Download Manager (FSDM) utility is available to allow you to download the latest drivers, utilities, and applications from the Fujitsu Support site. If you have a Windows 8 or Windows 7 operating system, you will need to go to the Support Site (http://support.fujitsupc.com/CS/Portal/support.do?srch=DOWNLOADS).
-
Page 149: Regulatory Notes And Statements
WLAN User’s Guide FCC Regulatory Information Please note the following regulatory information related to the optional wireless LAN device. Regulatory Notes and Statements Wireless LAN, Health and Authorization for use Radio frequency electromagnetic energy is emitted from Wireless LAN devices. The energy levels of these emissions, however, are far much less than the electromagnetic energy emissions from wireless devices such as mobile phones. -
Page 150: Federal Communications Commission Statement
(1) this device may not cause harmful interference, and (2) this device must accept any interference received, including interference that may cause undesirable operation. Modifications not expressly authorized by Fujitsu America, Incorporated, may invalidate the user's right to operate this equipment. -
Page 151: Canadian Notice
Canadian Notice The device for the 5150 - 5250 MHz band is only for indoor usage to reduce the potential for harmful interference to co-channel mobile satellite systems. The maximum antenna gain of 6 dBi permitted (for devices in the 5250 - 5350 MHz, 5470 - 5725 MHz and 5725 - 5825 MHz bands) to comply with the e.i.r.p. -
Page 152: Before Using Optional Wireless Lan
Before Using the Optional Wireless LAN This manual describes the procedures required to properly set up and configure the optional integrated WLAN+BT combo radio module (referred to as "WLAN device" in the rest of the manual). Before using the WLAN device, read this manual carefully to ensure its correct operation. - Page 153 Wireless LAN Modes Using this Device Ad Hoc Mode "Ad Hoc Mode" refers to a wireless network architecture where wireless network connectivity between multiple computers is established without a central wireless network device, typically known as Access Point(s). Connectivity is accomplished using only client devices in a peer-to-peer fashion.
- Page 154 Access Point (Infrastructure) Mode Infrastructure mode refers to a wireless network architecture in which devices communicate with wireless or wired network devices by communicating through an Access Point. In infrastructure mode, wireless devices can communicate with each other or with a wired network. Corporate wireless networks operate in infrastructure mode because they require access to the WLAN in order to access services, devices, and computers (e.g., file servers, printers, databases).
- Page 155 How to Handle This Device The WLAN device is an optional device that may come pre-installed in your mobile computer. Under normal circumstances, it should not be necessary for you to remove or re-install it. The Operating System that your mobile computer comes with has been pre-configured to support the WLAN device.
- Page 156 Deactivation Using the Wireless Device On/Off Switch The WLAN device can be deactivated quickly and efficiently by toggling the Wireless Device On/Off Switch to the Off position. The Wireless Device On/Off switch has no effect on non-Wireless LAN models. WLAN Switch Figure 3.
-
Page 157: Configuring The Wireless Lan
Configuring the Wireless LAN The optional WLAN device can be configured to establish wireless network connectivity using the software that is built into Windows. Support for most industry standard security solutions is contained in this software. Pre-defined parameters will be required for this procedure. Please consult with your network administrator for these parameters: Configuring the WLAN Using Windows The WLAN device can be configured to establish wireless network connectivity... -
Page 158: Troubleshooting The Wlan
Troubleshooting the WLAN Causes and countermeasures for troubles you may encounter while using your wireless LAN are described in the following table. Problem Possible Cause Possible Solution Unavailable network Incorrect Network name (SSID Ad hoc connection: verify that the network names (SSID’s) and connection or network key network keys (WEP) of all computers to be connected have been... -
Page 159: Wlan Specifications
WLAN Specifications Specifications Item Specification Type of network For Intel® Wilkins Peak2: Intel® Dual Band Wireless-N 7260 For Atheros® WB222: Qualcomm Atheros® AR946x Wireless Network Adapter Transfer rate (Automatic switching) IEEE802.11 a and g: 54 Mbps max. data rate; IEEE802.11n: 300 Mbps max. -
Page 160: Index
Caps Lock 41 CD/DVD indicator 54 Fault CD/DVD: correction 93 manual emergency removal 55 Fingerprint sensor 71 Charging capacity, battery 48 configure 71 First-time setup Cleaning 15 Components Fn + F10 44 installing / removing 83 Fn key 41 Fujitsu... - Page 161 Main memory see Adding memory 84 Operating system Manual removal of optical disk 55 Mechanical backup 71 activating system protection 73 Memory card cancel system protection 73 protecting with password 73 handling 58 inserting 58 Operating system, recovering 93 Fujitsu...
- Page 162 38 selecting an item 38 Screen brightness increase 43 switch off 43 reduce 43 Touchpad buttons 43 TPM 76 Screen port see VGA connection socket 78 Transport Transport damage 16 Security functions 70 Security Lock 71 Transportation 13, 15 Fujitsu...
- Page 163 Weight Saver changing 73 Removing 52 entering 72 wireless LAN removing 73 Switching off module 62 Using the Kensington Lock Cable 71 Switching on module 62 wireless LAN: safety notes 13 VGA connection socket 78 Virtual numeric keypad 42 Fujitsu...