Table of Contents
Advertisement
Available languages
Available languages
®
ELECTRIC
RANGE
Use & Ca_°_e Guide
COCINA
(ESTUFA) ELECTRICA
Gu_a para e_Uso y Cuidado
Models, Modelos 362.6278_,
9111_, 9120:% 9221 :_
= color number, nOmero de color
,
m
Z
i"
U)
X
m
u)
Z|
0
r-
183D6379P017
(SR880_0}
143 JR
Pdnted tn Mexico
Th[s bDok is printed on recycled paper.
Sears,
Roebuck
and Co., Hoffman
Estates,
IL 60179
U.S.A.
www.sears.com
Advertisement
Table of Contents

Related Manuals for Kenmore 362.6278 Series


Summary of Contents for Kenmore 362.6278 Series
- Page 1 ELECTRIC RANGE Use & Ca_°_e Guide COCINA (ESTUFA) ELECTRICA Gu_a para e_Uso y Cuidado Models, Modelos 362.6278_, = color number, nOmero de color 183D6379P017 (SR880_0} 143 JR Sears, Pdnted tn Mexico Th[s bDok is printed on recycled paper. ® 9111_, 9120:% 9221 :_ Roebuck and Co., Hoffman...
- Page 2 If you pull the range out from the wall for any reason, make sure the device is properly engaged when you push the range back against the wall If it is not, there is a possible risk of the range tipping over and causing injury if you or a child stand, sit or lean on an open door..
- Page 3 OVEN SAFETY • Stand away from the range when opening the oven door. Hot air or steam which escapes can cause burns to hands, face and/or eyes, • Do not heat unopened food containers, Pressure...
- Page 4 . To minimize the possibility of burns, ignition of flammable materials and spillage, the handle of a container should be turned toward the center of the range without extending over nearby surface units, o Always turn the surface units off before removing cookware. SAVE THESE INSTRUCTIONS =When preparing flaming foods under the vent hood, turn the fan on.
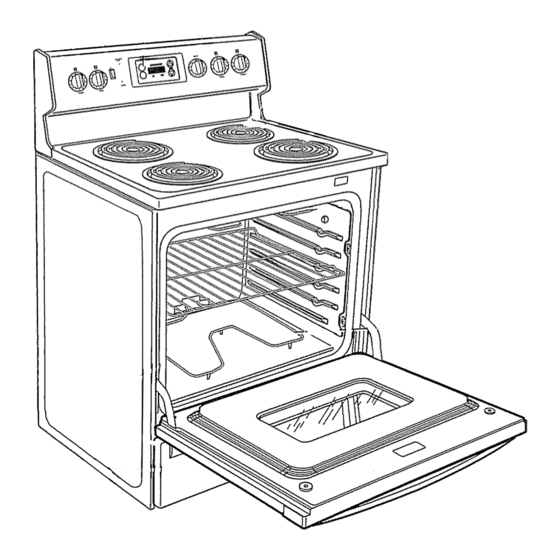
- Page 5 NOTE: N otallfeatures a reonallmodels, Oven Light Switch Surface Unit Control Knobs (4) Model and Serial Numbers (found on a label behind the range door or behind the storage drawer) L_.._.. Storage Drawer Broiler Pan and Grid Clock/Timer Controls Oven Control Knob...
- Page 6 How to Set Push the knob in and turn in either direction to the setting you want At both OFF and Hi the control clicks into position. You may hear slight clicking sounds during cooking, indicating the control is keeping the power level you set. A SURFACE UNIT on indicator light will glow when any surface unit is on.
- Page 7 Oven Temperature Knob Turn this knob to the setting you wahl The oven cycle light gfows until the oven reaches your selected temperature, then goes off and on with the oven element(s) during cooking •L Clock and Timer Features 1. TIMER ON/OFF Pad Press this pad to select the timer feature, 2.
-
Page 8: Removing/Replacing Shelf
Before you begin... To avoid possible burns, place the shelves in the desired position before you turn the oven on. The shelves have stop-locks, so that when placed correctly on the supports (A through E), they will stop before coming completely out; they also will not tilL. - Page 9 Broiling Guide The size, weight, IFOOd thickness, starting temperature, and Ground Beef your preference of doneness wilt affect broiling Beef Sleaks Rarer times_ This guide Medium is based on Well Done meats at refrigerator Rarer Medium temperature. Well Done Chicken eakery Product Bread (toast) EnglishMuffin...
- Page 10 Adjust the Oven Thermostat--Easy do yourself! You may find that your new oven cooks differently than the one it replaced, Use your new oven for a few weeks to become more familiar with it, If you still think your new oven is too hot or too cold, you can adjust the thermostat yourself,, Do not use thermometers, such as those found in grocery stores, to check the temperature setting of your...
- Page 11 Let the range cool before cleaning.. We recommend that you wear rubber gloves when cleaning the range. Soap and water will normally do the job. Heavy spattering or spiltovers may require cleaning with a mild abrasive cleaner., Soap-filled scouring pads may also be used.
- Page 12 Oven Light Replacement (on some models) CAUTION: Before replacing your oven light bulb, disconnect the electrical power to the range at the main fuse or circuit breaker panel, Be sure to let the light cover and bulb cool completely Wire cover holder To remove the cover: 1.
- Page 13 Clean the area under the drip pans often_ Built-up soil, especially grease, may catch fire,. Do not cover the drip pans with foil Using foil so close to the receptacle could cause shock, fire or damage to the range., Units Surface unit...
- Page 14 The oven is vented through an opening under the right rear surface unit.. Painted Surfaces Painted surfaces include the sides of the range and the sides of the door trim,. Clean these with soap and water or a vinegar and water solution, Do not use commercial oven cleaners, cleaning powders, steel wool or harsh abrasives on any painted surface.
- Page 15 Anti-Tip device WB2X7909.. CaJJ1-800-4-MY-HOME_ If you pull the range out and away from the wall for any reason, make sure the Anti-_p bracket is engaged when the range is pushed back against the wall_...
- Page 16 When the floor covering ends at the front of the range, the area that the range will rest on should be built up with plywood to the same level or higher than the floor covering. This will allow the range to be moved for cleaning or servicing..
- Page 17 Failure to wire your oven according to governing codes could result in a hazardous condition.. If there are no local codes, your range must be wired and fused to meet the requirements of the National Electrical Code, ANSI!NFPA No.
- Page 18 EI.ECTRICAL CONNECTIONS 3. Power Cord and Strain Relief installation a. Remove the wire cover (on the lower back of the range) by removing two (2) screws using a 1/4" nut driver_ Do not discard these screws, Back of range b. Remove the knockout ring (I3/8 ") located on bracket directly below the terminal block.
- Page 19 The 4th grounding lead must be connected to the frame of the range with the ground plate and the ground screw, a, Remove the 3 lower terminal screws from the terminal...
- Page 20 Cut and discard the ground strap. DO NOT DISCARD ANY SCREWS.. Insert the ground bare wire tip between the range frame and the ground plate (removed eartier) and secure it in place with the ground screw (removed earlier)..
- Page 21 Injury may result from spilled hot liquids or from the range itself,. 10. Level a. tnstalt the oven shelves in the oven and position the range where it wilt be installed b. Check for levelness by placing a...
- Page 22 It is recommended that the clock be changed if the red lines appear.. . Be sure all range controls are in the OFF position before leaving the range.. What To Do...
- Page 23 Oven temperature Oven thermostat too hot or too cold adjustment, Clock and timer do Plug on range is not completely not work inserted in the electrical outlet, A fuse in your home may be blown or the circuit breaker tripped.
- Page 24 %...L Master Protection Agreements Congratulations on making a smart purchase_ Your new Kenmore _ product is designed and manufactured for years of dependable operation.. But like all products, it may require preventive maintenance or repair from time to time.. That's when having a Master Protection Agreement can...
- Page 25 Instrucciones de seguridad Instrucciones de seguridad importantes Funcionamiento Caracteristicas de su estufa ... CSmo usar las unidades de superficie C6mo usar el homo ... Cuidado y mantenimiento Antes de llamar para un servicio Cuidado y limpieza ... Servicios al consumidor Contrato de protecci6n maestra Servicios de reparaci6n Garantfa...
- Page 26 . No deje solos a los nifios--los dejar solos o sin ser vigilados en un Area donde un aparato eleclrodom_stico estA en uso. Nunca se les deberia permitir sentarse o pararse sobre cualquier parte de ta estufa. . No permita que alguien se suba, se pare o se cuelgue de la puerta, del caj6n de almacenaje, o la cubierta para cocinar.
- Page 27 • E!sacarla parrilla hasta la posici6n de tope es una conveniencia para levantar comidas pesadas. Es tambi6n una precauci6n contra quemaduras causadas al tocar las superficies calientes de la puerta o las paredes del homo. o Cuando use bolsas para cocinar o asar en el homo, siga las direcciones del fabricante.
- Page 28 NOTA: N otodaslascaracteristicas est&n entodoslosmodetos, Interruptor de la Controles luz del horno Perillas de control para unidad de superficie N_tmeros de modeto y serie (encontrados sobre una etiqueta detr&s de la puerta del homo o detr&s de! caj6n de almacena Caj6n de a_mac _ena"...
- Page 29 C6mo ponerlas en posici6n Empuje la perilla hacia adentro y h&gala girar en cualquier direcciSn a la posiciSn que desea. En ambas posiciones OFF (APAGADO) y HI (ALTO) la perilta se engancha en posiciSn. Usted podria eschuchar unos leves sonidos mientras cocina, indicando que el control estA manteniendo el nivel de poder que usted seleccionS.
- Page 30 Perilla para la temperatura del horno Haga girar esta perilla a la posici6n que desea. La luz del ciclo del homo se enciende basra que el homo llega a su temperatura sefeccionada, luego se enciende y se apaga con el elemento(s) del homo durante el proceso de cocinar.
- Page 31 Antes de empezar... Para evitar posibles quemaduras, coloque las parriltas en la posici6n deseada antes de encender el homo. Las parrillas tienen frenos, de manera que al colocarse correctamente en los soportes (de la A a la E) frenarAn antes de salirse por completo, at mismo tiempo que se evita que se inclinen.
- Page 32 Gufa para asar Eltamaho, p eso, grosor, Comiaa temperatura Came molida inicial, y su preferencia de grado decocciSn Bisiess afectar_, las Cro'Josf Medianos cantidades de giencocidos tiempo paraasaro Estaguiabasada Crudost encarnes a la Medianos Biencocidos temperatura del Polio refdgerador. Prodactes de panadet[a Pan(toast) Pancitosingleses Colasde langosla...
- Page 33 Ajuste el termostato del hornomiF_cil hacer usted mismo! Usted podria encontrar que su nuevo homo cocina diferentemenle al que reemplaz6 Use su homo nuevo por unas pocas semanas para familiarizarse m&s con #1, Si usted todavia cree que su homo nuevo est& funcionando demasiado caliente o frio, usted mismo puede ajustar el termostato..
- Page 34 Si sacasu estufa para limpiarla, hacerle servicio o por cualquier raz6n, aseg_rese que el dispositivo contra volcaduras se reengancha adecuadamente ponga la estufa nuevamente La falla de no tomar esta precauci6n podria resuttar en que ta estufa se vuetque y cause heridas. Interior del horno Con un buen cuidado, el terminado de esmalte...
- Page 35 Elementos calentadores del horno No limpie el elemento para hornear o el elemento para asar, Cualquiera suciedad se quemar9` cuando los elementos son calentados. Para fimpiar el fondo del homo, levante levemente el elemento para hornean Limpie con agua tibia con jab6n,, Parrillas del horno Limpie las parrillas con un limpiador abrasive o esponjillao...
- Page 36 Cubierta para cocinar de esmalte porcelanizado El acabado de esmalte porcelanizado es firme pero quebrable si se usa mal. Este acabado es resistente al &cido. Sin embargo, cualquier derrame de comida acfdico (tales como jugos de fruta, tomates o vinagre) no se deberfa permitir que permanezca sobre el acabado Si &cidos se derraman sobre la cubierta cuando estb.
- Page 37 Panel de control y perillas Es recomendable limpiar el panel de control despu6s de cada uso del homo+ Use un paso ht)medo para limpiar o enjuagar. Para limpiar, use un jabSn suave y agua o una soluciSn de 50/50 de agua y vinagre..
- Page 38 ANTES DE EMPEZAR Lea estas instrucciones completa y cuidadosamente. IMPORTANTE - Guarde estas instrucciones para el use del inspector local, IMPORTANTE - Observe todos los c6digos y ordenanzas vigentes. NOTA PARA EL INSTALADOR: Cerci6rese de dejar estas instrucciones con el consumidor.
- Page 39 MATERIALES QUE PUEDE NECESITAR Pernos con Mangas ancla revest!mlento (Para e! soporte contra volcadura |nstalado en plsos de concrete _nfcarnente) (40 AMP aprobado per UL) CordSn de 4 cables O Cord6n de 3 de 4_ de largo cables de 4 _ de largo HERRAMIENTAS QUE VA A NECESITAR...
- Page 40 CONEXIONES ELISCTRICAS Requisitos el_ctricos 1" A PRECAUCION: personal, no use un cable de extensl6n aparato. Baje et fusible de la casa o abra el interruptor de circuitos antes de empezar la instalaci6n, Este aparato debe recibir e! voltaje y la frecuencia correctos y conectarse a un circuito ramal individual correctamente conectado a tierra, protegido pot un interruptor de circuitos o fusible que tenga el amperaje...
- Page 41 CONEXIONES ELIECTRICAS 3. Cord6n el6ctrico e instalaci6n aliviador de presi6n a, Retire la tapa de los cables (en la parle posterior inferior de la estufa) retirando dos tornillos con un destomillador de tuercas de I/4". No deseche estos tornillos. Parle posterior la estufa Tapa de los cables b.
- Page 42 4. Instalaci6n del cord6n eldctrico de 3 alambres A ADVERTENCIA: o de conexi6n a tierra se debe conectar al terminal neutro que se encuentra en el centro del bloque terminal. Los alambres eldctricos se deben conectar en los terminales a ia izquierda inferior y derecha inferior del bloque terminal, a, Retire los tres tornillos terminales inferiores del bloque terminal..
- Page 43 CONEXIONES ELECTRICAS 6. Instalaci6n del conducto a. Afloje los tres tornillos terminales inferiores del bloque terminal, Inserte la punta del alambre (blanco/neutro) central pelado a trav6s de la abertura del bloque terminal en la inferior central. En atgunos modelos, et alambre se debe insertar a tray,s de la abertura de la tira de conexi6n a tierra y luego en la abertura del bleque central inferior.
- Page 44 INSTALE LA ESTUFA 8. Reemplace la tapa de los alambres Reemplace la tapa de los alambres en la parte posterior de la estufa deslizando el borde derecho debajo de la pesta5a de retenciSn y reemptazando los dos tornillos retirados anteriormente,, CerciSrese de que no haya alambres pellizcados entre la tapa y la parte posterior de la estufa, 2 tornltlos...
- Page 45 11. Lista de verificaci6n de ia instalaci6n final • Revise que e! interruptor de circuitos est_ cerrado (RESET) o que se hayan reemplazado los fusibles del circuito.. - Cerci6rese de que la energia est6 en servicio en la edificaci6n. • Revise que todos los materiales de empaque y la cinta se hayan retirado.
- Page 46 Problema Posibles causas La comida no se Horno no puesto en BROIL (ASAR). asa adecuadamente La puerta no se abre a la posici6n de paro como se recomienda. Se estd usando una posici6n de parrilla incorrecta. La comida se est_ cocinando en una cacerola caliente, Los utensilios para asar.
- Page 47 Sears Roebuck and Co. Dept.. 817WA Hoffman Estates, ]L 6()179 Contrato de proteccibn maestra Felicitaciones por su compra inteligente_ Su nuevo producto Kenmore e estb. disefiado y fabricado para muchos afios de operaciSn confiab]e. Sin embargo, al igual que todos los productos, puede requerir de mantenimiento o reparaci6n preventivas en cualquier momento,.
- Page 48 For repair-in lawn and garden no matter who made it, no matter who sold it[ •!•!_•!i:• ili:;ii i For the replacement parts, accessories and owner's manuals that you need to do-it-yourself. :•i!/[:}_! i For Sears and items like garage door openers and water heaters. z_i _ _ 1-800-4-MY-HOM E®...