Table of Contents
Advertisement
Quick Links
Advertisement
Table of Contents

Related Manuals for Harman Kardon MaestroKitchen 100


Summary of Contents for Harman Kardon MaestroKitchen 100
-
Page 1: Sound System
MaestroKitchen ™ sound systeM Installation Manual... -
Page 2: Included Items
Included Items Included Items In MK100 SO (head unit) box: Input Panel Input Panel iPod/iPhone Input Panel Screw Kit Screw Caps Cushion Harman Kardon MaestroKitchen™ Head Unit USB Cables (2) Apple Cable AUX Cable RF Remote Control Input Panel 16mm... - Page 3 After deciding on the locations for the system’s main components: Determine the routing of all the system’s cables and wires: Before beginning the installation: • Door speaker wires Determine the locations for all of the Harman Kardon MaestroKitchen 100 system’s main • Subwoofer speaker wire components: •...
- Page 4 Installation Install the Door Speakers Mark an “X” at the location inside the cabinet door recess at the indicated position. Make sure the area around the “X” is free of dust or other debris. Place a 150mm mark at the indicated position.
- Page 5 Installation Remove the pre-scored tab on the hinged side of each door trim panel. Remove the adhesive backing from one of the long cabinet door gasket strips and attach it all the way around the outside of the outer rim of one door trim panel. IMPORTANT: Make sure the gasket is fully attached along its entire length before proceeding to Step 8.
- Page 6 Installation 14 of the supplied door trim panel screws to attach the door trim panel to the inside of Measure the included wire channel and the cabinet wall. If necessary, use a knife to shorten the the door. WARNING: Do not put excessive pressure on the electric screwdriver when wire channel so it will fit along the cabinet wall, leaving 3cm of distance from the channel to attaching the trim panel.
- Page 7 NOTE: You may need to drill a hole for the wire in the kitchen directly behind the head unit’s mounting location. Run Subwoofer speaker wire. Harman Kardon MaestroKitchen Head Unit Attach wire channel cover to wire channel base. Harman Kardon...
- Page 8 Drill 68mm mounting and on top of opening. kitchen cabinets. Input Panel Harman Kardon MaestroKitchen Head Unit. Assemble the cables to the input panel as shown in the illustration. 2. Insert jack through input panel. 1. Remove retainer from jack.
- Page 9 Installation Installing the Head Unit Preparing the Mounting Shelf Place the included head-unit mounting template on the mounting shelf that will hold the head unit. NOTE: The mounting shelf must be at least 562mm wide and 300mm deep to accommodate the head unit and power supply.
- Page 10 Installation The head unit is shipped with four different sets of feet: 16mm high, 13mm high, 6mm high and 3mm high. Select the proper foot height for your particular installation, based on the location of the head unit and the cabinet material thickness. Head Unit Hanging Under 16mm-thick 19mm-thick...
- Page 11 Installation Use the supplied screws to install the feet onto the bottom of the head unit. Use supplied screws to attach feet. Connecting and Installing the Head Unit Subwoofer 1 Subwoofer 2 Connector Connector Right Door USB 2 DAB/FM Attenna AUX Input Speaker Left Door Speaker...
- Page 12 NOTE: You may need to drill a hole for the cable in the kitchen cabinet directly behind the head-unit mounting location. Spread as far apart as possible DAB/FM Antenna (on top of cabinet) DAB/FM Antenna Harman Kardon MaestroKitchen Head Unit...
- Page 13 Installation Connect the left and right door speaker wires to the head unit’s Left and Right Door Speaker connectors: Use a Phillips screwdriver to loosen the screw. Insert the tinned bare wire into the connector under the metal washer. It is very important that the wire be under the washer. Tighten the screw to secure the wire.
- Page 14 Installation NOTE: The head unit will enter the Standby power mode (the front-panel Power button will glow amber). Power icon glows amber. Insert the head unit part-way into its designated position, so the front feet are partway into the mounting brackets. The head unit will extend forward approximately 1cm. IMPORTANT: Do not insert the head unit fully into the brackets at this time.
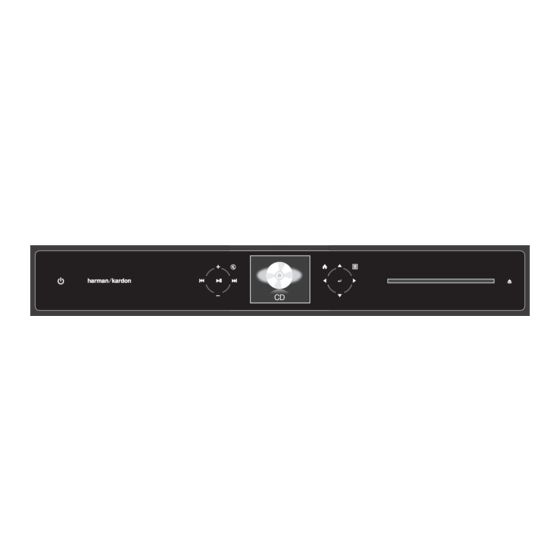
- Page 15 Installation The information screen will display “CD”. Touch the OK icon. Insert an audio CD into the disc slot. The disc will begin playing and the front panel will configure for CD operation. Information Home Options Eject Screen Icon Icon Icon Next/Previous Play/Pause...
- Page 16 Installation Optional System Testing Steps If you wish, you can use the following steps to test all of the system’s input connections: Connect an iPod or USB stick containing music files to one of the USB ports on the input panel. Touch the Home icon, then touch the Down icon so that “iPod” or “USB” (whichever you connected to the input panel) appears on the information screen.
-
Page 17: Troubleshooting
Troubleshooting Troubleshooting Problem Cause Solution Power icon does not glow amber when AC wall outlet is not live • Plug the power supply into a live AC wall outlet. power supply is connected to head unit • Confirm that the power supply is properly connected to the head unit. Power supply is not properly connected to head unit No sound from one (or both) door speaker(s) - Page 18 Made in P.R.C. © 2011 HARMAN International Industries, Incorporated. All rights reserved. Harman Kardon is a trademark of HARMAN International Industries, Incorporated, registered in the United States and/or other countries. Harman Kardon MaestroKitchen is a trademark of HARMAN International Industries, Incorporated.