Table of Contents
Advertisement
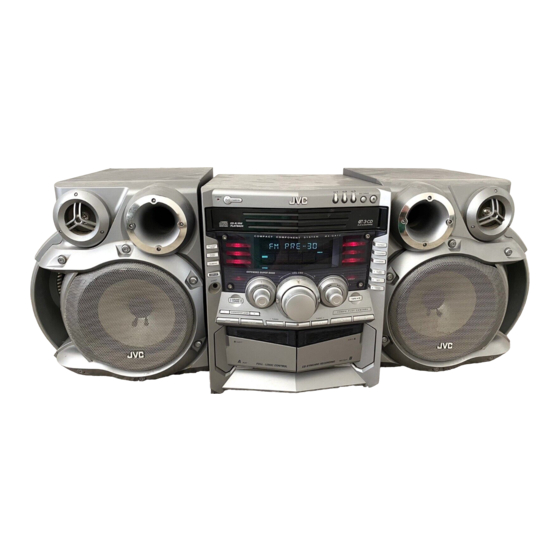
COMPACT COMPONENT SYSTEM
CA-MXGT88
CA-MXGA77
CA-MXGT88
STANDBY
ECO
C O M P A C T
REC START
/ STOP
CD REC
START
DUBBING
DISPLAY
PHONES
SOUND
TURBO
SUBWOOFER LEVEL
MP3
EJECT
CD
1
CD
2
CD
3
DISC CHANGE
C O M P O N E N T
S Y S T E M
M X - G T 8 8
REPEAT
PROGRAM
RANDOM
CLOCK
/ TIMER
PRESET
SET
CANCEL
/ DEMO
TAPE A / B
DISPLAY MODE RDS MODE
SELECT
TUNING
TUNING
BEEP
EJECT
INSTRUCTIONS
CA-MXGA77
STANDBY
ECO
C O M P A C T
C O M P O N E N T
REC START
/ STOP
CD REC
START
DUBBING
DISPLAY
PHONES
SOUND
TURBO
SUBWOOFER LEVEL
TUNING
MP3
EJECT
For Customer Use:
Enter below the Model No. and Serial
No. which are located either on the rear,
bottom or side of the cabinet. Retain this
information for future reference.
Model No.
Serial No.
CD
1
CD
2
CD
3
DISC CHANGE
S Y S T E M
M X - G A 7 7
REPEAT
PROGRAM
RANDOM
CLOCK
/ TIMER
PRESET
SET
CANCEL
/ DEMO
TAPE A / B
DISPLAY MODE RDS MODE
SELECT
TUNING
BEEP
EJECT
LVT1010-003B
[B]
Advertisement
Table of Contents

Related Manuals for JVC CA-MXGA77


Summary of Contents for JVC CA-MXGA77
- Page 1 COMPACT COMPONENT SYSTEM CA-MXGT88 CA-MXGA77 CA-MXGT88 STANDBY C O M P A C T C O M P O N E N T S Y S T E M REC START / STOP CD REC START DUBBING DISPLAY PHONES SOUND...
-
Page 2: Important For Laser Products
15 cm 1 cm 15 cm CA-MXGT88 CA-MXGA77 VARNING: Osynlig laser- ADVARSEL: Usynlig laser- VARO: Avattaessa ja suo- strålning när denna del är stråling ved åbning, når jalukitus ohitettaessa olet öppnad och spärren är... -
Page 3: Safety Instructions
“SOME DOS AND DON’TS ON THE SAFE USE OF EQUIPMENT” This equipment has been designed and manufactured to meet international safety standards but, like any electrical equipment, care must be taken if you are to obtain the best results and safety is to be assured. ✮✮✮✮✮✮✮✮✮✮✮✮✮✮✮✮✮✮✮✮✮✮✮✮✮✮✮✮✮✮✮✮✮✮✮✮✮✮✮✮✮✮✮✮✮✮✮... - Page 4 Introduction We would like to thank you for purchasing one of our JVC products. Before operating this unit, read this manual carefully and thoroughly to obtain the best possible performance from your unit, and retain this manual About This Manual This manual is organized as follows: •...
-
Page 5: Table Of Contents
Contents Location of the Buttons and Controls ... 3 Getting Started ... 6 Common Operations ... 9 Listening to the Radio ... 12 Receiving FM Stations with RDS ... 13 Playing Back CDs ... 15 Playing Back Tapes ... 22 Recording ... -
Page 6: Location Of The Buttons And Controls
Location of the Buttons and Controls Become familiar with the buttons and controls on your unit. Front Panel STANDBY REC START / STOP CD REC START DUBBING DISPLAY PHONES SOUND TURBO SUBWOOFER LEVEL EJECT DISPLAY MODE RDS MODE TUNING TUNING BEEP DISC CHANGE REPEAT... - Page 7 Display Window GROUP See pages in the parentheses for details. Front Panel (standby/on) button and STANDBY lamp (9, 26, 27) ECO button (9) 2 Carrousel 3 Sound mode lamps (11) 4 REC START/STOP button (23) CD REC START button (24) DUBBING button (24) 5 Display window 6 DISPLAY button (9)
-
Page 8: Remote Control
Remote Control STANDBY REC START / STOP CD REC START DUBBING DISPLAY PHONES SOUND TURBO SUBWOOFER LEVEL TUNING TUNING BEEP EJECT When using the remote control, point it at the remote sensor on the front panel. Remote Control 1 BEEP ON/OFF button (11) 2 SLEEP button (28) 3 Number buttons (12, 18) 4 SOUND TURBO button (10) -
Page 9: Getting Started
Getting Started Unpacking After unpacking, check to be sure that you have all the following items. The number in the parentheses indicates the quantity of the pieces supplied. • AM (MW) loop antenna (1) • FM antenna (1) • Remote control (1) •... -
Page 10: Connecting Speakers
AM (MW) antenna 2, 3 ANTENNA FM 75 AM (MW) loop antenna (supplied) Press and hold the clamp of the AM terminal on the rear of the unit. Insert the end of the AM (MW) loop antenna cord into the terminal. •... -
Page 11: Connecting Other Equipment
Connecting Other Equipment You can connect audio equipment—used only as a playback device. • DO NOT connect any equipment while the power is on. • DO NOT plug in any equipment until all connections are complete. To connect audio equipment Be sure that the plugs of the audio cords are color coded: White plugs and jacks are for left audio signals, and red ones for right audio signals. -
Page 12: Common Operations
Common Operations Turning On or Off the Power To turn on the unit, press so that the STANDBY lamp goes off. To turn off the unit (on standby), press again so that the STANDBY lamp lights up. A little power is always consumed even while the unit is on standby. -
Page 13: Adjusting The Volume
Adjusting the Volume You can adjust the volume level only while the unit is turned This function only affects the playback sound, not your recording. Turn the VOLUME control clockwise to increase the volume or counterclockwise to decrease it. • The volume level can be adjusted in 32 steps (VOL MIN, VOL 1 —... -
Page 14: Selecting The Sound Modes
Selecting the Sound Modes This function only affects the playback sound, not your recording. You can select one of the 6 preset sound modes (3 surround modes and 3 SEA—Sound Effect Amplifier—modes). To select the sound modes, turn the SOUND MODE control until the sound mode you want appears on the display. -
Page 15: Listening To The Radio
Listening to the Radio Tuning in to a Station—Auto Search Press FM/AM. The unit automatically turns on and tunes in to the previously tuned station (either FM or AM—MW). • Each time you press the button, the band alternates between FM and AM (MW). Start searching for stations. -
Page 16: Receiving Fm Stations With Rds
Receiving FM Stations with RDS RDS (Radio Data System) allows FM stations to send an additional signal along with their regular program signals. For example, the stations send their station names, as well as information about what type of program they broadcast, such as sports or music, etc. -
Page 17: Switching Temporarily To A Program Type Of Your Choice
Switching Temporarily to a Program Type of Your Choice The Enhanced Other Networks function allows the unit to switch temporarily to a broadcast program of your choice (NEWS or INFO) from a different station. To activate the Enhanced Other Networks function Enhanced Other Networks function is applicable only to preset FM RDS stations. -
Page 18: Playing Back Cds
Playing Back CDs This unit has been designed to playback the following CDs: • Audio CD • CD-R (CD-Recordable) • CD-RW (CD-ReWritable) • MP3 disc (MP3 files recorded on a CD-R or CD-RW)* When playing a CD-R or CD-RW • User-edited CD-Rs (CD-Recordable) and CD-RWs (CD-ReWritable) can be played back when they are already “finalized.”... - Page 19 • Each time you press the button, the indication on the display changes as follows: ALL DISC 1 DISC (initial setting) REPEAT ALL DISC* REPEAT 1 See page 21. Press one of the disc number buttons (CD1, CD2 or CD3) for the disc you want to start to play from.
-
Page 20: Basic Cd Operations
One Disc play When 2 or 3 CDs are loaded on the disc trays, you can select one particular disc to be played back. On the unit ONLY: Load CDs. • If the current playing source is not the CD player, press CD 6, then 7 before going to the next step. - Page 21 For MP3 disc: When the MP3 playback mode is the TRACK mode (See also page 19.) Turn the 4/¢ control before or during playback. • 4: Goes back to the beginning of the current or previous tracks. • ¢: Skips to the beginning of the next or succeeding tracks.
-
Page 22: Changing The Mp3 Playback Mode
Changing the MP3 Playback Mode When playing an MP3 disc, you can choose the playback mode of the MP3 disc as follows: • TRACK mode: The unit recognizes only tracks (files). You can play an MP3 disc like an Audio CD. •... -
Page 23: Programming The Playing Order Of The Tracks -Program Play
Programming the Playing Order of the Tracks —–Program Play You can arrange the order in which the tracks play before you start playing. You can program up to 32 tracks. • To use Repeat play (see page 21) for Program play, press REPEAT after starting Program play. -
Page 24: Playing At Random-Random Play
Playing at Random—–Random Play The tracks of the selected CD will play at random. • To use Random play, you have to cancel the Program play. On the unit ONLY: Load a CD. Press one of the disc number buttons (CD1, CD2, and CD3) for the disc you want to play, then press 7. -
Page 25: Playing Back Tapes
Playing Back Tapes Playing Back a Tape Press 0 EJECT for the deck you want to use. For Deck A Put a cassette in, with the exposed part of the tape down and the side you want to play facing front. •... -
Page 26: Recording
Recording IMPORTANT: • It should be noted that it may be unlawful to re-record pre-recorded tapes, records, or discs without the consent of the owner of copyright in the sound or video recording, broadcast or cable program and in any literary, dramatic, musical, or artistic embodied therein. -
Page 27: Dubbing Tapes
Dubbing Tapes On the unit ONLY: Press TAPE 3, then 7. Put the source cassette in deck A, and a recordable cassette into deck B. Press DUBBING. Dubbing starts. “DUBBING” appears, and the REC (recording) indicator lights up on the display. -
Page 28: Using The Timers
Using the Timers There are three timers available—Daily Timer, Recording Timer, and Sleep Timer. Before using the timers, you need to set the clock built in the unit. (See “Setting the Clock” on page 9.) Using Daily Timer With Daily Timer, you can wake to your favorite music or radio program. - Page 29 Turn the 4/¢ control to select the source to play, then press SET. • Each time you turn the 4/¢ control, the source changes as follows: TUNER AM TUNER FM TAPE TUNER FM : tunes in to a specified preset FM station. = go to step 6 .
-
Page 30: Using Recording Timer
Using Recording Timer With Recording Timer, you can make a tape of a radio broadcast automatically. You can set the timer whether the unit is on or off. How Recording Timer actually works The unit automatically turns on, tunes in to the specified station, sets the volume level to “VOL MIN,”... -
Page 31: Using Sleep Timer
To turn on or off Recording Timer after its setting is done 1 Press CLOCK/TIMER repeatedly until “REC” appears on the display. 2 To turn off the Recording Timer, press CANCEL/DEMO. The REC (recording timer) indicator goes off from the display (“OFF” appears for a while). The Recording Timer is canceled, but the setting for the Recording Timer remains in memory until you change it. -
Page 32: Maintenance
Maintenance To get the best performance of the unit, keep your discs, tapes, and mechanism clean. Cleaning the unit • Stains on the unit Should be wiped off with a soft cloth. If the unit is heavily stained, wipe it with a cloth soaked in water-diluted neutral detergent and wrung well, then wipe clean with a dry cloth. -
Page 33: Additional Information
Additional Information Description of the PTY codes: NEWS: News. AFFAIRS: Topical program expanding or enlarging upon the news — debate, or analysis. INFO: Program the purpose of which is to impart advice in the widest sense. SPORT: Program concerned with any aspect of sports. EDUCATE: Educational programs. -
Page 34: Troubleshooting
Troubleshooting If you are having a problem with your unit, check this list for a possible solution before calling for service. If you cannot solve the problem from the hints given here, or the unit has been physically damaged, call a qualified person, such as your dealer, for service. -
Page 35: Specifications
270 mm x 317 mm x 453 mm (W/H/D) Mass (approx.) 9.3 kg Supplied accessories See page 6. Design and specifications are subject to change without notice. CA-MXGA77 Amplifier section Output Power SUBWOOFERS MAIN SPEAKERS : Audio input sensitivity/Impedance (at 1 kHz, measured at MAIN SPEAKERS) AUX : : 6 Ω... - Page 36 VICTOR COMPANY OF JAPAN, LIMITED 0203TMMMDWSAM...
-
Page 37: Speaker System
JVC-edustajaan. Tak for købet af JVC-højttalerne. Gennemlæs venligst vejledningen omhyggeligt før de tages i brug, så De kan opnå den bedst mulige ydelse. Forhør hos Deres JVC forhandler hvis De har nogen spørgsmål. — SAFETY INSTRUCTIONS — Switch off using the switch on the equipment and make sure that your family know how to do this. - Page 38 Vahvistimen ulostuloliittimet Forstærkerudgangsbøsninger CONNECTION • DO NOT use other amplifier to operate this speaker system except for CA-MXGA77. • Turn off power to the whole system before connecting the speakers to the amplifier. Left speaker • The maximum power handling capacity of the SP-MXGA77 Linker Lautsprecher main speaker is 55 W Subwoofer is 100 W.
- Page 39 Gewicht : Je 5,5 kg Technische Änderungen vorbehalten. RACCORDEMENT • NE PAS utiliser d’autre amplificateur que le CA-MXGA77 pour faire fonctionner les enceintes. • Mettre hors circuit tout le système avant de raccorder les enceintes à l’amplificateur. • La puissance maximale admissible par le haut-parleur principal du SP-MXGA77 est de 55 W, celle admissible par le haut-parleur d’extrêmes graves est de 100 W.
- Page 40 AANSLUITINGEN • Gebruik GEEN andere versterker dan de CA-MXGA77 om dit luidsprekersysteem aan te sturen. • Schakel de spanning van alle aangesloten komponenten uit alvorens de luidsprekers met de versterker te verbinden. • Het maximale vermogen van de SP-MXGA77 hoofdluidspreker is 55 W en van de subwoofer 100 W. Te hoge ingang kan in abnormale geluidsreproduktie en in beschadigingen resulteren.
- Page 41 Il disegno e le specificazioni sono soggetti a cambiamenti senza preavviso. ANSLUTNING • Använd INTE någon annan förstärkare än CA-MXGA77 till att driva detta högtalarsystem med. • Slå av strömmen i alla apparater i ljudanläggningen innan högtalarna ansluts till förstärkaren.
- Page 42 : 5,5 kg perst. Oikeudet muutoksiin pidätetään. EN. GE. FR. NL. SP. IT. SW. FI. DA. TILSLUTNING • Anvend IKKE anden forstærker end CA-MXGA77 til drift af dette højttalersystem. • Sluk for strømmen til hele systemet før højttalerne forbindes til forstærkeren.