Table of Contents
Advertisement
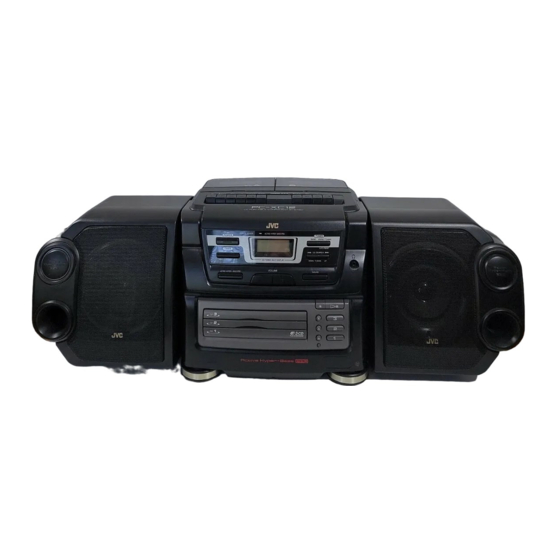
CD PORTABLE COMPONENT SYSTEM
SISTEMA PORTATIL DE COMPONENTES DE CD
CHAINE PORTABLE A LECTEUR CD
PC-XC12/XC8
INSTRUCTIONS
MANUAL DE INSTRUCCIONES
MANUEL D'INSTRUCTIONS
REC/
B
A
PLAY
PLAY
PLAY
PLAY
PC X C
CD PORTABLE COMPONENT SYSTEM
ON
REMOTE SENSOR
ACTIVE HYPER-BASS PRO
TUNER
POWER
BAND PRESET TUNING
AUTO PRESET
TIMER
CD SEARCH
WAKE UP
SLEEP
BEAT CUT
CD/TUNER MULTI DISPLAY
DOWN TUNING
UP
VOLUME
ACTIVE HYPER-BASS PRO
SOUND
CD
CD
3
-CD
CD
PLAY & EXCHANGE
CONTINUE
COMPACT
DIGITAL AUDIO
PLAY
PC X C
CD PORTABLE COMPONENT SYSTEM
ON
REMOTE SENSOR
ACTIVE HYPER-BASS PRO
POWER
TUNER
BAND PRESET TUNING
AUTO PRESET
TIMER
WAKE UP
SLEEP
CD SEARCH
CD/TUNER MULTI DISPLAY
BEAT CUT
DOWN TUNING UP
VOLUME
ACTIVE HYPER-BASS PRO
SOUND
CD
CD
3
-CD
CD
PLAY & EXCHANGE
CONTINUE
COMPACT
DIGITAL AUDIO
PC-XC8
PC-XC12
For Customer Use:
Enter below the Model No. and Serial
No. which are located on the rear of the
cabinet. Retain this information for future
reference.
Model No.
Serial No.
VNN7082-611M
[J]
Advertisement
Table of Contents

Related Manuals for JVC PC-XC12


Summary of Contents for JVC PC-XC12
- Page 1 CD PORTABLE COMPONENT SYSTEM SISTEMA PORTATIL DE COMPONENTES DE CD CHAINE PORTABLE A LECTEUR CD PC-XC12/XC8 INSTRUCTIONS MANUAL DE INSTRUCCIONES MANUEL D’INSTRUCTIONS REC/ PLAY PLAY PLAY PLAY PC X C CD PORTABLE COMPONENT SYSTEM REMOTE SENSOR ACTIVE HYPER-BASS PRO TUNER...
-
Page 2: Table Of Contents
ENGLISH Thank you for purchasing this JVC product. Please read these instructions carefully before starting operation to be sure to obtain optimum performance and a longer service life from the unit. CONTENTS Features ... 3 Safety precautions ... 3 Handling precautions ... 5 Attaching/detaching the speakers ... -
Page 3: Features
5. No doble en ángulo agudo el cordón, no jale del mismo ni lo retuerza. US JVC CORP. 41SLATER DRIVE ELMWOOD PARK. N.J.07407 MANUFACTURED AT Product complies with DHHS Rules 21 CFR Subchapter J in effect at date of manufacture. - Page 4 10 cm or more. Front view Vista frontal Vue avant 15 cm PC-XC12/XC8 6. No modifique el cordón eléctrico de ninguna manera. 7. Para evitar accidentes, no extraiga los tornillos para desarmar la unidad y no toque nada dentro de la misma.
-
Page 5: Handling Precautions
HANDLING PRECAUTIONS Do not use this unit in direct sunlight or leave the unit in closed automobiles (or yachts, etc.) where it would be exposed to high temperatures above 40°C (104°F). ÷ When abnormal operation occurs. * Unplug the AC power cord from the AC outlet and remove all the batteries. -
Page 6: Attaching/Detaching The Speakers
8. When listening with headphones ÷ Do not listen at high volumes as it could damage your hearing. ÷ For safety, do not drive while listening to this unit. 9. Carrying handle Do not raise or lower the carrying handle with the telescopic antenna extended, to avoid damaging the antenna. -
Page 7: Connections
Note: Since the speakers sound differently according to where they are placed, carefully place them for optimal effect within the length of the provided speaker cords. It is recommended that the left and right speakers be placed symmetrically in relation to the main unit. CONNECTIONS ÷... -
Page 8: Power Supply
Refer to the illustration for correct connection. CAUTIONS: 1. ONLY USE WITH JVC POWER CORD PROVIDED WITH THIS UNIT TO AVOID MALFUNCTION OR DAMAGE TO THE UNIT. REMOVE BATTERIES WHEN USING THE POWER CORD. - Page 9 TIME (MORE THAN TWO WEEKS) OR WHEN ALWAYS USING HOUSEHOLD AC, REMOVE THE BATTERIES TO AVOID A MALFUNCTION OR DAMAGE TO THE UNIT. ÷ WHEN THE JVC POWER CORD PROVIDED WITH THIS UNIT IS CONNECTED, THE POWER IS AUTOMATICALLY SWITCHED FROM BATTERIES HOUSEHOLD AC EVEN WHEN THE BATTERIES ARE LOADED.
-
Page 10: Names Of Parts And Their Functions
Sección del cambiador de CD/general PLAY PLAY ACTIVE HYPER-BASS PRO TUNER BAND PRESET TUNING AUTO PRESET CD SEARCH DOWN TUNING VOLUME SOUND PLAY & EXCHANGE CONTINUE PC-XC12 SLEEP SLEEP PROGRAM PROGRAM ALL DISC ALL DISC RANDOM RANDOM CONTINUE CONTINUE WAKE UP WAKE UP... - Page 11 SLEEP BEAT CUT CD/TUNER MULTI DISPLAY VOLUME ACTIVE HYPER-BASS PRO COMPACT DIGITAL AUDIO PC-XC12 9 pq w ACTIVE HYPER-BASS PRO button VOLUME buttons (+, –) SOUND button CD trays (DISC 1-DISC 3) CD tray (0) open/close buttons (DISC 1- DISC 3)
- Page 12 TIMER WAKE UP SLEEP BEAT CUT CD/TUNER MULTI DISPLAY ACTIVE HYPER-BASS PRO Cassette holder (Deck A) (PC-XC12 only) Cassette holder (PC-XC8 only) Cassette operation buttons (Deck A) (PC- XC12 only) Cassette operation buttons (PC-XC8 only) ‡ REC : Press this button with the 3 PLAY button to start recording.
-
Page 13: Remote Control Unit
Display window Tape (TAPE) mode display Recording indicator (REC) Band indicator Radio frequency display Preset station display STEREO indicator MONO indicator BEAT CUT button Rear panel Telescopic antenna AC IN (AC input) jack Battery compartment cover SPEAKER terminals Connect the provided speakers to these terminals. - Page 14 Using the remote control unit ÷ Point at the REMOTE SENSOR and operate within about 7 m (approx. 23 ft). ÷ The remote control range is less when the unit is used at an angle. ÷ Do not expose the REMOTE SENSOR to strong direct sunlight or artificial lighting.
-
Page 15: Switching The Power On/Off
TUNER POWER AUTO PRESET TIMER WAKE UP SLEEP BEAT CUT ACTIVE HYPER-BASS PRO COMPACT DIGITAL AUDIO PC-XC12 POWER button Botón POWER Touche d’alimentation (POWER) CD CONTROL buttons Botones CD CONTROL Touches CD CONTROL Conexión/desconexión de la alimentación ÷ Conexión: The red indicator lights. - Page 16 COMPU PLAY (only when AC power is used) Even when the power is set to standby, pressing the button shown below switches on the power and selects the source. PLAY TUNER BAND When wake up timer is engaged, this unit’s power is not switched on even when the deck’s 3 PLAY button is pressed.
-
Page 17: Volume, Tone And Other Controls
VOLUME, TONE AND OTHER CONTROLS VOLUME button + : Use to increase the volume. – : Use to decrease the volume. (Control range from VOL 0 to VOL 25.) ACTIVE HYPER-BASS PRO button ON : The ACTIVE HYPER-BASS PRO indicator lights up. Set to this position to activate ACTIVE HYPER-BASS PRO sound. -
Page 18: Handling Cds
HANDLING CDs Since dirty, damaged and warped CDs may damage the unit, take care regarding the following: 1. Usable CDs Use CDs with the mark shown. 2. Notes on handling CDs ÷ Do not touch the reflective recorded surface. ÷ Do not stick or write anything on the label side. -
Page 19: Playing Cds
SLEEP BEAT CUT ACTIVE HYPER-BASS PRO COMPACT DIGITAL AUDIO PC-XC12/XC8 Press the required CD tray open/close button (0) (DISC 1 to DISC 3). The CD tray opens. (The power is switched on when AC power is supplied.) ÷ When battery power is used, switch on the POWER button first, then perform operations. - Page 20 When the AC power cord is unplugged, never close the open tray by hand. To close it, plug the power cord in again and press the 0 button. Otherwise it may cause damage to the unit. ÷ To stop in the middle of a CD During play, press the stop/clear (7) button to stop play.
- Page 21 WAKE UP SLEEP BEAT CUT ACTIVE HYPER-BASS PRO COMPACT DIGITAL AUDIO PC-XC12/XC8 Load a CD in each tray (DISC 1-DISC 3). Press the CD CONTROL button (DISC 1) to start play. Press the CONTINUE button to set continuous play mode.
- Page 22 DISC CONTROL button ÷ Direct Disc Selection Press the CD CONTROL button (DISC 1 to DISC 3) corresponding to the No. of the required CD. Example: To designate Disc 2 The tracks on the designated CD are played in sequence. Note: ÷...
- Page 23 Repeat play (Using the remote control unit) Press the REPEAT button before or during play. It is possible to perform repeat play of a single track, all tracks on one CD, or all tracks on all CDs in the CD changer. Each time the REPEAT button is pressed, the mode will change in the order from a single track (...
- Page 24 Programmed play (using the remote control unit) ÷ Up to 20 tracks can be programmed to be played in any required order from one CD or all CDs in the CD changer. Example: (CD containing more than 12 tracks) Example 1: Programming tracks from disc 3 (tracks 2, 5, and 12).
- Page 25 ÷ Example 2: Programming tracks from 2 or more CDs in the order of disc 1 (track 3), disc 1 (track 6), and disc 3 (track 12). / CLEAR PROGRAM PROGRAM DISC TRACK PROGRAM Press the 7/CLEAR button. Press the PROGRAM button to set to the programming mode.
-
Page 26: Handling Cassette Tapes
CD SEARCH CD/TUNER MULTI DISPLAY DOWN TUNING VOLUME SOUND PC-XC12 Coloque un cassette con la cara A apuntando hacia arriba. Presiónelo para iniciar la reproducción. (Se conecta la alimentación y se activa el modo TAPE para iniciar la reproducción de la cinta.) -
Page 27: Relay Playback (From Deck B To Deck A) (Pc-Xc12 Only)
Press the 7/0 STOP/EJECT button to stop the tape running before turning off the power. RELAY PLAYBACK (FROM DECK B TO DECK A) (PC-XC12 only) Operate in the order shown PC-XC12 Set the POWER button to ON. Load a cassette. -
Page 28: Radio Reception
SLEEP BEAT CUT ACTIVE HYPER-BASS PRO COMPACT DIGITAL AUDIO PC-XC12/XC8 Press the TUNER/BAND button. ÷ The power is switched on and a band and radio frequency will be shown in the display. ÷ When battery power is used, switch on the POWER button first, then perform operations. - Page 29 Notes: ÷ When seek tuning to the required station is not possible because the broadcast signal is too weak, press the UP or DOWN button momentarily to perform manual tuning. ÷ When the power is set to STANDBY, or another mode (TAPE or CD) is selected, the last tuned frequency is stored in memory.
- Page 30 ÷ To change preset stations Perform step above after tuning to the required station. Notes: ÷ The previous stored station is erased when a new station is stored, because the new station’s frequency replaces the previous frequency in memory. ÷ When listening to an AM broadcast, noise may be heard if the remote control unit is used.
-
Page 31: Recording
TUNER BAND PRESET TUNING AUTO PRESET CD SEARCH PROGRAM SOUND CONTINUE PC-XC12 Presione botón correspondiente al CD que va a grabar. Presione el botón 7 para activar el modo de parada. Coloque un cassette con el lado A apuntando hacia arriba. (Antes de iniciar la grabación, bobine la cinta hasta el fin del... - Page 32 TUNER BAND PRESET TUNING AUTO PRESET CD SEARCH DOWN TUNING SOUND PC-XC12 Coloque un cassette. Presione el botón TUNER/BAND. Sintonice la estación deseada. Presione el botón ‡ REC conjuntamente con el botón 3 PLAY. ÷ Para parar la grabación temporariamente, presione el botón 8 PAUSE.
-
Page 33: Tape Dubbing (Synchro Start Dubbing) (Pc-Xc12 Only)
This button should normally be set to “CUT-1”. TAPE DUBBING (SYNCHRO START DUBBING) (PC-XC12 only) Normal-speed dubbing from Deck B to Deck A can be performed. Operate in the order shown Load a cassette for recording. (Refer to the note on page 31.) -
Page 34: Wake Up Timer Operations
WAKE UP TIMER OPERATIONS Wake up timer can be set up to 12 hours in advance, starting timer playback of a CD, tape or broadcast at any 30-minute interval within the 12 hours. Setting the wake up timer (Example: When the present time is PM 10:00 and you want to set the timer for AM 6:00 next morning (about 8 hours later)) TIMER... - Page 35 PLAY TUNER BAND PRESET TUNING AUTO PRESET CD SEARCH DOWN TUNING SOUND PLAY & EXCHANGE CONTINUE PC-XC12 Coloque el botón POWER en ON. Seleccione la fuente de sonido. Timer mode Operations Modo de temporizador Operaciones Mode de minuterie Opérations Load a disc and press the 7/CLEAR button to set the CD mode.
-
Page 36: Sleep Timer Operations
SLEEP TIMER OPERATIONS Use this when you want to fall asleep while listening to a tape, broadcast or CD. Set to the required source and tune (broadcast) or play back (CD or tape). Press the SLEEP button to set the sleep time. TIMER SLEEP WAKE UP... -
Page 37: Maintenance
MAINTENANCE Cleaning is important! When the tape is running, magnetic powder and dust naturally accumulate on the heads, capstan and pinch roller. When they become too dirty... ÷ Sound quality deteriorates. ÷ The output sound level drops. ÷ Previously recorded tape is not completely erased. -
Page 38: Troubleshooting
TROUBLESHOOTING What appears to be trouble is not always serious. First make sure... ÷ When abnormal operation occurs. * Unplug the AC power cord from the AC outlet. Then reconnect and switch the power ON. ÷ Power cannot be turned on. * Is the power cord unplugged? ÷... -
Page 39: Specifications
Tape deck section Track system : 4-track 2-channel stereo Motor : Electronic governor DC motor for capstan Heads : (PC-XC12) Deck A; Hard permalloy head for recording/playback, Magnetic head for erasure Deck B; Hard permalloy head for playback (PC-XC8) Hard permalloy head for... - Page 40 VICTOR COMPANY OF JAPAN, LIMITED Printed in Malaysia EN, SP, FR 0298MNMUIAJEM...