
Related Manuals for FireplaceXtrordinair 36 ELITE-ZC


Summary of Contents for FireplaceXtrordinair 36 ELITE-ZC
- Page 1 • Zero Clearance Listed Tested to: Fireplace U.L. 127 and portions of U.L. 1482 & 907 36 E LITE NSTALLATION ANUAL 10850 117th Place N.E. Kirkland, WA 98033 Part # 93508090 4020405 $10.00...
-
Page 2: Table Of Contents
ABLE OF ONTENTS Features & Specifications Features: ..................1 Installation Options: ................1 Heating Specifications ................1 Dimensions ..................1 Installation Installation Preparation ...............2 Packing List ..................2 Fireplace Placement Requirements............3 Minimum Framing Dimensions ............3 Clearances ...................4 Corner Installation ................4 Raised Fireplaces................5 Facing Requirements .................5 Mantel Requirements .................7 Hearth Requirements .................7 Cooling Vents ...................8... -
Page 3: Features
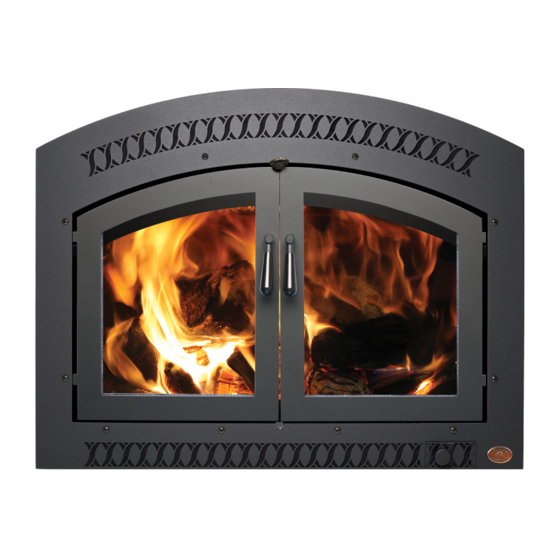
EATURES AND PECIFICATIONS Features: Installation Options: • Straight or Corner Placement • EPA Phase II approved (2.3 g/hr.) • Flush or Recessed Face • Maximum Log Length of 24" • Raised or Flush Floor Hearth • Large firebox capacity - 3.7 cu. ft. •... -
Page 4: Installation
NSTALLATION Installation Preparation Read this entire manual before installing the fireplace. Failure to install this fireplace in accordance with all local codes and the requirements listed in this manual may result in property damage, bodily injury, or even death. Notify your insurance company before installing this fireplace. The requirements listed below are divided into sections. -
Page 5: Fireplace Placement Requirements
NSTALLATION ONTINUED Fireplace Placement Requirements Minimum Framing Dimensions A firestop is required at the top of the fireplace enclosure or ceiling level (whichever is lower). The fireplace enclosure must not be Min. 4-1/2" less than 81" above the base of the fireplace. -
Page 6: Clearances
NSTALLATION ONTINUED • Fireplace must be installed on a level surface capable of supporting the fireplace and chimney • Place the ember strip included with the fireplace below the front edge of the fireplace. EMBER STRIP The ember strip insures no ember falls INSTRUCTIONS between the fireplace and hearth onto the... -
Page 7: Raised Fireplaces
NSTALLATION ONTINUED Raised Fireplaces • If the fireplace is raised more than 15” above the sub-floor, the fireplace enclosure will have to be raised accordingly (see “Minimum Framing Dimensions” on page 3). + The fireplace may be placed on a platform designed to support the fireplace and vent (Approximately 600 Lbs.). - Page 8 NSTALLATION ONTINUED Facing Requirements (continued) • The combustible area above the facing must not protrude more than 3/4" from the facing. If it does, it is considered a mantel and must meet the mantel requirements listed in this manual. •+ To achieve a facing that is flush with the drywall to the side of the fireplace, recess the framing directly next to the fireplace.
-
Page 9: Mantel Requirements
Mantel side columns that protrude more than 3/4" must maintain an 18" clearance to the faceplate • Collinswood® makes a mantel specifically designed for the Fireplace Xtrordinair 36 Elite-ZC. This mantel has been listed with this appliance as a component of this appliance and is not subject to the above mantel requirements. -
Page 10: Cooling Vents
NSTALLATION ONTINUED Cooling Vents The cooling vents provide cooling air for the fireplace and chimney system. Failure to correctly install the cooling vents will lead to an extremely dangerous installation and possibly a fire. • The two cooling vents must be installed so as to route air from the outside to the two starter collars on the top rear corners of the fireplace. -
Page 11: Blower
NSTALLATION ONTINUED Blower The external blower pushes air through blower duct to the fireplace, where it is heated and distributed into the room. The blower may be located to draw air from the exterior of the home, producing positive pressure inside the home and providing outside air for the combustion chamber. -
Page 12: Blower Electrical Connection
NSTALLATION ONTINUED Blower Duct Connection (continued) • The maximum length for 8" diameter blower duct is 25' (use two 6" to 8" adapters) Caulk around all Blower • A maximum of two 90° bends may be used. four sides of the Cover blower housing •... -
Page 13: Chimney
NSTALLATION ONTINUED Chimney Requirements • Use one of the following brands and type of chimney: • Temco 82 • Superior TF8 • FMI 8DM • Marco 8D Chimneys Part Numbers Chimney Temco 82 Superior FMI 8DM M a r c o Components T F 8 12"... -
Page 14: Chimney Height
NSTALLATION ONTINUED Chimney 2' Min. Height Rain Cap • Minimum 15' system height 3' Min. (measured from the base of the Storm Collar fireplace) Flashing • Maximum 35' system height (measured from the Attic Firestop (with insulation shield) base of the fireplace) Chimney must be totally ? In some... -
Page 15: Using Offsets
NSTALLATION ONTINUED be used. Follow the manufacturer's instructions for the use of flashing and an adjustable storm collar at the roof line to prevent water from entering the house. Manufacturers require that chimneys extending beyond a certain height above the roof (frequently above 5') must also be braced. Using Offsets •... -
Page 16: Clearances To Combustibles
NSTALLATION ONTINUED Clearances to Combustibles Follow the clearances listed below - do not follow the clearances listed in the chimney instructions • Maintain a 2" clearance from the chimney to combustibles (measured horizontally) • Use offsets, if necessary, to maintain clearances •... -
Page 17: Framing The Roof
NSTALLATION ONTINUED Framing the Roof • Follow the manufacturer's instructions for the use of flashing and an adjustable storm collar at the roof line to prevent water from entering the house. • The table below may be used to determine the appropriate framing size. When installing into a sloped roof, it is important to determine the size of the framing for clearance purposes. -
Page 18: Finalizing The Installation
NSTALLATION ONTINUED Finalizing the Installation ACID WASH WARNING : Before installing the faceplate, make sure any masonry that has been treated with acid wash has been properly neutralized (this is used primarily with brick faces). Acid wash (muriatic acid) is used to remove excess mortar. If not properly neutralized with an ammonia solution, the gold face may develop a permanent tarnish when the acid evaporates over time. - Page 19 NSTALLATION ONTINUED 5 Make sure the insulation between the firebox and fireplace can is still in place Before putting on the faceplate, make sure the insulation is in place and forms a barrier between the firebox and the zero-clearance can. Check both sides and above the firebox.
- Page 20 NSTALLATION ONTINUED 8 Attach the two male quick-connects from the switch plate to the two female quick-connects leading from the fireplace. If the optional summer fan switch is being used, connect the other two quick connects, otherwise tuck the two male quick-connects leading from the fireplace into the cavity behind the faceplate.
- Page 21 NSTALLATION ONTINUED 10 Install the door(s). Single Door Installation Insert the cover plate through the obround hole and tighten in Use a 1/2" wrench to remove place with the two nuts and washers (use a 3/8" nutdriver.) this bolt (you may need to use a 9/16"...
-
Page 22: Listing Information
ISTING NFORMATION The listing label is shown below. It can be found on the base of the fireplace behind the faceplate. -
Page 23: Safety Label
ISTING NFORMATION... -
Page 24: Index
NDEX 4020405 Acid Wash ............16 Firestops ............14 Baffle Placement ..........16 FMI Chimney............11 Blower...............9 Framing Dimensions ..........3 Blower Duct Connection ........9 Grate Placement ..........16 Blower Electrical Connection .........10 Header (see framing dimensions) ......3 Blower Housing...........10 Hearth Requirements ...........7 BTU Output............1 Heat Shield (switching old to new style) ....19 Chimney............11 Heating Specifications ..........1 Chimney Cap (see Chimney Termination)....15...