Table of Contents
Advertisement
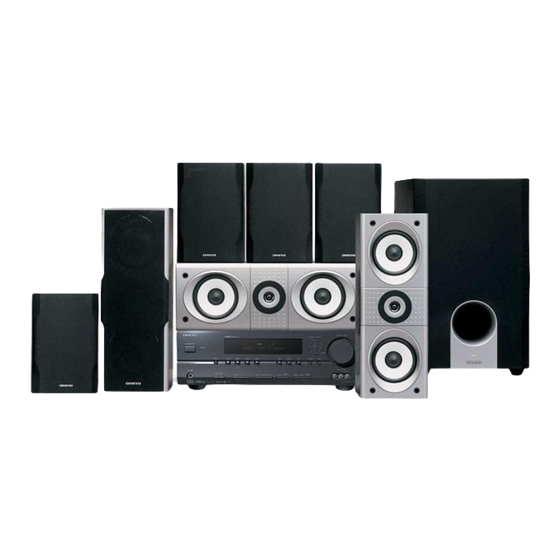
7.1ch Home Theater System
HT-S790
AV Receiver (HT-R540)
Front Speakers (SKF-540F)
Center Speaker (SKC-540C)
Surround Speakers (SKM-540S)
Surround Back Speakers (SKB-540)
Powered Subwoofer (SKW-540)
Instruction Manual
Thank you for purchasing an Onkyo 7.1ch Home
Theater System. Please read this manual thoroughly
before making connections and plugging in the unit.
Following the instructions in this manual will enable
you to obtain optimum performance and listening
enjoyment from your new 7.1ch Home Theater Sys-
tem.
Please retain this manual for future reference.
Contents
Introduction ..................................... 2
Connection .................................... 19
Turning On & First Time Setup..... 34
Basic Operation
Playing your AV components ....... 36
Listening to the Radio .................. 38
Enjoying the Listening Modes ..... 46
Advanced Operation ..................... 52
Troubleshooting ............................ 61
E
n
Advertisement
Table of Contents

Related Manuals for Onkyo HT-S790


Summary of Contents for Onkyo HT-S790
- Page 1 Instruction Manual Listening to the Radio ....38 Enjoying the Listening Modes ..46 Thank you for purchasing an Onkyo 7.1ch Home Theater System. Please read this manual thoroughly before making connections and plugging in the unit. Following the instructions in this manual will enable you to obtain optimum performance and listening enjoyment from your new 7.1ch Home Theater Sys-...
-
Page 2: Important Safety Instructions
WARNING: AVIS WARNING TO REDUCE THE RISK OF FIRE OR ELECTRIC RISK OF ELECTRIC SHOCK RISQUE DE CHOC ELECTRIQUE DO NOT OPEN NE PAS OUVRIR SHOCK, DO NOT EXPOSE THIS APPARATUS TO RAIN OR MOISTURE. The lightning flash with arrowhead symbol, within an equilateral triangle, is intended to alert the user to the CAUTION: presence of uninsulated “dangerous voltage”... -
Page 3: Precautions
If water or any other liquid gets For Canadian Models inside this unit, have it checked by your Onkyo NOTE: dealer. THIS CLASS B DIGITAL APPARATUS COMPLIES WITH CANADIAN ICES-003. -
Page 4: Speaker Precautions
Speaker Precautions Placement Input Signal Warning • The speaker cabinets are made out of wood and are The speakers can handle the specified input power when therefore sensitive to extreme temperatures and used for normal music reproduction. If any of the follow- humidity, do not put them in locations subject to direct ing signals are fed to them, even if the input power is sunlight or in humid places, such as near an air condi-... -
Page 5: Enjoying Home Theater
Enjoying Home Theater Speaker Sets A and B You can use two sets of speakers with the AV receiver: speaker set A and speaker set B. Speaker set A (included speakers) should be used in your main listening room for up to 7.1-channel playback. *While speaker set B is on, speaker set A is reduced to 5.1-channel playback. -
Page 6: Package Contents
Package Contents Make sure you have the following items: AV receiver (HT-R540) Subwoofer (SKW-540) (Red) (White) Remote controller & two batteries (AA/R6) Speaker cable for front speakers 15 ft. (4.5 m) Indoor FM antenna (Green) Speaker cable for center speaker 10 ft. (3 m) AM loop antenna (Blue) (Gray) -
Page 7: Features
Features Amplifier *1 OptiResponse, and OR-EQ are trademarks of Onkyo Cor- poration. • 7-channel amplifier • 110 watts per channel rms into 8 ohms, 2 channels driven at 1 kHz, less than 0.9% total harmonic distor- tion (FTC rating) Manufactured under license from Dolby Laboratories. - Page 8 Getting Started in Five Easy Steps Hookup Connect the AV receiver to your AV system. ☞ page 19 ANTENNA SURROUND BACK SURROUND FRONT CENTER SPEAKERS SPEAKERS SPEAKERS A SPEAKER COMPONENT VIDEO DIGITAL IN VIDEO 2 IN VIDEO 1 IN DVD IN XIAL MONITOR VIDEO 2...
-
Page 9: Table Of Contents
Components ..33 Controlling Other Components....58 Connecting the Power Cord ......33 Entering Remote Control Codes....58 Remote Control Codes for Onkyo Components Connected via ....59 Turning On & First Time Setup Resetting REMOTE MODE Buttons ... 59 Resetting the Remote Controller ....59 Turning On the AV Receiver ....34... -
Page 10: Getting To Know The Av Receiver
Getting to Know the AV Receiver Front Panel North American Model MASTER VOLUME TUNING PRESET STANDBY/ON STANDBY ENTER MULTI CH VIDEO VIDEO VIDEO TAPE TUNER RETURN SETUP VIDEO 3 INPUT PHONES VIDEO AUDIO SPEAKERS DIGITAL TUNING TONE STEREO LISTENING MODE DISPLAY INPUT DIMMER... - Page 11 Getting to Know the AV Receiver TONE, [–], and [+] buttons (44) TUNING MODE button (38) Used to adjust the bass and treble. Selects the Auto or Manual tuning mode for AM and FM radio. STEREO button (46) RETURN button Selects the Stereo listening mode.
-
Page 12: Rear Panel
Remote Interactive jack can be connected your AV receiver. to the jack on another -capable Onkyo com- ponent. To use , you must make an analog audio connection (RCA) between the AV receiver and the other component, even if they are connected digi- tally. -
Page 13: Remote Controller
Remote Controller Installing the Batteries Aiming the Remote Controller When using the remote controller, point it toward the AV To open the battery compartment, press receiver’s remote control sensor, as shown below. the small hollow and slide open the cover. Remote control sensor AV receiver STANDBY indicator... -
Page 14: Using The Remote Controller
RECEIVER/TAPE mode is used to control the AV used to control up to seven different components. The receiver. It can also be used to control an Onkyo cassette remote controller has a specific operating mode for use recorder connected via with each type of component. - Page 15 Remote Controller For detailed information, see the pages in parentheses. SETUP button Used to access the setup menus. ON/STANDBY button (34) Sets the AV receiver to On or Standby. CINE FLTR button (50) Used with the CinemaFILTER function. INPUT SELECTOR buttons (36) Used to select the input sources.
-
Page 16: Dvd Mode
Sets the DVD player to On or Standby. By default, the remote controller is set to control an Number buttons Onkyo DVD player. Used to enter title, chapter, and track numbers and times for locating specific points. To select your DVD player as the input source, press: DISC +/–... - Page 17 Sets the component to On or Standby. By default, the remote controller is set to control an Number buttons Onkyo CD player. Used to enter track numbers and times for locating specific points on CD/MD players. To select the input source, press: DISC/ALBUM +/–...
-
Page 18: Speakers
Speakers Subwoofer (SKW-540) For detailed information, see the pages in parentheses. ■ Front STANDBY/ON indicator Red: Subwoofer in standby mode Green: Subwoofer on With the Auto Standby function, the SKW-540 automatically turns on when an input signal is detected in Standby mode. When there’s no input signal for a while, the SKW-540 automatically enters Standby mode. -
Page 19: Connection
Connecting Your Speakers Speaker Connection Precautions Connecting Speaker Set A Read the following before connecting your speakers: The AV receiver’s positive (+) speaker terminals and speaker’s positive (+) terminals are color-coded for ease • You can connect speakers with an impedance of of identification. -
Page 20: Connecting Antennas
Connecting Antennas This section explains how to connect the supplied indoor Connecting the AM Loop Antenna FM antenna and AM loop antenna, and how to connect commercially available outdoor FM and AM antennas. The supplied indoor AM loop antenna is for indoor use only. -
Page 21: Connecting An Outdoor Fm Antenna
Connecting Antennas Connecting an Outdoor FM Antenna Connecting an Outdoor AM Antenna If you cannot achieve good reception with the supplied If good reception cannot be achieved using the supplied indoor FM antenna, try a commercially available out- AM loop antenna, an outdoor AM antenna can be used in door FM antenna instead. -
Page 22: Connecting Your Components
Connecting Your Components AV Connection Color Coding About AV Connections RCA-type AV connections are usually color coded: red, • Before making any AV connections, read the manuals white, and yellow. Use red plugs to connect right-chan- supplied with your other AV components. nel audio inputs and outputs (typically labeled “R”). -
Page 23: Connecting Audio And Video Signals To The Av Receiver
Connecting Your Components Connecting Audio and Video Signals to the AV Receiver By connecting both the audio and video outputs of your DVD player and other AV components to the AV receiver, you can switch the audio and video signals simultaneously simply by changing the input source on the AV receiver. : Signal Flow Video Video... -
Page 24: Tv Or Projector
Connecting Your Components Connecting a TV or Projector Step 1: Video Connection Choose a video connection that matches your TV ( , , or ), and then make the connection. Step 2: Audio Connection Choose an audio connection that matches your TV ( , , or ), and then make the connection. -
Page 25: Dvd Player
Connecting Your Components Connecting a DVD player Step 1: Video Connection Choose a video connection that matches your DVD player ( , , or , and then make the connection. You must connect the AV receiver to your TV via the same type of connection. Step 2: Audio Connection Choose an audio connection that matches your DVD player ( , , or... - Page 26 Connecting Your Components Hooking Up the Multichannel DVD Input If your DVD player supports multichannel audio formats such as DVD-Audio or SACD, and it has a multichannel analog audio output, you can connect it to the AV receiver’s multichannel DVD input. Use a multichannel analog audio cable, or several normal audio cables, to connect the AV receiver’s DVD IN FRONT L/R, CENTER, SURROUND L/R, SURR BACK L/R, and SUBWOOFER jacks to the 7.1-channel analog audio output on your DVD player.
-
Page 27: Vcr Or Dvd Recorder For Playback
Connecting Your Components Connecting a VCR or DVD Recorder for Playback With this hookup, you can use your VCR’s tuner to listen to your favorite TV programs via the AV Hint! receiver, useful if your TV has no audio outputs. Step 1: Video Connection Choose a video connection that matches your VCR or DVD recorder ( , , or... -
Page 28: Vcr Or Dvd Recorder For Recording
Connecting Your Components Connecting a VCR or DVD Recorder for Recording Step 1: Choose a video connection that matches your VCR or DVD recorder ( ), and then make the connec- tion. The video source to be recorded must be connected to the AV receiver via the same type of connection. Step 2: Make the audio connection ANTENNA SURROUND BACK... -
Page 29: Satellite, Cable, Set-Top Box, Or Other Video Source
Connecting Your Components Connecting a Satellite, Cable, Set-top box, or Other Video Source With this hookup, you can use your satellite or cable receiver to listen to your favorite TV programs Hint! via the AV receiver, useful if your TV has no audio outputs. Step 1: Video Connection Choose a video connection that matches the video source ( , , or... -
Page 30: Cd Player Or Turntable
Connecting Your Components Connecting a CD Player or Turntable ■ CD Player or Turntable (MM) with Built-in Phono Preamp Step 1: Choose a connection that matches your CD player ( , , or ). Use connection for a turntable with a built-in phono preamp. -
Page 31: Hdd-Compatible Component
Connecting Your Components Connecting an HDD-compatible Component As of this printing, the Onkyo Remote Interactive Dock is the only HDD-compatible component available. ■ For HDD-compatible components that ■ For HDD-compatible components that don’t support video support video Connect your HDD-compatible component’s analog Connect your HDD-compatible component’s analog... -
Page 32: Cassette, Cdr, Minidisc, Or Dat Recorder
• Make sure that the capacity of the component that you connect to the AC OUTLET does not exceed the stated capacity (e.g., 100 W). Notes: AC OUTLET • Onkyo components connected via should be AC 120V 60Hz SWITCHED connected directly to a wall outlet, not the AV TOTAL 120W 1A MAX. -
Page 33: Connecting Onkyo Components
Connecting Your Components Connecting Onkyo Components Step 1: Make sure that each Onkyo component is connected to the AV receiver with an analog audio cable (con- nection in the hookup examples) (see pages 24 to 32). Step 2: Make the connection. -
Page 34: Turning On The Av Receiver
If you have, see “Assigning Digital Inputs to Input Sources” on COAX page 35. OPT1 ■ Have you connected an Onkyo MD recorder, CD recorder, or next generation HDD-compatible component? If you have, see “Changing the Input Display” on page 35. CD recorder, MD recorder, TAPE RI Dock, etc. -
Page 35: First Time Setup
First Time Setup Assigning Digital Inputs to Input Changing the Input Display Sources If you connect an -capable Onkyo MiniDisc recorder, CD recorder or next generation HDD-compat- 2, 3 ible component to the TAPE IN/OUT or VIDEO 2 IN jacks, for... -
Page 36: Playing Your Av Components
Playing Your AV Components Basic AV Receiver Operation MULTI CH ON/STANDBY REMOTE MODE RECEIVER Subwoofer’s TAPE INPUT SELECTOR M D/CDR rear panel MASTER VOLUME TUNING PRESET STANDBY/ON STANDBY MULTI CH ENTER MULTI CH VIDEO VIDEO VIDEO TAPE TUNER RETURN SETUP TAPE TUNER CABLE... -
Page 37: Using The Multichannel Dvd Input
Playing Your AV Components Displaying Source Information ON/STANDBY REMOTE MODE You can display various information about the current RECEIVER RECEIVER input source as follows. TAPE INPUT SELECTOR M D/CDR Press the [RECEIVER] REMOTE RECEIVER MULTI CH MODE button, and then press the MULTI CH [DISPLAY] button repeatedly to TAPE... -
Page 38: Listening To The Radio
Listening to the Radio Tuning into AM/FM Radio Stations Listening to AM/FM stations ■ Auto Tuning Mode TUNER TUNING Press the [TUNING MODE] button TUNING MODE so that the AUTO indicator MASTER VOLUME TUNING PRESET appears on the display. STANDBY/ON STANDBY ENTER MULTI CH... -
Page 39: Presetting Am/Fm Stations And Xm Channels
Listening to the Radio ■ Tuning into Stations by Frequency Press the [MEMORY] button. You can tune into AM and FM stations directly by enter- The MEMORY indicator appears and MEMORY ing the appropriate frequency. the preset number flashes. ON/STANDBY REMOTE MODE RECEIVER RECEIVER... -
Page 40: Listening To Xm Satellite Radio ® (North American Models Only)
Listening to the Radio Connecting the XM Passport System ® Listening to XM Satellite Radio (North American Models Only) The XM Passport System is sold separately. You can pur- chase the XM Passport System from the XM Web site at: http://www.xmradio.com (U.S.A.) Important XM Radio Information http://www.xmradio.ca (Canada) - Page 41 Listening to the Radio ■ Channel Search Mode Signing Up for XM Satellite Radio Press the [RECEIVER] button, Before you can use XM Satellite Radio, you must first followed by the [ENTER] button sign up for an account. You’ll need a major credit card to select “Channel Search”...
- Page 42 Listening to the Radio ENTER ENTER PLAYLIST/CAT PLAYLIST/CAT TUNER TUNING RETURN RETURN SETUP MASTER VOLUME TUNING PRESET STANDBY/ON STANDBY ENTER MULTI CH VIDEO VIDEO VIDEO TAPE TUNER RETURN SETUP LISTENING MODE STEREO SURROUND 3 INPUT VIDEO PHONES VIDEO AUDIO SPEAKERS DIGITAL TUNING TONE...
- Page 43 Listening to the Radio XM Radio Messages ENTER TUNING The following messages may appear while using XM radio. MASTER VOLUME TUNING PRESET STANDBY/ON STANDBY ENTER MULTI CH VIDEO VIDEO VIDEO TAPE TUNER RETURN SETUP 3 INPUT VIDEO PHONES VIDEO AUDIO SPEAKERS DIGITAL TUNING...
-
Page 44: Common Functions
Common Functions This section explains functions that can be used with any Adjusting the Bass and Treble input source. You can adjust the bass and treble for the front speakers, except when the Direct or Pure Audio (not North Amer- ican models) listening mode is selected. -
Page 45: Using The Sleep Timer
Common Functions Using the Sleep Timer Adjusting Speaker Levels With the sleep timer, you can set the AV receiver so that You can adjust the volume of each speaker in speaker set it turns off automatically after a specified period. A. -
Page 46: Using The Listening Modes
Using the Listening Modes Selecting with the Remote Controller Selecting Listening Modes For a description of each listening mode, see “About the DISC ALBUM INPUT Listening Modes” on page 48. GUIDE PREVIOUS TOP MENU MENU SP A / B MUTING •... - Page 47 ✔ DTS, DTS 96/24 ✔ DTS-ES Discrete ✔ DTS-ES Matrix DTS+Neo:6 ✔ DTS+Dolby EX DTS+PLIIx Music ✔ DTS+PLIIx Movie Mono Movie Orchestra Onkyo Unplugged ✔ ✔ ✔ ✔ ✔ ✔ ✔ ✔ Original Studio-Mix TV Logic All Ch Stereo Full Mono *1.
-
Page 48: About The Listening Modes
Using the Listening Modes About the Listening Modes The AV receiver’s listening modes can transform your Dolby Digital listening room into a movie theater or concert hall, with Use this mode with DVDs that bear the high fidelity and stunning surround sound. Dolby Digital logo, and Dolby Digital TV broadcasts. - Page 49 Using the Listening Modes Onkyo Original DSP Modes DTS-ES Matrix This mode is for use with DTS-ES Matrix Mono Movie soundtracks, which use a matrix-encoded This mode is suitable for old movies and other mono back-channel for 6.1/7.1-channel playback. Use it with sources.
-
Page 50: Using The Late Night Function
Using the Listening Modes Using the CinemaFILTER ON/STANDBY With the CinemaFILTER, you can soften overly bright REMOTE MODE RECEIVER RECEIVER movie soundtracks, which are typically mixed for repro- TAPE INPUT SELECTOR M D/CDR duction in a movie theater. CinemaFILTER can be used with the following listening modes: Dolby Digital, Dolby Digital EX, PLII/IIx MULTI CH Movie, DTS, DTS-ES, DTS Neo:6 Cinema, DTS 96/24,... - Page 51 Using the Listening Modes adjusts the front left, right, and center mix, allowing you Press the [SETUP] button. to adjust the weight of the center channel sound. It can Setup closes. be adjusted from 0 to 7 (default value is 3). SETUP DTS Neo:6 Music Mode Setting ■...
-
Page 52: Advanced Setup
Advanced Setup Advanced Speaker Settings Use the Up and Down [ buttons to select “2. SP Dis- tance,” and then press the [ENTER] button. ON/STANDBY REMOTE MODE RECEIVER RECEIVER TAPE INPUT SELECTOR M D/CDR MULTI CH TAPE TUNER CABLE + 10 D TUN --/--- DIMMER... - Page 53 Advanced Setup Speaker Levels Repeat step 4 so that the level of the test tone from each speaker With this function, you can adjust the volume of each is the same. speaker so that all speakers can be heard equally at the listening position.
- Page 54 Advanced Setup Use the Down [ ] button to Speaker Configuration, Crossover Frequency, select “Front,” and then use the and Double Bass settings only need to be Left and Right [ ] buttons to changed if you’re not using the speakers in select Small or Large.
- Page 55 Advanced Setup Use the Down [ ] button to Speaker cone Crossover select “Surr Back,” and use the diameter frequency Left and Right [ ] buttons to Over 8 in. select Small, Large, or None. 40/50/60Hz* (20 cm) Small: Select if the surround back 6-1/2 to 8 in.
-
Page 56: Digital Input Signal Formats
Advanced Setup Digital Input Signal Formats Correcting Sound and Picture Sync The following table shows the display indicator for each When using progressive scanning on your DVD player, digital signal format. you may find that the picture and sound are out of sync. With this setting, you can correct this by delaying the Format Display... -
Page 57: Recording
Recording This section explains how to record the selected input Recording Audio and Video from source to a component with recording capability, and Separate Sources how to record audio and video from different sources. You can overdub audio onto your video recordings by simultaneously recording audio and video from two sep- Recording the Input Source arate sources. -
Page 58: Controlling Other Components
Controlling Other Components You can use the AV receiver’s remote controller While holding down the REMOTE (RC-649M) to control your other AV components, MODE button that you want to including those made by other manufacturers. This sec- REMOTE MODE set, press the [DISPLAY] button tion explains how to enter the necessary remote control for 3 seconds. -
Page 59: Remote Control Codes For Onkyo Components Connected Via
MODE buttons are preprogrammed with remote control codes for control- ling Onkyo DVD players and CD play- If you want to control an Onkyo component by pointing CABLE ers respectively. When these buttons the remote controller directly at it, or you want to control are reset, the preprogrammed code is an Onkyo component that’s not connected via... - Page 60 Controlling Other Components To control another component, point the remote controller at it and use the buttons explained below. (You must select the appropriate remote control mode first.) With some AV components, certain buttons may not work as expected, and some may not work at all. ■...
-
Page 61: Troubleshooting
If you can’t resolve the issue yourself, try resetting • While a pair of headphones is connected to the the AV receiver before contacting your Onkyo dealer. PHONES jack, no sound is output by the speakers To reset the AV receiver to its factory defaults, (page 45). - Page 62 Troubleshooting The multichannel DVD input doesn’t work • The surround back speakers are not used with all lis- tening modes. Select another listening mode • Check the multichannel DVD input connections (page 48). (page 26). • Not much sound may be produced by the surround •...
- Page 63 • With some AV components, certain buttons may not work as expected, and some may not work at all. • To control an Onkyo component that’s connected via , point the remote controller at the AV receiver. Be sure to enter the appropriate remote control code first (see page 59).
- Page 64 2. Use the Up and Down [ ]/[ ] buttons to select a setting (see below). Onkyo is not responsible for damages (such as CD rental fees) due to unsuccessful recordings caused by 3. Use the Left and Right [ ] buttons to change the unit’s malfunction.
-
Page 65: Specifications
Specifications Amplifier Section General Rated Output Power (FTC) Power Supply North American: AC 120 V, 60 Hz All channels: 110 watts minimum continuous power Others: AC 230-240 V, 50Hz per channel, 8 ohm loads, 2 channels Power Consumption North American: 5.9 A driven at 1 kHz, with a maximum total Others: 670 W harmonic distortion of 0.9%... - Page 66 Specifications ■ Speaker ■ Powered Subwoofer (SKW-540) ■ Center Speaker (SKC-540C) Type: Bass-reflex Type: 2 Way Bass-reflex 8 Ω Input Impedance: sensitivity/impedance: 330 mV / 100 kΩ Maximum input power: 130 W Maximum output power: 230 W (Dynamic Power) Output sound pressure Frequency response: 25 Hz–150 Hz level:...
- Page 67 Memo...
- Page 68 Units 2102-2107, Metroplaza Tower I, 223 Hing Fong Road, Kwai Chung, N.T., HONG KONG Tel: 852-2429-3118 Fax: 852-2428-9039 http://www.ch.onkyo.com/ I0602-1 SN 29344189 (C) Copyright 2006 ONKYO CORPORATION Japan. All rights reserved. * 2 9 3 4 4 1 8 9 *...