Canon Speedlite 430EX User Manual
Multi-feature flash unit for canon eos cameras
Hide thumbs
Also See for Speedlite 430EX:
- Instruction manual (116 pages) ,
- Instruction manual (42 pages) ,
- Instruction manual (41 pages)
Table of Contents
Advertisement
Advertisement
Chapters
Table of Contents

Related Manuals for Canon Speedlite 430EX


Summary of Contents for Canon Speedlite 430EX
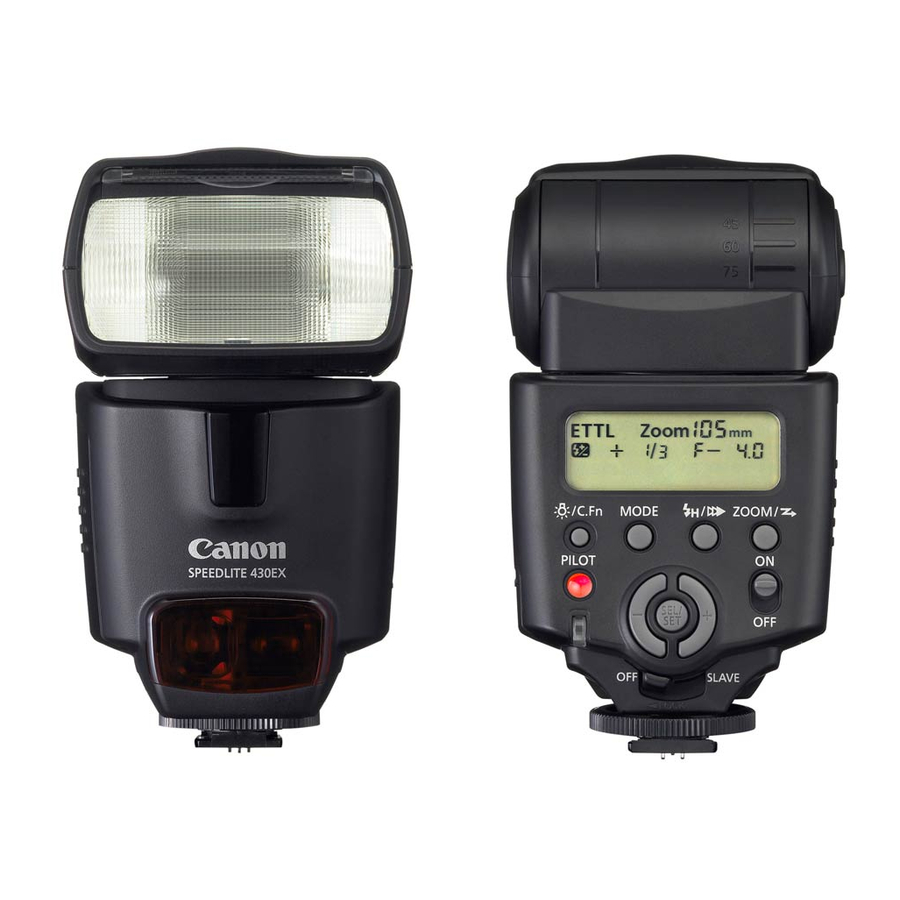
- Page 2 Thank you for purchasing a Canon product. The Canon Speedlite 430EX is a multi-feature flash unit for Canon EOS cameras. It works automatically with E-TTL II, E-TTL, and TTL autoflash systems. It can be used as an on-camera flash or as part of a wireless flash system.
- Page 3 Contents Getting Started and Basic Operation......... 7 Using Flash ................ 13 Wireless Flash ..............23 Reference ................30 Conventions Used in this Manual The <9> symbol in the text refers to the +/– button. The <8> symbol in the text refers to the Select/Set button.
- Page 4 Nomenclature Built-in wide panel (retracted) (p.18) Flash head Wireless sensor Bracket fitting AF-assist beam emitter Bracket mount (p.22) cover Locking ring (p.9) Mounting foot (p.9) Locking pin (p.9) Contacts Case Mini stand Shoe Mini stand pocket...
- Page 5 Bounce angle index <z> Bounce lock release button (p.17) <E> High-speed sync (FP flash)/ LCD panel Shutter curtain synchronization button (p.16) * <A> LCD panel illumination/ Battery compartment cover Custom Function (p.8) setting button (p.6/20) <G> Zoom button/ <J> Wireless set button Pilot lamp/Test firing/ (p.18/27, 28) Wireless slave auto power...
-
Page 6: Lcd Panel
LCD Panel Zoom focal length Manual flash output level Aperture Flash exposure compensation Max. flash range amount Custom Function No. Custom Function setting <d> Manual zoom <s> Auto zoom <a/b> for image size E-TTL (ll)/TTL autoflash <f> Indicator (meters) Flash exposure compensation Indicator (feet) <c>... -
Page 7: Table Of Contents
Getting Started and Basic Operation Installing Batteries ..........8 Attaching to the Camera......... 9 Turn on the Power Switch ........10 Fully Automatic Flash Shooting ......11 Using E-TTL II and E-TTL Autoflash in the Shooting Modes............ 12 To avoid overheating and deteriorating the flash head, do not fire rapid bursts of more than 20 continuous flashes. -
Page 8: Installing Batteries
Normal Flash 0.1 - 3.7 sec. 200 - 1400 Based on new size-AA alkarine batteries and Canon’s testing standards. Since the shape of their contacts is not standardized, using non-alkaline size-AA batteries may result in faulty battery connection. Use four new batteries of the same brand and type. Do not mix battery types. -
Page 9: Attaching To The Camera
Attaching to the Camera Loosen the locking ring. Turn the locking ring as shown by the arrow to loosen it. Attach it to the camera. Slip the Speedlite’s mounting foot all the way into the hot shoe. Tighten. Turn the locking ring as shown by the arrow. -
Page 10: Turn On The Power Switch
Turn on the Power Switch Set the power switch to <K>. The flash will start recycling. Check that the flash is ready. When the pilot lamp lights in red, the flash is ready to fire. To fire a test flash, press the pilot lamp. -
Page 11: Fully Automatic Flash Shooting
Fully Automatic Flash Shooting When you set the camera’s shooting mode to <V> (Program AE) or <U> (Full Auto), E-TTL II/E-TTL fully automatic flash will make it as easy as normal AE shooting. Set the Speedlite to <a>. Press the <D> button so that <a>... -
Page 12: Using E-Ttl Ii And E-Ttl Autoflash In The Shooting Modes
Using E-TTL II and E-TTL Autoflash in the Shooting Modes Just set the camera’s shooting mode to <W> (aperture-priority AE), <X> (shutter-priority AE), or <q> (manual) and you can use E-TTL II/E-TTL autoflash. Select this mode when you want to set the shutter speed manually. The camera will then automatically set the aperture matching the shutter speed to obtain a standard exposure. -
Page 13: Using Flash
Using Flash fFlash Exposure Compensation ....... 14 7 FE Lock ............15 cHigh-Speed Sync ..........16 rSecond-Curtain Sync ........16 Bounce Flash............17 H Setting the Flash Coverage and Using the Wide Panel ............. 18 q Manual Flash ..........19 C Setting Custom Functions...... -
Page 14: Fflash Exposure Compensation
fFlash Exposure Compensation You can adjust the flash output as easily as normal exposure compensation. Flash exposure compensation can be set up to ±3 stops in 1/3-stop increments. (If the camera’s exposure compensation is set in 1/2-stop increments, flash exposure compensation is set in 1/2-stop increments.) Press the <8>... -
Page 15: Fe Lock
7 FE Lock FE (flash exposure) lock enables you to lock the correct flash exposure for any part of the picture. With <a> displayed on the LCD panel, you press the camera’s <7> button. If the camera does not have the <7> button, press the <P>... -
Page 16: Chigh-Speed Sync
cHigh-Speed Sync With high-speed sync, you can use flash with all shutter speeds. This is convenient when you want to use aperture priority for fill-flash portraits. Press the <E> button so that <c> is displayed. Check that the <F> icon is lit in the viewfinder. -
Page 17: Bounce Flash
Bounce Flash By pointing the flash head toward a wall or ceiling, the flash will bounce off the surface before illuminating the subject. This can soften shadows behind the subject for a more natural-looking shot. This is called bounce flash. Set the Bounce Direction Hold down the <z>... -
Page 18: H Setting The Flash Coverage And Using The Wide Panel
H Setting the Flash Coverage and Using the Wide Panel The flash coverage can be set to match the lens focal length from 24mm to 105mm. The flash coverage can be set automatically or manually. Also, with the built-in wide panel, the flash coverage will be compatible with ultra wide-angle lenses as short as 14mm. -
Page 19: Manual Flash
q Manual Flash You can set the flash output from 1/64 power to 1/1 full power in full- stop increments. Use a hand-held flash meter to determine the required flash output to obtain a correct flash exposure. Be sure to first set the camera’s shooting mode to <W>... -
Page 20: C Setting Custom Functions
C Setting Custom Functions You can customize Speedlite features to suit your preferences. Do it with Custom Functions. Press the <A> button for 2 sec. so that <u> is displayed. Select the Custom Function No. Press the < > button to select the Custom Function number. -
Page 21: Custom Function Settings
Custom Function Settings Custom Setting Function Item Setting Description C.Fn-01 Auto Power Off activation Auto power off after 60 min. Slave unit’s auto power off C.Fn-02 time Auto power off after 10 min. Enabled C.Fn-03 Auto zoom for image size Disabled Disabled C.Fn-04 AF-assist beam OFF... -
Page 22: About Color Temperature Information Transmission
About Color Temperature Information Transmission When the flash fires, the color temperature information is transmitted to certain specific EOS digital camera. This feature optimizes the flash picture’s white balance. When the camera’s color balance is set to <A> or <Q>, it will work automatically. To see if this feature works with your camera, see the “White Balance”... -
Page 23: Wireless Flash
Wireless Flash Wireless Flash ............24 Setting Manual Flash with the Slave Unit ..... 29... -
Page 24: Wireless Flash
Wireless Flash With multiple Canon Speedlites having the wireless flash feature, you can create various lighting effects with the same ease as using normal E-TTL II autoflash. The settings you input with the master unit attached to the camera are also transmitted to the slave unit(s) controlled by wireless. - Page 25 Set the master unit’s flash mode to <a>. The slave unit(s) will also be automatically set to <a>. Check that the flash is ready. When the slave unit is ready to fire, the AF-assist beam will blink once each second. Check the flash operation.
- Page 26 Use the mini stand (tripod socket provided) to prop up the slave unit. Use the bounce feature to swing the slave unit’s flash body so that the wireless sensor faces the master unit. Indoors, the wireless signal may also bounce off the wall so there is more leeway in positioning the slave unit(s).
-
Page 27: Flash Exposure Compensation
430EX’s LCD panel. Setting Communication Channel If there is another Canon wireless flash system nearby, you can change the channel No. to prevent signal confusion. Both the master and slave units must be set to the same channel No. -
Page 28: Modeling Flash
Setting the Slave ID Set the slave ID if you use two (A and B) or three (A, B, and C) slave groups. Press the <G> button so that <x> blinks. Press the <9> button to select the slave ID (A, B, or C). Press the <8>... - Page 29 Setting Manual Flash with the Slave Unit Manual flash can be set manually with the slave unit. Do this in the following cases: (1) When you want to set the flash output with the slave units individually for wireless or manual flash, as with studio flash units. (2) When you use Speedlite Transmitter ST-E2 for wireless or manual flash.
-
Page 30: Reference
Reference 430EX System 1 Speedlite 430EX (Slave unit) 2 Mini stand (included with 430EX) 3 Speedlite 580EX (On-camera/Master unit) 4 Speedlite Transmitter ST-E2 Dedicated transmitter for wireless control of 430EX set as slave units. 5 Macro Ring Lite MR-14EX / 6 Macro Twin Lite MT-24EX Flash for macro photography. -
Page 31: Troubleshooting
Troubleshooting Have a problem? See the table below. The Speedlite does not detach from the camera. The mounting foot’s locking pin has not been retracted. Loosen the locking ring all the way before detaching the Speedlite. (p.9) The Speedlite does not fire. The batteries are installed in the wrong orientation. - Page 32 The periphery or bottom of the picture looks dark. When you set the flash coverage manually, the setting was a higher number than the lens focal length, resulting in a dark periphery. Set the flash coverage that is a lower number than the lens focal length or set it to auto zoom.
-
Page 33: Specifications
Specifications • Type Type: On-camera, E-TTL II/E-TTL/TTL autoflash Speedlite Compatible cameras: Type-A EOS cameras (E-TTL II/E-TTL autoflash), Type-B EOS cameras (TTL autoflash) Guide No.: 43/141 (at 105mm focal length, ISO 100 in meters/feet) Flash coverage: 24 - 105mm (14mm with wide panel) •... - Page 34 (W x H x D): • Weight: 330 g / 11.6 oz (Speedlite only, excluding batteries) All specifications are based on Canon’s testing criteria. Product specifications and external appearance are subject to change without notice. Manual Flash Guide No. (GNo.) (ISO 100, in meters/feet)
- Page 35 Using a Type-B Camera If you use the 430EX with a Type-B camera (TTL autoflash camera), note the available features and restrictions below. When a Type-B camera is used with the 430EX set to autoflash, <b> will be displayed on the Speedlite’s LCD panel. Features Available with All Type-B Cameras Configuration Available Features...
- Page 36 This device complies with Part 15 of the FCC Rules. Operation is subject to the following two conditions: (1) This device may not cause harmful interference, and (2) this device must accept any interference received, including interference that may cause undesired operation. Do not make any changes or modifications to the equipment unless otherwise specified in the instructions.
- Page 37 This mark indicates that the product complies with Australia’s EMC regulations.
- Page 38 This Instructions booklet is dated July 2005. For information on the camera’s compatibility with system accessories marketed after this date, contact your nearest Canon Service Center.