
Related Manuals for JVC TH-A55


Summary of Contents for JVC TH-A55
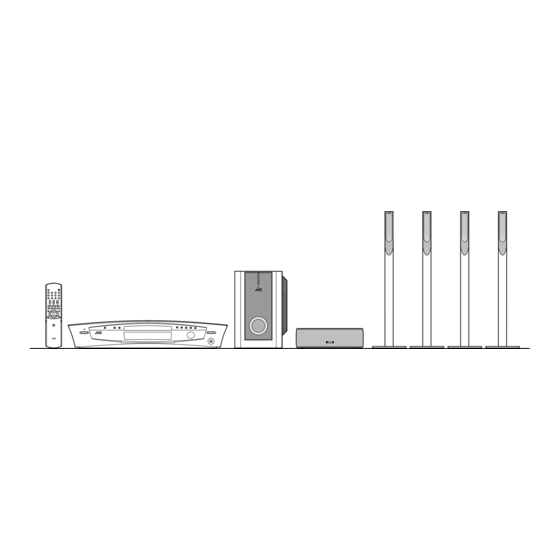
- Page 1 DVD DIGITAL CINEMA SYSTEM TH-A85 Consists of XV-THA85, SP-PWA85, SP-THA85C and SP-THA85F TH-A55 Consists of XV-THA55, SP-PWA55, SP-THA55C, SP-THA55F and SP-THA55S INSTRUCTIONS LVT1025-009B...
- Page 2 Warnings, Cautions and Others CAUTION To reduce the risk of electrical shocks, fire, etc.: 1. Do not remove screws, covers or cabinet. 2. Do not expose this appliance to rain or moisture. CAUTION — (XV-THA85/XV-THA55) Disconnect the mains plug to shut the power off completely (the STANDBY lamp goes off).
- Page 3 Warnings, Cautions and Others Caution: Proper Ventilation To avoid risk of electric shock and fire and to protect from damage, place the apparatus on a level surface. The minimal clearances are shown below: Wall or obstructions XV-THA85/ XV-THA55 3 cm Wall or obstructions SP-PWA85/...
-
Page 4: Table Of Contents
Table of contents Introduction... 2 Notes on handling...2 Supplied accessories ...2 About discs ... 3 Playable disc types ...3 Disc structure ...4 Playback Control function (PBC) — VCD and SVCD only ...4 Names of parts and controls ... 5 Getting started ... 8 Connections ...8 Using the remote control ...16 Basic operations ... -
Page 5: Introduction
Introduction Notes on handling % Important cautions Installation of the system • Select a place which is level, dry and neither too hot nor too cold; between 5°C and 35°C (41°F and 95°F). • Leave sufficient distance between the system and the TV. •... -
Page 6: About Discs
About discs Playable disc types This system has been designed to play back the following discs: DVD Video (DVD), Video CD (VCD), Super Video CD (SVCD), Audio CD, CD-R and CD-RW. • This system can also play back MP3 and JPEG files recorded on CD-Rs and CD-RWs. -
Page 7: Disc Structure
About discs IMPORTANT Before playing a disc, make sure of the following; • Check the connection with the TV. • Turn on your TV and select the correct input mode on the TV to view the pictures or on-screen information on the TV screen. •... -
Page 8: Names Of Parts And Controls
Names of parts and controls The illustrations of the center unit and the subwoofer used in this manual are of TH-A85 unless otherwise noted. Front panel (center unit) A Source button (SOURCE) A pg. 20 B Volume buttons (VOLUME +/–) A pg. 20 C Disc tray A pg. - Page 9 Names of parts and controls Display window (center unit) Dolby Pro Logic II indicator ( • Linear PCM indicator (LPCM) A pg. 30 • Digital signal format indicators A pg. 30 • Dolby Digital ( DIGITAL), DTS ( B MP3 indicator A pg. 24 C Channel indicator (CH) A pg.
- Page 10 Names of parts and controls Remote control NOTE • To use buttons 9 – W and g – o, slide down the remote control cover. A Remote control mode selecting buttons (CONTROL) A pg. 17 – 47 CATV/DBS, TV, VCR B Source selecting buttons A pg.
-
Page 11: Getting Started
Getting started Connections • Do not connect the AC power cord until all other connections have been made. • Since different components often have different terminal names, carefully read the instructions supplied with the components you are going to connect. Connecting a TV To view pictures and on-screen displays, connect the TV to the center unit. -
Page 12: Connecting The Fm And Am Antennas
Getting started Connecting the FM and AM antennas Make sure the antenna conductors do not touch any other terminals, connecting cords and power cords. This could cause poor reception. AM loop antenna Setting up supplied AM loop antenna Attach the AM loop to its base by snapping the tabs on the loop into the slot on the base. -
Page 13: Connecting The Powered Subwoofer
NOTE Only for TH-A85 • Do not lean against the satellite speakers, as the speakers could fall down or break, possibly causing injury. Especially be careful not to let children lean against them. TH-A55 Front left Surround left Powered subwoofer... - Page 14 Getting started Assembling the satellite speakers (TH-A85 only) Each speaker (except the center speaker) has been divided into two parts for shipment. Before connecting the satellite speakers, first assemble them by following the procedure below. Speaker section Before assembling — •...
- Page 15 Getting started Connecting the satellite (front, center, surround) speakers (TH-A85) Each speaker (SP-THA85F) can be used as a front or surround speaker. CAUTION • When you connect (larger) speakers other than the supplied ones, only use speakers with the same speaker impedance (SPEAKER IMPEDANCE) as indicated by the speaker terminals on the rear of the powered subwoofer.
- Page 16 CAUTION When installing the satellite speakers on the wall (TH-A55 only); • Be sure to have them installed on the wall by a qualified personnel. DO NOT install the satellite speakers on the wall by yourself to avoid unexpected damage from their falling off the wall due to incorrect installation or weakness in wall structure.
-
Page 17: Connecting To An Analog Component
Getting started Connecting to an analog component You can enjoy the sound of an analog component such as a VCR, TV, or Cassette recorder with this system. Use RCA pin plug cords (not supplied) for connection. Cassette recorder NOTE • The signals input to the VIDEO jack of the VCR IN jacks will be output only from the VIDEO jack of the VIDEO OUT jacks, not from the S-VIDEO jack of the VIDEO OUT jacks. -
Page 18: Connecting The Power Cord
Getting started Connecting the power cord Make sure that all connections have been completed, before plugging in the power cords of the center unit and powered subwoofer. Firmly insert the supplied power cord into the unit. Plug both power cords into AC outlets. Center unit Plug into AC outlets. -
Page 19: Using The Remote Control
Getting started Using the remote control The remote control makes it easy to use many of the system functions from a distance of up to 7 m away. • You can also use the remote control supplied for this system to operate other manufacturers’... - Page 20 You can operate your TV using the remote control supplied with this system. • Refer also to the instruction manuals supplied with your TV. % To set the manufacturer’s code You can operate a JVC TV without setting the remote control signal. Press TV. Press and hold . TV.
- Page 21 18, 19, 20 Zenith 07, 17 VCR/DBS. Stops operation. Pauses playback. Fast forwards video tape. Rewinds video tape. Press this button together with (play button) to start recording or together with to pause recording. Selects the channel. (for the JVC’s VCR only)
-
Page 22: Basic Operations
Basic operations This section mainly explains operations commonly used when you enjoy this system. • Turn on your TV and select the correct input mode on the TV. Source selecting buttons Turning the system on/off To turn the power on On the remote control: Press AUDIO. -
Page 23: Selecting The Source To Play
Basic operations Selecting the source to play On the remote control: Press one of the source selecting buttons (DVD, FM/AM, VCR or DBS). DVD: To play back a disc (DVD, Video CD etc.). (A pg. 23, 25) FM/AM: To tune in an FM or AM station. (A pg. 27) Each time you press the button, the band alternates between FM and AM. -
Page 24: Adjusting The Brightness
Basic operations Adjusting the brightness You can dim the indications on the display window and the illumination lamp level on the center unit. On the remote control: Press DIMMER. Each time you press the button, the brightness level changes as follows;... -
Page 25: Adjusting The Bass/Treble Sound
DVD in the progressive scan mode. In such a case, change the scan mode to “INTERLACE”. To check the compatibility of your TV, contact your local JVC customer service center. • All JVC progressive TVs and High-Definition TVs are fully compatible with this system. -
Page 26: Playback
Playback This section explains basic operations of DVD player. For more details about DVD player operations, see pages 33 to 45. • shows the types of discs the operation is available for. • Turn on your TV and select the correct input mode on the TV. - Page 27 Playback NOTE • You can check playback information on the display window and the TV screen. (A pg. 33) • Some tracks on an MP3 disc may be skipped or may not be played back normally. • When you play back a JPEG disc, press buttons after the whole picture appears on the TV screen.
-
Page 28: Playback Features
Playback NOTE • You can change the time information mode. (A pg. 34) • You can also check the playback information on the TV screen. (A pg. 33) Tray lock You can lock the tray and prohibit the unwanted disc ejection by children. - Page 29 Playback Fast-forward/fast-reverse search You can search for a particular point while playing a disc. During playback On the remote control: Press Each time you press the button, the search speed changes as follows; Forward: Reverse: are only available for DVD. To return to normal speed playback Press (play button).
-
Page 30: Tuner Operations
Tuner operations You can browse through all the stations or use the preset function to go immediately to a particular station. IMPORTANT Before using the remote control for the following operation; • Press FM/AM. Setting the AM tuner interval spacing Some countries space AM stations 9 kHz apart, and other countries use 10 kHz spacing. -
Page 31: Selecting The Fm Reception Mode
Tuner operations Press MEMORY. The channel number position starts flashing on the display window for about 5 seconds. While the channel number position is flashing: Press number button(s) (1-10, +10) to select a channel number. The channel number and the CH indicator start flashing. Examples: For channel number 3: Press 3. -
Page 32: Creating Realistic Sound Fields
Creating realistic sound fields You can use the following surround modes to reproduce a realistic sound field. • Dolby Surround Dolby Pro Logic II • Dolby Digital • • DTS Digital Surround • DSP modes DAP modes • All Channel Stereo •... - Page 33 Creating realistic sound fields Creating sound field Reflections from behind Early reflections Direct sounds All Channel Stereo All Channel Stereo (ALL CH ST.) mode can reproduce a larger stereo sound field using all the connected (and activated) speakers. All Channel Stereo can be used while reproducing 2 channel stereo source.
-
Page 34: Using The Surround Mode
Creating realistic sound fields Using the surround mode The system is set up to automatically select the optimal surround mode for input signal from digital multichannel software. When playing back 2 channel source, you can select the desired surround mode manually. On the remote control: When playing back digital multichannel software The appropriate multichannel surround mode is automatically... -
Page 35: Adjusting The Sound
Creating realistic sound fields Adjusting the sound On the remote control: Press TEST. Check if you can hear the sounds through all the speakers at the equal level. “TEST TONE” and the corresponding signal indicator starts flashing on the display window, and the test tone comes out of the speakers in the following order;... -
Page 36: Advanced Operations
Advanced operations This section explains advanced operations for disc playback using the remote control. • shows the types of discs an operation is available for. • Turn on your TV and select the correct input mode on the TV. NOTE •... -
Page 37: Playing From A Specified Position On A Disc
Advanced operations Basic operation on the on-screen bar Example: When selecting the Repeat mode of DVD During playback or while stopped Press ON SCREEN twice. The on-screen bar appears on the TV screen. • The currently selected item shows green. Press Cursor to move Press ENTER. -
Page 38: Number Buttons
Advanced operations Cursor ( / / / ) /ENTER Locating a desired scene using a Video CD/SVCD menu with PBC A Video CD or SVCD recorded with PBC has its own menus such as a list of contained songs. You can locate a specific scene by using these menus. -
Page 39: Using The Mp3 Control Display
Advanced operations Use number buttons (0-10, +10) to enter the desired title or group number. The system starts playback from the first chapter/track/file of the selected title/group. Example: To select 8: Press 8. To select 10: Press 10. Or press +10, then 0. To select 20: Press +10, then 10. -
Page 40: Using The Jpeg Control Display
Advanced operations To select the other group Press Cursor to return to the group list, then press Cursor to select the desired group. To skip groups/tracks during playback Press Cursor repeatedly for forward-skip. Press Cursor repeatedly for reverse-skip. To start playback by specifying the track number Press number buttons (0-10, +10) to enter the track number. -
Page 41: Selecting A View Angle Of Dvd
Advanced operations Selecting a view angle of While playing back a DVD containing multi-view angles, you can enjoy the same scene at different angles. Cursor ( / / / ) /ENTER Selecting a view angle During playback When using the ANGLE button: Press ANGLE. -
Page 42: Selecting The Subtitle/Audio Languages
Advanced operations Selecting the subtitle/ audio languages When playing back a DVD (or SVCD) containing subtitles in several languages, you can select the subtitle language to be displayed on the TV screen. When a DVD contains audio (sound track) in several languages, you can also select the language (sound track) to listen to. -
Page 43: Audio Language
Advanced operations Press Cursor to select the desired audio language. Each time you press the button, the audio language changes. Press ENTER. The pop-up window disappears. To turn off the on-screen bar Press ON SCREEN. NOTE • Some audio languages are abbreviated in the pop-up window. See “The language codes list”... -
Page 44: Special Picture Playback
Advanced operations Special picture playback This system provides special picture playback functions including frame-by-frame, slow-motion and zoom. Cursor ( / / / ) /ENTER Frame-by-frame playback During playback Press repeatedly. Each time you press the button, the still picture advances by one frame. To return to normal playback Press (play button). -
Page 45: Changing The Vfp Setting
Advanced operations Changing the VFP setting The VFP (Video Fine Processor) function enables you to adjust the picture character according to the type of programming, picture tone or personal preference. NOTE Before you start operation; • The VFP setting screen disappears if no operations are done for more than about 10 seconds. -
Page 46: Program Playback
Advanced operations Program Playback You can play up to 99 tracks in any order. You may program the same track more than once. Cursor ( / / / ) /ENTER While stopped Press ON SCREEN twice. The on-screen bar appears on the TV screen. Press Cursor to move Press ENTER. -
Page 47: Random Playback
Advanced operations Random Playback You can play tracks on a disc in random order. Cursor ( / / / ) /ENTER While stopped Press ON SCREEN twice. The on-screen bar appears on the TV screen. Press Cursor to move Example: For Audio CD Press ENTER. -
Page 48: Repeating A Desired Part
Advanced operations NOTE • If you press REPEAT while stopped, you need to press button) to start Repeat Playback. • When the Program mode is active with a Video CD, SVCD, Audio CD, the Repeat mode changes in the same manner. Note that, however, in the “... -
Page 49: Setting Dvd Preferences
Setting DVD preferences You can adjust the initial settings for DVD playback according to your preference or needs using 5 choice menus shown on the TV screen. • Adjustments are possible only when selecting DVD as the source. Using the choice menus •... - Page 50 Setting DVD preferences Basic operation on the choice menus IMPORTANT Before using the remote control for the following operation; • Press DVD. Cursor ( / / / ) /ENTER Press CHOICE. The language menu (LANGUAGE) appears on the TV screen. Press Cursor repeatedly to display one of the choice menus.
-
Page 51: Menu Description
Setting DVD preferences Menu description :Language menu (LANGUAGE) NOTE • You can select “MENU LANGUAGE”, “AUDIO LANGUAGE” and “SUBTITLE” only while playback is stopped. MENU LANGUAGE Some DVDs have their own menus in multiple languages. • Select the initial language*. ENGLISH, SPANISH, FRENCH, CHINESE, GERMAN, ITALIAN, JAPANESE and language codes from AA to ZU (see below) - Page 52 Setting DVD preferences : Picture menu (PICTURE) MONITOR TYPE You can select the monitor type to match your TV when you play DVDs recorded in the picture’s height/width ratio of 16:9. • 16:9 NORMAL (Wide television conversion) Select this when the aspect ratio of your TV is fixed to 16:9 (wide TV).
- Page 53 Setting DVD preferences : Speaker setting menu (SPK. SETTING) SIZE Accesses the SIZE sub-menu (speaker size setting menu). (See following.) LEVEL Accesses the LEVEL sub-menu (speaker level setting menu). (See following.) DISTANCE Accesses the DISTANCE sub-menu (speaker distance setting menu). (See following.) CROSS OVER* * * * Small speakers cannot reproduce bass sounds efficiently.
-
Page 54: Parental Lock
Setting DVD preferences : Other setting menu (OTHERS) NOTE • You can select “PARENTAL LOCK” only while playback is stopped. RESUME You can activate or deactivate Resume Playback function. • ON Select this to activate the function. • OFF Select this to deactivate the function. ON SCREEN GUIDE You can activate or deactivate the on-screen guide icons. -
Page 55: Releasing Parental Lock Temporarily
Setting DVD preferences Press ENTER. Press Cursor repeatedly to select the level of restriction, then press ENTER. moves to “PASSWORD”. • Select “NONE” to cancel this function. Press number buttons (0-9) to enter a four-digit number as your password, then press ENTER. moves to “EXIT”. - Page 56 Setting DVD preferences Country/Area codes list for Parental Lock Andorra United Arab Emirates Afghanistan Antigua and Barbuda Anguilla Albania AM Armenia Netherlands Antilles Angola Antarctica Argentina American Samoa Austria Australia AW Aruba Azerbaijan Bosnia and Herzegovina Barbados Bangladesh Belgium GM Gambia Burkina Faso Bulgaria Bahrain...
-
Page 57: System Setting
System setting You can adjust the sound and speaker settings of this system. • The adjustments on a source take effect for the other sources. Cursor ( / / / ) NOTE Before you start operation; • There is a time limit when doing the following steps. If the setting is cancelled before you finish, start from step 1 again. -
Page 58: Av Compu Link Remote Control System
The AV COMPU LINK remote control system allows you to operate JVC TVs and VCRs through the center unit. This system is equipped with the AV COMPU LINK-III, which adds a function to operate JVC’s video components via the video components terminals. -
Page 59: References
• Avoid exposure to direct sunlight, temperature extremes and moisture. Trouble shooting Use this chart to help you solve daily operational problems. If there is any problem you cannot solve, contact your JVC service center. General PROBLEM Power does not come The power cord is not connected to the center unit or an AC outlet. -
Page 60: Dvd Playback
References PROBLEM No sound. The system cord and/or speaker cord is not connected. There is a short in the speaker cord. The audio cord is not connected to AUDIO IN (VCR) and/or DIGITAL IN (DBS) correctly. An incorrect source has been selected. Muting is on. -
Page 61: Mp3 Playback
References MP3 Playback PROBLEM A disc cannot be played. No MP3 files are recorded to the disc. MP3 files do not have the file extension in their file names. MP3 files are not recorded in a format compliant with ISO 9660 Level 1 or 2. The different types of files are recorded to the disc. -
Page 62: Glossary
References Glossary Aspect ratio The ratio of vertical and horizontal sizes of a displayed image. The horizontal vs. vertical ratio of conventional TVs is 4:3, and that of wide-screens is 16:9. Chapter Refers to individual chapters included in a title. Composite video signal Refers to video signal comprised of three kinds of signals combined: an image signal made up of luminance and chrominance... -
Page 63: Index
References Index A-B Repeat Playback... 45 All Channel Stereo (ALL CH ST.) ... 30 – 32 Angle... 38 Audio CD ... 3, 4 Audio language (AUDIO LANGUAGE) ... 39, 48 Auto standby (AUTO STANDBY) ... 51 AUTO/PCM... 22 AV COMPU LINK ... 55 Bass (BASS) ... -
Page 64: Specifications
References Specifications % Center unit (XV-THA85/XV-THA55) Audio section Total Harmonic Distortion 0.01 % NOTE: This value is measured at System cord CONNECTOR for reference. Audio input sensitivity/Impedance (at 1 kHz) Analog input: AUDIO IN VCR: 360 mV/47 kC Digital input*: DIGITAL IN (DBS): –21 dBm to –15 dBm (660 nm E30 nm) - Page 65 References Front Speakers (SP-THA55F) Speakers: 8 cm Bass-reflex, Magnetically Shielded Power Handling Capacity: 80 W Impedance: Frequency Range: 80 Hz to 20 kHz Dimensions (W D):103 mm 194 mm Mass: 0.77 kg Center Speaker (SP-THA55C) Speakers: 8 cm Bass-reflex, Magnetically Shielded Power Handling Capacity: 80 W Impedance: Frequency Range:...
- Page 66 © 2003 VICTOR COMPANY OF JAPAN, LIMITED 0703SKMIDEJEM...