Table of Contents
Advertisement
Quick Links
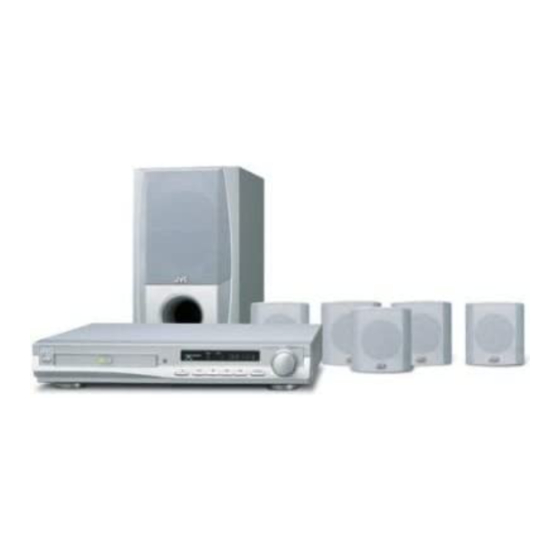
DVD DIGITAL THEATER SYSTEM
TH-A25
SOUND
STANDBY
STANDBY/ON
Consists of XV-THA25 and SP-THA25
DVD DIGITAL THEATER SYSTEM TH-A25
INSTRUCTIONS
VOLUME
SOURCE
For Customer Use:
Enter below the Model No. and Serial No.
which are located either on the rear, bot-
tom or side of the cabinet. Retain this
information for future reference.
Model No.
Serial No.
LVT1111-001B
[J]
Advertisement
Table of Contents

Related Manuals for JVC SP-THA25


Summary of Contents for JVC SP-THA25
- Page 1 TH-A25 SOUND DVD DIGITAL THEATER SYSTEM TH-A25 STANDBY STANDBY/ON INSTRUCTIONS Consists of XV-THA25 and SP-THA25 VOLUME SOURCE For Customer Use: Enter below the Model No. and Serial No. which are located either on the rear, bot- tom or side of the cabinet. Retain this information for future reference.
- Page 2 Warnings, Cautions and Others CAUTION RISK OF ELECTRIC SHOCK DO NOT OPEN CAUTION: TO REDUCE THE RISK OF ELECTRIC SHOCK. DO NOT REMOVE COVER (OR BACK) NO USER SERVICEABLE PARTS INSIDE. REFER SERVICING TO QUALIFIED SERVICE PERSONNEL. The lightning flash with arrowhead symbol, within an equilateral triangle is intended to alert the user to the presence of uninsulated "dangerous voltage"...
-
Page 3: Table Of Contents
Table of Contents Parts Identification ... 2 Center Unit ... 2 Remote Control ... 3 Getting Started ... 4 Before Installation ... 4 Checking the Supplied Accessories ... 4 Putting Batteries in the Remote Control ... 4 Connecting the FM and AM Antennas ... 5 Speaker Layout Diagram ... -
Page 4: Parts Identification
Parts Identification Center Unit Front Panel DVD DIGITAL THEATER SYSTEM TH-A25 STANDBY STANDBY/ON See pages in the parentheses for details. Front Panel 1 STANDBY/ON button and STANDBY lamp (12–15) 2 Disc tray (12) 3 Remote sensor 4 Display 5 VOLUME control (13, 15) 6 0 (open/close) button (12, 14) •... -
Page 5: Remote Control
Remote Control Remote Control AUDIO DIMMER SLEEP MEMORY CANCEL SOUND FM/AM TV CH CONTROL TEST TONE TV VOL TV/VIDEO MUTING AUDIO VOL MENU ENTER CHOICE/TIME ON SCREEN STEP DOWN - TUNING - UP AUDIO SUBTITLE ANGLE ZOOM SLOW RETURN REPEAT PROGRESSIVE FM MODE RM-STHA25J... -
Page 6: Getting Started
Getting Started Before Installation General Precautions • DO NOT insert any metal object into the center unit. • DO NOT disassemble the center unit or remove screws, covers, or cabinet. • DO NOT expose the center unit to rain or moisture. Locations •... -
Page 7: Connecting The Fm And Am Antennas
Connecting the FM and AM Antennas If FM reception is poor, connect outdoor FM antenna (not supplied). FM antenna (supplied) CENTER FRONT WOOFER IMPEDANCE FRONT/CENTER WOOFER:MIN 3 MIN 6 Cooling fan (See “About the cooling fan” below.) FM antenna connection Connect the supplied FM antenna to the COAXIAL FM 75 Ω... -
Page 8: Speaker Layout Diagram
Getting Started Speaker Layout Diagram Center unit DVD DIGITAL CINEMA SYSTEM TH-A25 DVD DIGITAL THEATER SYSTEM TH-A25 STANDBY STANDBY STANDBY/ON STANDBY/ON FRONT FRONT FRONT FRONT To the speaker IMPEDANCE WOOFER:MIN 3 on left front (White connector) To the speaker on right front To the speaker on center (Red connector) (Green connector) -
Page 9: Connecting The Speakers
Connecting the Speakers Connect the satellite speakers and subwoofer to the terminals on the rear panel using speaker cords supplied. The ends of the speaker cords are colored to indicate the terminals to be connected. CAUTION: Use speakers with the SPEAKER IMPEDANCE indicated by the speaker terminals. -
Page 10: Connecting Audio/Video Component
Getting Started Connecting Audio/Video Component Turn the power off to all components before connections. TV connection The S-video cord and the component video cord are not supplied with this system. Use the cords supplied with another components or purchase them at an electric appliance store. Video cord (supplied) S-video cord (not supplied) You can select one of three connection types—... - Page 11 Audio component connection Connect other components to the center unit with the audio cord. Use the cord supplied with the other component or purchase one at an electric appliance store. Optical digital cord (not supplied) Audio cord (not supplied) DIGITAL IN OPTICAL Center unit AUDIO IN...
-
Page 12: Tv Settings
DVD in the progressive scanning mode. In such a case, change the scanning mode to “INTERLACE TV.” FM MODE To check the compatibility of your TV, contact your local JVC customer service center. • All JVC progressive TVs and High-Definition TVs are fully compatible with this system. -
Page 13: Operating Tv
Operating TV You can use the remote control to operate not only this unit but also JVC’s TV. • Refer also to the manuals supplied for the other products. • To operate the TV, aim the remote control directly at the remote sensor on the TV. -
Page 14: Basic Disc Operations
Basic Disc Operations This manual mainly explains operations using the buttons on the remote control. You can also use the buttons on the center unit if they have the similar names (or marks) as those on the remote control. If operations using the center unit are different from those using the remote control, they are then explained. -
Page 15: Start Playback
Start Playback Press 3/8. The disc tray closes. “LOADING” appears on the display for a while. • You can also start playback by closing the disc tray using 0 on the front panel. • Some discs show menus on the TV screen after you press 3/8. See “Disc Menu-Driven Playback”... -
Page 16: Moving To Another Chapter/Track/File
Basic Disc Operations AUDIO DIMMER SLEEP Number buttons MEMORY SOUND FM/AM TV CH CONTROL TEST TONE TV VOL TV/VIDEO MUTING AUDIO VOL MENU ENTER CHOICE/TIME ON SCREEN STEP ¢/4 DOWN - TUNING - UP AUDIO SUBTITLE ANGLE ZOOM Moving to Another Chapter/Track/File To go to another chapter (for DVD), track (for CD and VCD), or file (for MP3 and JPEG) Press ¢... -
Page 17: Basic Tuner Operations
Basic Tuner Operations AUDIO DIMMER SLEEP MEMORY CANCEL FM/AM SOUND FM/AM TV CH CONTROL TEST TONE TV VOL TV/VIDEO MUTING AUDIO VOL +/– AUDIO VOL MENU ENTER CHOICE/TIME ON SCREEN STEP DOWN - TUNING - UP AUDIO SUBTITLE ANGLE ZOOM SLOW RETURN REPEAT PROGRESSIVE... -
Page 18: Other Basic Operations
Other Basic Operations AUDIO DIMMER DIMMER SLEEP MEMORY CANCEL SOUND FM/AM TV CH CONTROL TEST TONE TV VOL TV/VIDEO MUTING AUDIO VOL MENU ENTER CHOICE/TIME ON SCREEN STEP DOWN - TUNING - UP AUDIO SUBTITLE ANGLE ZOOM SLOW RETURN REPEAT PROGRESSIVE FM MODE RM-STHA25J... -
Page 19: Creating Realistic Sound Fields
Creating Realistic Sound Fields AUDIO DIMMER SLEEP L-F.BLANCE-R CENTER REAR SUBWOOFER BASS TREBLE MEMORY SOUND FM/AM TEST TONE TV CH CONTROL TEST TONE TV VOL TV/VIDEO MUTING AUDIO VOL MENU ENTER CHOICE/TIME ON SCREEN STEP DOWN - TUNING - UP AUDIO SUBTITLE ANGLE ZOOM SLOW RETURN... -
Page 20: Basic Sound Adjustment Procedure
Creating Realistic Sound Fields I Basic sound adjustment procedure Ex. : To adjust the front speaker balance From the remote control ONLY: Play the disc you want to use for the sound adjustment. Press SOUND repeatedly until “FRONT BALANCE” and the adjustment bar appear on the TV screen. -
Page 21: Surround Mode Introduction
Surround Mode Introduction You can use the following surround to reproduce a realistic sound field. • Multichannel Surround—Dolby Digital and DTS Digital Surround • Dolby Pro Logic II modes I Dolby Digital and DTS Digital Surround To enjoy surround effectively, all the speakers need to be connected and activated. -
Page 22: Activating The Surround Mode
Creating Realistic Sound Fields AUDIO DIMMER SLEEP MEMORY CANCEL FM/AM SOUND TV CH CONTROL TEST TONE TV VOL TV/VIDEO MUTING AUDIO VOL MENU MENU ENTER CHOICE/TIME ON SCREEN STEP DOWN - TUNING - UP AUDIO SUBTITLE ANGLE ZOOM SLOW RETURN REPEAT PROGRESSIVE FM MODE... -
Page 23: Disc Introduction-Dvd/Vcd/Svcd/Cd
Disc Introduction—DVD/VCD/SVCD/CD This system has been designed to play back the following discs: DVD, DVD-R, DVD-RW, Video CD (VCD), Super Video CD (SVCD), Audio CD (CD), CD-R, and CD-RW. • This system can also play back MP3 and JPEG files recorded on CD-Rs and CD-RWs. -
Page 24: Disc Playback
Disc Playback You can only use the remote control for the operations in this “Disc Playback” section. AUDIO DIMMER SLEEP MEMORY CANCEL SOUND FM/AM CONTROL TEST TONE TV CH TV VOL TV/VIDEO MUTING AUDIO VOL MENU ENTER CHOICE/TIME ON SCREEN STEP DOWN - TUNING - UP AUDIO... -
Page 25: Basic Operation Through The On-Screen Bar
Contents of the on-screen bar • : Disc Type icon DVD SVCD VCD • : Title icon Shows current title and total number of the titles on the disc. • : Chapter icon Shows current chapter and total number of the chapters in the current title. -
Page 26: Selecting The Audio Languages
Disc Playback DIMMER SLEEP MEMORY FM/AM CONTROL TEST TONE TV CH TV VOL TV/VIDEO MUTING AUDIO VOL MENU ENTER CHOICE/TIME CHOICE/TIME ON SCREEN DOWN - TUNING - UP AUDIO AUDIO SUBTITLE ANGLE ZOOM SUBTITLE SLOW RETURN PROGRESSIVE FM MODE RM-STHA25J DVD THEATER SYSTEM Selecting the Audio Languages While playing back a DVD/SVCD containing audio languages... -
Page 27: Selecting The Playback Channel
Selecting the Playback Channel When you play back a karaoke VCD/SVCD or CD, you can select the left channel or right channel to listen to. Press AUDIO repeatedly. • Each time you press the button, the sound mode changes as follows: MONO LEFT MONO RIGHT STEREO... -
Page 28: Disc Menu-Driven Playback
Disc Playback AUDIO DIMMER SLEEP MEMORY CANCEL SOUND FM/AM TV CH CONTROL TEST TONE TV VOL TV/VIDEO MUTING AUDIO VOL MENU TOP MENU ENTER CHOICE/TIME ON SCREEN STEP ¢/4 DOWN - TUNING - UP AUDIO SUBTITLE ANGLE ZOOM RETURN SLOW RETURN REPEAT PROGRESSIVE FM MODE... -
Page 29: Moving To A Particular Portion Directly
Moving to a Particular Portion Directly You can move to another title, chapter, track, or particular portion in the chapter/title (DVD) or the disc (CD/VCD/SVCD) directly. From the remote control ONLY: Press ON SCREEN. The on-screen bar will appear on the TV screen. Press 3/2 to select one of the icons below. -
Page 30: Repeating Playback
Disc Playback AUDIO DIMMER SLEEP MEMORY CANCEL SOUND FM/AM TV CH CONTROL TEST TONE TV VOL TV/VIDEO MUTING AUDIO VOL MENU ENTER CHOICE/TIME ON SCREEN STEP DOWN - TUNING - UP AUDIO SUBTITLE ANGLE ZOOM SLOW SLOW RETURN REPEAT PROGRESSIVE FM MODE RM-STHA25J DVD THEATER SYSTEM... -
Page 31: Special Picture Playback
To cancel A–B Repeat Press 5/∞ to select “ OFF” in step 3 , then press ENTER. “REPEAT A-B” disappears from the display and “REPEAT:OFF” appears on the TV screen. On some DVDs, A–B Repeat may not be used even within the same title. -
Page 32: Mp3/Jpeg Introduction
MP3/JPEG Introduction This system is incorporated with an MP3 decoder and JPEG decoder. You can play back MP3 tracks (files) and JPEG files recorded on CD-Rs and CD-RWs. • Notice that “files” and “tracks” are used interchangeably in the MP3 explanation. Notes: This system can play back a disc containing both MP3 and JPEG files. -
Page 33: Mp3/Jpeg Playback
MP3/JPEG Playback MENU ENTER CHOICE/TIME CHOICE/TIME ON SCREEN STEP 4/¢ DOWN - TUNING - UP AUDIO SUBTITLE ANGLE ZOOM SLOW RETURN REPEAT PROGRESSIVE FM MODE RM-STHA25J DVD THEATER SYSTEM Starting Playback It is recommended to turn on your TV when playing back MP3 or JPEG files. -
Page 34: Operations Using The On-Screen Display
MP3/JPEG Playback AUDIO DIMMER SLEEP Number buttons MEMORY CANCEL SOUND FM/AM TV CH CONTROL TEST TONE TV VOL TV/VIDEO MUTING AUDIO VOL MENU 3/2/5/∞ ENTER ENTER CHOICE/TIME ON SCREEN STEP DOWN - TUNING - UP AUDIO SUBTITLE ANGLE ZOOM SLOW RETURN REPEAT PROGRESSIVE FM MODE... -
Page 35: Selecting A Particular File/Folder Directly
Selecting a Particular File/Folder Directly You can move to a particular file/folder in the current folder directly. From the remote control ONLY: Press the number buttons to select a file/folder number (item number) you want, then press ENTER. The system starts playback from the selected file. 0001/0003 0:00:28 ALPHA... -
Page 36: Tuner Operations
Tuner Operations AUDIO DIMMER SLEEP MEMORY CANCEL FM/AM SOUND FM/AM TV CH CONTROL TEST TONE TV VOL TV/VIDEO MUTING AUDIO VOL MENU ENTER CHOICE/TIME ON SCREEN STEP ¢/4 DOWN - TUNING - UP AUDIO SUBTITLE ANGLE ZOOM SLOW RETURN REPEAT PROGRESSIVE FM MODE RM-STHA25J... -
Page 37: Using Preset Tuning
Using Preset Tuning Once a station is assigned to a channel number, the station can be quickly tuned. You can preset up to 30 FM and 15 AM stations. To store the preset stations From the remote control ONLY: Tune in the station you want to preset (see “Tuning in Stations”). -
Page 38: Setting Up The Dvd Preferences
Setting Up the DVD Preferences You can only use the remote control for the setup menu operations. AUDIO DIMMER SLEEP MEMORY SOUND FM/AM CONTROL TEST TONE TV CH TV VOL TV/VIDEO MUTING AUDIO VOL MENU ENTER CHOICE/TIME CHOICE/TIME ON SCREEN STEP DOWN - TUNING - UP AUDIO... -
Page 39: The Basic Procedure To Set Up The System Preferences
I The basic procedure to set up the system preferences Ex.: To select the TV screen size. Press CHOICE/TIME. The main page of the setup menu appears on the TV screen. SETUP MENU - - MAIN PAGE GENERAL SETUP PREFERENCES EXIT SETUP Press ∞... -
Page 40: Setting The Preferences
Setting Up the DVD Preferences AUDIO DIMMER SLEEP Number buttons MEMORY CANCEL SOUND FM/AM TV CH CONTROL TEST TONE TV VOL TV/VIDEO MUTING AUDIO VOL MENU ENTER CHOICE/TIME CHOICE/TIME ON SCREEN Setting the Preferences You can select your favorite language to listen to or read on the TV screen. -
Page 41: To Set The Parental (Rating) Level
Press 5/∞ to select the desired setting. Select the audio language in this case. Press ENTER. The selected language is highlighted. • When you select “OTHERS,” the “INPUT LANGUAGE CODE” page appears. Press the number buttons to enter the code (4 digits) of the language you want to set, then press ENTER. -
Page 42: To Release The Parental Lock Temporarily
Setting Up the DVD Preferences AUDIO DIMMER SLEEP Number buttons MEMORY CANCEL SOUND FM/AM TV CH CONTROL TEST TONE TV VOL TV/VIDEO MUTING AUDIO VOL MENU ENTER CHOICE/TIME ON SCREEN I Language Code List Code Language Code 6565 Afar 7079 6566 Abkhazian 7082... -
Page 43: Maintenance
Maintenance To get the best performance of the unit, keep your discs and mechanism clean. General Notes In general, you will have the best performance by keeping your discs, and the mechanism clean. • Store discs in their cases, and keep them in cabinets or on shelves. •... -
Page 44: Troubleshooting
Troubleshooting Use this chart to help you solve daily operational problems. If there is any problem you cannot solve, contact your JVC service center. PROBLEM Power does not come on. The remote control does not work. No sound. Sound is emitted from only one speaker. -
Page 45: Specifications
Specifications Center unit (XV-THA25) Amplifier section Front/Center/Rear: 30 W per channel, min. RMS, driven into 6 Ω at 1 kHz, with no more than 10% total harmonic distortion Subwoofer: 55 W, min. RMS, driven into 3 Ω at 100 Hz, with no more than 10% total harmonic distortion Audio section... - Page 46 If service is not available locally, box the product carefully, preferably in the original carton, and ship, insured, with a copy of your bill of sale plus a letter of explanation of the problem to the nearest JVC Factory Service Center, the name and location of which will be given to you by the toll-free number.
-
Page 47: How To Locate Your Jvc Service Center
To prevent electrical shock,do not open the cabinet.There are no user serviceable parts inside.Please refer to qualified service personnel for repairs. Accessories To purchase accessories for your JVC product,please call toll free:1 (800)882-2345 or on the web at www.JVC.com BT-51005-5 (0301) ®... - Page 48 VICTOR COMPANY OF JAPAN, LIMITED 0803TMMMDWSAM © 2003 VICTOR COMPANY OF JAPAN, LIMITED...