Swann Pro-Series Instruction Manual
Ultimate optical zoom security camera
Hide thumbs
Also See for Pro-Series:
- User manual (60 pages) ,
- Instruction manual (57 pages) ,
- User manual (48 pages)

Related Manuals for Swann Pro-Series


Summary of Contents for Swann Pro-Series
- Page 1 Ultimate Optical Zoom Security Camera INSTRUCTION MANUAL MANUAL DE INSTRUCCIONES MANUEL D’UTILISATION MVFBCAM150514T...
-
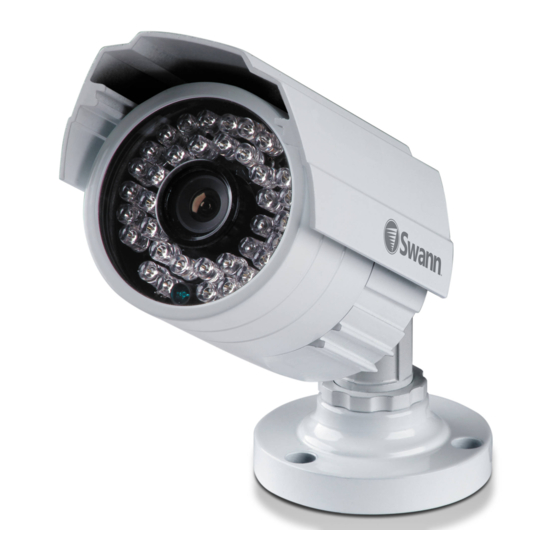
Page 2: About The Camera
About the Camera Congratulations on your purchase of this PRO-CAM from Swann! You’ve chosen well: we think this is one of the finest vari-focal CCTV video cameras available. The adjustable lens and on-screen menu system make the PRO-CAM ideal for monitoring any kind of space in almost any lighting conditions... even no light at all, as it can see up to 40m/130ft in complete darkness! Our two cents: you’ve spent the money on a great camera. -
Page 3: Adjusting The Lens
Adjusting the Lens The zoom and focus controls are located on the rear of the camera. ZOOM: The left hand dial controls the level of zoom. You can vary the viewing angle between 23° and 81°. This is an approximately 4x (2.8mm-12mm) optical zoom, which operates in a similar manner to the zoom on your digital camera. -
Page 4: Connection Guide
Connection Guide Connect the camera’s DC and BNC cables to the extension cable, twist the BNC connector to lock it together securely. (Optional) If you intend to use the OSD controller, connect the camera’s green RS485 plug to the extension cable. You may first need to attach the RS485 plug to the wires on the cables as shown in the diagram above. - Page 5 Mounting There are three ways that you can mount the PRO-CAM: to a wall (1, recommended) or to a horizontal surface, either above (2) or suspended (3, requires additional hardware). Option 1 To mount the camera, use the supplied mounting hardware (screws). If you’re mounting onto a wooden surface, you can drive the screws directly into the wood.
-
Page 6: Troubleshooting
Troubleshooting Problem: At night, all I see is white. Solution: The camera is most likely looking through a window. At night, the infrared light the camera uses to see in the dark can ‘bounce back’ off a reflective surface (such as glass, water, spider webs, some ceramics and so on) and effectively blind the camera. -
Page 7: Helpdesk / Technical Support Details
Helpdesk / Technical Support Details Swann Technical Support All Countries E-mail: tech@swann.com Telephone Helpdesk USA toll free AUSTRALIA toll free 1-800-627-2799 1300 138 324 0203 027 0979 USA Exchange & Repairs NEW ZEALAND toll free 1-800-627-2799 (Option 1) 0800 479 266 (M-F, 9am-5pm US PT) Limited Warranty Terms &... - Page 8 Acerca de la cámara ¡Felicitaciones por su compra de esta PRO-CAM de Swann! Ha elegido bien: creemos que es una de las mejores cámaras de video de CCTV varifocales disponibles. La lente ajustable y el sistema de menú en pantalla hacen que la cámara PRO-CAM sea ideal para supervisar cualquier tipo de espacio en casi cualquier condición de iluminación...
-
Page 9: Ajuste De La Lente
Ajuste de la lente Los controles de zoom y foco se ubican en la parte posterior de la cámara. ZOOM: La perilla izquierda controla el nivel del zoom. Puede variar el ángulo de visión entre 23° y 81°. Se trata de un zoom óptico de aproximadamente 4x (2.8mm- 12mm), que funciona de forma similar al zoom de su cámara digital. -
Page 10: Montaje De La Cámara
Montaje de la Cámara Conecte los cables DC y BNC de la cámara al cable de extensión. (Opcional) Si intenta utilizar el controlador OSD, conecte el enchufe verde RS485 al cable de extensión. Podría necesitar acoplar primero el enchufe RS485 a los alambres en los cables como se muestra en el siguiente diagrama. -
Page 11: Solución De Problemas
Solución de Problemas Hay tres formas en que puede montar la PRO- CAM: sobre una pared (1, recomendada) o una superficie horizontal, ya sea en altura (2) o suspendida (3, requiere elementos adicionales). Para montar la cámara, use los elementos de montaje provistos (tornillos). - Page 12 Solución de Problemas Problema: De noche, sólo se ve una imagen blanca. Solución: La cámara probablemente está enfocando una ventana. De noche, la luz infrarroja que usa la cámara para ver en la oscuridad puede “rebotar” en una superficie reflexiva (como el vidrio, agua, telas de araña, algunas cerámicas, etc.) y efectivamente cegar la cámara.
-
Page 13: Información Sobre La Garantía
Detalles del servicio de asistencia Soporte Técnico Swann Correo electrónico para todos los países: tech@swann.com Teléfono del servicio de asistencia Número de llamada sin cargo Número de llamada sin cargo EE.UU. AUSTRALIA 0203 027 0979 1-800-627-2799 1300 138 324 Cambio y reparaciones EE. UU. Número de llamada sin cargo NUEVA ZELANDA 1-800-627-2799 (Option 1) - Page 14 À propos de la caméra Félicitations pour votre achat de cette caméra PRO-CAM de Swann! Vous avez fait un bon choix : nous croyons que c’est une des meilleures caméras vidéo CCTV à focale variable sur le marché. L’objectif ajustable et le système de menu à l’écran font de la PRO-CAM une caméra idéale pour n’importe quel type d’espace dans presque toutes les conditions d’éclairage…...
- Page 15 Ajuster l’objectif Les commandes de zoom et de mise au point sont situées à l’arrière de la caméra. ZOOM : Le cadran gauche contrôle le niveau de zoom. Vous pouvez faire varier l’angle de prise de vue entre 23° et 81°. C’est un zoom optique d’approximativement (2.8mm-12mm), fonctionne de manière semblable au zoom sur...
-
Page 16: Guide De Connexion
Guide de Connexion Connectez les câbles CC et BNC de la caméra au câble de prolongement. (Facultatif) Si vous prévoyez utiliser le contrôleur OSD, connectez la prise verte RS485 de la caméra au câble de prolongement, Vous pouvez d’abord attacher la prise RS485 aux fils des càbles tel qu’indiqué... -
Page 17: Montage
Montage Diagrammes non à l’échelle Il y a trois façons que vous pouvez monter la PRO-CAM : au mur (1, recommandé) ou sur une surface horizontale, soit au-dessus (2) ou suspendu (3, requiert du matériel additionnel). Pour monter la caméra, utilisez le matériel de montage (vis) fourni. -
Page 18: Dépannage
Dépannage Problème : La nuit, je ne vois que du blanc. Solution : La caméra regarde probablement à travers une fenêtre. La nuit, la lumière infrarouge que la caméra utilise pour voir dans le noir peut ‘rebondir’ sur une surface réflective (comme du verre, de l’eau, des toiles d’araignée, certaines céramiques et ainsi de suite), et ainsi aveugler la caméra. -
Page 19: Information Sur La Garantie
Soutien Technique Détails Félicitation pour votre achat. Si à n’importe quel moment ce produit ne fonctionne pas quand vous le branchez pour la première fois ou si vous vous rencontrez un problème, ne le rapportez pas au magasin ! Utilisez le guide d’installation / Europe (Royaume-Uni) Manuel de la boite, ou 0203 027 0979... - Page 20 © Swann Communications 2014...
- Page 21 On-Screen Display (OSD) Instruction Manual Welcome! Lets get started.
- Page 22 Introduction So - you have bought one (or more!) of Swann’s range of Pro Series cameras, browsed through the On-Screen Display (OSD), noticed lots of confusing settings, and don’t quite understand what they all do. This manual will help you navigate through the OSD and explain the OSD settings in detail.
- Page 23 Getting to know the OSD Controller Arrow Buttons Quick save Use to navigate through the OSD and adjust settings. Display the OSD Main Menu/ Enter function...
- Page 24 Connecting the OSD Controller If this is your first time connecting the OSD Controller, follow the instructions below to connect it to your camera. 1. Insert the RS485 plug coming from the camera into the RS485 Port (1). 2. Connect a free end of the supplied power splitter to the DC IN 12V Port (2).
- Page 25 Navigating the OSD • Press to display the Main Menu of the MAIN MENU OSD on your screen. IMAGE • Press to choose a selection in DAY&NIGHT AUTO the menu list. ZONE MASKING MOTION DET • Press to toggle between options VIDEO LANGUAGE ENGLISH...
- Page 26 The OSD Settings • IMAGE • 3D-NR (3D Noise Reduction): Lets you IMAGE turn the camera’s 3D filtering system on 3D-NR to assist in obtaining low-noise images IR IS for recordings done at night or in dim AE MODE BACK LIGHT conditions.
- Page 27 • AE (Automatic Exposure) Mode: Lets you choose from several AE modes that will allow the camera to evaluate the amount of light coming through IMAGE its image sensor and deliver optimal exposure to the objects in the scene by 3D-NR automatically setting the appropriate I RI S...
- Page 28 • Image Enhance: Lets you manually adjust the IMAGE levels of sharpness, contrast and saturation in 3D-NR the displayed image. IR IS • Sharpness: The clarity of detail and edges AE MODE BACK LIGHT AWB - PRO in the image. Setting the sharpness too high IMAGE ENHANCE will make the image look pixelated.
- Page 29 • Mirror: Lets you horizontally reverse the orientation of the image. • Flip: Lets you turn the image upside down. This is useful if you have your IMAGE camera mounted upside down on a ceiling and do not want to rotate it 3D-NR physically.
- Page 30 • DAY & NIGHT Lets you choose how the camera handles colour and manages the transition from daytime to nighttime and vice-versa • Auto: Lets you set the camera to MAIN MENU switch automatically from day to night mode. IMAGE •...
- Page 31 • ZONE MASKING Lets you create and place a “privacy mask” MAIN MENU to conceal parts of the image on the screen. This restricts what can be seen - useful IMAGE DAY&NIGHT AUTO when you want to protect personal privacy ZONE MASKING or sensitve areas.
-
Page 32: Motion Detection
• MOTION DETECTION Lets you can enable motion detection MAIN MENU on the camera. Note that, if you’re using a Swann DVR with motion detection IMAGE DAY&NIGHT AUTO enabled, then there’s no need to arm it on ZONE MASKING the camera as well. MOTION DET VIDEO LANGUAGE... -
Page 33: Video Standard
• VIDEO STANDARD MAIN MENU Lets you set the appropriate video IMAGE DAY&NIGHT AUTO standard for your television. ZONE MASKING MOTION DET VIDEO For example, NTSC (used in USA, LANGUAGE ENGLISH Japan, Canada) or PAL (used in UK and LOAD DEFAULT SOFT VERSION 20140101 Australia). -
Page 34: Load Default
• LOAD DEFAULT MAIN MENU If the changes made to the OSD settings IMAGE have made the image look worse that AUTO DAY&NIGHT it originally was or you have moved the ZONE MASKING MOTION DET camera somewhere else and want to re- VIDEO tune the camera, simply reset all OSD LANGUAGE... - Page 35 • RS485 Lets you configure the camera’s RS485 MAIN MENU communication settings - camera ID, protocol and baud rate IMAGE DAY&NIGHT AUTO If you change these settings, make sure ZONE MASKING you take note of the new values as the MOTION DET VIDEO information in these settings are required...
-
Page 36: Troubleshooting
Troubleshooting Problem: I can’t get the OSD to display on my monitor. Solution: • Check the power supply to the OSD Controller. • Check if the Red and Black connectors are correctly inserted into the RS485 green plug. Look for the A+ and B- labels below the RS485 port on the bottomside of the OSD Controller. -
Page 37: Need Help
Need Help? Swann Technical Support All Countries E-mail: tech@swann.com Telephone Helpdesk USA Toll Free 1-800-627-2799 USA Parts & Warranty 1-800-627-2799 (Option 1) (M-F, 9am-5pm US PT) AUSTRALIA 1300 138 324 NEW ZEALAND Toll Free 0800 479 266 0203 027 0979... - Page 38 M800OSD150514E | © Swann Communications 2014...