Table of Contents
Advertisement
CD RECEIVER
RECEPTOR CON CD
RECEPTEUR CD
• This unit is equipped with the display demonstration. To cancel it, see page 8.
• Esta unidad está equipada con la demostración en indicación. Para cancelarla, consulte la página 8.
• Cet appareil est équipé d'une fonction de démonstration des affichages. Pour l'annuler, référez-
vous à la page 8.
For installation and connections, refer to the separate manual.
Para la instalación y las conexiones, refiérase al manual separado.
Pour l'installation et les raccordements, se référer au manuel séparé.
S
INSTRUCTIONS
MANUAL DE INSTRUCCIONES
MANUEL D'INSTRUCTIONS
KD-S30
KD-S30
KD-S30
COMPACT
DIGITAL AUDIO
For customer Use:
Enter below the Model No. and
Serial No. which are located on
the top or bottom of the cabinet.
Retain this information for future
reference.
Model No.
Serial No.
GET0174-001A
[J]
Advertisement
Table of Contents

Related Manuals for JVC KD-S30


Summary of Contents for JVC KD-S30
- Page 1 For installation and connections, refer to the separate manual. Para la instalación y las conexiones, refiérase al manual separado. Pour l’installation et les raccordements, se référer au manuel séparé. MANUEL D’INSTRUCTIONS INSTRUCTIONS MANUAL DE INSTRUCCIONES KD-S30 KD-S30 KD-S30 COMPACT DIGITAL AUDIO For customer Use: Enter below the Model No.
-
Page 2: How To Reset Your Unit
INFORMATION (For U.S.A.) This equipment has been tested and found to comply with the limits for a Class B digital device, pursuant to Part 15 of the FCC Rules. These limits are designed to provide reasonable protection against harmful interference in a residential installation. This equipment generates, uses, and can radiate radio frequency energy and, if not installed and used in accordance with the instructions, may cause harmful interference to radio communications. -
Page 3: Table Of Contents
Thank you for purchasing a JVC product. Please read all instructions carefully before operation, to ensure your complete understanding and to obtain the best possible performance from the unit. CONTENTS How to reset your unit ... How to use the MODE button ... -
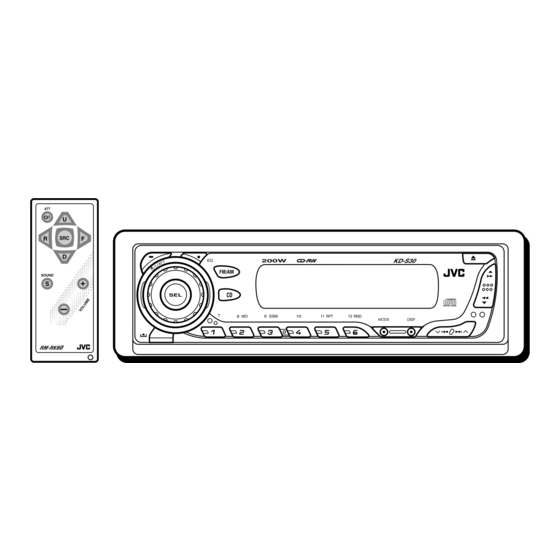
Page 4: Location Of The Buttons
LOCATION OF THE BUTTONS Control panel Display window 1 Control dial (standby/on/attenuator) button 3 SEL (select) button 4 EQ (equalizer) button 5 FM/AM button 6 CD button 7 Display window 8 0 (eject) button 9 5 (up) button ¡ (fast-forward) button (control panel release) button q Number buttons w Remote sensor... -
Page 5: Remote Controller
Remote controller 1 • Turns on the unit if pressed when the unit is turned off. • Turns off the unit if pressed and held until “SEE YOU” appears on the display. • Drops the volume level in a moment if pressed briefly. -
Page 6: Preparing The Remote Controller
Preparing the remote controller Before using the remote controller: • Aim the remote controller directly at the remote sensor on the main unit. Make sure there is no obstacle in between. Remote sensor • Do not expose the remote sensor to strong light (direct sunlight or artificial lighting). -
Page 7: Basic Operations
Turning on the power Turn on the power. Note on One-Touch Operation: When you select a source in step 2 below, the power automatically comes on. You do not have to press this button to turn on the power. Select the source. To operate the tuner (FM or AM), see pages 10 –... -
Page 8: Canceling The Display Demonstration
Canceling the display demonstration When shipped from the factory, display demonstration has been activated, and starts automatically when no operations are done for about 20 seconds. • It is recommended to cancel the display demonstration before you use the unit for the first time. -
Page 9: Setting The Clock
Setting the clock Press and hold SEL (select) for more than 2 seconds so that one of the PSM items appears on the display. (PSM: see page 19.) Set the hour. 1 Select “CLOCK H” (hour) if not shown on the display. -
Page 10: Radio Operations
RADIO OPERATIONS Listening to the radio You can use either automatic searching or manual searching to tune in to a particular station. Searching for a station automatically: Auto search Select the band (FM 1 – 3, AM). Each time you press the button, the band changes as follows: Selected band appears. -
Page 11: Storing Stations In Memory
Tune in to a station you want while “M” (manual) is flashing. To tune in to stations of higher frequencies To tune in to stations of lower frequencies • If you release your finger from the button, the manual mode will automatically turns off after 5 seconds. -
Page 12: Tuning In To A Preset Station
Manual preset You can preset up to 6 stations in each band (FM1, FM2, FM3, and AM) manually. Ex.: Storing FM station of 92.5 MHz into the preset number 1 of the FM1 band. Select the band (FM1 – 3, AM) you want to store FM stations into (in this example, FM1). -
Page 13: Cd Operations
Playing a CD Open the control panel. Note on One-Touch Operation: When a CD is already in the loading slot, pressing CD turns on the unit and starts playback automatically. Insert a CD into the loading slot. The unit turns on, draws the CD and starts playback automatically. -
Page 14: Locating A Track Or A Particular Portion On A Cd
To stop play and eject the CD Press 0. CD play stops and the control panel flips down. The CD automatically ejects from the loading slot. The source changes to the tuner (you will hear the last received station). • If you change the source, the CD play also stops (without ejecting the CD). -
Page 15: Prohibiting Cd Ejection
To play back tracks repeatedly (Track Repeat Play) You can play back the current track repeatedly. Press MODE to enter the functions mode while playing a Press RPT (repeat), while “MODE” is still flashing on the display, so that “TRK RPT” appears on the display. -
Page 16: Sound Adjustments
SOUND ADJUSTMENTS Selecting preset sound modes (C-EQ: custom equalizer) You can select a preset sound mode (C-EQ: custom equalizer) suitable to the music genre. Select the sound mode you want. Each time you press the button, the sound modes change as follows: USER ROCK CLASSIC... -
Page 17: Adjusting The Sound
Adjusting the sound You can adjust the sound characteristics to your preference. Select the item you want to adjust. Each time you press the button, the adjustable items change as follows: (bass) (treble) LOUD (volume) (loudness) Indication To do: BAS* Adjust the bass. -
Page 18: Other Main Functions
OTHER MAIN FUNCTIONS Changing the general settings (PSM) You can change the items listed in the table on page 19 by using the PSM (Preferred Setting Mode) control. Basic Procedure Press and hold SEL (select) for more than 2 seconds so that one of the PSM items appears on the display. - Page 19 Preferred Setting Mode (PSM) items • For detailed operations of each PSM items, refer to the pages listed in the table. Indications DEMO Display demonstration CLOCK H Hour adjustment CLOCK M Minute adjustment LEVEL Level display DIMMER Dimmer mode AMP GAIN Amplifier gain control To select the level meter—LEVEL You can activate or deactivate the level meter...
-
Page 20: Detaching The Control Panel
Detaching the control panel You can detach the control panel when leaving the car. When detaching or attaching the control panel, be careful not to damage the connectors on the back of the control panel and on the panel holder. Detaching the control panel Before detaching the control panel, be sure to turn off the power. -
Page 21: Troubleshooting
What appears to be trouble is not always serious. Check the following points before calling a service center. Symptoms • Sound cannot be heard from the speakers. • The unit does not work at all. • SSM (Strong-station Sequential Memory) automatic preset does not work. -
Page 22: Maintenance
MAINTENANCE Handling discs This unit has been designed to reproduce CDs, CD-Rs (Recordable), and CD-RWs (Rewritable). • This unit is not compatible with MP3 discs. How to handle discs When removing a disc from its case, press down the center holder of the case and lift the disc out, holding it by the edges. -
Page 23: Specifications
AUDIO AMPLIFIER SECTION Maximum Power Output: Front: 50 W per channel Rear: 50 W per channel Continuous Power Output (RMS): Front: 19 W per channel into 4 , 40 Hz to 20 000 Hz at no more than 0.8% total harmonic distortion. Rear: 19 W per channel into 4 , 40 Hz to 20 000 Hz at no more than 0.8%... - Page 24 US RESIDENTS ONLY Having TROUBLE with operation? Please reset your unit Refer to page of How to Reset Still having trouble?? USA ONLY Call 1-800-252-5722 http://www.jvc.com We can help you! EN, SP, FR 1103KKSMDTJEIN © 2003 VICTOR COMPANY OF JAPAN, LIMITED...
- Page 25 This unit is designed to operate on 12 V DC, NEGATIVE ground electrical systems. If your vehicle does not have this system, a voltage inverter is required, which can be purchased at JVC car audio dealers. Parts list for installation and connection The following parts are provided for this unit.
-
Page 26: Localizacion De Averias
Removing the unit Before removing the unit, release the rear section. When using the optional stay Cuando emplea un soporte opcional Lors de l’utilisation du hauban en option Fire wall Tabique a prueba de incendios Cloison Dashboard Tablero de instrumentos Tableau de bord Install the unit at an angle of less than 30˚. -
Page 27: Electrical Connections
• Reemplace el fusible por uno con la corriente especificada. Si el fusible se quemase frecuentemente consulte con su concesionario de JVC de equipos de audio para automóviles. • Se recomienda conectar los altavoces con una potencia máxima de más de 50 W (tanto atrás como adelante, con una impedancia de 4 a 8 ). - Page 28 Connections Adding Other Equipment / Conexiones para añadir otros equipos / Raccordement pour ajouter d’autres appareils Amplifier / Amplificador / Amplificateur You can connect an amplifier to upgrade your car stereo system. • Connect the remote lead (blue with white stripe) to the remote lead of the other equipment so that it can be controlled through this unit.