Table of Contents
Advertisement
Advertisement
Table of Contents

Related Manuals for Kodak 605


Summary of Contents for Kodak 605
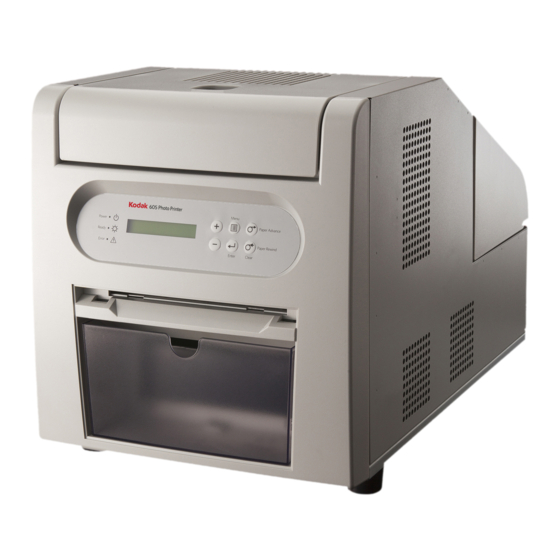
- Page 2 Front 1. Air Vents 2. Cover Release 3. Top Cover 4. Operator Panel 5. Print Exit Slot 6. Print Catcher 7. Trim Tray Back 8. USB Port 9. Data Plate 10. Power Connector 11. Power Switch 12. Paper Door April 9, 2007...
- Page 3 Internal View 1. Thermal Print Head 2. Peel Plate 3. Cleaning Roller 4. Platen Roller Operator Panel April 9, 2007...
-
Page 4: Table Of Contents
Table of Contents Chapter 1 Installing the Printer Driver Installing the Printer Driver..........................1-1 Borderless Printing ............................1-2 Customizing Printing Preferences........................1-2 Uninstalling the Printer and Printer Driver .......................1-3 WINDOWS XP Operating System .........................1-3 WINDOWS VISTA Operating System ......................1-3 Chapter 2 Setting Up the Printer Package Contents .............................2-1 Before You Begin .............................2-2 Recommended Air Flow Clearances ......................2-2... - Page 5 Table of Contents Chapter 4 Operating the Printer Making Prints..............................4-1 Handling and Storing Prints ..........................4-1 Understanding the Operator Panel Lights ......................4-2 Using Setup Mode to Review Printer Settings ....................4-2 Accessing the Printer Settings........................4-3 Chapter 5 Maintaining the Printer Cleaning the Printer ............................5-1 Performing Routine Maintenance ........................5-1 Cleaning the Thermal Print Head and the Peel Plate Edge................5-2 Cleaning the Platen Roller ..........................5-3...
-
Page 6: Chapter 1 Installing The Printer Driver
Installing the Printer Driver The printer driver is software that lets the operating software access the printer’s features. The WINDOWS XP/VISTA Operating System 605 printer driver requires the following: Operating System Service Pack Minimum Memory WINDOWS 2003 Server 256 MB... -
Page 7: Borderless Printing
Installing the Printer Driver Click Printer Driver to start the installer. Follow the on-screen instructions to install the printer driver. Borderless Printing For borderless printing, set the size of the image as follows: Page Size Image Size 4 x 6 in. 4.1 x 6.1 in. -
Page 8: Uninstalling The Printer And Printer Driver
Installing the Printer Driver Uninstalling the Printer and Printer Driver You must have Administrator privileges to uninstall the IMPORTANT: printer and printer driver. WINDOWS XP Select Start>Printers and Faxes. Operating System The Printers and Faxes dialog box appears. Right-click the printer you want to remove, and select Delete. Click Yes. -
Page 10: Chapter 2 Setting Up The Printer
Setting Up the Printer Package Contents The KODAK 605 Photo Printer is packaged with the following items: Printer KODAK Thermal Printer Cleaning Kit Trim Tray (not installed) Print Catcher (not installed) Power Cable USB Cable Paper Flange with gear (Green) -
Page 11: Before You Begin
Have the following items available before you begin your printer setup: • KODAK Photo Print Kit 6800/4R or KODAK Photo Print Kit 6800/6R which contains the correct paper and ribbon for the best print quality and print life from your printer. -
Page 12: Removing The Packing Material
Setting Up the Printer Removing the Packing Material Keep the carton and packing inserts for repacking and transporting the printer. Remove the tape from the top cover and paper door. Slide the cover release toward you. The cover does not open beyond a 90° angle. IMPORTANT: Open the top cover carefully. -
Page 13: Installing The Trim Tray
Setting Up the Printer Installing the Trim Tray CAUTION There are sharp cutter blades inside the printer. Do not insert hands or objects. The trim tray collects paper trimmings that are generated when the printer cuts the prints. Insert the trim tray into the printer as shown. To keep your prints dust-free and to prevent paper jams, empty the trim tray each time you change the paper. -
Page 14: Connecting The Cables
Setting Up the Printer Connecting the Cables You must install the printer driver before connecting the IMPORTANT: cables. Install the printer driver software before you connect the cables. Chapter 1 , Installing the Printer Driver, for instructions. Connecting the Power If you received more than one power cable with your printer, make sure to use the correct power cable for your country. -
Page 15: Loading The Ribbon
Setting Up the Printer Loading the Ribbon Make sure that you have a KODAK Photo Print Kit 6800/4R or KODAK Photo Print Kit 6800/6R available. These kits contain the correct size ribbon for your printer. See Appendix A for details on the Photo Print Kits (sold separately). -
Page 16: Turning On The Printer
Setting Up the Printer Remove the label. Insert the right side of the take-up spool into the spool holder on the Take-up spool right. Insert the left side of the take-up spool in the spool holder on the left. Adjust the take-up spool until the spool locks into the spool holder. Slack in the ribbon can cause a paper jam. -
Page 17: Loading The Paper
Setting Up the Printer Loading the Paper Make sure that you have a KODAK Photo Print Kit 6800/4R or KODAK Photo Print Kit 6800/6R available. These kits contain the correct size paper for your printer. See Appendix A for details on the photo print kits (sold separately). - Page 18 Setting Up the Printer Carefully lower the paper roll into the slots. Match the geared flange (green) with the geared slot (green) on the printer. Label Remove the label from the paper roll. NOTE: Verify that the paper unrolls from the top of the roll. Slot Feed the paper into the rear printer slot until the red LED light turns off and the green LED light turns on.
-
Page 19: Making A Test Print
Setting Up the Printer Making a Test Print Make a test print to check that the printer is installed and set up correctly. Press Menu twice until Test Print Mode appears. Press Enter to start printing the test print. For more information on using the operator panel in Setup mode, see “Using Setup Mode to Review Printer Settings”... -
Page 20: Chapter 3 Calibrating The Printer
Calibrating the Printer The KODAK Calibration Utility (Calibration Utility) lets the KODAK 605 Photo Printer produce the best possible color response. Calibration adjusts the response of the printer so that a specific data input value yields a specific color density output. -
Page 21: Launching The Calibration Utility
Click File>Properties. Click the Printer Calibration tab. Click KODAK Photo Printer Visual Calibration Utility... The KODAK Visual Calibration dialog box opens. The name of the printer and the paper installed appear in the upper left of the dialog box. April 9, 2007... -
Page 22: From The Windows Os Desktop
Click Start>Programs>KODAK Photo Printer>KODAK Photo OS Desktop Printer Calibration Utility. NOTE: If you have more than one Kodak printer that uses the Visual Calibration Utility for calibration, the following dialog box may appear. Select the printer you wish to calibrate, and click OK. - Page 23 Calibrating the Printer Click Set Printer to Factory Defaults. April 9, 2007...
- Page 24 Calibrating the Printer Click Print Test Image. The printer prints the test print. April 9, 2007...
- Page 25 Calibrating the Printer Examine the test print from the printer to determine the most neutral gray patch, and then click the patch in the Calibration Utility screen that corresponds with the most neutral patch on the test print. Only do Step if you want to adjust the highlights so that IMPORTANT: your prints meet your personal preference.
-
Page 26: Uninstalling The Calibration Utility
Calibrating the Printer Uninstalling the Calibration Utility WINDOWS XP Select Start>Settings>Control Panel>Add or Remove Programs Operating System Select the application. Select Remove. WINDOWS VISTA Select Start>Control Panel>Programs>Uninstall a program. Operating System Select the application. Select Uninstall. April 9, 2007... -
Page 28: Chapter 4 Operating The Printer
Operating the Printer Making Prints You make prints using photo printing software applications. For application-specific printing information, see the user’s guide or online Help for the software application. Handling and Storing Prints For best results: • Make sure hands are clean and free of food, oil, and grease. •... -
Page 29: Understanding The Operator Panel Lights
Operating the Printer Understanding the Operator Panel Lights Light Color Printer Status Power Orange The printer power is on. Ready Green The printer is ready to make prints. Error An error has occurred. See the message on the operator panel, then “Resolving Operator Panel Error Messages”... -
Page 30: Accessing The Printer Settings
Operating the Printer Accessing the Printer Press Menu repeatedly to scroll through the printer settings in the following Settings order. Printer Setting Operator Panel Action Required Display Printer ready Ready None. The printer is on and ready to make prints. Changing energy Energy Save Mode Press Enter to turn Energy Save Mode on or off. - Page 31 Operating the Printer Printer Setting Operator Panel Action Required Display Changing the wait Wait Time Press Enter to change wait time from 0 to 100 seconds. The default is time 1 second. This only applies when printing 4R prints using 6R ribbon. The wait time is the length of time that the printer waits before it starts printing after receiving a 4R print.
-
Page 32: Chapter 5 Maintaining The Printer
Clean the platen roller monthly using the alcohol pads included in the KODAK Thermal Printer Cleaning Kit. Only clean the thermal print head if directed to do so by a Kodak service representative. Do not include the thermal print head in your monthly cleaning process. -
Page 33: Cleaning The Thermal Print Head And The Peel Plate Edge
585-722-5151. Customers outside the U.S. can contact their local Kodak service representative. For environmental issues related to Kodak products, contact Kodak at 1-800-242-2424. Cleaning the Thermal Only do this procedure if directed to do so by a Kodak IMPORTANT: service representative. Print Head and the Peel Plate Edge Make sure the power switch is turned off ( ). -
Page 34: Cleaning The Platen Roller
Maintaining the Printer Cleaning the Platen Roller Remove an alcohol pad from its packaging. Wipe the rubber section of Platen Roller the platen roller with the pad. Rotate the roller to clean the entire surface. Allow the alcohol to dry completely (about five minutes) before you resume printing. -
Page 36: Chapter 6 Troubleshooting
6-3. Prints have vertical streaks Thermal print head is dirty. If directed by your Kodak service representative, clean the thermal print head. See “Cleaning the Thermal Print Head and the Peel Plate Edge” on page 5-2. -
Page 37: Resolving Operator Panel Error Messages
Troubleshooting Resolving Operator Panel Error Messages Refer to the following table to resolve errors reported on the operator panel. If the problem persists, contact your Kodak service representative. Error Message Description or Cause Possible Solution Paper Empty The paper is empty or is not loaded. -
Page 38: Clearing A Paper Jam
Troubleshooting Clearing a Paper Jam Press and hold Paper Rewind until the Paper Empty message appears. Once the Paper Empty message appears: – Open the paper door. – Cut off any damaged or printed areas of the paper. – Load the paper. See “Loading the Paper”... -
Page 39: Recovering From A Power Interruption
NOTE: If the Paper Jam message is still displayed on the operator panel, and you are at the end of a paper roll, it is possible that a segment of paper is too short to automatically exit the printer. Contact KODAK Service and Support. -
Page 40: Appendix A: Important Printer Information
Appendix A: Important Printer Information System Requirements • Computer with MICROSOFT WINDOWS XP, WINDOWS 2003 Server, WINDOWS VISTA Operating System • Minimum 1.0 GHz Celeron Microprocessor • Minimum memory requirement is determined by your operating system (see the table on page 1-1) •... -
Page 41: Printer Supplies
For best results, replace both the paper and ribbon at the IMPORTANT: same time. Used ribbon is safe for land-fill disposal. Do not recycle used ribbon. KODAK Photo Print Kit 6800 / 4R Catalog Number 182-0547 Storage specifications 86° F (30° C) or lower... -
Page 42: Thermal Printer Cleaning Kit
Important Printer Information Thermal Printer Use the KODAK Thermal Printer Cleaning Kit when performing routine Cleaning Kit maintenance on the printer (see page 5-1). One Thermal Printer Cleaning Kit is included with your printer. KODAK Thermal Printer Cleaning Kit Catalog number... -
Page 44: Appendix B: Safety And Regulatory Information
• Alcohol pads are used to clean the thermal print head and other internal printer components. In the United States for health, safety, and environment information, call 585-722-5151. Customers outside the U.S. can contact their local Kodak service representative. April 9, 2007... -
Page 45: Safety Labels
Safety and Regulatory Information Safety Labels Please observe the important safety warnings that are posted on the printer. P/N 2J5451 1641132182 CAUTION HOT SURFACE To avoid burns, use caution when closing the cover. P/N 2J5452 1641132183 CAUTION SHARP OBJECTS The metal edges of the printer may be sharp. P/N 2J5439 1641132233 CAUTION SHARP CUTTER BLADE... -
Page 46: Regulatory And Safety Compliance
Safety and Regulatory Information Regulatory and Safety Compliance Safety Complies with UL 60950-1:2003 CAN/CSA C22.2 No. 60950-1-03 EN 60950-1:2001 IEC 60950-1:2001 Tested for Norwegian IT Power systems 240V phase to phase Electromagnetic NOTE: This equipment has been tested and found to comply with the limits for a Class A digital device, pursuant to part 15 of the FCC rules. - Page 47 Safety and Regulatory Information CAUTION This is a class A product. In a domestic environment this product may cause radio interference in which case the user may be required to take adequate measures. “Changes or modifications not expressly approved by the party responsible for compliance could void the user’s authority to operate the equipment.”...
-
Page 48: Noise Emission
In the European Union, this symbol indicates that when the last user wishes to discard this product, it must be sent to appropriate facilities for recovery and recycling. Contact your local KODAK Representative or refer to www.kodak.com/go/recycle for additional information on the collection and recovery programs available for this product. -
Page 49: China Rohs
This value is assigned based on normal use of the product as described in the operating instructions. Table of hazardous substance's name and concentration Model Name: KODAK 605 Photo Printer April 9, 2007... -
Page 50: Index
5-3 clearing, 6-2 clearances for air flow, 2-2 clearing paper jam, 6-3 connecting cables, 2-5 KODAK Photo Print Kit, 2-6, 2-8, A-2 contents, package, 2-1 capacity of, A-2 catalog number for, A-2 contents of, A-2 disposal, printer, B-5 KODAK Service contacting, 5-1—5-2, B-1... - Page 51 5-1 calibrating, 3-1 maintenance cleaning, 5-1 cleaning rollers, 5-3 operating, 4-1 KODAK Thermal Printer Cleaning Kit, A-3 packing instructions for, A-3 performing routine, 5-1 preferences, customizing, 1-2 Material Safety Data Sheet, 5-1 regulatory information, B-1 repacking, A-3 setting up, 2-1—2-10...
- Page 52 Index printer specifications, A-1 test print, making, 2-10 safety thermal print head compliance, B-3 cleaning, 5-1, 5-2, 6-1 warning labels, B-2 transporting the printer, A-3 location of, B-2 trim tray, 2-1 setting up the printer, 2-1—2-10 cleaning, 5-1 setup mode, 4-2 installing, 2-4 software troubleshooting...