IBM T60 THINKPAD Manual
Ibm t60 thinkpad
Hide thumbs
Also See for T60 THINKPAD:
- Hardware maintenance manual (226 pages) ,
- Service and troubleshooting manual (86 pages) ,
- Setup poster (2 pages)

Related Manuals for IBM T60 THINKPAD


Summary of Contents for IBM T60 THINKPAD
- Page 1 IBM T60 THINKPAD MANUAL IT SERVICES OKANAGAN COLLEGE www.okanagan.bc.ca./helpdesk...
-
Page 2: Table Of Contents
Table of Contents Welcome to your T60 IBM ThinkPad ................3 Starting your computer ....................... 4 ThinkVantage........................4 Pointing Devices ......................... 5 Using an LCD projector...................... 5 DVDs ..........................5 CD Writing.......................... 5 Connecting to the OC wireless network ................6 Customizing your desktop .................... -
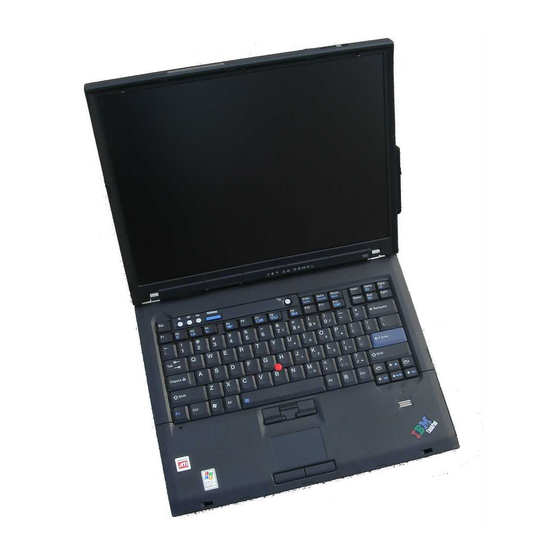
Page 3: Welcome To Your T60 Ibm Thinkpad
Welcome to your T60 IBM ThinkPad Front view: 1. ThinkLight 2. Status indicators 3. Wireless antenna 4. Security key hole 5. USB connectors 6. CD/DVD status 7. CD/DVD latch 8. CD/DVD eject button 9. CD/DVD drive 10. Fingerprint reader (not on all machines) 11. -
Page 4: Starting Your Computer
Starting your computer Press and hold the power button at the top of the keyboard (18) for a couple seconds. After the computer does some boot-up things, you’ll see a Novell log-in screen asking you for a username and password. If you’re plugged in to the college network using an Ethernet cable from your laptop to a network connection on the wall, you can enter your Novell username and your Novell password (see page 12 for more details on what your Novell log-in might be). -
Page 5: Pointing Devices
Pointing Devices (all 3 devices are active simultaneously) Mouse – plug a mouse into any USB port. TouchPad – slide your finger around on the touchpad (14). The buttons below the touchpad are left and right clicks. TrackPoint – the pencil eraser-thing in the middle of the keyboard (11) Put the tip of your finger on it and gently push in different directions. -
Page 6: Connecting To The Oc Wireless Network
Connecting to the OC wireless network (from any campus) Press the ThinkVantage button (17). (or go to Start, Programs, Accessories, Administrative Tools, ThinkVantage, Productivity Center) Turn on your Wireless Radio by selecting Power On/Off Wireless Radio and turning the Power On. Note: there’s also switch on the front of the laptop (19) that turns on the wireless radio. -
Page 7: Customizing Your Desktop
Customizing your desktop I like to put my commonly used applications on the task bar. Here’s how. Click Start, Settings, Control Panel, Taskbar and Start Menu. Unlock the taskbar and click OK. Locate your most commonly used applications (ie. MS Word) using Start, Programs …... -
Page 8: A Quick Guide To Careful Saving
Where did my files go? A quick guide to careful saving. There are several places where you can save your work. By default a file is saved to My Documents (but where exactly is that?) If you click the Up icon you can sometimes figure out where you actually are. -
Page 9: Using Mystorage To Access Your F: Drive
You can put files into the shared folders on drive K: and anyone with OC network access, and the proper rights, can access them. Usually you have to send them an e-mail telling them where to find the the files because some of the shared folders on drive K: are quite large and have a complex folder structure. -
Page 10: Connecting To The Network Through Vpn (Virtual Private Network)
Connecting to the network through VPN (Virtual Private Network) VPN gives you full access to your network drives when you’re logged in over wireless or from home. Click on the OC VPN icon on your desktop. Log in using your e-mail username and password. Logging into Novell Once you connect through VPN, run the... -
Page 11: Web Browsers And Pop-Ups
Web Browsers and pop-ups A pop-up is a little window that appears in front of a web page. Often they’re used for annoying advertising so most web browsers are set to automatically block pop-ups. But some pop-ups are useful, even essential. Here’s how to allow pop-ups from certain sites (like Okanagan.bc.ca) Internet Explorer: Pull down Tools to Pop-up Blocker to Pop-up blocker settings. - Page 12 listening to audio WinAmp iTunes (free download) recording/editing audio none Audacity (free download) playing video Windows Media Player Quicktime (free download) RealPlayer (free download) FlashPlayer (free download) editing video Windows Movie Maker Adobe Premiere Elements uploading files to a website FileZilla creating web pages Page 2000...
-
Page 13: Novell
A Quick Guide to usernames and passwords Novell This gets you into the OC network. You can use any computer that’s connected via an Ethernet cable (ie. Any computer in any lab at any campus). Note that when you’re not connecting from your home campus it may take a little longer as the network has to search other servers to authenticate your identity. -
Page 14: Outlook
Outlook MS Outlook is the standard e-mail client for OC. The full version can be used when you’re hardwired into the OC network. When you’re running wireless or surfing from home, you use the Web version which is accessed through Quick Links on the OC home page. (or http://mail.okanagan.bc.ca/exchange Your username is generally your first initial and your last name, all lowercase, no spaces or punctuation.