Table of Contents
Advertisement
Advertisement
Table of Contents

Related Manuals for Uniden XDECT 7055


Summary of Contents for Uniden XDECT 7055
- Page 1 XDECT 7055...
- Page 3 XDECT 7055+5 5 of each Rechargeable battery pack (BT-694 or BT-694s) If any items are missing or damaged, contact your place of purchase. Never use damaged products! Need Help? Get answers at our website: www.uniden.com.au for Australian model or www.uniden.co.nz for New Zealand model.
-
Page 4: Table Of Contents
What's in the manual? Installing Your Phone ...... 3 Using Privacy Mode ..... 18 Charge the Battery ......3 Using Call Transfer ....... 19 Connect the Telephone Cord ..4 Using the Intercom ....... 19 Getting to Know Your Phone..5 Using the Answering System .. -
Page 5: Installing Your Phone
Installing Your Phone Charge the Battery 11 Unpack all handsets, battery packs, and battery covers. If any battery cover is already on the handset, press in on the notch and slide the cover down and off. Line up the red and black wires on the battery Black pack with the label inside the... -
Page 6: Connect The Telephone Cord
81 Place a handset in the base and any accessory handset(s1 in the charger(s1 with the display(s1 facing forward. The light on the base and ChArGE each charger should all turn on. If... Try... reseating the handset. ChArGE light does checking the AC adapter connection. -
Page 7: Getting To Know Your Phone
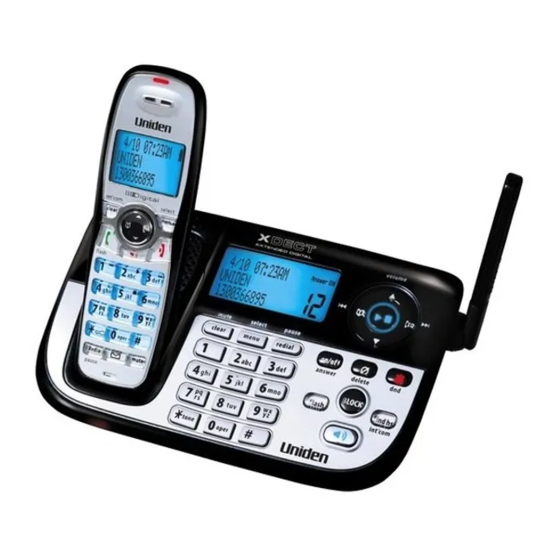
Getting to Know Your Phone Parts of the Base If the key name is spelled out on the key itself, it's not labeled in the drawing below. PHONEBOOK/LEFT PLAY/STOP Display Speaker CALLER ID/RIGHT DOWN DO NOT DISTURB DELETE FIND HANDSET/ INTERCOM SPEAKER Charging... - Page 8 Key name What it does (and icon) In standby or during a call: open the phonebook. In any menu or list: go up one level. (If you are already at the top level, the phone exits the menu and returns to the PhONEBOOK/ previous operation.) LEFT...
-
Page 9: Parts Of The Handset
Parts of the handset CLEAR/ INTERCOM If the key name is spelled out CALLER ID/ PHONEBOOK/ on the key itself, it's not RIGHT LEFT labeled in the drawing to TALK/FLASH the right. DOWN SPEAKER Twelve- key dial KEYPAD LOCK MESSAGES Microphone Handset keys and how Charging... -
Page 10: Reading The Displays
Key name What it does (and icon) In standby: start a telephone call (get a dial tone). TALK ( )/FLASh During a call: switch to a waiting call. Switch a normal call to the speakerphone (& back). SPEAKEr ( In standby: open the redial list. rEDIAL/PAUSE While entering a phone number: insert a 2-second pause. -
Page 11: Using The Menus
Using the Menus The menus are designed to be as easy as possible. Some users don't even need the manual once they know how to perform these actions: Open the menu Press MENU/SELECT The arrow cursor on the left side of the line shows which Move the cursor menu item is currently highlighted. -
Page 12: Using The Handset Menus
Using the handset Menus Handset Setup You can change these settings separately for each handset. Turn on T-coil mode to reduce noise on some hearing T-coil aids (see "Do you use a T-coil hearing aid?" on page 26). Choose one of four melodies or four tones for the handset's main ring tone. -
Page 13: Entering Text On Your Phone
Call Blocking This menu lets you block unwanted calls from up to 20 phone numbers and manage your call block list (see page 161. Entering Text on Your Phone When you want to enter text into your phone (for example, a name in the phonebook1, use the twelve-key dial pad to enter the letters printed on the number keys. -
Page 14: Using Your Phone
Using Your Phone From a handset From the base To... From a handset speakerphone speakerphone Press make a call: Dial the TALK ( )/ Press Press SPEAKEr SPEAKEr number, then FLASh Press TALK ( )/ answer a call Press Press SPEAKEr SPEAKEr FLASh... -
Page 15: Using The Redial List
Using the redial List The phone saves the last 5 numbers you dial on each station. To open the redial list, press ; use to scroll rEDIAl/pAUsE DoWN through the list. To close the list, press . With the pHoNEbook/lEfT phone in standby, open the list and find the number you want. -
Page 16: Using The Phonebook
Caller ID menu options Open the CID list with the phone in standby. Find the number you want and press . Choose one of these CID menu options: MENU/sElECT Delete Entry Erase this Caller ID number. Add this number to this station's phonebook. The phone Store Into Pb prompts you to enter a name &... -
Page 17: Chain Dialing
Phonebook menu options Open the phonebook with the phone in standby, then press MENU/ to open the phonebook menu. Choose one of these options: sElECT Add an entry to your phonebook. The phone prompts you to enter Create the name & phone number. (Handsets will also prompt you to choose a personal ring.) Copy All Copy the whole phonebook to another station. -
Page 18: Using Special Features
Using Special Features Using Do Not Disturb Do Not Disturb or DND feature turns off the ringers of the base and all handsets at the same time. With the phone in standby, press and hold on the Do NoT DIsTUrb base. -
Page 19: Using Voice Message Notification
Private (Handset only) Block all calls from numbers reported by CID Number as "Private." (This does not count as one of the 20 entries.) Unknown (Handset only) Block all calls from numbers reported by CID Number as "Unknown". (This does not count as one of the 20 entries.) Call block entry options With the phone in standby, open the call block list and find the entry you want. -
Page 20: Using Multi-Station Features
XDECT 7005 accessory handsets. Your base might be compatible with other Uniden accessory handsets: please visit our website for a list of compatible handsets. Accessory handsets must be registered to the base before you ... -
Page 21: Using Call Transfer
Using Call Transfer To... From the base From a handset Press Press FIND hANDSET/INTErCOM CLEAr/INTErCOM put the call on hold. put the call on hold. transfer a Select the station you want to transfer the call to, or select call All to page all the stations at the same time. -
Page 22: Using The Answering System
Using the Answering System Setting Up Your Answering System You can set up your answering system from any handset. To... Follow these steps Your greeting can be between 2 seconds and 30 seconds long. If you don't record an outgoing message, the system uses a pre-recorded greeting: Hello, no one is available to take your call. -
Page 23: Getting Your Messages
Set the amount of time callers have to leave a message, Record Time either 1 minute or 4 minutes. Choose Announce Only if you don't want the system to let callers to leave a message. Have the system beep every 15 seconds when you have a new message;... -
Page 24: Screening Your Calls
How to operate your answering system From a handset (remote To... From the base operation) Press Press PLAY/STOP. MESSAGES The system announces the number of new & old messages, play new then plays the first new message followed by the day messages &... -
Page 25: Using The System While You're Away From Home
Only one handset at a time can screen calls. If another handset is screening the call, the handset beeps and returns to standby. Using the System While You're Away from home You can also operate your answering system from any touch-tone phone. -
Page 26: Solving Problems
Solving Problems If you have any trouble with your phone, try these simple steps first. If you still have a question, visit the website listed on the front cover. If… Try… Checking the telephone cord connection. No stations can make Disconnecting the base AC adapter. -
Page 27: Weak Or Hard To Hear Audio
If… Try… Making sure the Record Time is not set to The answering Announce Only. system won't record messages. Deleting messages (the memory may be full). Making sure no other handset is using the system. A handset can't access the answering system. Making sure the phone is in standby. -
Page 28: Noise Or Static On The Line
Noise or Static On The Line Do you use a T-Coil hearing aid? If you have a hearing aid Interference is the most common equipped with a telecoil (T-coil) cause of noise or static on a feature, the interaction between cordless phone. -
Page 29: Resetting And Registering Handsets
this problem. The technician who installed your DSL service might have left some filters for you; if not, call your DSL provider or look in any electronics store. Plug the DSL filter into the telephone wall jack and plug your phone’s base into the filter. -
Page 30: Handling Liquid Damage
If... Try... you don't hear a dial tone Making sure the handset is fully charged, then start over at step 1. the display says Registration Failed To register a handset to a different base, see the section "Expanding Your phone" in the user's guide for the other base. handling Liquid Damage Moisture and liquid can damage your cordless phone. -
Page 31: Important Information
Important Information Terms Used In This Guide Accessory An extra handset that can register to and be used with an expandable phone base. All accessory handset handsets must be registered to a base before you can use them. The main part of the phone. It connects to your phone line and lets you make and receive calls. Base Most bases also have a cradle to store a handset. -
Page 32: Battery Information
Using another charger may damage the battery pack or cause the battery pack to explode. Uniden works to reduce lead content in PVC coated cords in our products & accessories. -
Page 33: Mounting The Base Unit On A Wall
Mounting the base unit on a wall This phone can be mounted on any standard telephone wall plate. Route the AC adapter and the telephone cord through the hole of the wall mount bracket. Line up the four tabs on the wall mount bracket (two at the top and two at the bottom) with the four notches on the bottom of the base. - Page 34 Place the mounting slots over the pins on the wall plate. Wall plate Slide the base down to lock it into place. (To AC outlet) Removing the wall-mount bracket At the bottom of the base, lift up on the release latch between the two bottom tabs and push the bracket up.
-
Page 35: One-Year Limited Warranty
(E) Used in conjunction with any equipment or parts or as a part of a system not manufactured by Uniden. (F) Only available in the original country of sale. Parts Covered: This warranty covers for one (1) year, the Product and included accessories. - Page 36 © 2009 Uniden Australia Pty Ltd/Uniden New Zealand Limited Printed in Vietnam UNZZ01073BZ(01...