Table of Contents
Advertisement
Quick Links
Advertisement
Table of Contents

Related Manuals for Swann SwannEye


Summary of Contents for Swann SwannEye
- Page 1 SwannEye Pan/Tilt IP Camera M440IPC050911E...
- Page 2 Choose something that you’ll remember, but that others would be unlikely to guess. • If you do manage to lock yourself out of the SwannEye, you’ll need to contact us at the Swann Technical Support Telephone Helpdesk - the number is on the back cover.
-
Page 3: Welcome
Welcome The SwannEye IP Camera is an integrated wireless IP (network) camera solution. Put simply, it’s a very smart camera that has its own web server embedded. Once configured, the camera only needs a power source to operate. Communication to the camera can be done wirelessly through almost any browser from almost any broadband internet connection in the world. -
Page 4: Table Of Contents
Bottom View ......................8 Installation Software installation 5.1. PC configuration ....................9 5.2. Mac OS X configuration ..................10 Using the SwannEye Search Tool on the local network 6.1. SwannEye Search Tool options ..............12 6.1.1. Device Information ..............13 6.1.2. IP Config ..................13 Accessing the camera from the Local Area Network (LAN) 7.1. - Page 5 8.4.19. Maintain: Upgrade Firmware ...........46 8.4.20. Maintain: Log .................47 8.4.21. Restore Factory Settings ............48 8.4.22. Reboot Device ................48 8.4.23. Home ....................48 Connecting the camera to the internet 9.1. Connect directly through ADSL modem (no router) ......49 9.2. Using a router to access the Internet ............50 Accessing the camera from the internet 10.1.
-
Page 6: Product Features
Product Features Quick and easy installation: The included SwannEye Search Tool helps you find your camera on the network and the intuitive web interface makes setup a breeze. Wired & Wireless access: The camera can be accessed through a wired connection using the 10/100 RJ45 LAN port or through wireless. -
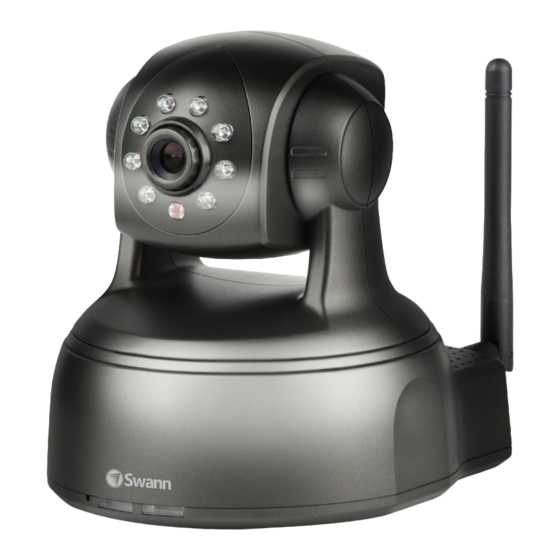
Page 7: Product Layout
SwannEye IP Camera Product Layout 3.1. Front view Infrared Light Sensor Light Sensor detects low light and LEDs switches to night vision Light Sensor Infrared LEDs These allow the camera to achieve night-vision up to 33ft/10m. Network Activity This will flash when there is... -
Page 8: Bottom View
SwannEye IP Camera 3.3. Bottom View The reset switch is located on the rear of the camera, right under the antenna. If you ever need to reset the camera back to factory settings and are unable to do this from the menu screens, you can use the reset switch. -
Page 9: Software Installation
The simplest way of doing this is via the SwannEye Search Tool included on the CD. There is a version for PC and Mac. The SwannEye Search Tool is also available from our website. -
Page 10: Mac Os X Configuration
• Once you double-click on it, the SwannEye Search Tool window will open. You can now proceed to configure your camera using the following instructions. -
Page 11: Using The Swanneye Search Tool On The Local Network
“Network Configuration” to manually change the subnet for that camera to match the same subnet as the LAN. See “6.1. SwannEye Search Tool options” on page 12 for more information on what to do. -
Page 12: Swanneye Search Tool Options
If your camera is successfully listed in the Device List window, you can now proceed to “6. Using the SwannEye Search Tool on the local network” on page 11 to log in and view the camera and configure its settings. -
Page 13: Device Information
SwannEye IP Camera 6.1.1. Device Information Some basic information is provided such as Device name and the System/App Firmware Version numbers. 6.1.2. IP Config This page is used to configure the network settings. Set IP Automatically (Recommended): Check this box to obtain an IP address from the DHCP server. - Page 14 SwannEye IP Camera Address: The IP address assigned to the camera. If you are not having this automatically assigned by a DHCP server, you will need to manually enter in a valid static IP that is available on your network. The first sections match the first three sections of your subnet.
-
Page 15: Accessing The Camera From The Local Area Network (Lan)
On the PC, we recommend using Internet Explorer to access the full range of options available. In the SwannEye Search Tool’s Device List (as shown below left) we can see the camera found is called ‘SwannEye’ and the IP config section (below right) shows the IP address assigned is 192.168.99.176 and the port number assigned to it is 85. -
Page 16: Username And Password
SwannEye IP Camera 7.1. Username and password When the login screen appears, enter the username and password. By default, there is an Administrator account already set up in the camera. The default Administrator account name is : admin and the password is 123456. There are three types of access: Administrator: Administrator accounts have full access to the camera. -
Page 17: Login Page
SwannEye IP Camera 7.2. Login page 7.2.1. Language The camera defaults to English but if you need a different language, click on it from the list along the top row. After a few seconds, the interface will update with the new language. -
Page 18: Browser Options On The Mac
SwannEye IP Camera 7.2.3. Browser options on the Mac Mode 1: This mode should not be used on the Mac. Mode 2: Choose Mode 2 for all browsers when run on a Mac-based computer. Note: If you are finished configuring or monitoring the camera in your browser, you should close your browser completely to log out and avoid anyone else gaining access to the camera. -
Page 19: Interface & User Accounts
SwannEye IP Camera Interface & user accounts Once you are logged in, you will see the Main Interface. This is where you can view your cameras and control many of their functions such as turning recording on and off. From here you can also access the remote settings. -
Page 20: Device Status
SwannEye IP Camera 8.1. Device Status In addition to the IP camera you are accessing, you can link a further eight cameras to the interface and view and control them all from the one interface. The Device Settings section displays the current status of the camera you are curently viewing, along with icons for all nine cameras. -
Page 21: Visitor Access
SwannEye IP Camera 8.2. Visitor Access Window mode: From this section you can switch between displaying only one camera in the viewing window to four or nine in grid mode. To add more cameras, see “8.4.5. Multi-Device Settings” on page 27. - Page 22 SwannEye IP Camera PLAY / STOP / AUDIO / TALK / RECORD / SNAPSHOT: Play: Provides a live feed from the camera or returns to live view. Stop: Stops live video viewing of the camera. The camera can not be recorded, and is not displayed on the viewing screen.
-
Page 23: Camera Controls
SwannEye IP Camera 8.3. Camera Controls camera control panel (for Operators and Administrators) gives the user all the functions of visitor access plus the ability to control the movement of the camera through pan/ tilt. Operator access does not allow the... - Page 24 SwannEye IP Camera FPS: The number of Frames Per Second the interface will display. “Full Speed” will display the maximum number of frames supported by the camera and your network connection. Typically, this will be Realtime. Lowering the frame rate can improve performance if you’re on a slow network/Internet connection.
-
Page 25: Remote Settings
SwannEye IP Camera 8.4. Remote Settings When you login as administrator, Remote Settings is enabled. From here, you can access a host of options which are listed below. The following pages described these features in detail. Note: When adding or changing values in these screens, remember to click ‘Submit’... -
Page 26: Date & Time Settings
SwannEye IP Camera 8.4.3. Date & Time Settings Set the date and time for your location. This is important when stamping the date and time onto video files and snapshots to identify when they were taken. 8.4.4. User Settings Eight accounts can be created on this system including a name, password and the level of access they have. -
Page 27: Multi-Device Settings
SwannEye IP Camera 8.4.5. Multi-Device Settings This feature is one of the most versatile in a camera of this class. It allows you to link up to eight other IP cameras to this camera and control and view them from the one interface. - Page 28 SwannEye IP Camera Add cameras connected to the Internet To add a device/camera that is not on the Local Area Network but is accessible via the internet, you will need to enter in its information manually. First make sure you can access the remote camera through an internet browser via its IP address (i.e.
-
Page 29: Network: Network Settings
SwannEye IP Camera 8.4.6. Network: Network Settings Obtain IP Automatically: If the IP camera is connected to a router with DHCP function, you can check this box to obtain an IP address automatically from your router. Otherwise, uncheck this box to manually set up a static IP address using the extra fields which appear. -
Page 30: Network: Wireless Settings
SwannEye IP Camera 8.4.7. Network: Wireless Settings This sets up wireless LAN credentials so that the camera can connect to a network router via WiFi. Note: To access the camera through WiFi, you need to set it up through this page while connected to the camera through a wired connection. - Page 31 SwannEye IP Camera Encryption: The camera supports WEP, WPA and WPA2 encryption to protect the data being transmitted between your PC and the camera. You need to match which encryption you use on the camera to what you are using on your router.
-
Page 32: Network: Adsl Settings
SwannEye IP Camera 8.4.8. Network: ADSL Settings The IP camera can connect to a DSL modem and pass the login details to the modem to access your ISP account. Using ADSL Dialup: Check this box to turn on the ADSL feature of the camera. -
Page 33: Network: Upnp Settings
SwannEye IP Camera 8.4.9. Network: UPnP Settings If your router supports UPnP and you have it activated, you should check this box (and click “submit”) to turn on UPnP on the camera. Your router and the camera can then automatically negotiate and open the necessary ports required in order to access the camera over the internet. -
Page 34: Network: Ddns Settings
SwannEye IP Camera 8.4.10. Network: DDNS Settings If you do not already know what DDNS is, it may seem one of the most daunting aspects of setting up a device to be accessible from the internet. See the section “10. Accessing the camera from the internet” on page 51 for an explanation on what DDNS is and why you might want to use it. -
Page 35: Alarm: Alarm Settings
SwannEye IP Camera 8.4.11. Alarm: Alarm Settings Alarm Detect Motion Detection Armed: Arms Motion Detection (see page 40). Alarm Input Armed: Arms the alarm block on the rear of the camera. This is an advanced feature, and recommended for experienced users only. -
Page 36: Alarm: Email Settings
SwannEye IP Camera 8.4.12. Alarm: eMail Settings Set up email credentials so that the camera can send warnings and captured images to your email inbox. Sender: The sender of the email warnings. Receiver 1 - 4: The recipients of the e-mail warnings. You can define up to four. - Page 37 SwannEye IP Camera Mail test error messages The following are error messages you may get when testing the email function. Cannot connect to the server. Network Error. Please try later. Server Error. Incorrect user or password. The sender is denied by the server: The sender may need to be authenticated by the server.
-
Page 38: Ftp Settings
SwannEye IP Camera 8.4.13. FTP Settings Set up FTP credentials so that the camera can send warnings and captured images to an FTP server. Note: When Alarm Service Settings->Upload Image on Alarm is checked, the FTP Service takes effect. Set these parameters to enable upload of images to an FTP server when an alarm triggers. - Page 39 SwannEye IP Camera FTP Test error messages Click the TEST button to test your FTP settings. If there is a problem, you will get one of the following error messages. Can not connect to the server. Please check FTP Server is correct or not.
-
Page 40: Alarm Settings (Motion Detection)
SwannEye IP Camera 8.4.14. Alarm Settings (Motion Detection) The ALARM SETTINGS page is where you can configure motion detection and the alarms or actions to be taken when motion is detected. The camera can send email alerts or upload images to a server when it detects movement. - Page 41 SwannEye IP Camera Upload Images on Alarm: Check this box if you want to send an image when an alarm is triggered. Upload Interval (Seconds): Set an interval (in seconds) between each upload . Scheduler: Use the scheduler to limit motion triggered to only certain periods.
-
Page 42: Other Settings
SwannEye IP Camera 8.4.15. Other Settings This lets you set parameters for Pan/Tilt control primarily in regards to speed of movement of the pan and tilt. Status LED Mode: Alters the behavior of the Network Indicator LED on the front of the camera. -
Page 43: Maintain: Device Info
The Device Info page contains lots of technical data about the hardware/firmware/ software that the camera uses. You might need to know some of this information if you’re contacting Swann Technical Support. Device Name: The name of the camera you selected in the Alias Menu. -
Page 44: Maintain: Alias Settings
SwannEye IP Camera 8.4.17. Maintain: Alias Settings The camera can be named here. Alias: The name of the camera. Enter the name you want for the camera here. You can choose anything you like - however, for maximum compatibility with other network devices, we suggest using: •... -
Page 45: Maintain: Date & Time Settings
SwannEye IP Camera 8.4.18. Maintain: Date & Time Settings Device Clock Time: The current time as measured by the camera. Device Clock Timezone: Where the camera is located in the world, relative to GMT (Greenwich Mean Time). For example, the Eastern Standard Time in the USA is GMT-05:00, whereas the time on the east coast of Australia is GMT+10:00. -
Page 46: Maintain: Upgrade Firmware
SwannEye IP Camera 8.4.19. Maintain: Upgrade Firmware The device and embedded Web User Interface (UI) occasionally get upgraded to correct errors or add new features. Use this function to load the new settings into the camera. Use the ‘Browse’ button to find the file containing the update and click ‘Open. ’... -
Page 47: Maintain: Log
SwannEye IP Camera 8.4.20. Maintain: Log The Log will show you a list of all the camera’s recent activities. -
Page 48: Restore Factory Settings
SwannEye IP Camera 8.4.21. Restore Factory Settings This resets all the settings in the camera back to the way they were when left the factory. Use this carefully since it will delete any settings or preferences such as your network settings and you will have to re-setup the camera again. -
Page 49: Connecting The Camera To The Internet
Alternatively, it can connect to a router in bridge mode. • Connect the IP camera to the DSL modem using a network cable • Activate the ‘SwannEye Search Tool’ on the PC • Login to the IP camera web browser page as an Administrator • Go to the ADSL settings page and enter your ISP login credentials... -
Page 50: Using A Router To Access The Internet
• Connect the IP camera to the LAN using a network cable. This can be a switch or a router depending on your network. • Activate the SwannEye Search Tool on the PC • Login to the IP camera web browser page as an Administrator • Enter the DDNS settings page and enable the DDNS service and click ‘Submit’... -
Page 51: Accessing The Camera From The Internet
It is also called a WAN (Wide Area Network) public IP address and is usually assigned by your ISP. The IP address you used from the SwannEye Search Tool to access your camera is your INTERNAL IP (also called your LAN (Local Area... -
Page 52: Your Ip Address
SwannEye IP Camera 10.2. Your IP Address 10.2.1. Dynamic IP address Your IP address is likely to change. This is because every time you connect to your Internet Service Provider (ISP), you are assigned a new IP number. Sometimes, your ISP may change your IP address without your knowledge. This is normal and... -
Page 53: Port Mapping
SwannEye IP Camera 10.4. Port mapping In addition to an IP address, you need to assign a port to your camera through which outside communications can access the camera. The port assigned to the camera is done through “8.4.6. Network: Network Settings” on page 29. Once assigned you need to map (or ‘forward’) the port in your network router to the IP... -
Page 54: Ddns
SwannEye IP Camera 10.5. DDNS Dynamic Domain Name Servers are similar to DNS servers. The difference is that they are meant for people who don’t want to buy a domain name (like Google. com), but still want an easy way to remember their own IP address. Domain names have yearly fees to register and maintain. -
Page 55: How To Register A Name
SwannEye IP Camera 10.5.3. How to register a name? To register a dynamic DNS name of your own, you need to visit the website of one of the many DDNS providers on the internet. We run our own at www.swanndvr. -
Page 56: Access The Ip Camera Using A Ddns Name
SwannEye IP Camera 10.5.4. Access the IP camera using a DDNS name To access the camera from the internet outside of your Local Area Network (LAN) you can now enter the DDNS name+port into a browser in the format: http://yourdomainname.swanndvr.net:85 Yourdomainname: the DNS hostname you registered with SwannDVR 85: is the port number (in this example only). -
Page 57: Accessing The Camera Through A Mobile Device
SwannEye IP Camera Accessing the camera through a mobile device 11.1. iPhone/iPad You can download the SwannEye app from the App Store. Install it on your device. 11.2. Android Device You can download the SwannEye app from GooglePlay. We’re continually making improvements and updates to our mobile viewing software. -
Page 58: Troubleshooting
SwannEye IP Camera Troubleshooting 12.2.1. Forgotten the administrator username or password? The default username is: admin. The password is 123456. If you have set a new administrator username or password and you cannot remember it, you will need to reset the camera back to its default factory settings. -
Page 59: Network Configuration Problems
The video streaming is controlled by the ActiveX plugin. If this is not installed correctly, it could be affecting your ability to view the camera. • Install the SwannEye Search Tool. The ActiveX controller is installed with this program. • When using Internet Explorer, accept and download the ActiveX control when prompted by the browser. -
Page 60: Can't Access The Network Camera From The Internet
SwannEye IP Camera 12.2.8. Can’t access the Network camera from the internet? • Is the ActiveX plugin correctly installed? • Is the network port used by the camera blocked by a firewall or anti-virus software? • Has UPnP (which will allow sucessful port forwarding) been turned on at the camera (see “8.4.9. -
Page 61: Specifications
SwannEye IP Camera Specifications Image sensor 1/4 color CMOS Lens 3.6mm Infrared LED 8 pcs Pixel 300,000 Night vision distance up to 10M / 33ft AWS/AGC/AES/exposure Auto Minimum illumination 0.1Lux Image format PAL/NTSC Compression format MJPEG Stream type HTTP Maximum frame rate... - Page 62 SwannEye IP Camera User authentication user/password (administrator/operator/visitor) Simultaneous viewers 4 Viewers Microsoft Internet Explorer 6.0 or above Google Chrome Web browser Mozilla Firefox Apple Safari Opera Supported mobile Apple iPhone / Android Power DC 5V 1.5A 4W infrared off Power Consumption...
-
Page 63: Warranty Terms & Conditions
Swann. The end user is responsible for all freight charges incurred to send the product to Swann’s repair centers. The end user is responsible for all shipping costs incurred when shipping from and to any country other than the country of origin. -
Page 64: Helpdesk / Technical Support Details
(M-Th, 6am-10pm US PT) (Tu-F 1am-5pm AUS ET) (F 6am-2pm US PT) (Sa 1am-9am AUS ET) USA Exchange & Repairs NEW ZEALAND toll free 1-800-627-2799 (Option 1) 0800 479 266 (M-F, 9am-5pm US PT) 0203 027 0979 © Swann Communications 2012...