Table of Contents
Advertisement
Available languages
Available languages
Advertisement
Chapters
Table of Contents

Related Manuals for Pioneer RSM400DV


Summary of Contents for Pioneer RSM400DV
- Page 1 English Espanõl...
-
Page 2: Safety Precaution
Safety Precaution CAUTION RISK OF ELECTRIC SHOCK DO NOT OPEN CAUTION: This product is a class 1 laser product classified under the Safety of laser CAUTION: TO REDUCE THE RISK OF ELECTRIC SHOCK DO NOT REMOVE products , IEC 60825-1:2007. COVER (OR BACK) NO USER-SERVICEABLE PARTS INSIDE REFER SERVICING TO QUALIFIED SERVICE PERSONNEL. -
Page 3: Table Of Contents
Contents Safety Precaution Recording to USB Recording to TAPE Contents Synchronized Recording from CD to TAPE Setting up Language Codes Hooking up the unit Main Unit Area Codes Remote control Troubleshooting OSD Initial language setting - Optional Types of Playable Discs Initial Setting the Area Code Specifications Adjust the general settings... -
Page 4: Setting Up
Setting up Be careful of the following Attaching the speakers to the unit • Be careful to make sure children not to put their hands or any objects into the Connect the black end of each wire to the terminals marked - (minus) and the *speaker duct. -
Page 5: Hooking Up The Unit
Hooking up the unit VIDEO OUT jack connection COMPONENT VIDEO OUT Connect the VIDEO OUT jack on the unit to the corresponding input jacks on your TV (PROGRESSIVE SCAN) jacks using a Video cable. connection Connect one end of the component (Y PB PR) cable to the COMPONENT VIDEO OUT (PROGRESSIVE SCAN) jack on the unit and other end to the... -
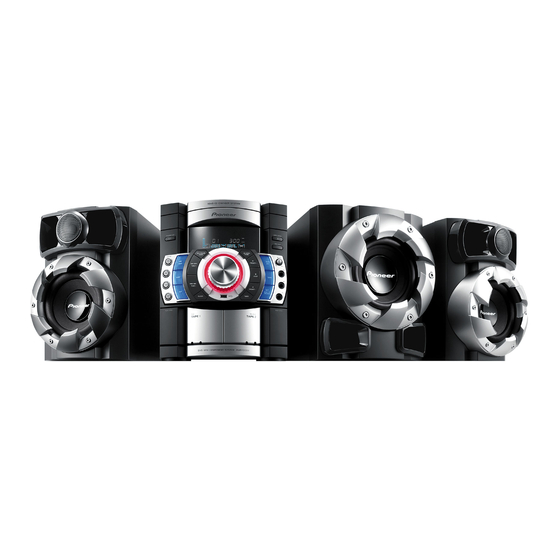
Page 6: Main Unit
Main unit OPEN/CLOSE: Open or close your Disc tray CD door. | STANDBY/ON DISC SKIP Display window Choose a desired disc. X.BOOM MIC VOL. Extreme Dynamic Sound System Adjust microphone volume. Reinforce the treble, bass and MIC 1, 2 surround effect. -
Page 7: Remote Control
DISPLAY: Accesses On-Screen Display. MENU: Accesses the menu on a DVD disc. SETUP: Accesses or removes setup menu. TV Control buttons : Controls the TV. (Pioneer TV only) (left/right/up/down): Used to navigate Controlling the TV. on-screen displays. You can control the sound level, input source, and ENTER: Acknowledges menu selection. -
Page 8: Osd Initial Language Setting - Optional
OSD Initial language setting - Optional Adjust the general settings During the first use of this unit, the initial language setup menu ON REMOTE appears on your TV screen. You must complete initial language selec- 1 Display setup menu SETUP tion before using the unit. - Page 9 Adjust the display settings 2.1 Speaker Setup TV Aspect – Select which screen aspect to use based on the shape of your TV screen. ON REMOTE [4:3]: Select when a standard 4:3 TV is connected. 1 Open the settings menu SETUP [16:9]: Select when a 16:9 wide TV is connected.
-
Page 10: Setting The Sound Mode
Setting the sound mode Adjust the lock settings To access the lock options, you must enter the 4-digit password. If you have not USER EQ yet entered a password you are prompted to do so. Enter a 4-digit password. Enter it again to verify. If you make a mistake while entering number, press 1 Press USER EQ. -
Page 11: Setting The Clock
Setting the Clock Enjoying a pre-programmed sound field ON UNIT The system has a number of pre-set surround sound fields. You can select a desired sound mode by using EQ/ P.EQ. 1 Turn the power on / | The displayed items for the Equalizer may be different depending on sound CLOCK 2 Press for at least 2 seconds sources and effects. -
Page 12: Displaying Disc Information
Displaying Disc Information Playing a Disc ON REMOTE ON UNIT ON REMOTE 1 Open the disc tray OPEN/CLOSE OPEN/CLOSE 1 Press DISPLAY 2 Insert a disc 2 Select an item 3 Close the disc tray OPEN/CLOSE OPEN/CLOSE 3 Adjust the Display menu settings 4 To Start playback ... - Page 13 ® Changing the character set to display DivX subtitle correctly 1.5 times faster playback (Option) DivX 1 Press when a disc is already playing to watch and listen. 2 x1.5 will appear on the screen. 1 If the subtitle does not display properly, press and hold SUBTITLE about 3 3 Press ...
-
Page 14: Viewing Photo Files
Viewing photo files Creating your own program You can play the contents of a disc in the order you want by arranging the order ON UNIT of the songs on the disc. The program is cleared when the disc is removed. ON REMOTE 1 Select a desired music then press PGM MEM or select “... -
Page 15: Listening To The Radio
Listening to the cassette tapes Listening to the radio ON REMOTE ON UNIT ON REMOTE ON UNIT 1 Open the tape door PUSH OPEN 1 Select FM/ AM TUNER FUNCTION 2 Insert the tape 2 Select the radio station TUNE -/+ TUNE -/+ PUSH OPEN 3 Close the tape door... -
Page 16: Listening To Music From Your External Device
Using an USB device Listening to music from your external device You can enjoy media files saved on an USB device by connecting the USB device to the USB port of the unit. The unit can be used to play the music from many types of external device. If you want to operate other function, see the CD playback section. -
Page 17: Recording To Usb
When you are recording, look out for the following Recording to USB • You can check the recording percentage rate for the USB record on the You can record a various sound source to USB. screen during the recording. (AUDIO, MP3/ WMA CD only) •... -
Page 18: Recording To Tape
Recording to TAPE Synchronized Recording from You can record a various sound source to TAPE. CD to Tape ON UNIT ON REMOTE ON UNIT ON REMOTE PUSH OPEN 1 Open the tape deck. PUSH OPEN 1 Open the tape deck and then insert >... -
Page 19: Language Codes
Language Codes Use this list to input your desired language for the following initial settings: Disc Audio, Disc Subtitle, Disc Menu. Language Code Language Code Language Code Language Code Language Code Language Code Afar 6565 Croatian 7282 Hausa 7265 Lingala 7678 Quechua 8185... -
Page 20: Troubleshooting
Troubleshooting Symptom Cause Correction POWER No power Plug in the power cord. The power cord is not plugged in. RADIO No sound The function switch is not set to the Radio mode. Set the switch to the Radio mode. There are electronic devices near the unit. Set the unit far from the devices. -
Page 21: Types Of Playable Discs
About the Symbol Display Types of Playable Discs “ ” may appear on your TV display during operation and indicates that the Logo Type function explained in this owner’s manual is not available on that specific DVD video disc. DVD-VIDEO: Discs such as movies that can be purchased or rented. -
Page 22: Specifications
220 x 336 x 296 mm 274 x 336 x 336 mm Net Weight (1 EA) 4.5 kg 6.0 kg Published by Pioneer Corporation. Designs and specifications are subject to change without prior notice. Copyright © 2009 Pioneer Corporation. All rights reserved. -
Page 24: Precauciones De Seguridad
Precauciones de seguridad PRECAUCIÓN ADVERTENCIA: No utilice ni guarde las pilas bajo la luz directa del sol ni en un lugar excesivamente caluroso, como el interior de un automóvil o junto a una estufa. RIESGO DE DESCARGA Ello podría ocasionar la fuga del electrolito que contienen las pilas, o que las mismas ELÉCTRICA NO ABRIR se sobrecalentaran, explotaran o empezaran a arder. - Page 25 Contenido Precauciones de seguridad Grabación a USB Contenido Grabación en una CINTA Grabación sincronizada de CD a cinta Configuración Conexión de la unidad Códigos de idioma Unidad principal Códigos de área Control remoto Solución de problemas Configuración del idioma inicial del OSD Tipos de disco reproducibles - Opcional Especificaciones...
-
Page 26: Configuración
Configuración Tenga cuidado de lo siguiente Conexión de los altoparlantes a la unidad • Asegúrese de que los niños no introduzcan sus manos u objetos extraños en Conecte el extremo negro del cable a los terminales marcados como - (menos) el *conducto del altoparlante. -
Page 27: Conexión De La Unidad
Conexión de la unidad Conexión de la toma de SALIDA DE VÍDEO (VIDEO OUT) Conexión de clavijas de Conecte la toma VÍDEO OUT de esta unidad a las tomas de entrada correspondientes en SALIDA DEL COMPONENTE su televisor, utilizando el cable de vídeo. DE VÍDEO (BARRIDO PROGRESIVO) Le permite conectar un extremo del... -
Page 28: Unidad Principal
Unidad principal OPEN/CLOSE: Abre o cierra la Bandeja de disco puerta del compartimento de CD. | STANDBY/ON DISC SKIP Ventana de visualización Seleccione el disco deseado. MIC VOL. X.BOOM Ajusta el volumen del micrófono. Sistema de sonido dinámico extremo Le permite reforzar los agudos, los graves MIC 1, 2 y los efectos de sonido envolvente. -
Page 29: Control Remoto
MENU: Accede al menú de un DVD. SETUP: Accede o elimina el menú de configuración. Botones de control de TV: Controla la TV. (Sólo para TV ( izquierda/derecha/arriba/abajo): Navegue por Pioneer) la visualización en pantalla. ENTER: Acepta la selección del menú. Control de la TV. -
Page 30: Configuración Del Idioma Inicial Del Osd - Opcional
Configuración del idioma inicial del OSD - Opcional Ajuste de la configuración general EN EL CONTROL Durante la primera utilización de esta unidad, aparecerá en la TV el REMOTO menú de configuración de idioma inicial. Debe completar la selección inicial de idioma antes de poder usar la unidad. Inglés será la opción 1 Visualice el menú... - Page 31 Ajuste las configuraciones de la pantalla 2.1 Altavoces setup Aspecto TV – Seleccione el formato de pantalla a usar teniendo en cuenta la EN EL CONTROL forma de su televisor. REMOTO [4:3]: seleccione cuando esté conectada una TV con formato 4:3. 1 Abra el menú...
-
Page 32: Ajuste Del Modo De Sonido
Ajuste la configuración del bloqueo Para generar el código de registro, localice la sección [Vídeo DivX(R) bajo demanda] en el menú [Config.]. Visite la página vod.divx.com e inserte este Para acceder a las opciones de bloqueo, debe introducir una contraseña de 4 código para completar el proceso de registro;... -
Page 33: Ajuste Del Reloj
Use su lector como reloj despertador Disfrutar de un campo de sonido 1 Mantenga pulsado TIMER. Las funciones parpadearán (Ej. TUNER preprogamado (SINTONIZADOR), USB, ...) Pulse SET cuando aparezca la función con la que desee despertarse. El sistema incluye varios campos de sonido preprogramados. Puede Si escoge TUNER, “PLAY”... -
Page 34: Visualizar La Información Del Disco
Visualizar la información del disco Lectura de un disco EN EL CONTROL EN EL CONTROL EN EL LECTOR REMOTO REMOTO 1 Abra la bandeja de discos OPEN/CLOSE 1 Pulse DISPLAY OPEN/CLOSE 2 Introduzca un disco 2 Seleccione un elemento ... - Page 35 Cambiar los caracteres establecidos para la visualización correcta de Reproducción 1,5 veces más rápida subtítulos en DivX ® - Opcional DivX 1 Pulse cuando se esté reproduciendo un disco para verlo y escucharlo. 2 x1.5 aparecerá en la pantalla. 1 Si el subtítulo no se muestra correctamente, mantenga pulsado SUBTITLE 3 Pulse de nuevo ...
-
Page 36: Visualizar Archivos Fotográficos
Visualizar archivos fotográficos Creación de sus propios programas Puede leer los contenidos de un disco en el orden que desee, organizando los EN EL CONTROL archivos musicales del disco. El programa será eliminado cuando el disco se retire. EN EL LECTOR REMOTO 1 Seleccione la música deseada y pulse PGM MEM o seleccione “... -
Page 37: Escuchar La Radio
Escuchar la radio Escuchar las cintas EN EL CONTROL EN EL LECTOR EN EL LECTOR REMOTO TUNER FUNCTION 1 Abra la compuerta de cintas PUSH OPEN 1 Seleccione FM/ AM 2 Inserte la cinta 2 Seleccione una emisora de radio TUNE -/+ TUNE -/+ PUSH OPEN... -
Page 38: Escuchar Música Desde El Reproductor Portátil O Un Dispositivo Externo
Utilización de un dispositivo USB Escuchar música desde el reproduc- tor portátil o un dispositivo externo Puede disfrutar de archivos multimedia guardados en un dispositivo USB conectándolo en el Puerto USB de la unidad. La unidad puede usarse para reproducir música desde muchos tipos de Si desea utilizar otra función, consulte la sección de reproducción de CD. -
Page 39: Grabación A Usb
Durante la grabación, compruebe lo siguiente Grabación a USB • Durante la grabación puede comprobar en la pantalla el porcentaje de gra- Puede grabar varias fuentes de sonido en el USB. bación de USB. (Sólo para AUDIO, MP3/ WMA CD) •... -
Page 40: Grabación En Una Cinta
Grabación en una CINTA Grabación sincronizada de CD a cinta Puede grabar varias fuentes de sonido en una CINTA. EN EL CONTROL EN EL LECTOR EN EL CONTROL REMOTO EN EL LECTOR REMOTO PUSH OPEN 1 Abra la compuerta de la cinta. PUSH OPEN 1 Abra el compartimento de cinta y, >... -
Page 41: Códigos De Idioma
Códigos de idioma Utilice esta lista para introducir el idioma deseado para las siguientes configuraciones iniciales: Audio del disco, subtítulos del disco, menú del disco. Idioma Código Idioma Código Idioma Código Idioma Código Idioma Código Idioma Código Afar 6565 Croata 7282 Hausa 7265... -
Page 42: Solución De Problemas
Solución de problemas Problema Causa Solución POWER Sin potencia Enchufe el cable. El cable de alimentación está desconectado. RADIO No hay sonido El interruptor de función no está ajustado en modo Radio. Coloque el interruptor en modo de Radio. Hay dispositivos electrónicos cerca de la unidad. Coloque la unidad lejos de los dispositivos. -
Page 43: Tipos De Disco Reproducibles
Acerca del símbolo desplegable Tipos de disco reproducibles “ ” puede aparecer visualizado en su TV durante el funcionamiento, indicando Tipo Logotipo que la función expuesta en este manual de usuario no está disponible para ese disco de DVD Video, en concreto. VIDEO-DVD: discos, como los de películas, que se pueden comprar o alquilar. -
Page 44: Especificaciones
220 x 336 x 296 mm 274 x 336 x 336 mm Peso neto (1EA) 4,5 kg 6,0 kg Publicado por Pioneer Corporation. El diseño y las especificaciones están sujetos a cambios sin previo aviso. Copyright © 2009 Pioneer Corporation. Todos los derechos reservados.