Table of Contents
Advertisement
Advertisement
Table of Contents

Related Manuals for Kyocera Verizon


Summary of Contents for Kyocera Verizon
- Page 1 User Guide...
-
Page 2: Table Of Contents
Table of Contents Get Started ..........................1 Your Phone at a Glance ...................... 1 Set Up Your Phone ......................3 Insert a SIM Card......................3 Remove a SIM Card ....................4 Charge the Battery ....................... 5 Charge the Battery Wirelessly ..................5 Turn Your Phone On and Off .................... - Page 3 Phone Calls ..........................28 Make Phone Calls ......................28 Call Using the Phone Dialpad ..................28 Call from Recent Calls ....................29 Call from Contacts ......................29 Call Using a Speed Dial Number ................29 Call Emergency Numbers ...................29 Call Numbers with Pauses ..................30 Call Using the Plus (+) Code ..................31 Receive Phone Calls ......................31 Voice Mail ..........................32 Review Voice Mail ......................32...
- Page 4 Quick Responses......................40 Auto-retry ........................41 TTY Mode ........................41 Voice Privacy ......................42 DTMF Tones .......................42 Auto Answer on Headset ....................42 Contacts............................43 Contacts List ........................43 Add a Contact ........................44 Save a Phone Number .......................45 Edit a Contact ........................45 Add a Group Contact ......................48 Edit a Group Contact ......................49 ICE (In Case of Emergency) ....................49 Synchronize Contacts ......................50...
- Page 5 Save and Resume a Draft Message ................61 Social Networking Accounts ....................61 YouTube ........................62 Apps and Entertainment ......................63 Google Play Store App ......................63 Find and Install an App ....................63 Create a Google Wallet Account .................64 Google Play Store Options ..................64 Request a Refund for a Paid App ................65 Open an Installed App ....................65 Uninstall an App ......................66 Navigation ..........................66...
- Page 6 Learn to Navigate Chrome ..................78 Chrome Menu ......................80 Select Text on a Web Page ..................81 Adjust Chrome Settings ....................81 Manage Bookmarks ....................83 Mobile Hotspot ......................84 Tethering ........................85 Camera and Camcorder ......................86 Use the Camera App ......................86 Open or Close the Camera App ..................86 Viewfinder Screen.......................86 Take a Picture or Record a Video ................87 Review Screen ......................88...
- Page 7 View Calendar Events ....................100 Edit Calendar Events ....................100 Erase Calendar Events ..................... 101 Show or Hide Calendars ................... 101 Synchronize Calendars with Your Phone ..............101 Clock ..........................102 Desk Clock ....................... 102 Alarm ........................103 Timer ........................104 Stopwatch .........................
- Page 8 Format the microSD Card ..................118 Unmount the microSD Card ..................118 Use the Phone’s microSD Card as a Media Device ..........118 File Manager ........................119 Supported Formats ....................120 Update Your Phone ......................120 Settings ........................... 122 Airplane Mode ........................122 Wi-Fi Settings ........................
- Page 9 Roaming Tone ......................131 Emergency Tone ...................... 131 SD Card Notifications ....................132 Battery Charged Tone ....................132 NFC Sound in Call ....................132 Display Settings ....................... 132 Brightness ........................ 132 Wallpaper ......................... 132 Auto-Rotate Screen ....................133 Sleep ........................133 Daydream .........................
- Page 10 Enable Widgets ......................141 Owner Information ....................142 Security Settings ......................142 Encryption ........................ 142 Set Up SIM Card Lock ....................143 Make Passwords Visible ................... 143 Device Administrators ....................144 Unknown Sources..................... 144 Verify Apps ....................... 144 Credential Storage ....................144 Language &...
- Page 11 Notes ............................155 Copyright & Trademarks ......................156...
-
Page 12: Get Started
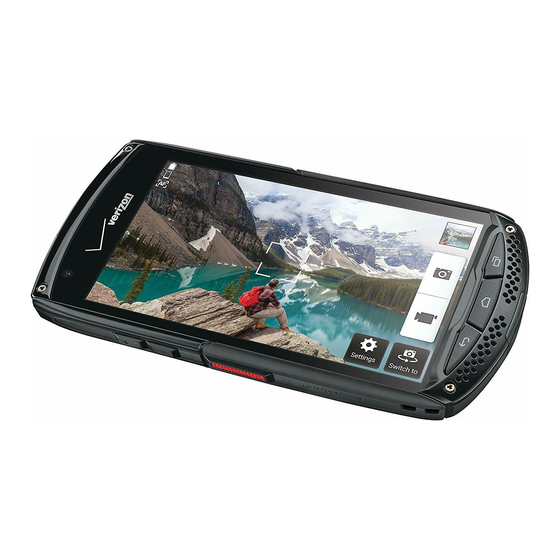
Get Started The following topics give you all the information you need to set up your phone and Verizon service the first time. Your Phone at a Glance The following illustration outlines your phone’s primary external features and keys. Get Started... - Page 13 Key Functions ● LED Indicator displays a phone notification, charging status, or alert. ● Front Camera takes pictures and records videos while facing the screen, and allows you to video conference. ● Proximity/Light Sensor detects how close an object is to the surface of the screen. This is typically used to detect when your face is pressed up against the screen, such as during a phone call.
-
Page 14: Set Up Your Phone
● microSD Card/SIM Card Slots take a SIM card and a microSD card. Note: microSD card is sold separately. ● Camera Key lets you activate the camera and camcorder. ● Back Camera lets you take pictures and videos. ● Camera Flash helps illuminate subjects in low-light environments when taking a picture or recording a video. -
Page 15: Remove A Sim Card
Remove a SIM Card You can remove the SIM card to use with other compatible phones. 1. Turn off your phone. 2. Locate and open the cover to the microSD card/SIM card slots on the side of the phone. 3. Push the SIM card gently with your finger. The card rejects itself. Pull out the card from the slot and close the cover. -
Page 16: Charge The Battery
Charge the Battery Fully charge the battery before powering on the phone. Important: Unplug the charger from the electrical outlet when not in use to reduce the environmental impact of charging. 1. Open the cover to the USB/charging port on the bottom of the phone. 2. -
Page 17: Turn Your Phone On And Off
Before starting wireless charging, please note the following: ● If the charging areas are not touching, the charging results will be poor. ● Make sure there is nothing between your phone and wireless charger. ● Your phone may become hot while charging the battery. ●... -
Page 18: Turn Your Screen On And Off
Hard Restart ► Press and hold the Power/Lock key for about ten seconds. The phone shuts down and automatically starts up. Turn Your Screen On and Off Your phone allows you to quickly turn the screen off when not in use and to turn it back on when you need it. -
Page 19: Setup Wizard
► Select your language from English, Español, Tiế ng việ t, 한국어 , 中文 ( 簡体 ), or 中文 ( 繁 體 ) and tap Next. Setting Up Verizon Cloud Set up Verizon Cloud to sync and save your important contacts, photos, videos, music, documents, etc. Follow the instructions onscreen. Setting Up Your Email Choose the type of email accounts you want to set up and configure them. - Page 20 Note: Voice Mail is a subscription based service. Set Up Voice Mail 1. From the Home screen, tap > Voice Mail. 2. Read the message and tap Continue. 3. Terms & Conditions may appear. Read it and tap Accept, if you agree to it. 4.
-
Page 21: Phone Basics
Phone Basics Your phone is packed with features that simplify your life and expand your ability to stay connected to the people and information that are important to you. The following topics will introduce the basic functions and features of your phone. Smart Sonic Capability The Smart Sonic receiver inside your phone transmits sound by way of vibrations throughout the entire area of the display screen. - Page 22 Swipe or Slide Flick Pinch and Spread To swipe or slide means to Flicking the screen is similar Pinch the screen using your quickly drag your finger to swiping, except that you thumb and forefinger to zoom vertically or horizontally need to swipe your finger in out, or spread the screen to across the screen.
-
Page 23: Your Home Screen
Your Home Screen The Home screen is the starting point for your phone’s applications, functions, and menus. You can customize your Home screen by adding application icons, shortcuts, folders, widgets, wallpapers and more. Home Screen Overview The following illustration describes the basics of the Home screen. ●... -
Page 24: Extended Home Screens
● Favorites Tray: Contains up to five icons and appears on every Home screen. You can customize these icons except the application launcher icon in the center of the tray. Tip: Press to return to the main Home screen from any other screen. Tip: You can access the icon glossary and video tutorials by tapping >... - Page 25 Lightly pinch any Home screen with your thumb and index finger to display the Home screen thumbnails. 2. The following options are available: Tap a thumbnail to access the Home screen. to add a new Home screen. Touch and hold a thumbnail and drag it to rearrange the positions of the Home screens.
- Page 26 Move or Remove Items on the Home Screen ► Touch and hold the item you want to move or remove from the Home screen. To move the item, drag it to a new area and release it. To remove the item, drag it to “Remove” at the top of the screen and release it when it turns red.
-
Page 27: Dura Grid
Change the Wallpaper 1. Touch and hold the empty area on the Home screen and then tap Wallpapers. – or – From the Home screen, tap > Settings > Display > Wallpaper. 2. Tap an option: Gallery to set a saved picture in Gallery. Select an album, select an image and zoom in and out on the image to resize it. -
Page 28: Launcher Screens
2. Tap Widgets and slide the Widgets screen to find the nine-position Dura Grid widget. 3. Touch and hold the nine-position Dura Grid widget and move your finger to one of the Home screen thumbnails displayed at the top of the screen. 4. -
Page 29: Status Bar
Status Bar The status bar at the top of the screen provides phone and service status information on the right side and notification alerts on the left. To see the descriptions of the icons displayed on the status bar: ► From the Home screen, tap >... -
Page 30: Enter Text
RINGTONE & NOTIFICATIONS to switch between SOUND ON, VIBRATE, and SILENT. NFC to enable or disable the NFC feature. Touch and hold to access the NFC settings menus. ECO MODE to enable or disable the Eco Mode feature. Touch and hold to launch the Eco Mode app. - Page 31 Swype Keyboard Overview Note: Key appearance may vary depending on the selected application or text field. Phone Basics...
- Page 32 Tip: For tips on using Swype, touch and hold the Swype key and then tap Help > How to Swype. Some of the keys on the Swype keyboard are given below: Description Text mode: Tap to toggle between the Alphabet keyboard and Number &...
- Page 33 ► Tap to select ABC mode. Tap to select Number & Symbol mode. In ABC mode, tap to alter the capitalization: (Unshifted) to enter all letters in a word lowercase. (One-character-shifted) to capitalize only the first letter of a word. (Caps lock) to enter all letters in a word uppercase.
-
Page 34: Google Keyboard
For more information about the Swype keyboard settings, see Swype Keyboard Settings page 147. Voice Input You can use voice input to enter text by speaking anywhere that you can enter text with the touchscreen keyboard. 1. Tap on the keyboard. ... - Page 35 Google Keyboard Overview Note: Key appearance may vary depending on the selected application or text field. Some of the keys on the Google Keyboard are given below: Description Shift: Tap to toggle between lower case and upper case. Caps lock: Double-tap the lower case or upper case shift key. Text mode: Tap to toggle between the Alphabet keyboard and Number &...
- Page 36 Description Next: Tap to go to the next text entry field. Alternate: Tap to toggle between the default Number & Symbol keyboard and additional Number & Symbol keyboard. Go: Tap to go to a Web address. Space: Tap to insert a space. Touch and hold to select the input method. Text Mode ABC mode is primarily used for entering letters while Number &...
-
Page 37: Google Voice Typing
2. Select a language. 3. Tap 4. Type the word you want to add. 5. Type the shortcut to bring up the typed word, if you want. 6. Press . A list of words you have added to the dictionary is displayed. ... - Page 38 To copy and paste the text: 1. Open the application or received message that you want to copy text from. 2. Touch and hold the text body. Selection tabs appear and the currently selected words or characters are highlighted. Drag the tabs to expand or reduce the range of the selected text.
-
Page 39: Phone Calls
Phone Calls With the Verizon network and your phone’s calling features, you can enjoy clear phone calls across the country. Make Phone Calls There are several convenient ways to place calls from your phone. Call Using the Phone Dialpad The most “traditional” way to place a call is by using the phone dialpad. -
Page 40: Call From Recent Calls
Call from Recent Calls The Recent calls list lets you quickly place calls to recent incoming, outgoing, or missed numbers. 1. From the Home screen, tap Phone > Recent calls to display the recent calls list. 2. Tap the phone icon next to the number or contact to place a call. -
Page 41: Call Numbers With Pauses
2. Tap 911 > Call. To call the 911 emergency number when the screen is locked: 1. Tap Emergency call on the screen. 2. Tap 911 > Call. Once an emergency call is placed, your phone will be in Emergency mode for the following five minutes after the call where non-emergency calls cannot be made. -
Page 42: Call Using The Plus (+) Code
Call Using the Plus (+) Code When placing international calls, Plus Code Dialing automatically enters the international access code for your location (for example, 011 for international calls made from the U.S.). 1. From the Home screen, tap Phone > Dialpad 2. -
Page 43: Voice Mail
Voice Mail Your phone comes with the Voice Mail application. Voice Mail allows you to manage your Voice Mail directly from your phone rather than calling to your Voice Mail box. Voice Mail displays a list of your messages and allows you to choose which message(s) to listen to or delete. Or you can choose the traditional Voice Mail service. -
Page 44: Compose And Send A Voice Message
• Add to Contacts to store the sender information to Contacts. • Contacts details to display the sender information saved in Contacts. You may see more options such as Play All Unheard Message, Sort By, View Saved Voice Mail and Settings by tapping on the inbox screen. Compose and Send a Voice Message Record a voice message and send it as an attachment. -
Page 45: Voice Mail (Traditional)
Voice Mail (Traditional) In addition to Voice Mail on page 32, you can also access your Voice Mail regularly through the Voice Mail application. Set Up Voice Mail You should set up your Voice Mail and personal greeting as soon as your phone is activated. Always use a password to protect against unauthorized access. -
Page 46: In-Call Options
In-call Options While you’re on a call, you will see a number of onscreen options. Tap an option to select it. ● Add call: Tap to initiate a 3-way call. ● End call: End the current call. ● Dialpad/Hide: Toggle the appearance of the onscreen dialpad to enter additional numbers such as an extension or access code. -
Page 47: Call Waiting
1. From the Home screen, tap Phone > Dialpad. 2. Enter *67. 3. Enter a phone number. 4. Tap Call. Call Waiting When you’re on a call, Call Waiting alerts you to incoming calls by sounding beeps. Your phone screen informs you that another call is coming in and displays the caller’s phone number (if available). -
Page 48: Call Forwarding
Call Forwarding Call Forwarding lets you forward all your incoming calls to another phone number – even when your phone is turned off. You can continue to make calls from your phone when you have activated Call Forwarding. Note: You are charged a higher rate for calls you have forwarded. To activate Call Forwarding: 1. -
Page 49: Recent Calls
2. Tap the assigned contact you want to replace and tap Replace. 3. Select a contact. If the contact has more than one number, select a number. Recent Calls The Recent calls tab of the Phone application lists max. 500 recent incoming, outgoing, and missed calls. -
Page 50: Call Settings
Clear Recent Calls Use the menu option to clear your recent calls. 1. From the Home screen, tap Phone > Recent calls. 2. Tap > Clear recent calls > OK. Call Settings Your phone’s Call settings menu lets you configure your Voice Mail options and a number of other settings for the phone application. -
Page 51: Vibrate When Ringing
3. Tap OK to assign the ringtone. Vibrate When Ringing Set your phone to ring and vibrate simultaneously. 1. From the Home screen, tap Phone > Menu > Call settings. 2. Select the Vibrate when ringing check box. Incoming Call Select the way to answer incoming calls. -
Page 52: Auto-Retry
2. Tap a message, edit it and tap OK. To restore the default messages, tap > Restore defaults. Auto-retry With Auto-retry enabled, your phone will automatically redial the number it failed to connect to. 1. From the Home screen, tap Phone > Menu > Call settings. 2. -
Page 53: Voice Privacy
Voice Privacy You can enable the enhanced privacy mode. 1. From the Home screen, tap Phone > Menu > Call settings. 2. Select the Voice privacy check box. DTMF Tones Follow the steps below if you need to change the DTMF tones. 1. -
Page 54: Contacts
Contacts The Contacts application lets you store and manage contacts from a variety of sources, including contacts you enter and save directly in your phone as well as contacts synchronized with your Google Account, your PC, and compatible email programs. Contacts List Scroll through the list to view all your contacts. -
Page 55: Add A Contact
Accounts: Enables or disables the auto-sync feature. Settings: Opens the display settings screen. You can select how your contacts are displayed. See Display Options to follow. Display Options Select which contacts to be displayed on Contacts. 1. From the Home screen, tap >... -
Page 56: Save A Phone Number
Tap the location/account above name and select an option to change where to save the contact to. : Tap the picture icon to assign a picture to the contact. See Assign a Stored Picture to a Contact on page 46 or Assign a New Picture to a Contact on page 46. - Page 57 Add or Edit Information for a Contact Follow the instructions to add or edit information for an existing contact. 1. From the Home screen, tap > Contacts. 2. Tap a contact to display it, and tap > Edit. 3. Tap any field you want to change or add. See Add a Contact on page 44.
- Page 58 4. Tap Take photo. 5. Tap to take a picture. You may be prompted to size the picture for use with contacts. Drag the square to frame the portion of the picture to use. Touch and hold the edge of the square and drag it to resize the square and tap Save or SAVE.
-
Page 59: Add A Group Contact
3. Tap an available vibration. The phone vibrates when selected. 4. Tap OK to assign the vibration. Add a Contact to Favorites The Favorites tab of the Phone menu is a listing that can help you quickly access your most used or preferred contacts entries. -
Page 60: Edit A Group Contact
4. Tap Add new and tap the entries you want to add. 5. Tap Done > Save. Edit a Group Contact Manage the group contacts that you have created. Add or Remove a Group Contact Entry, or Rename a Group 1. -
Page 61: Synchronize Contacts
2. Tap In case of emergency > > Edit. 3. Tap the contact you want to replace and tap Change. Select a new contact from the displayed list and tap Save. – or – next to the contact you want to remove and tap Save. Synchronize Contacts Syncing data from your managed accounts lets you add and manage new or existing contacts from your online or remote accounts to your phone. - Page 62 Drive to send the information to Drive. Confirm, or edit, the document title and account and folder to save, and then tap OK. Email to send the information as an email attachment. See Send an Email Message on page 56 for details on sending email. ...
-
Page 63: Accounts And Messaging
Accounts and Messaging With Verizon service and your phone’s messaging capabilities, you have the opportunity to share information through many different channels and accounts, including Gmail (Google), personal and corporate email, text and multimedia messaging, and social networking accounts. Gmail / Google You will need a Google Account to access several phone features such as Gmail, Google+, and the Google Play Store applications. -
Page 64: Sign In To Your Google Account
6. Select the BACKUP & RESTORE and COMMUNICATION options, if prompted, and tap 7. Tap I accept if you agree to the Google Terms of Service and Privacy Policy, Chrome Terms of Service and Privacy Notice, and Google Play Terms of Service. Tap underlined items to read them. -
Page 65: Send A Gmail Message
Select messages and conversations: Tap the box next to the email or conversation. View the inbox of your other Gmail account: • Tap the account name at the top of the screen, and then tap the account you want to view. -
Page 66: Email
Tip: You can also access new messages through the Notifications bar. When a new Gmail message arrives, you’ll see the icon in the status bar. Slide the bar down to display notifications. Tap a message to display it. 3. To reply to or forward a message: ... -
Page 67: Send An Email Message
– or – From the Home screen, tap > Email, if you have not set up any email account yet, and tap Microsoft Exchange. 2. Enter the Email address and Password information and then tap Next. Consult your network administrator for further details: ... -
Page 68: View And Reply To Email
1. From the Home screen, tap > Email > Tip: Tap the account name at the top of the screen to switch to a different email account. 2. Enter email addresses directly in the To field. If you’re sending the email to several recipients, separate the email addresses with a comma. -
Page 69: Manage Your Email Inbox
to reply to the sender of the message. Tap > Reply all to reply to all recipients of the message. 4. After composing your message, tap Manage Your Email Inbox Your email inbox provides management options for viewing, sorting, and deleting your email messages. -
Page 70: Email Account Settings
Reply all: Check to display the Reply all option as default. Swipe to delete: Check to delete a message in conversation list by swiping it. Message format: Select a format to use for messages. Storage for attachment: Select where to save attachment. ... -
Page 71: Message
Sync email: Check to synchronize your email. Sync contacts: Check to synchronize your contacts. Sync calendar: Check to synchronize your calendar. Sync task: Check to synchronize your task. Roaming auto-retrieve: Check to automatically retrieve messages while roaming. ... -
Page 72: Save And Resume A Draft Message
2. On the messaging list screen, tap the message with "Draft" in red. 3. When you finish editing the message, tap Send to send it. For more information on Message+, visit verizonwireless.com/wcms/consumer/products/verizon-messages.html. Social Networking Accounts Stay in touch while on the go with all your social networking accounts. -
Page 73: Youtube
YouTube YouTube™ is a video sharing website on which users can upload and share videos. The site is used to display a wide variety of user-generated video content, including movie clips, TV clips, and music videos, as well as video content such as video blogging, informational shorts and other original videos. -
Page 74: Apps And Entertainment
When you find what you want, you can easily download and install it on your phone. To access the Google Play Store app, you must first connect to the Internet using your phone’s Wi-Fi, Verizon 4G, or data connection and sign in to your Google Account. See Web and Data on page 73 and Sign In to Your Google Account on page 53. -
Page 75: Create A Google Wallet Account
If you selected a paid application, after tapping ACCEPT, follow the onscreen instructions to add a payment method and complete your purchase. Warning: Read the notification carefully! Be especially cautious with applications that have access to many functions or a significant amount of your data. Once you tap ACCEPT on this screen, you are responsible for the results of using this item on your phone. -
Page 76: Request A Refund For A Paid App
My wishlist displays the apps you have bookmarked. To bookmark an app, tap the bookmark icon on the apps detailed screen. Redeem allows you to redeem Google Play Store gift card and promotional code. Note: Tap SETTINGS or HELP for additional options. Request a Refund for a Paid App If you are not satisfied with an app, you can ask for a refund within 15 minutes of the purchase, unless otherwise stated by the app developer. -
Page 77: Uninstall An App
Uninstall an App You can uninstall any app that you have downloaded and installed from the Google Play Store app. 1. From the Home screen, tap > Play Store. 2. Tap on the top left of the screen, or touch and hold the left end of the screen and slide it to the right, and tap My apps. - Page 78 Find Your Current Location Note: Don’t forget to set your location sources. On the Google Maps screen, tap . A blinking blue arrow indicates your current location on the map. This feature is available when the location setting is enabled. See Location Services Settings on page 137.
-
Page 79: Music
► On the Google Maps screen, tap at the bottom left of the screen, or touch and hold the left end of the screen and slide it to the right: Traffic: Provides real-time traffic information. The colors on the roads indicate the traffic conditions. - Page 80 Access the Music Player App 1. From the Home screen, tap > Music Player. 2. Tap the category tab to view its contents. Swipe across the screen to display all tabs. Available categories are: Artists: Displays your music sorted by artist. ...
- Page 81 Repeat is off, Repeating all songs or Repeating current song for cycling through the repeat options. Tap for additional options. Available menus may vary: • Top Menu to go back to the top screen of the app. • Add to playlist to add the item to the playlist.
-
Page 82: Play Music
2. Tap the playlist which contains the item you want to remove from the playlist. 3. Tap next to the item, or touch and hold the item, and tap Remove from playlist. To rename a playlist: 1. On the Music Player app, tap the Playlists tab. 2. -
Page 83: Back Up Your Downloaded Music Files
Back Up Your Downloaded Music Files Verizon recommends you back up your downloaded music files to your computer. Although the downloaded files can only be played on your phone and on your account, backing them up to your computer lets you access the files in case your microSD card is lost or damaged, or if you install a new microSD card. -
Page 84: Web And Data
Web and Data Your phone’s data capabilities let you wirelessly access the Internet or your corporate network through a variety of connections, including Wi-Fi, Verizon 4G LTE, 3G, 2G, and Virtual Private Networks (VPN). The following topics address your phone’s data connections and the built-in Web browser. -
Page 85: Check The Wireless Network Status
Note: Wi-Fi networks are self-discoverable, which means no additional steps are required for your phone to connect to a Wi-Fi network. It may be necessary to provide a user name and password for certain closed wireless networks. Check the Wireless Network Status Check the status of your current wireless network, including speed and signal strength, through the Wi-Fi settings menu. -
Page 86: Data Services
• Scan to scan for Wi-Fi networks. • WPS Pin Entry to set up a Wi-Fi Protected Setup connection by entering the PIN on your router. • Wi-Fi Direct to use a peer-to-peer Wi-Fi connection. The Wi-Fi client and the hotspot operation will be disabled while Wi-Fi direct is enabled. -
Page 87: Launch A Web Connection
The following symbols are used: Icon Description Your phone is connected to the high-speed Verizon 4G LTE network. Your phone is connected to the 3G network. Your phone is connected to the 1X network. Your phone is connected to the EDGE network. -
Page 88: Virtual Private Networks (Vpn)
Virtual Private Networks (VPN) From your phone, you can add, set up, and manage virtual private networks (VPNs) that allow you to connect and access resources inside a secured local network, such as your corporate network. Prepare Your Phone for VPN Connection Depending on the type of VPN you are using at work, you may be required to enter your login credentials or install security certificates before you can connect to your company’s local network. -
Page 89: Connect To Or Disconnect From A Vpn
4. Tap Save. The VPN is then added to the VPNs section of the VPN settings screen. Connect to or Disconnect from a VPN Once you have set up a VPN connection, connecting and disconnecting from the VPN is easy. Connect to a VPN >... - Page 90 Scrolling As with other parts of your phone’s menu, you’ll have to drag up and down to see everything on some websites. To scroll through a website’s page: ► In a single motion, touch and drag across or up and down a page. Selecting To select onscreen items or links: ►...
-
Page 91: Chrome Menu
Tip: You can also enter a search term into the field to perform a Web search. 2. Tap Go on the keyboard to launch the new page. Chrome Menu The Chrome menu offers additional options to expand your use of the Web on your phone. Open the Chrome Menu The Chrome menu may be opened anytime you have an active data session, from any page you are viewing. -
Page 92: Select Text On A Web Page
● Help & feedback: Opens a support page for Chrome. Note: The Chrome menu options may vary depending on the version installed on your phone. Select Text on a Web Page You can highlight text on a Web page and copy it, search for it, or share it. 1. - Page 93 Autofill forms: Saves texts to auto-fill in web forms. You can store your profile and credit card information. Save passwords: Saves your passwords. ● ADVANCED: Privacy: • Navigation error suggestions: Shows suggestions for alternatives when a web address does not resolve or a connection cannot be made.
-
Page 94: Manage Bookmarks
Bandwidth management: • Preload webpages: Selects when to preload webpages. • Reduce data usage: Allows to compress pages you visit before downloading them. About Chrome: Provides the information on Chrome. Manage Bookmarks Make browsing easier by setting up and using custom bookmarks. View Bookmarks ►... -
Page 95: Mobile Hotspot
Mobile Hotspot Mobile Hotspot allows you to turn your phone into a Wi-Fi hotspot. The feature works best when used in conjunction with 4G data services (although 3G service can also be used). Set Up Mobile Hotspot > Settings > More… > Tethering & Mobile Hotspot. 1. -
Page 96: Tethering
Connect to Mobile Hotspot 1. Enable Wi-Fi (wireless) functionality on your target device (laptop, media device, etc.). 2. Scan for Wi-Fi networks from the device and select your phone hotspot from the network list. 3. Select this device and follow your onscreen instructions to enter the passkey (provided on the Mobile Hotspot page). -
Page 97: Camera And Camcorder
Camera and Camcorder You can use the camera or camcorder to take and share pictures and videos. Your phone comes with an 8.0 megapixel back camera and 2.0 megapixel front camera with an autofocus feature that lets you take sharp pictures and videos. Use the Camera App The following topics teach you how to take pictures and record videos. -
Page 98: Take A Picture Or Record A Video
● Storage Area: Displays where the pictures and videos will be saved; microSD or phone. ● Available Shots/Time: Displays remaining shots/time with the current settings. ● Zoom Slider: Adjusts your zoom level. ● Thumbnail: Displays the thumbnail of the latest image. Tap to view and manage. ●... -
Page 99: Review Screen
Review Screen After taking a picture or video, tap the thumbnail image to see the item in the review screen. From there, you can instantly share your photos or videos (see Share Pictures and Videos page 94) or tap the Gallery icon to edit your photos or replay your videos (see View Pictures and Videos Using Gallery on page 91). -
Page 100: Camera And Camcorder Settings
• Set picture as: Sets the picture as the contact photo or wallpaper. • Details: Shows the details of the picture. • Print: Displays the printing menu. Camera and Camcorder Settings You can adjust the settings of your camera and camcorder by tapping Settings on the viewfinder screen. - Page 101 Picture size: Select from 8.0MP(3264x2448), w6.0MP(3264x1836), 5.0MP(2560x1920), 3.2MP(2048x1536), 2.0MP(1600x1200), w1.0MP(1280x720), 0.8MP(1024x768), or VGA(640x480). Video size: Select from HD(1080p), HD(720p), DVD(480p), VGA, or MMS(60s). Focus settings: Select from Continuous AF, Face detection, Macro, or Infinity. Auto exposure: Select from Center weighted, Frame average, or Spot metering. ...
-
Page 102: View Pictures And Videos Using Gallery
View Pictures and Videos Using Gallery Using the Gallery application, you can view pictures and watch videos that you’ve taken with your phone’s camera, downloaded, or copied onto your microSD card or phone’s internal memory. For pictures that are on your microSD card or phone’s internal memory, you can do basic editing such as rotating and cropping. -
Page 103: View Pictures And Videos
Note: Depending on the number of pictures stored, it may take some time for Gallery to load all your albums on the screen. Close the Gallery App ► While in the Gallery screen, press View Pictures and Videos After selecting an album, you can browse through the pictures and videos of that album in grid view. -
Page 104: Edit A Picture
• Delete: Deletes the displayed image. Tap OK to confirm the deletion. • Slideshow: Starts the slideshow of the stored pictures. • Edit: Provides some editing options. See Edit a Picture to follow. • Rotate left/Rotate right: Rotates the picture. •... -
Page 105: Share Pictures And Videos
Trim: Displays options to crop, straighten, rotate, etc. the picture. Effect: Displays options to adjust the exposure, contrast, sharpness, etc. : Undoes an action. : Redoes an action. : Displays options for resetting the image to the original state, displaying the applied effects to the image, exporting the image, etc. -
Page 106: Send Pictures Or Videos By Message
2. Tap > Gmail or Email. If you cannot find it, tap See all. 3. Compose your message and then tap Note: If you have multiple accounts, the default account will be used. For more information about sending email and Gmail, see Send an Email Message on page 56 Send a Gmail Message... -
Page 107: Share Pictures On Picasa
Share Pictures on Picasa You need to be signed in to a Google Account to upload pictures to the Picasa™ picture organizing service. 1. Touch and hold the picture to place a check mark on it. Tap multiple pictures to select them. -
Page 108: Tools And Calendar
Tools and Calendar Learn how to use many of your phone’s productivity-enhancing features. Calendar Use Calendar to create and manage events, meetings, and appointments. Your Calendar helps organize your time and reminds you of important events. Depending on your synchronization settings, your phone’s Calendar stays in sync with your Calendar on the Web, or the corporate calendar. -
Page 109: Invite Guests To Your Calendar Event (Google Account Only)
7. Enter email addresses to invite guests to your event and add the event descriptions. See Invite Guests to Your Calendar Event (Google Account Only) on page 98. 8. If the event occurs on a regular basis, tap the REPETITION field and set the frequency. 9. -
Page 110: Calendar Event Alerts
1. Open Calendar and create a new event. Tap the Calendar field and then select your Google Account (or one of your other Google Calendars). See Add an Event to the Calendar on page 97. 2. Add details about the event, such as date and time, location, and more. 3. -
Page 111: View Calendar Events
• to access the settings screen of the event. • > OK to delete the event. Press to keep the reminder pending in the notifications area of the status bar. To set reminder settings: ► On any Calendar view, tap > Settings > General settings, and set the items under NOTIFICATIONS &... -
Page 112: Erase Calendar Events
2. Open the calendar event details: In Agenda, Day, and Week views, tap the calendar event you want to edit. In Month view, tap the date where the calendar event occurs, and then tap the calendar event. 3. Tap . -
Page 113: Clock
Synchronize a Google Calendar 1. From the Home screen, tap > Settings > Google. 2. Tap the account you want to sync with. 3. Select the Calendar check box. 4. Press > > Calendar. 5. Tap > Calendars to display > Calendars to sync. 6. -
Page 114: Alarm
Tap Menu > Night mode. Tip: Tap the screen to cancel night mode. World Clock You can add the time from around the globe on the Clock screen. 1. From the Home screen, tap > Clock. 2. Tap the Clock tab to display the Clock screen, if necessary. 3. -
Page 115: Timer
2. Tap the Alarms tab to display the Alarms screen, if necessary. Note: When you first open the alarms, two alarms are set up by default and ready for you to customize. These alarms are turned off by default. 3. Tap an existing alarm time to change the settings. –... -
Page 116: Stopwatch
Reset to return to the start of the countdown. Delete to delete the timer. Add new to add a new timer. Stopwatch You can use your phone as a stopwatch. 1. From the Home screen, tap > Clock. 2. -
Page 117: Sound Recorder
2. Tap the screen to switch the light on and off. Sound Recorder The Sound Recorder app lets you record sound and save it as an audio file on your phone or the inserted microSD card. Record Sound 1. From the Home screen, tap >... -
Page 118: Voice Services
to delete a file or files. Tap a file or files to select the file(s) you want to delete and tap > OK. To select all files on the list, tap next to > Select all. Tap next to each file: •... -
Page 119: Text-To-Speech
For example, say “Open Calendar,” to open the Calendar. The application screen is displayed. Open a Settings Menu with the Voice Dialer ► When prompted to speak, say “Open [settings menu name].” For example, say “Open sound settings.” The Sound settings menu screen is displayed. -
Page 120: Eco Mode
Eco Mode The Eco Mode allows you to save battery life while using your phone. 1. From the Home screen, tap > Eco Mode. 2. Tap an option to enable or disable the Eco Mode: On: Enables the Eco Mode. The Eco Mode On icon appears on the status bar when selected. -
Page 121: The Bluetooth Settings Menu
Tap the ON icon next to Bluetooth to turn Bluetooth off. Note: Turn off Bluetooth when not in use to conserve battery power, or in places where using a wireless phone is prohibited, such as aboard an aircraft and in hospitals. The Bluetooth Settings Menu The Bluetooth settings menu gives you access to information and controls for your phone’s Bluetooth feature. -
Page 122: Reconnect A Headset Or Car Kit
To listen to music with your headset or car kit, the headset or car kit must support the A2DP Bluetooth profile. Important: Perform the pairing process at a secure location. Important: It is recommended to use a passcode of at least eight digits for pairing with a device without a pre-defined PIN. -
Page 123: Disconnect Or Unpair From A Bluetooth Device
3. Make sure that the headset is discoverable. 4. Tap the headset’s name in the PAIRED DEVICES list. 5. If prompted to enter a passcode, try 0000 or 1234, or consult the headset or car kit documentation to find the passcode. 6. - Page 124 1. Set the receiving device to discoverable mode. You may also need to set it to “Receive Beams” or “Receive Files”. Refer to the device’s documentation for instructions on receiving information over Bluetooth. 2. On the phone, open the application that contains the information or file you want to send. For example, if you want to send a saved picture, from the Home screen, tap >...
-
Page 125: Supported Bluetooth Profiles
6. When your phone receives a file transfer request notification, slide down the Notifications panel, tap the notification, and then tap Accept. 7. When a file is transferred, a notification is displayed. To open the file immediately, slide down the Notifications panel, and then tap the relevant notification. When you open a received file, what happens next depends on the file type: ●... -
Page 126: Turn Nfc On Or Off
To use NFC technology on your phone, your phone must be within approximately 0.78 in. (2 cm) of the NFC-enabled smartphone, smart accessory, NFC-enabled access point, or smart tag that you want to exchange information with. When information is transferred over an NFC connection, your smartphone vibrates. -
Page 127: Microsd Card
2. Bring your phone close to another NFC-enabled device, typically back to back aiming the NFC antenna, and then tap your screen. The app determines what gets beamed. microSD Card A microSD™ card is an optional accessory that allows you to store images, videos, music, documents, and voice data on your phone. - Page 128 3. Press around the edges of the cover to the microSD card/SIM card slots to ensure that it is securely closed. Warning: Be sure all ports and covers are properly sealed to maintain the phone's waterproof capability. To remove a microSD card: 1.
-
Page 129: View The Microsd Card Memory
Note: You can easily damage the microSD card by improper operation. Please be careful when inserting, removing, or handling the microSD card. Note: Make sure your battery is fully charged before using the microSD card. Your data may become damaged or unusable if the battery runs out while using the microSD card. View the microSD Card Memory The Storage settings menu gives you access to your microSD card memory information. -
Page 130: File Manager
3. On your computer, the connected phone is recognized as a portable media device. Navigate to the device and select SD card. 4. Manage the data as you wish, unmount the phone as required by your computer's operating system to safely remove your phone, and disconnect the phone from the computer. -
Page 131: Supported Formats
Storage capacity: Opens the Storage settings menu. See Storage Settings on page 135. Reload: Reloads the data. ► Touch and hold a folder or file for the following options: Share: Shares the file using applications, such as Bluetooth and Email. ... - Page 132 Check for new software update: Checks if there is any update for your phone. Tools and Calendar...
-
Page 133: Settings
Settings The following topics provide an overview of items you can change using your phone’s Settings menus. Airplane Mode Airplane Mode allows you to use many of your phone’s features, such as Gallery, Camera, and Music, when you are on an airplane or in any other area where making or receiving calls or data is prohibited. - Page 134 2. Tap and select the Auto-sync data check box. View Data Usage 1. From the Home screen, tap > Settings > Data usage. 2. Confirm Mobile data access is set to on. 3. Tap next to Data usage cycle to change the period of time for which the chart will display the data usage.
-
Page 135: Maximzr Settings
Tap the orange line, select the limit by scrolling the value and then tap Set. When your data usage reaches the set level, your phone will alert you. Restrict the Background Data Usage You can restrict the background data usage. 1. -
Page 136: Default Sms App
Default SMS App When your phone is installed with more than one SMS app, you can specify which one to use as default for sending and receiving SMS messages. > Settings > More… > Default SMS app. A list of all 1. -
Page 137: Roaming Settings
Roaming is the ability to make or receive calls and use data services when you’re off the Verizon network. Roaming Icon Your display screen always lets you know when you’re off the Verizon network. Anytime you are roaming, the phone displays the roaming icon Settings... - Page 138 When you’re roaming on other networks, your call quality and security will be similar to the quality you receive when making calls on the Verizon network. However, you may not be able to access certain features, such as data services, depending on the available network.
-
Page 139: Emergency Alerts
Emergency Alerts Your phone is compatible with the federally supervised cell phone alert services to send out broadcast SMS messages for public warning: To display the Emergency Alerts: ► From the Home screen, tap > Emergency Alerts. To configure the Emergency Alerts settings: 1. -
Page 140: Sound Settings
Tap Add and select a sound data. 3. Tap OK to assign the ringtone. To buy ringtones: 1. From the Home screen, tap > Settings > Sound > Phone ringtone. 2. Tap Buy Ringtone. The Verizon Tones screen opens. 3. Follow the onscreen instructions. Settings... -
Page 141: Vibrate Pattern
Vibrate Pattern Select a vibration pattern. 1. From the Home screen, tap > Settings > Sound > Vibrate pattern. 2. Tap a vibrate pattern from the available list. Your phone briefly vibrates when selected. 3. Tap OK to assign the vibrate pattern. Vibrate When Ringing Set your phone to ring and vibrate simultaneously. -
Page 142: Dial Pad Touch Tones
Dial Pad Touch Tones Play tones when using the dialpad. 1. From the Home screen, tap > Settings > Sound. 2. Select the Dial pad touch tones check box. Touch Sounds Play sounds when making an onscreen selection. 1. From the Home screen, tap >... -
Page 143: Sd Card Notifications
1. From the Home screen, tap > Settings > Sound > Emergency tone. 2. Select Off, Alert, or Vibrate. SD Card Notifications Set a notification tone to sound when SD card is mounted or unmounted. 1. From the Home screen, tap >... -
Page 144: Auto-Rotate Screen
Auto-Rotate Screen Your phone is capable of automatically changing the orientation of some onscreen content. With this feature, you can view the screen in either portrait or landscape orientation by turning the phone sideways. By default, the screen orientation automatically changes when the phone is rotated. -
Page 145: Font Size
To see the preview, tap START NOW. Font Size Choose the font size of the screen as you like. 1. From the Home screen, tap > Settings > Display > Font size. 2. Select your favorite size. Key Backlight Select the delay time before the key backlight automatically turns off. -
Page 146: Storage Settings
2. Tap Do nothing > OK if you do not want to assign any function to the key. – or – Select a function you want to assign to the key and tap OK. The assigned function works when you press and hold the key. Storage Settings The Storage settings menu lets you manage the storage on your phone and provides options for your microSD card. -
Page 147: Battery Settings
Unmount the USB Storage Unmount the USB storage so that you can safely remove it. 1. From the Home screen, tap > Settings > Storage > Unmount USB storage. 2. Read the message and tap OK. Erase the Data on the USB Storage Warning: You cannot retrieve the data once deleted. -
Page 148: Application Manager
Media Sync Mode to let your phone transfer media files on Windows or by using Android File Transfer on Mac (see www.android.com/filetransfer). Internet Connection Mode to let your phone connect to the Internet through an Ethernet/LAN adapter or modem. ... -
Page 149: Lock Screen Settings
Location Information through software, widgets or peripheral components you choose to download, add or attach to your wireless device or through web access, messaging capabilities or other means and you are authorizing Verizon Wireless to collect, use and disclose your Location Information as appropriate to provide you with any location services that you enabled. - Page 150 Important: Highest security level protection (password protection) and frequent change of password are recommended to protect your phone and data from unauthorized access. Use Face Unlock 1. From the Home screen, tap > Settings > Lock screen > Screen lock > Face Unlock.
-
Page 151: Improve Face Matching
Use PIN 1. From the Home screen, tap > Settings > Lock screen > Screen lock > PIN. 2. Enter a PIN, tap Continue, re-enter your PIN, and tap OK to save the setting. To unlock the screen with PIN: ►... -
Page 152: Liveness Check
5. When the message "Face captured." appears, tap Done. Liveness Check Enabling this option requires you to blink when unlocking the screen with the Face Unlock feature. From the Home screen, tap > Settings > Lock screen. 2. Select the Liveness check check box. 3. -
Page 153: Owner Information
1. From the Home screen, tap > Settings > Lock screen. 2. Select the Enable widgets check box. Owner Information You can display some text information on the locked screen. 1. From the Home screen, tap > Settings > Lock screen > Owner info. 2. -
Page 154: Set Up Sim Card Lock
2. With your phone connected to the power source, on the Home screen, tap > Settings > Security > Encrypt & Decrypt data > Phone. 3. Read the message and tap Next. 4. Enter the PIN or password and tap Next. 5. -
Page 155: Device Administrators
1. From the Home screen, tap > Settings > Security. 2. Clear the Make passwords visible check box. Device Administrators You can enable or disable the authority to be a device administrator of certain applications. If disabled, you will typically lose some functionality in those applications, such as the ability to sync new email or calendar events to your phone. -
Page 156: Language & Input Settings
Install from SD Card You can install encrypted certificates from the SD card. 1. From the Home screen, tap > Settings > Security > Install from SD card. 2. Tap an available certificate. 3. Follow the onscreen instructions. Clear Credentials You can remove all the credentials on your phone. -
Page 157: Default Text Input
Default Text Input You can select the default method you will use when accessing the keyboard. See Touchscreen Keyboards on page 19. Google Keyboard Settings You can customize the Google Keyboard settings as you like. 1. On the Google Keyboard, touch and hold the key immediately left to the space key and tap Google Keyboard Settings. -
Page 158: Swype Keyboard Settings
Show correction suggestions: Tap to select when correction suggestions are displayed. Enable gesture typing: Check to input a word by sliding through the letters. Dynamic floating preview: Check to display the word suggestion while using the gesture typing. ... -
Page 159: Google Voice Typing Settings
• Long-press delay: Tap to set the time needed to select alternate characters. • Show complete trace: Check to display the complete Swype path. • Auto-correction: Check to automatically correct mistyped words. • Auto-capitalization: Check to automatically capitalize the first letter of sentence- initial words where available. -
Page 160: Voice Search Settings
Offline speech recognition: Tap to download the speech recognition data for offline use. Voice Search Settings You can configure the settings of the voice search feature. 1. From the Home screen, tap > Settings > Language & input > Voice Search. 2. -
Page 161: Backup And Restore
● All other email and social networking accounts ● System and application data and settings ● Downloaded applications Backup and Restore Back up your phone's data and settings before resetting your phone. To set your backup and restore options: 1. From the Home screen, tap >... -
Page 162: Accounts Settings
Accounts Settings Add and manage all your email, social networking, and picture and video sharing accounts. Set Up a New Account 1. From the Home screen, tap > Settings > Add account. 2. Tap an account type such as Corporate, Email, Google, etc. 3. -
Page 163: Accessibility Settings
6. Tap Select time zone, and then select a time zone from the onscreen list. Scroll down the list to view additional time zones. 7. Select the Use 24-hour format check box to use the 24-hour format. 8. Tap Choose date format to select how the date information is displayed on your phone. Accessibility Settings The Accessibility menu lets you enable and manage accessibility-related applications. - Page 164 Magnification Gestures You can zoom in and out by triple-tapping the screen. 1. From the Home screen, tap > Settings > Accessibility > Magnification gestures. 2. Read the information and tap the OFF icon to enable the feature. Large Text Use large fonts on the screen.
-
Page 165: Printing
Touch & Hold Delay Set the delay time when the screen recognizes the touch and hold operation. 1. From the Home screen, tap > Settings > Accessibility > Touch & hold delay. 2. Select Short, Medium, or Long. Printing You can print the data on your phone. 1. - Page 166 All features, functionality and other specifications, as well as the information contained in this guide are based upon the latest available information and are believed to be accurate at the time of printing. Kyocera Communications, Inc. reserves the right to change or modify any information or specifications without notice or obligation.
- Page 167 The Bluetooth word mark and logos are registered trademarks owned by Bluetooth SIG, Inc. and any use of such marks by Kyocera Corporation is under license. Other trademarks and trade names are those of their respective owners. Bluetooth QD ID (Qualified Design ID): 54459 Swype and the Swype logos are registered trademarks or trademarks of Nuance Communications, Inc.
- Page 168 4009869 Conforms to ANSI/ISA 12.12.01 & UL 60950-1 Copyright & Trademarks...
- Page 169 Index 3-Way calling, 36 navigation, 78 Accessibility select text on a Web page, 81 settings, 152 Calculator, 105 Account Calendar, 97 create, 151 add a task, 98 manage, 151 add an event, 97 Airplane Mode, 122 edit events, 100 Alarm, 103 erase events, 101 Android Beam, 115 event alerts, 99...
- Page 170 speed dial numbers, 29 auto-rotating screen, 133 TTY mode, 41 battery percentage, 134 vibrate, 40 brightness, 132 Voice Mail settings, 40 daydream, 133 voice privacy, 42 font size, 134, 153 Call Forwarding, 37 key backlight, 134 Call Waiting, 36 settings, 132 Caller Name ID, 35 sleep, 133 Camera...
- Page 171 Google Account, 52 format, 118 create, 52 insert, 116 sign in to, 53 remove, 117 Google Keyboard, 23 slot, 3 text mode, 25 unmount, 118 user dictionary, 25 use as a media device, 118 Google Maps, 66 view the memory, 118 Google Play, 63 Mobile hotspot, 84 install apps, 63...
- Page 172 Programmable key, 2, 134 touch screen, 131 Proximity sensor, 2 Sound Recorder, 106 Quick settings, 18 Speaker, 2 Recent apps key, 2 Speaker key, 2 Recent calls, 38 Speed dialing, 29 clear, 39 set up, 37 filter, 38 Spread, 11 view, 38 Status bar, 18 Ringtone, 129...
- Page 173 Vibrate settings, 33 pattern, 130 Voice Mail (Traditional), 8, 34 when ringing, 130 notification, 34 when typing, 131 retrieve, 34 Video set up, 9 record video, 86 Voice search, 108, 149 settings, 89 Volume key, 2 view, 91 Volumes, 129 Virtual Private Networks (VPN), 77 Wallpaper, 16 add a connection, 77...