Table of Contents
Advertisement
Advertisement
Table of Contents

Related Manuals for Radio Shack Passive


Summary of Contents for Radio Shack Passive
- Page 1 Passive Infrared Sensor Alarm with Keychain Remote...
-
Page 2: Table Of Contents
ˆ Contents Features ..............3 Preparation ............5 Installing Batteries ..........5 Setting the Security Code ........9 Resetting the Security Code ......13 Installation ............13 Choosing a Mounting Location ......14 Temporarily Placing the Sensor Alarm ....15 Mounting the Sensor Alarm ...... -
Page 3: Features
Features Your RadioShack Passive Infrared Sensor Alarm is a high-quality, battery-operated security device. It uses a passive infrared (PIR) motion sensor to detect in- truders and activate a built-in alarm. The sensor alarm’s features include: Wireless RF (Radio Frequency) Operation — pro- vides maximum reliability with no wiring required. - Page 4 Chime — lets you select a more pleasant sounding doorbell-type chime as the audible alarm. Panic Alarm — sounds the alarm immediately if you press on the main unit or if you press both PANIC (at the same time) on the remote control. DISARM RF Remote Control Keychain —...
-
Page 5: Preparation
ˆ Preparation INSTALLING BATTERIES The main unit of your sensor alarm requires four AA batteries (not supplied) for power. For the best perfor- mance and longest life, we recommend alkaline bat- teries (available at your local RadioShack store). Warning: Dispose of old batteries promptly and prop- erly. - Page 6 management authorities for information on recycling or disposal programs in your area or call 1-800-822- 8837. Some options that might be available are: mu- nicipal curbside collection, drop-off boxes at retailers such as your local RadioShack store, recycling collec- tion centers, and mail-back programs. 1.
- Page 7 2. Place the batteries in the compartment and on top of the attached ribbon, as indicated by the polarity symbols (+ and –) marked inside. Note: As soon as you press the last battery in place, the alarm sounds a loud chirp and both the red and the green indicators light briefly.
- Page 8 replace these batteries, be sure to apply the cur- rent security code to the remote control so the sensor alarm will recognize the remote signals (see “Remote Control” on Page 11). When the main unit’s indicator flashes LOW BATT about every 5 seconds, or if the sensor alarm stops operating properly, replace the batteries.
-
Page 9: Setting The Security Code
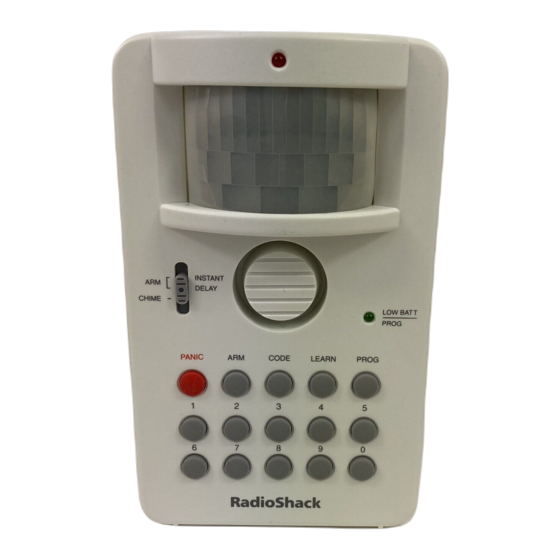
SETTING THE SECURITY CODE Main Unit You can use a four-digit security code to disarm the alarm. The default code is 1234. Follow these steps to set a new security code at any time. Red Indicator Green Indicator INSTANT DELAY CHIME LOW BATT PROG... - Page 10 2. If necessary, disarm the sensor alarm (the red indicator should not be flashing) by entering the current security code. 3. Press . The sensor alarm beeps once and PROG the green PROG indicator lights. 4. Press . The sensor alarm beeps twice and CODE the PROG indicator flashes slowly.
-
Page 11: Remote Control
“Arming and Disarming the Sensor Alarm” on Page 19). Remote Control Each time you remove and replace the batteries in the main unit, you must program the main unit to rec- ognize the remote control’s signals. If you change the security code, there is no need to reprogram the main unit;... - Page 12 4. Enter your four-digit security code. The sensor alarm beeps three times and its PROG indicator flashes quickly. 5. Press on your remote control. DISARM The alarm’s PROG indicator lights steadily and the sensor alarm chirps, indicating that it received the remote signal. DISARM PANIC 6.
-
Page 13: Resetting The Security Code
es the remote signals (see “Arming and Disarming the Sensor Alarm” on Page 19). RESETTING THE SECURITY CODE If you ever forget your security code, you can easily reset it to the default code (1234) by removing and re- installing the main unit’s batteries (see “Installing Bat- teries”... -
Page 14: Choosing A Mounting Location
• out of strong drafts, like those caused by central heating vents or air conditioners or air movement around fireplaces, exterior walls and windows, and refrigerators • so it does not detect your pet’s movements CHOOSING A MOUNTING LOCATION The sensor alarm’s main unit is designed to be mounted on a smooth, flat wall surface. -
Page 15: Temporarily Placing The Sensor Alarm
TEMPORARILY PLACING THE SENSOR ALARM Before you permanently mount the sensor alarm, temporarily place it at the selected location so you can check the coverage area. You might need to check several different locations to find the best one. Place the main unit on a stepladder (for example) at the recommended height, then move the stepladder to various locations in the room(s) you want to pro- tect. - Page 16 3. Set the main unit’s slide switch to . A door- CHIME bell-type chime immediately sounds. INSTANT DELAY CHIME LOW BATT PROG 4. Walk around in the protected area. When the sensor alarm detects your motion, the chime sounds again. •...
-
Page 17: Mounting The Sensor Alarm
MOUNTING THE SENSOR ALARM After you determine the best location for your sensor alarm, follow these steps to mount it on the wall. 1. If necessary, disarm the sensor alarm (the red indicator should not be flashing) by entering the current security code. - Page 18 4. Turn the main unit clockwise (so the right screw head slides into the curved groove) until it is secure. Installation...
-
Page 19: Operation
ˆ Operation We recommend that you test the sensor alarm at least once a month by arming and disarming it as de- scribed in the following section. ARMING AND DISARMING THE SENSOR ALARM Arming To have the alarm’s siren sound as soon as the sen- sor detects motion, set the main unit’s slide switch to INSTANT INSTANT... - Page 20 To have the alarm’s siren sound about 30 seconds af- ter the sensor detects motion, set the slide switch to DELAY To arm the sensor alarm, press on the main unit or on the remote control. At either the INSTANT setting, you have 10 seconds to leave the sensor alarm’s coverage area.
- Page 21 the indicator flashes every second for about 30 sec- onds, then the alarm siren sounds and the indicator stays on. The alarm siren sounds for up to 2 minutes. To stop it sooner, disarm the alarm (see “Disarming”). If you do not disarm the alarm, the sensor alarm is still armed and the siren will sound again the next time the sen- sor detects motion.
-
Page 22: Using The Chime Alarm
Notes: • You can temporarily silence the alarm only once each time you disarm it. • If entering your security code does not disarm the sensor alarm, try entering the default code (1234). If that code does not disarm the alarm either, remove the sensor alarm from the wall and remove and reinstall the batteries. -
Page 23: Using The Panic Alarm
sounds every time the sensor detects motion. To turn off the chime, set the slide switch to either INSTANT DELAY USING THE PANIC ALARM If you want to startle an intruder (for example) by in- stantly sounding the alarm siren, simply press PANIC on the main unit or press on the re-... -
Page 24: Care
ˆ Care To enjoy your RadioShack Passive Infrared Sensor Alarm for a long time: • Keep the sensor alarm and remote dry. If they do get wet, wipe them dry immediately. • Use and store the sensor alarm and remote only in normal temperature environments. -
Page 25: Replacing The Remote Control's Battery
REPLACING THE REMOTE CONTROL’S BATTERY Your sensor alarm’s remote control uses the supplied 12V alkaline battery for power. When the remote con- trol’s indicator lights dimly or not at all when you press , or if the remote control stops operat- DISARM ing properly (the main unit cannot receive the remote control’s signals), replace the battery. -
Page 26: Fcc Statement
Note: You do not need to reset the remote control or main unit after replacing the remote’s battery. Cautions: • Dispose of the old battery promptly and properly. Do not burn or bury it. • Always remove an old or weak battery. Batteries can leak chemicals that can destroy electronic parts. -
Page 27: Specifications
radio communications. However, there is no guaran- tee that interference will not occur in a particular in- stallation. If this equipment does cause harmful interference to radio or television reception, which can be determined by turning the equipment off and on, the user is encouraged to try to correct the inter- ference by one or more of the following measures: •... - Page 28 Operating Ambient Temperature ......32–122°F (0–50°C) Operating Relative Humidity ......Less than 95% Auto Alarm Reset Time ......120 ±5 Seconds Siren Output Sound Pressure Level: About 108 dB at 1 Foot (34 cm) Internal PIR Detection Area ......30 Feet (9.1 m) at a 110°...
- Page 29 Limited Ninety-Day Warranty This product is warranted by RadioShack against manufacturing defects in material and workmanship under normal use for ninety (90) days from the date of purchase from RadioShack company-owned stores and authorized RadioShack franchisees and dealers. EXCEPT AS PROVIDED HEREIN, RadioShack MAKES NO EXPRESS WARRANTIES AND ANY IMPLIED WARRANTIES, INCLUDING THOSE OF MERCHANTABILITY AND FITNESS FOR A PARTICULAR PURPOSE, ARE LIMITED...
- Page 30 (continued) (c) refund the purchase price. All replaced parts and products, and products on which a refund is made, become the property of RadioShack. New or reconditioned parts and prod- ucts may be used in the performance of warranty service. Re- paired or replaced parts and products are warranted for the remainder of the original warranty period.