Advertisement
Quick Links
Advertisement

Related Manuals for Peavey SANPERA I

Summary of Contents for Peavey SANPERA I
- Page 1 SANPERA I ™ ® SANPERA Player`s Handbook...
- Page 2 SANPERA I ™ ® Welcome Thank you for purchasing the Sanpera foot controller for your VYPYR amplifier. ® We are certain you will enjoy having the control of your VYPYR at your feet.
- Page 3 Note: Your Sanpera I is powered by your VYPYR amplifier and ® requires the special 8-pin MIDI cable included with your Sanpera in order to function correctly.
-
Page 4: Preset Mode
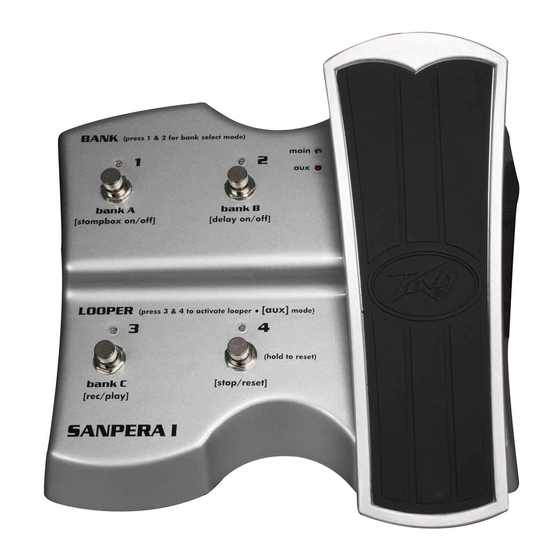
SANPERA I ™ ® The Sanpera I operates in three modes, PreSeT mode, LooPer mode and Bank SeLecT mode. The functions of buttons 1-4 will vary depending on which mode you are in. PRESET MODE When you first plug your Sanpera I into the amplifier (using the provided 8 pin MIDI cable) the pedal will default to PRESET mode. - Page 5 BANK SELECT MODE The Sanpera I allows you to access all three BANKS of presets found on your VYPYR amplifier. To ® enter BANK SELECT mode, press buttons 1 and 2 simultaneously. Three LEDs will illuminate to indicate you are in BANK SELECT mode. Buttons 1, 2 and...
- Page 6 SANPERA I ™ ® LOOPER CONTROLS To enter LOOP mode, press buttons 3 and 4 simultane- ously. Upon entering LOOP mode all active LEDs will change from red to green, indicating you are in LOOP mode. In the case, the Stompbox and Delay effects are set to OFF (See Looper controls items 1 and 2), you may not see any active LEDs upon entering LOOP mode.
-
Page 7: Delay On/Off
LOOPER CONTROLS 1. Stompbox On/Off In LOOP mode this button allows you the ability to turn on and off the STOMPBOX selected (if any) on your VYPYR amplifier. If the corresponding LED is green, ® the effect is active; if the LED is off, the effect is also off. 2. -
Page 8: Expression Pedal
SANPERA I ™ ® 5. Main/AUX Indication LED These LEDs indicate whether the pedal is in MAIN mode or AUX MODE. Depress the toe area of the expression pedal to switch between modes. The default setting of the expression pedal is to control the volume of the am- plifier. -
Page 9: Calibration Mode
CALIBRATION MODE: Occasionally it may be necessary to re-calibrate your expression pedal. To enter CALIBRATION MODE hold button 4 and press button 1. Upon entering CALIBRA- TION mode the LED above button 1 will be green. This green LED indicates that you need to press button 1 after each step of the calibration process. - Page 10 1 year Tubes and Meters 90 days Cables Limited Lifetime [*Denotes additional warranty period applicable if optional Warranty Registration Card is completed and returned to Peavey by original retail purchaser within 90 days of purchase.]...
- Page 11 What Peavey Will Do We will repair or replace (at Peavey's discretion) products covered by warranty at no charge for labor or materials. If the product or component must be shipped to Peavey for warranty service, the consumer must pay initial shipping charges. If the repairs are covered by warranty, Peavey will pay the return shipping charges.
- Page 12 Peavey Electronics Corporation • 5022 Hartley Peavey Drive • Meridian, MS 39305 Phone: (601) 483-5365 • Fax: (601) 486-1278 • www.peavey.com...