Table of Contents
Advertisement
Advertisement
Table of Contents
Troubleshooting

Related Manuals for Vision Fitness R2850HRT


Summary of Contents for Vision Fitness R2850HRT
- Page 1 O w n e r’s G u i d e R2850HRT E3800HRT COMMERCIAL FITNESS BIKES...
- Page 4 Bike will be an important tool in helping your members achieve this exercise habit. This Owner’s Guide provides you with basic information on using this VISION FITNESS Bike. A more complete knowledge of your new Bike will assist you in helping your members achieve their goals.
-
Page 5: Table Of Contents
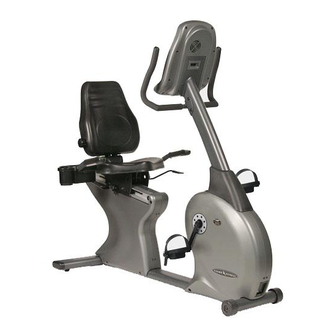
SERVICE AND TROUBLESHOOTING E3800HRT SEAT POST ADJUSTMENT . 8 PREVENTATIVE MAINTENANCE ..31 R2850HRT SEAT RAIL ADJUSTMENT, TROUBLESHOOTING ... . 32 LUMBAR ADJUSTMENT, TILTING SEAT . 9 OBTAINING SERVICE . - Page 6 CONSOLE MAST HANDLEBARS CONSOLE SEAT HANDLEBARS CONSOLE MAST SEAT ADJUSTMENT ACCESSORY TRAY REAR FOOT FRONT FOOT & TRANSPORT WHEELS R 2 8 5 0 H R T COMMERCIAL STEP-THRU SEMI-RECUMBENT FITNESS BIKE...
- Page 7 CONSOLE MULTI-POSITION HANDLEBARS ACCESSORY TRAY CONSOLE MAST SEAT POST SEAT ADJUSTMENT REAR FOOT FRONT FOOT & TRANSPORT WHEELS E 3 8 0 0 H R T C O M M E R C I A L U P R I G H T F I T N E S S B I K E...
-
Page 8: Safety Instructions
When using an electrical product, basic precautions should always be followed, including the following: Read all instructions before using this exercise product. Your VISION FITNESS Bike is self-generating (requiring no external power source) and must be pedaled to power-up the console. WARNING! - Page 9 OTHER SAFETY TIPS FOR YOUR VISION FITNESS BIKE CAUTION! If you experience chest pains, nausea, dizziness or shortness of breath, stop exercising immediately and consult your physician before continuing. Bike • Do not wear loose clothing that might catch on any part of the Bike •...
-
Page 10: Assembly & Moving The Bike
ASSEMBLY It is recommended, when possible, that an authorized VISION FITNESS retailer, service provider or sales representative assemble and install your Bike. If you have elected to assemble this product yourself, for your safety please read and follow each of the steps in the included assembly instructions. - Page 11 STABILIZING THE BIKE After positioning the Bike in its intended location, check stability by attempting to rock it side to side. Rocking or wobbling indicates that your Bike needs to be leveled. Determine which leveler is not resting completely on the floor.
- Page 12 SEAT POST ADJUSTMENT E3800HRT The E3800HRT uses a simple pull- pin adjustment knob to adjust seat height. To adjust, grab hold of the seat and pull the seat post knob out. Raise or lower the seat to its desired position and release the seat post knob.
-
Page 13: Adjustment
SEAT RAIL ADJUSTMENT R2850HRT While seated on the Bike, lift the spring-loaded seat lever on the right side of the seat to make adjustments. Slide the seat forward or backward to desired location. Release the spring-loaded seat lever and gently attempt to rock forward and backward to assure it is locked in place. -
Page 14: Contact Heart Rate
CONTACT HEART RATE HAND PULSE HEART RATE SENSORS The Contact Hand Pulse Sensors are included on each product to monitor your heart rate. To use, grasp both of the sensors with a comfortable grip during your workout. The console will display your heart rate. Although your signal will be displayed immediately, it may take the system a few seconds to zero in on your actual heart rate. -
Page 15: Heart Rate Chest Strap
TELEMETRIC HEART RATE CHEST STRAP The wireless Telemetric Chest Strap uses a pair of electrodes on the underside of the strap to send your heart rate signal to the console. Prior to wearing the chest strap, moisten the two rubber electrode pads with several drops of water. -
Page 16: Self-Powered Features
SELF-POWERED FEATURES On the R2850HRT and E3800HRT the user’s pedaling generates the power to initialize and display information on the monitor. A minimum of 20 RPM (revolutions per minute) is required to start and maintain enough power to keep the monitor functional. If the minimum RPM is not maintained, the monitor will begin to shutdown in order to maintain the batteries charge. -
Page 17: Using The Optional Adapter
The battery should last a long time; however the type of use the Bike receives will ultimately play a factor in battery life. Please contact your authorized VISION FITNESS Dealer or Service Provider if you feel the battery needs to be replaced. -
Page 18: Display Console
DISPLAY CONSOLE DISPLAY CONSOLE OVERVIEW The computerized display allows the user to select a workout that meets their desired fitness goals. It allows the user to monitor the progress and feedback of each workout so they can track improvements in overall fitness over time. -
Page 19: Display Console Descriptions
DISPLAY CONSOLE DESCRIPTIONS A. START Press the START key to begin a MANUAL workout using the default settings and bypass initial set-up. When the program begins, the user has the ability to change resistance levels with the ARROW keys. Feedback information will be calculated using default settings. - Page 20 DISPLAY CONSOLE DESCRIPTIONS (continued) H. MESSAGE WINDOW This window provides fixed and scrolling messages to walk the user through setup, provide instruction, provide feedback information, or provide positive re-enforcement. FEEDBACK: During your workout these windows display exercise feedback about your workout, including: WORKOUT TIME: the time elapsed or the time remaining in your workout.
-
Page 21: Csafe Ports, Using The Fan
CSAFE Two network ports allow the bike to use a fitness entertainment system, and/or a interactive fitness network such as Fitlinxx ® CSAFE: This connection enables the console to upload the users exercise information to a fitness network data base. ENTERTAINMENT: This feature allows the console to power a third-party receiver for entertainment systems such as Cardio Theater... -
Page 22: Programming Overviews
PROGRAMMING OVERVIEWS MANUAL is a user-controlled program in which the user controls all resistance changes. INTERVAL is an efficient workout that strengthens your cardiovascular system by alternating work intervals and recovery intervals. FAT BURN is a program that uses slight increases in resistance to achieve a higher workload and a higher amount of calories burned. - Page 23 FIT TEST is a five minute sub-maximal test to evaluate the user’s fitness level. CUSTOM allows users or trainers the ability to preset five workout profiles by setting the workload for each segment in the program. Each program will be saved unless they are changed in setup.
-
Page 24: Using The Console
USING THE CONSOLE QUICK START easiest begin exercising is to simply press the START key. Current default settings will be used to determine exercise feedback. The user will need to adjust resistance as they need. SELECTING A PROGRAM The user will need to select one of the program keys on the left side of the console keypad. - Page 25 ENTERING RESISTANCE LEVEL Use the UP arrow key and DOWN arrow key to adjust the displayed resistance level to the correct value. Press ENTER to select. NOTE: the WATTS program will require the user to set WATT LEVEL instead of RESISTANCE LEVEL. ENTER USER WEIGHT Use the UP arrow key and DOWN arrow key to adjust the user weight...
-
Page 26: Using The Programs
USING THE PROGRAMS The MANUAL, INTERVAL and FAT BURN PROGRAMS are all preset program profiles with 15 segments of equal time. Each segment is 1/15 of the total program time. When adjusting the programs resistance level, the change will be made to the entire programs intensity level, not just the current segment. -
Page 27: Using The Sprint 8 Program
USING THE SPRINT 8 PROGRAM The SPRINT 8 program is an anaerobic interval program designed to build muscle, improve speed, and naturally increase the release of Human Growth Hormone (HGH) your body. Producing HGH through exercise and a proper diet has been shown as an effective way to burn fat and build lean muscle mass according to Phil Campbell, author of Ready, Set, GO! SYNERGY FITNESS . -
Page 28: Using The Fit Test Program
USING THE FIT TEST PROGRAM The FIT TEST program is a five minute sub-maximal fitness test that measures cardiovascular fitness and can be used to determine the exerciser’s general fitness level. It is a great way for individuals to gauge exercise improvements over time. - Page 29 THE TEST For best results the user is required to pedal between 40 and 60 RPM. The exerciser must keep their hands on the hand pulse heart rate sensors or wear a telemetric chest strap to complete the test. NOTE: If 40-60 RPM is not maintained or the console does not sense a heart rate the test will be terminated.
-
Page 30: Using Custom Programs
USING CUSTOM PROGRAMS The CUSTOM programs allow five separate workout choices to be set and then stored for future use. Setup for the CUSTOM programs begins just as any other program. The user will push the CUSTOM program button, set age, set time, and set weight. At this point, the console will ask the user to select one of five CUSTOM programs. -
Page 31: Using Hrt ® Programs
ALL HRT PROGRAMS During the workout, the user will grasp the hand pulse sensors or wear the telemetric chest strap to send their heart rate signal to a receiver in the console. The console will continuously monitor the heart rate, adjusting the resistance level of the Bike to keep your heart rate within several beats of your target heart rate. - Page 32 HRT CARDIO The HRT CARDIO program is designed to maintain your heart rate at 80% of your predicted maximum heart rate. It is intended to improve efficiency and endurance of your cardiovascular system by working your heart, lungs and circulatory systems. This is a great workout for anyone, but beginners may want to start lower and build their way up to 80% of their predicted maximum heart rate.
-
Page 33: Using Facility Engineering Mode
USING FACILITY ENGINEERING MODE SETTINGS Engineering mode is used to customize your Bike for your facilities needs, or to view useful information about your Bike. These features are only accessible to your staff when they press the keys in a specific sequence. USING ENGINEERING MODE You must supply power to the Bike by turning the pedals. -
Page 34: Using Engineering Mode
USING FACILITY ENGINEERING MODE SETTINGS continued USER DEFAULT LANGUAGE – This mode allows you to choose from a variety of Language options. Choose from English, German, French, Dutch, Spanish, or Italian. MILES OR KILOMETER SETTING – This allows you to choose miles or kilometers for speed and distance. -
Page 35: Service And Troubleshooting
SERVICE AND TROUBLESHOOTING PREVENTATIVE MAINTENANCE TIPS • Locate Bike in a cool, dry place. • Clean the top surface of the pedals regularly. • Make sure pedals are kept tight to crank arms. • Keep the display console free from fingerprints and salt buildup caused by sweat. -
Page 36: Troubleshooting
TROUBLESHOOTING Our Bikes are designed to be reliable and easy to use. If, however, you have a problem, these troubleshooting steps may reveal the cause. PROBLEM: The console does not light up. SOLUTION: Make sure you are pedaling the Bike. SOLUTION: Make sure the wire harness is plugged into the back of the console. -
Page 37: Obtaining Service
Do not attempt to service this Bike yourself except for the maintenance tasks described in this manual. For information on service to your VISION FITNESS Bike, contact the local retailer from whom you purchased the Bike. To expedite service, please make sure to have your serial number available. -
Page 38: Limited Home Use Warranty
LABOR - TWO YEARS VISION FITNESS shall cover the Labor cost for the repair of the device for a period of two years from the date of original purchase, so long as the device remains in the possession of the original owner. - Page 39 WARRANTY REGISTRATION Your warranty card must be completed and sent to VISION FITNESS before a warranty claim can be processed. You may also register via our website at www.visionfitness.com. Inside the enclosed warranty card, you will find a customer survey.
-
Page 40: Commercial Warranty
COMMERCIAL USES DEFINED VISION FITNESS warrants the E3800HRT & R2850HRT Fitness Bikes for use in commercial facilities. Examples of commercial facilities include but are not limited to: Hotels; Resorts; Police and Fire Stations; Apartment Complexes; Rehabilitation and Sports Medicine Clinics; Hospitals;... - Page 41 WARRANTY REGISTRATION Your warranty card must be completed and sent to VISION FITNESS before a warranty claim can be processed. We suggest that commercial facilities register via our website at www.visionfitness.com and complete the commercial customer survey.
- Page 44 500 South CP Avenue • P.O. Box 280 Lake Mills, WI 53551 toll free 800.335.4348 • phone 920.648.4090 fax 920.648.3373 www.visionfitness.com ©2006 Vision Fitness. All Rights Reserved. HRT is a Trademark of Vision Fitness. 11.06 OM18.47PRD REV1...