Pioneer VSX-819H-k Operating Instructions Manual
Audio/video multi-channel receiver
Hide thumbs
Also See for VSX-819H-k:
- Operating instructions manual (212 pages) ,
- Service manual (102 pages) ,
- Catalog (8 pages)
Table of Contents
Advertisement
Quick Links
Advertisement
Table of Contents

Related Manuals for Pioneer VSX-819H-k


Summary of Contents for Pioneer VSX-819H-k
- Page 1 VSX-819H...
-
Page 2: Operating Environment
SERVICE PERSONNEL. shock to persons. D3-4-2-1-1_En-A Thank you for buying this Pioneer product. Operating Environment Operating environment temperature and humidity: Please read through these operating instructions so +5 ºC to +35 ºC (+41 ºF to +95 ºF); less than 85 %RH you will know how to operate your model properly. - Page 3 This product is for general household purposes. Any Manufactured under license from Dolby failure due to use for other than household purposes Laboratories. Dolby, Pro Logic, Surround EX (such as long-term use for business purposes in a and the double-D symbol are trademarks of restaurant or use in a car or ship) and which Dolby Laboratories.
-
Page 4: Table Of Contents
Contents 01 Before you start 05 Listening to your system Checking what’s in the box ....6 Auto playback ......33 Loading the batteries . - Page 5 10 Controlling the rest of your system Setting the remote to control other components ......51 Selecting preset codes directly .
-
Page 6: Before You Start
Before you start Chapter 1: Before you start Checking what’s in the box Installing the receiver Please check that you’ve received the following • When installing this unit, make sure to put supplied accessories: it on a level and stable surface. •... -
Page 7: 02 5 Minute Guide
5 minute guide Chapter 2: 5 minute guide Connect your speakers and place them for optimal surround sound. Introduction to home theater See Connecting the speakers on page 21. Home theater refers to the use of multiple Where you place the speakers will have a big audio tracks to create a surround sound effect, effect on the sound. -
Page 8: Automatically Setting Up For Surround Sound (Mcacc)
5 minute guide Play a BD/DVD, and adjust the volume. Switch on the receiver and your TV. Make sure that BD/DVD is showing in the Connect the microphone to the MCACC receiver’s display. If it isn’t, press BD on the SETUP MIC jack on the front panel. - Page 9 5 minute guide Follow the instructions on-screen. If you see an error message (ERR) in the right side column, there may be a problem with the • Make sure the microphone is connected. speaker connection. If selecting RETRY • Make sure the subwoofer is on and the doesn’t fix the problem, turn off the power and volume is turned up.
-
Page 10: Other Problems When Using The Auto Mcacc Setup
5 minute guide With the Phase Control mode switched on, this Other problems when using the Auto receiver can reproduce powerful bass sound MCACC Setup without deteriorating the quality of the original If the room environment is not optimal for the sound (see illustration below). -
Page 11: Connecting Up
Connecting up Chapter 3: Connecting up Be careful to connect the terminal in the proper direction. Making cable connections Make sure not to bend the cables over the top About HDMI of this unit (as shown in the illustration). If this HDMI (High Definition Multimedia Interface) happens, the magnetic field produced by the supports both video and audio on a single... -
Page 12: Analog Audio Cables
Connecting up Analog audio cables Component video cables Use component video cables to get the best Use stereo RCA phono cables to connect possible color reproduction of your video analog audio components. These cables are source. The color signal of the TV is divided into typically red and white, and you should the luminance (Y) signal and the color (P connect the red plugs to R (right) terminals... -
Page 13: Connecting A Tv And Blu-Ray Disc Player Or Dvd Player
Connecting up Connecting a TV and Blu-ray Disc player or DVD player This page shows you how to connect your BD/DVD player and TV to the receiver. This receiver SURROUND BACK L (Single) PRE O HDMI HDMI CD-R/TAPE ZONE2 BD/DVD DVR/VCR TV/SAT DVR/VCR... -
Page 14: Connecting The Multichannel Analog
Connecting up Connect the composite video output and Connect the analog audio outputs from your TV to the TV/SAT inputs on this receiver. the stereo analog audio outputs on your BD/DVD player to the BD/DVD inputs on this This will allow you to play the sound from the TV’s built-in tuner. -
Page 15: Connecting A Satellite Receiver Or Other Digital Set-Top Box
Connecting up Connecting a satellite receiver or other digital set-top box Satellite and cable receivers, and terrestrial digital TV tuners are all examples of so-called ‘set-top boxes’. This receiver SURROUND AUDIO SPEAKERS BACK L (Single) FRONT PRE OUT HDMI HDMI CD-R/TAPE ZONE2 SUBWOOFER... -
Page 16: Connecting Other Audio Components
Connecting up This receiver Connecting other audio components HDMI CD-R/TAPE CD-R/TAPE BD/DVD The number and kind of connections depends on the kind of component you’re connecting. TV/SAT Follow the steps below to connect a CD-R, MD, DVR/VCR TV/SAT DAT, tape recorder or other audio component. COAXIAL COAXIAL ASSIGNABLE... -
Page 17: Connecting An Hdd/Dvd Recorder, Vcr And Other Video Sources
Connecting up Connecting an HDD/DVD recorder, VCR and other video sources This receiver has audio/video inputs and outputs suitable for connecting analog or digital video recorders, including VCRs and HDD/DVD recorders. This receiver SURROUND AUDIO SPEAKE BACK L (Single) PRE OUT HDMI HDMI CD-R/TAPE... -
Page 18: Using The Component Video Jacks
Connecting up Using the component video jacks Component video should deliver superior picture quality when compared to composite video. A further advantage (if your source and TV are both compatible) is progressive-scan video, which delivers a very stable, flicker-free picture. See the manuals that came with your TV and source component to check whether they are compatible with progressive-scan video. -
Page 19: Connecting To The Front Panel Video Terminal
Connecting up Connecting to the front panel Connecting antennas video terminal Connect the AM loop antenna and the FM wire antenna as shown below. To improve Front video connections are accessed via the reception and sound quality, connect external front panel using the INPUT SELECTOR or antennas (see Using external antennas on VIDEO button on the remote control. -
Page 20: Using External Antennas
Connecting up Using external antennas To improve FM reception Connect an external FM antenna as shown below. 75 Ω coaxial cable ANTENNA J-shaped plug (not supplied) LOOP To improve AM reception Connect a 5 m to 6 m length of vinyl-coated wire to the AM antenna terminal without disconnecting the supplied AM loop antenna. -
Page 21: Connecting The Speakers
Connecting up You can use the speakers connected to the B speaker terminals to listen to stereo playback Connecting the speakers in another room. Make sure to review Placing A complete setup of six speakers (including the the speakers on page 23 when placing the subwoofer) is shown here but everyone’s home speakers in another room. -
Page 22: Use The Pre Out Outputs To Connect The Surround Back Speakers
Connecting up Bare wire connections Use the PRE OUT outputs to connect A-Speaker terminals: the surround back speakers Connect the PRE OUT outputs of the unit and Twist exposed wire strands together. additional amplifier to add a surround back Loosen terminal and insert exposed wire. speaker. -
Page 23: Placing The Speakers
Connecting up Where you put your speakers in the room has Placing the speakers a big effect on the quality of the sound. The To achieve the best possible surround sound, following guidelines should help you to get the install your speakers as shown below. best sound from your system. -
Page 24: Switching The Speaker System
Connecting up • SPB – Sound is output from the two • If the surround speakers cannot be set speakers connected to speaker system B directly to the side of the listening position (only stereo playback is possible). with a 7.1-channel system, the surround •... -
Page 25: Plugging In The Receiver
Check the power cord once in a while. If you find it damaged, ask your nearest Pioneer authorized independent service company for a replacement. • The receiver should be disconnected by removing the mains plug from the wall socket when not in regular use, e.g., when... -
Page 26: Controls And Displays
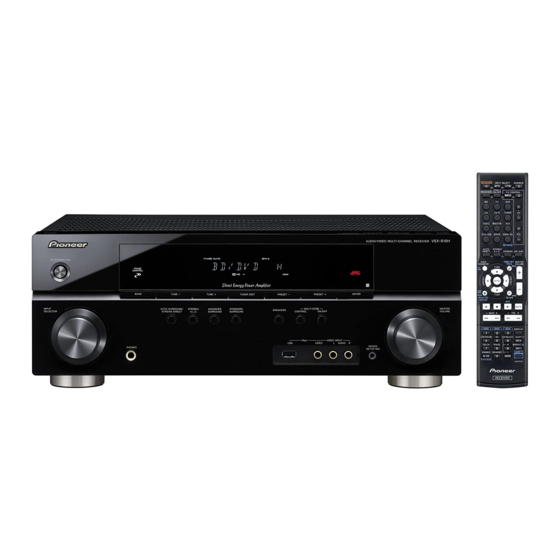
Controls and displays Chapter 4: Controls and displays Front panel VSX–819H AUDIO / VIDEO MULTI- CHANNEL RECEIVER STANDBY/ON PHASE CONTROL – – BAND TUNE TUNE TUNER EDIT PRESET PRESET ENTER INPUT AUTO SURROUND/ STEREO/ ADVANCED STANDARD MULTI-ZONE MASTER SPEAKERS CONTROL ON/OFF SELECTOR STREAM DIRECT... -
Page 27: Operating Range Of Remote Control
Controls and displays ADVANCED SURROUND Operating range of remote control Switches between the various surround The remote control may not work properly if: modes (page 34). • There are obstacles between the remote STANDARD SURROUND control and the receiver’s remote sensor. Press for Standard decoding and to switch •... -
Page 28: Display
Controls and displays Display PHASE PRESET Information or Input signal indicator Lights when the Phase Control is switched on (page 10). Shows the preset number of the tuner or the input signal type, etc. AUTO 10 Character display Lights when the Auto Surround feature is switched on (see Auto playback on page 33). - Page 29 Controls and displays Lights when a source with Dolby Digital Plus encoded audio signals is detected. 2 HD Lights when a source with Dolby TrueHD encoded audio signals is detected. Lights to indicate Dolby Digital EX decoding. 2PLllx Lights to indicate 2 Pro Logic II / 2 Pro Logic IIx decoding (see Listening in surround sound on page 33 for more on this).
-
Page 30: Remote Control
Controls and displays INPUT SELECT Use to select the input source. Remote control RECEIVER Switches the receiver between standby and on. RECEIVER RECEIVER INPUT SELECT SOURCE Switches the remote to control the receiver ZONE 2 RECEIVER ON/OFF TV CONTROL INPUT (used to select the white commands above the number buttons (S.RETRIEVER, etc)). - Page 31 Press TUNER first to access: DTV/TV TUNER EDIT Switches between the DTV and analog TV Memorizes/names stations for recall input modes for Pioneer flat screen TVs. (page 48 and 49). BAND Switches between AM, FM ST (stereo) and FM MONO radio bands (page 48).
- Page 32 Controls and displays 13 SOURCE 12 Number buttons and other component controls Press to turn on/off other components Use the number buttons to directly select a connected to the receiver (see page 53 for radio frequency (page 48) or the tracks on a more on this).
-
Page 33: Listening To Your System
Listening to your system Chapter 5: Listening to your system Important Listening in surround sound • The listening modes and many features Using this receiver, you can listen to any source described in this section may not be in surround sound. However, the options available depending on the current source, available will depend on your speaker setup settings and status of the receiver. -
Page 34: Using The Advanced Surround Effects
Listening to your system • DTS NEO:6 – Allows you to hear 6.1 When the surround back speaker is channel playback with DTS encoded connected. sources If you connected surround back speakers, see also Using surround back channel processing Using the Advanced surround effects on page 36. -
Page 35: Listening In Stereo
Listening to your system Listening in stereo Using Front Stage Surround When you select STEREO you will hear the Advance source through just the front left and right The Front Stage Surround Advance function speakers (and possibly your subwoofer allows you to create natural surround sound depending on your speaker settings). -
Page 36: Using Stream Direct
Listening to your system • Press RECEIVER, then press S.RETRIEVER to switch the sound retriever on or off. Using Stream Direct Use the Stream Direct modes when you want to hear the truest possible reproduction of a Listening with Acoustic source. -
Page 37: Setting The Up Mix Function
Listening to your system • With a 7.1-channel surround system, audio signals that have undergone matrix Setting the Up Mix function decoding processing through surround In a 7.1-channel surround system with back channel processing to which the Up surround speakers placed directly at the sides Mix function is added are output from the of the listening position, the surround sound surround back speakers. -
Page 38: Setting The Audio Options
Listening to your system AUDIO AUDIO TUNER EDIT MASTER PARAMETER PARAMETER TOOLS VOLUME MENU Setting the Audio options MENU RECEIVER INPUT SELECT SOURCE There are a number of additional sound ZONE 2 ENTER RECEIVER ON/OFF TV CONTROL settings you can make using the AUDIO INPUT HOME PARAMETER menu. - Page 39 Listening to your system Setting What it does Option(s) Adjusts the level of dynamic range for movie soundtracks AUTO (Dynamic Range optimized for Dolby Digital, DTS, Dolby Digital Plus, Dolby Control) TrueHD, DTS-HD and DTS Master Audio (you may need to use this feature when listening to surround sound at low volumes).
-
Page 40: Playing Other Sources
Listening to your system • HDMI – Selects an HDMI signal. H can be selected for BD/DVD, TV/SAT or DVR/VCR Playing other sources input. For other inputs, HDMI cannot be Turn on the power of the playback selected. component. When set to DIGITAL or HDMI, 2 D lights when a Dolby Digital signal is input, and DTS Turn on the power of the receiver. -
Page 41: The System Setup Menu
The System Setup menu Chapter 6: The System Setup menu • Auto MCACC – This is a quick and effective automatic surround setup (see Using the System Setup menu Automatically setting up for surround The following section shows you how to make sound (MCACC) on page 8). -
Page 42: Speaker Setting
The System Setup menu Select ‘Manual SP Setup’ then press Select ‘Speaker Setting’ from the ENTER. Manual SP Setup menu. 2a.Speaker Setting System Setup 2.Manual SP Setup 2.Manual SP Setup Front SMALL 1.Auto MCACC a.Speaker Setting a.Speaker Setting 2.Manual SP Setup b.Crossover Network b.Crossover Network Center... -
Page 43: Crossover Network
The System Setup menu • Surr. Back – Select the number of Crossover Network surround back speakers you have (one, two • Default setting: 100Hz Select LARGE if your surround or none). This setting decides the cutoff between bass back speakers reproduce bass frequencies sounds playing back from the speakers effectively. -
Page 44: Speaker Distance
The System Setup menu Select a setup option. Speaker Distance • Manual – Move the test tone manually For good sound depth and separation from from speaker to speaker and adjust your system, you need to specify the distance individual channel levels. of your speakers from the listening position. - Page 45 The System Setup menu Select the component that corresponds Press RECEIVER on the remote control, with the one you connected to that input. then press the SETUP button. Select between BD, TV, DVR, MULTI (MULTI An on-screen display (OSD) appears on your CH IN) or OFF.
-
Page 46: Using The Multi-Zone Feature
Using the MULTI-ZONE feature Chapter 7: Using the MULTI-ZONE feature MULTI-ZONE listening options MULTI-ZONE listening The following table shows what you can listen to in the sub zone: This receiver can power up to two independent Sub Zone Input sources available systems in separate rooms after you have made the proper MULTI-ZONE connections. -
Page 47: Using The Multi-Zone Controls
Using the MULTI-ZONE feature • If you select TUNER, you can use the tuner Using the MULTI-ZONE controls controls to select a preset station (see The following steps use the front panel controls Saving station presets on page 48 if you’re to select sources. -
Page 48: Using The Tuner
Using the tuner Chapter 8: Using the tuner Improving FM stereo sound If the TUNE or ST indicators don’t light when Listening to the radio tuning to an FM station because the signal is The following steps show you how to tune in to weak, press the BAND button to select FM FM and AM radio broadcasts using the MONO and set the receiver to the mono... -
Page 49: Listening To Station Presets
Using the tuner Press PRESET / to select the station • Once you have named a station preset, preset you want. press DISPLAY to show the name. When You can also use the number buttons. you want to return to the frequency display, press DISPLAY several times to Press ENTER. -
Page 50: Making Recordings
Making recordings Chapter 9: Making recordings Select the source you want to record. Use the MULTI CONTROL buttons (or INPUT Making an audio or a video SELECT). recording Select the input signal (if necessary). You can make an audio or a video recording Press the RECEIVER button then press SIGNAL from the built-in tuner, or from an audio or SEL to select the input signal corresponding to... -
Page 51: Controlling The Rest Of Your System
Controlling the rest of your system Chapter 10: Controlling the rest of your system While pressing the RECEIVER button, press and hold the ‘1’ button for three Setting the remote to control seconds. other components Press the MULTI CONTROL button for Most components can be assigned to one of the component you want to control. -
Page 52: Controls For Tvs
Cable TV/Satellite TV/TV/DTV button on or off. DTV/TV Switches between the DTV and analog TV input DTV/TV modes for Pioneer flat screen TVs. TOP MENU Switches TEXT ON/OFF for TVs. HOME MENU Use as the GUIDE button for navigating. Cable TV/Satellite TV/TV/DTV RETURN Use to select closed captioning with DTV. -
Page 53: Controls For Other Components
Controlling the rest of your system Controls for other components This remote control can control these components after entering the proper codes or teaching the receiver the commands (see Controlling the rest of your system on page 51 for more on this). Use the MULTI CONTROL buttons to select the component. - Page 54 Controlling the rest of your system Button(s) Function Components DISPLAY Press to display information. BD/DVD/DVR player TOP MENU Displays the disc ‘top’ menu of a BD/DVD player. BD/DVD/DVR player MENU Displays menus for the current BD/DVD or DVR you are BD/DVD/DVR player using.
-
Page 55: Preset Code List
Philips 2005, 2011, 2022, Supervision 2086 Clatronic 2089 Kennex 2093 Synn 2086 2023, 2031, 2039, 2062 Coby 2095 Kenwood 2051 Pioneer 2004, 2012, 2014, Tatung 2035, 2093 Conia 2082 KeyPlug 2093 TCM 2002 2049, 2120, 2121, 2122, Continental Edison 2094 Kiiro 2093... - Page 56 Controlling the rest of your system AudioTon 0010, 0026, 0114 Contec 0026, 0027, 0032, Expert 0041 Ausind 0017 Exquisit 0040 0039, 0113 Manufacturer Code Autovox 0017, 0023, 0025, Continental Edison 0033 Fenner 0027, 0039 A.R. Systems 0040 Cosmel 0027, 0039 Ferguson 0033, 0037, 0026, 0114 Acme 0026...
- Page 57 0040 0039, 0040, 0114 0040, 0113 Intervision 0010, 0025, Lumatron 0030, 0034, New World 0028 Pioneer 0010, 0031, 0033, Nicamagic 0026, 0113 0026, 0029, 0040, 0114 0037, 0040, 0114 0034, 0037, 0040, 0120 Irradio 0017, 0027, 0028, Lux May 0034...
- Page 58 Controlling the rest of your system Prandoni-Prince 0017, SBR 0037, 0040 Susumu 0028 Universum 0010, 0017, SCHAUB LORENTZ 0031 Sutron 0027, 0039 0030 0025, 0034, 0035, 0037, Precision 0026, 0114 Schneider 0026, 0028, Sydney 0026, 0113, 0114 0040, 0114 Prima 0027, 0031, 0039 Sysline 0037 Univox 0040 0034, 0037, 0040, 0075,...
- Page 59 Teac 1018 De Graaf 1006 Intervision 1000, 1018 Phonola 1006 Tec 1004, 1017, 1018 Decca 1000, 1001, 1006 Irradio 1005, 1007, 1017 Pioneer 1006, 1120 Teleavia 1001 Denko 1017 ITT 1001 Portland 1003, 1004, 1018 Telefunken 1001 Dual 1001, 1006, 1018...
-
Page 60: Other Connections
• Features such as the equalizer cannot be controlled using this receiver, and we recommend switching the equalizer off before connecting. • Pioneer cannot under any circumstances accept responsibility for any direct or indirect loss arising from any inconvenience or loss of recorded material resulting from the iPod failure. -
Page 61: Ipod Playback
(e.g., albums). Note 1 The controls of your iPod (excluding iPod touch or iPhone) will be inoperable when connected to this receiver (Pioneer shows in the iPod display). 2 • Note that non-roman characters in the title are displayed as •... -
Page 62: Watching Photos And Video Content
Other connections About iPod Button What it does Press repeatedly to switch between Shuffle Songs, Shuffle Albums and Shuffle Off. DISPLAY Press repeatedly to change the song playback information displayed in the front panel display. / ‘Made for iPod’ means that an electronic When browsing, press to move to previous/next levels. -
Page 63: Connecting A Usb Device
(MP3 players) of format FAT16/32. It is not possible to connect this receiver to a personal computer for USB playback. • Pioneer cannot guarantee compatibility (operation and/or bus power) with all USB mass storage devices and assumes no responsibility for any loss of data that may occur when connected to this receiver. -
Page 64: Compressed Audio Compatibility
Other connections Other compatibility information Button What it does • VBR (variable bit rate) MP3/WMA/MPEG-4 / During playback, press to skip to AAC playback: Yes previous/next track. / • DRM (Digital Rights Management) TOP MENU Press to return to the menu screen. protection compatible: Yes (DRM-protected RETURN audio files will not play in this receiver). -
Page 65: Additional Information
• After about a minute (you won’t be able to switch the unit on during this time), off. switch the receiver back on. If the message persists, call a Pioneer authorized independent service company. No sound is output when a •... - Page 66 Additional information Problem Remedy Considerable noise in radio • Connect the antenna (page 19) and adjust the position for best reception. broadcasts. • Route any loose cables away from the antenna terminals and wires. • Fully extend the FM wire antenna, position for best reception, and secure to a wall (or connect an outdoor FM antenna).
-
Page 67: Hdmi
Additional information HDMI Symptom Remedy No picture or sound. • If the problem still persists when connecting your HDMI component directly to your monitor, please consult the component or monitor manual or contact the manufacturer for support. No picture. • Depending in the output settings of the source component, it may be outputting a video format that can’t be displayed. -
Page 68: Ipod Messages
Additional information iPod messages Symptom Cause Action iPod/USB Error 1 There is a problem with the signal path from the Switch off the receiver and reconnect the iPod to (I/U ERR1) iPod to the receiver. the receiver. If this doesn’t seem to work, try resetting your iPod. -
Page 69: Changing The Tv Format Setting
Additional information Changing the TV format setting Specifications If the System Setup menu is not displayed Audio section correctly, it may be that the TV system is set FTC power output incorrectly for your country or region......65 W + 65 W (STEREO, 20 Hz to 20 kHz, 8 Ω, 0.2 %) Switch the receiver into standby. -
Page 70: Cleaning The Unit
Additional information Integrated control section Control (IR) terminal . . . ∅ 3.5 Mini-jack (MONO) Cleaning the unit IR signal..High Active (High Level : 2.0 V) • Use a polishing cloth or dry cloth to wipe off dust and dirt. - Page 71 253 Alexandra Road, #04-01, Singapore 159936 TEL: 65-6472-7555 PIONEER ELECTRONICS AUSTRALIA PTY. LTD. 178-184 Boundary Road, Braeside, Victoria 3195, Australia, TEL: (03) 9586-6300 PIONEER ELECTRONICS DE MEXICO S.A. DE C.V. Blvd.Manuel Avila Camacho 138 10 piso Col.Lomas de Chapultepec, Mexico,D.F. 11000 TEL: 55-9178-4270 K002_B_En <5707-00000-188-0S>...