Advertisement
Quick Links
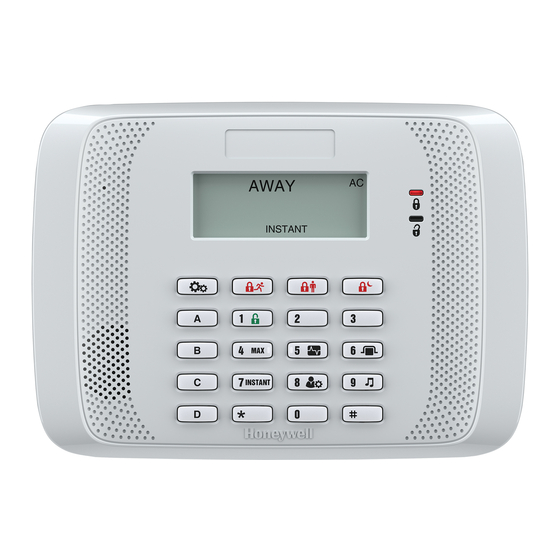
ADEMCO 6152 / 6152V Keypads – Installation and Setup Guide
Addressable Fixed English & Voice Fixed English Keypads for use with Honeywell Control Panels
Sounder
6152V Microphone
FEATURES
• Backlit keys
• Supervised by control panel (if supported)
6152V Models also include:
• Voice Chime
• Voice Status
• Message Center
PROGRAMMABLE FUNCTION KEYS
To activate Function keys, press and hold key for at least 2 seconds; key pairs are activated immediately.
A or
and
B or
and
C or
and
D
SETTINGS KEY FUNCTIONS
Settings Key
Press
for 2 Seconds
Press
for 2 Seconds
and during Display test, press
and hold
and
for 3 Seconds.
AWAY
NIGHT
NO
PHONE
TEST
BYPASS
NOT READY
STAY
ALARM
CHIME BAT
FIRE
CHECK INSTANT CANCELED
Programmable
Function Keys*
Note: See the control's
instructions for details on
programming the Function
keys for panic alarms or
other special functions
(i.e., macros).
Result
Enters Display Test Mode
Reboots the Keypad (the
keypad beeps and the ARM
and READY LEDs flash for
several seconds)
AC
Arming Keys
6152V VOICE CONTROL KEYS
Fixed Word Display
2-Digit Zone Identifier
The '21' digits are used for specific
trouble indications. Refer to the
control panel instructions for details.
= System ARMED
= System NOT ARMED
= READY to Arm
= NOT READY to Arm
6152V: Message Indicators
= Recording Message
= Message Recorded
= No message
See the keypad's User Guide for details.
6152V Keys
Volume Adjust
Play/Stop Record
Function/Record
Voice Key
Advertisement

Related Manuals for Honeywell ADEMCO 6152


Summary of Contents for Honeywell ADEMCO 6152
- Page 1 ADEMCO 6152 / 6152V Keypads – Installation and Setup Guide Addressable Fixed English & Voice Fixed English Keypads for use with Honeywell Control Panels Fixed Word Display 2-Digit Zone Identifier The ‘21’ digits are used for specific trouble indications. Refer to the control panel instructions for details.
- Page 2 1. OPEN Control Panel Control Panel Terminal Strip AUX DATA DATA Black (Gnd) 2. WIRE Red (+12vdc) • Connect only one wire per terminal. Green (Data To Control) • For Daisy-Chain Configurations, use Yellow (Data From Control) Wall wire splicing so only one wire is Surface connected to each terminal.
- Page 3 VIEWING THE KEYPAD ADDRESS FUNCTION KEY LABELS A set of adhesive-backed labels with some typical function Press and hold down the keys at the same symbols (fire, police, personal emergency) is provided. These time for 3 seconds. The current address is displayed. No key labels can be placed next to the keys to identify each key's entry is allowed.
- Page 4 REFER TO INSTALLATION INSTRUCTIONS FOR THE CONTROL PANEL WITH WHICH THIS DEVICE IS USED FOR WARRANTY INFORMATION AND LIMITATIONS OF THE ENTIRE ALARM SYSTEM. WARRANTY INFORMATION: For the latest warranty information, please go to: www.honeywell.com/security/hsc/resources/wa DOCUMENTATION AND ONLINE SUPPORT: For the latest documentation and online support information, please go to: http://www.security.honeywell.com/hsc/resources/MyWebTech...