Table of Contents
Advertisement
Available languages
Available languages
Quick Links
Download this manual
See also:
Service Manual
TY-FB9TU
Model No.
U/V Tuner Board with MATE I/F
Operating Instructions
Before connecting, operating or adjusting this product, please read these
instructions completely. Please keep this manual for future reference.
Tarjeta de sintonizador U/V con MATE I/F
Manual de instrucciones
Antes de conectar, utilizar o ajustar este producto, lea completamente este manual de
instrucciones; y guárdelo para consultarlo en el futuro en caso de ser necesario.
TQZH751-1
Advertisement
Chapters
Table of Contents

Related Manuals for Panasonic TY-FB9TU


Summary of Contents for Panasonic TY-FB9TU
-
Page 1: Operating Instructions
TY-FB9TU Model No. U/V Tuner Board with MATE I/F Operating Instructions Before connecting, operating or adjusting this product, please read these instructions completely. Please keep this manual for future reference. Tarjeta de sintonizador U/V con MATE I/F Manual de instrucciones Antes de conectar, utilizar o ajustar este producto, lea completamente este manual de instrucciones;... -
Page 2: Table Of Contents
Specifications ............15 Features Can receive terrestrial analog broadcasting You can install the U/V Tuner Board with MATE I/F TY-FB9TU in the slot of the display and receive terrestrial analog broadcasting. Can connect various kinds of video equipment The option board can be installed in the PG, PR Series plasma displays. -
Page 3: Safety Precautions
Safety Precautions (Be sure to observe) WARNING • Never attempt to disassemble or modify this product. To avoid fire, shock, or failure. • If you sense smoke, an odd odor, or unusual noises while in operation, immediately unplug the display. Switch off the display and unplug the power cord plug from the supply outlet. -
Page 4: Connection
Connection Installation Precautions • Before installation Turn the power switch off and disconnect the plug of the display. Disconnect all the plugs connected to the display. • Before removing, turn the power off with the tuner board’s remote control and then turn the main power off. •... -
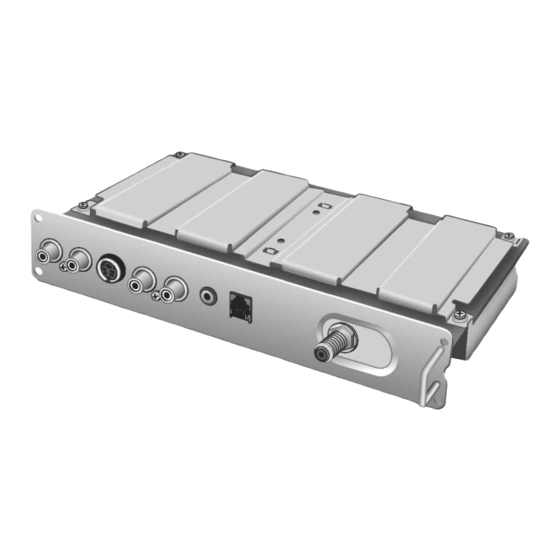
Page 5: Connection Of External Equipment
Connection Attaching the ferrite core Less than 10 cm (4”) Pull back the tabs Put the cable (in two places) to and close. open. Note If the ferrite core is not attached, noise may occur in the video or audio. Handling the antenna cable To avoid noise in the video, hold the antenna cable correctly. -
Page 6: The Remote Control
The remote control Control reference of Tuner board and Display Note ASPECT button For the common features, be sure to use the remote control of Tuner board. Change aspect (see page 8). The remote control The remote RECALL button of Tuner board control of Display Display the channel, the audio •... -
Page 7: Watching Tv Programs
Watching TV programs Preparation 1. Connect the power cord of the display to the wall socket. 2. Press Power button on the display to turn on the main power. • The power indicator lights (Green: Power ON, Red: Standby, No light: Power OFF). -
Page 8: Aspect Mode
ASPECT mode You can change the aspect ratio so the picture expands to the optimum size to fill the screen. Press [ASPECT] to select the aspect mode. The modes you can select depend on viewing materials. Each time you press the button: POWER MUTE 4 : 3... -
Page 9: Changing The Initial Settings
Changing the initial settings You can change the settings to suit your preferences and to suit the unit to the environment in which it is being used. Then you can clone the setting and switch to the “HOTEL” mode so the guest users can access the particular settings only (see page 14). -
Page 10: Channels Menu
Changing the initial settings See page 9 for operation. CHANNELS menu CH. SCAN FAV : Enter up to 16 favorite channels. : Scan all channels you can select using [ CH , CH FAVORITES Add or delete the 16 favorite channels. 1. -
Page 11: Set Up Menu
Changing the initial settings See page 9 for operation. SET UP menu IDIOMA / LANGUE Select the menu language. ENGLISH cc ON MUTE Display closed captions when muting the sound. (Refer to “CLOSED CAPTIONS Note CHART” below.) • Set “ cc MODE” to “OFF” to activate “... - Page 12 Changing the initial settings To set V-CHIP SET 1. Press [ ] to select the option menu. U.S. MOVIES U.S. TV PROGRAMS CANADIAN FRENCH CANADIAN ENGLISH 2. Press [ ] to select “SETTING” and press [ 3. Press [ ] to highlight the option menu selected in step1, and press [ LOCK ] to select “ON”...
-
Page 13: Replicating The Settings - Clone Box
Replicating the settings - CLONE BOX The Clone Box (separately purchased) replicates the settings of the master TV into other TVs. Selecting the master TV settings Select the settings of the master TV (see pages 9-12). You can replicate the following settings. POWER MUTE Menu... -
Page 14: Downloading The Settings Into Another Tv (Teach)
Replicating the settings - CLONE BOX Downloading the settings into another TV (TEACH) Be sure to set the TV to the normal TV mode before downloading. If not in the normal TV mode, change the mode referring to “Switching between the normal TV mode and the HOTEL mode” (see below). Preparation •... -
Page 15: Troubleshooting Guide
Intermittent Remote Control Operation No Channel Control Check if the board is installed in the compatible slot. Specifications U/V Tuner Board with MATE I/F Model No. TY-FB9TU Channel Capability-181 VHF-12 : UHF-56 : Cable-125 1.0 Vp-p (75 Ω) Connection Terminals AV INPUT VIDEO (RCA PIN JACK TYPE) Y : 1.0 Vp-p (75 Ω), C : 0.286 Vp-p (75 Ω) -
Page 16: Características
Especificaciones ..........29 Características Puede recibir emisiones analógicas terrestres Puede instalar la tarjeta de sintonizador U/V con MATE I/F TY-FB9TU en la ranura de la pantalla y recibir emisiones analógicas terrestres. Puede conectar varios tipos de equipos de vídeo La tarjeta opcional se puede instalar en las pantallas de plasma de las series PG y PR. -
Page 17: Precauciones Para Su Seguridad
Precauciones para su seguridad (Sígalas siempre) ADVERTENCIA • No intente nunca desmontar o modificar este producto. Para evitar un incendio, descarga eléctrica o fallo. • Si nota humo, un mal olor o ruidos extraños durante el funcionamiento, desenchufe inmediatamente la pantalla. Apague la pantalla y desenchúfela de la toma de corriente. -
Page 18: Conexión
Conexión Instalación Precauciones • Antes de instalar Desconecte la alimentación y desenchufe la pantalla. Desconecte todas las clavijas conectadas a la pantalla. • Antes de quitar, dé vuelta a la energía apagado con el control del romote del sintonizador board’s y entonces dé... -
Page 19: Conexión De Un Equipo Externo
Conexión Colocación del núcleo de ferrita Menos de 10 cm (4”) Tire de las lengüetas Ponga el cable (dos lugares) para y cierre. abrir. Nota Si no se pone el núcleo de ferrita pueden producirse ruidos en el vídeo o audio. Manejo del cable de antena Para evitar ruido en el vídeo, sujete bien el cable de la antena. -
Page 20: El Control Remoto
El control remoto Referencia de controles de la tarjeta de sintonizador y pantalla Nota Botón ASPECT Para las funciones comunes, asegúrese de usar el control remoto de la tarjeta de sintonizador. Cambia el aspecto (vea la página 22). Control remoto de la Control remoto Botón RECALL tarjeta de sintonizador... -
Page 21: Para Ver Programas De Tv
Para ver programas de TV Preparación 1. Conecte el cable de alimentación de la pantalla a la toma de corriente. 2. Presione el botón POWER en la pantalla para conectar la alimentación principal. • El indicador de alimentación se enciende (Verde: alimentación conectada, Rojo: en espera, Apagado: alimentación desconectada). -
Page 22: Modo Aspect
Modo ASPECT Puede cambiar la relación de aspecto para que la imagen se expanda hasta llenar la pantalla. Presione [ASPECT] para seleccionar el modo de aspecto. Los modos que puede seleccionar dependen del material que va a ver. Cada vez que presione el botón: POWER MUTE 4 : 3... -
Page 23: Cambio De Los Ajustes Iniciales
Cambio de los ajustes iniciales Puede cambiar los ajustes según sus preferencias para adaptarlos al aparato y al ambiente de utilización. Luego podrá clonar los ajustes y cambiar al modo “HOTEL” para que los clientes puedan tener acceso a ajustes particulares solamente (vea la página 28). -
Page 24: Menú Canales
Cambio de los ajustes iniciales Vea la página 23 para conocer la operación. Menú CANALES FAV : Introduzca hasta 16 de sus canales favoritos. BUSQUEDA TODO : Explore todos los canales que pueda seleccionar con [ CH , CH Agregue o borre los 16 canales favoritos. FAVORITOS 1. -
Page 25: Menú Ajuste
Cambio de los ajustes iniciales Vea la página 23 para conocer la operación. Menú AJUSTE IDIOMA / LANGUE Selecciona el idioma de menús. ENGLISH cc EN MUDO Visualiza títulos ocultos cuando se silencia el Nota sonido. (Consulte la “LISTA DE TÍTULOS •... - Page 26 Cambio de los ajustes iniciales Para ajustar V-CHIP 1. Presione [ ] para seleccionar el menú de PELICULAS DE EEUU PROGRAMAS DE EEUU opciones. FRANCES DE CANADA INGLES DE CANADA 2. Presione [ ] para seleccionar “AJUSTE” y presione [ 3.
-
Page 27: Repetición De Los Ajustes - Caja De Clonación
Repetición de los ajustes - CAJA DE CLONACIÓN La caja de clonación (adquirida por separado) repite los ajustes del TV maestro en otros TVs. Selección de los ajustes del TV maestro Seleccione los ajustes del TV maestro (vea las páginas 23-26). Usted puede replegar los ajustes siguientes. -
Page 28: Descarga De Los Ajustes A Otro Tv (Enseñar)
Repetición de los ajustes - CAJA DE CLONACIÓN Descarga de los ajustes a otro TV (ENSEÑAR) Asegúrese de poner el TV en el modo de TV normal antes de descargar. Si no está en el modo de TV normal, cambie el modo consultando “Cambio entre el modo de TV normal y el modo HOTEL”... -
Page 29: Guía Para La Solución De Problemas
Compruebe si la tarjeta está instalada en la ranura compatible. Especificaciones Tarjeta de sintonizador U/V con MATE I/F Número de modelo TY-FB9TU Capacidad de recepción de canales: 181 12 de VHF, 56 de UHF y 125 de televisión por cable 1,0 Vp-p (75 Ω) Terminales de conexión... - Page 30 Memo...
- Page 31 Memo...
- Page 32 Nú úmero de serie Web Site : http://panasonic.net/ Printed in Japan Impreso en Japón MBS0306A1098...