Table of Contents
Advertisement
YP T7 Cover0.0
1/14/05 18:2712:0
Samsung Electronics America, Inc.
400 Valley Road, Suite 201 Mount Arlington, NJ 07856
1-800-SAMSUNG (1-800-726-7864)
www.samsung.com
AH68-01629L (Rev 0.0)
Page 1
- 65,000 Color LCD
- MP3, WMA, Audio ASF,Secure WMA and
Ogg Playback
- Removable Storage Device
- Text and Image Viewer
- Direct MP3 Recording
- FM Reception
- SRS WOW Surround Sound
- USB 2.0 High Speed Data Transfer
- Upgradable
- Built-in Rechargeable Li-polymer Battery
- Voice Recording Function
Advertisement
Table of Contents

Related Manuals for Samsung YP-T7


Summary of Contents for Samsung YP-T7
- Page 1 - SRS WOW Surround Sound - USB 2.0 High Speed Data Transfer - Upgradable - Built-in Rechargeable Li-polymer Battery - Voice Recording Function Samsung Electronics America, Inc. 400 Valley Road, Suite 201 Mount Arlington, NJ 07856 1-800-SAMSUNG (1-800-726-7864) www.samsung.com AH68-01629L (Rev 0.0)
-
Page 2: Table Of Contents
T7 AME ENG inlay 1/14/05 18:2812:0 Page 2 Contents Contents I Preparations I Additional Usage Safety Instructions ..............................4 Using Navigation ..............................45 Battery Charger Safety ............................6 Setting Playlist ..............................49 Charging the battery ............................7 FM Radio Settings ..............................50 Features ................................8 FM Recording ..............................54 Components ..............................11 Viewing Image ..............................55 Location of Controls............................12... -
Page 3: Safety Instructions
T7 AME ENG inlay 1/14/05 18:2812:0 Page 4 Safety Instructions Safety Instructions Read and understand all the instructions to avoid injury to yourself and damage to the equipment. I Earphones Do not expose to extreme Do not subject the player to Follow Traffic Safety Instructions temperatures (above 95°F severe impact. -
Page 4: Battery Charger Safety
T7 AME ENG inlay 1/14/05 18:2812:0 Page 6 Battery Charger Safety Charging the battery The charger is supplied with your player. CAUTION Plug the charger into a wall outlet. Opening the case may result in electric shock. When recharging is complete, “FULLY CHARGED”... -
Page 5: Features
T7 AME ENG inlay 1/14/05 18:2812:0 Page 8 Features Features 65,000 Color LCD Direct MP3 Recording The 65,000 color LCD allows color display of image files. You can convert music from CDs, cassettes, and radio into MP3 files without a PC. MP3, WMA, Audio ASF, Secure WMA and FM Reception Ogg Playback... -
Page 6: Components
T7 AME ENG inlay 1/14/05 18:2812:0 Page 10 Features Components Upgradable You can upgrade the built-in programs when available. Please check the home page (www.samsung.com) for upgrades. Belt Clip Neck Strap Earphone Charger AH61-01914A AH61-01414B AH30-00075D AH44-00050B Built-in Rechargeable Li-polymer Battery The built-in rechargeable lithium battery provides up to 10 hours of play time. -
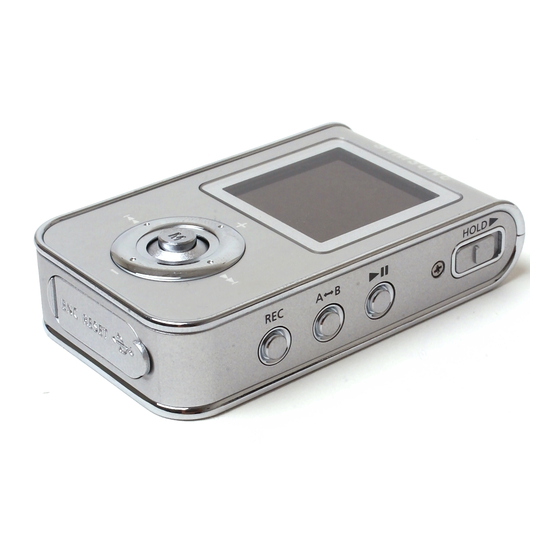
Page 7: Location Of Controls
T7 AME ENG inlay 1/14/05 18:2812:0 Page 12 Location of Controls Location of Controls Microphone I Display Display Earphone Jack Play mode indicator Neck strap Hook Remaining Battery Power indicator Play/Stop/Pause indicator 01:07 Equalizer, SRS indicator time indicator ROOT MENU, Navigation button/ Move to Track/ Building Bridges Current song... -
Page 8: Connecting The Player To Pc
T7 AME ENG inlay 1/14/05 18:2812:0 Page 14 Connecting the player to your PC Connecting the player to your PC System Requirements. For Windows 98/98SE, install the USB driver prior to The PC system must meet the connecting the player to PC. following specifications: Pentium 200MHz or greater I Installing software... -
Page 9: Connecting The Player To Your Pc
Connecting the player to your PC I Connecting the player to your PC with the USB cable Upon installation of the USB driver "SAMSUNG YP-T7 USB Device" will appear Connect the USB cable to the USB port on your computer. -
Page 10: Manual Installation Of The Usb Driver
If the driver does not install automatically, follow the instructions below to Select [Control Panel] [System] [Device Manager]. install the USB driver manually. Click [YP-T7]. The USB driver is located in C:\WINDOWS\INF\MUSBA2.inf. if the driver does not appear, click on Browse to locate it. - Page 11 T7 AME ENG inlay 1/14/05 18:2812:0 Page 20 Manual installation of the USB Driver Manual installation of the USB Driver Click [Reinstall Driver]. The USB driver is located in C:\WINDOWS\INF\DISKDRV.inf. if the driver does not appear, click on Browse to locate it.
-
Page 12: Using The Removable Storage(Pc)
Using the removable storage(PC) Using the removable storage(PC) Before formatting can begin, you must connect your YP-T7 to your PC using the USB cable Select the files to save. Drag and drop them into respective folders in the (see page 16). -
Page 13: Transferring Music Files Using Windows Media
T7 AME ENG inlay 1/14/05 18:2812:0 Page 24 Transferring music files using Windows Media Transferring music files using Windows Media When the [Sync] window appears, I Downloading Secure WMA Files select the file on your PC you want to Press the [Start Sync] Make sure to download the Secure WMA file you purchased from a pay site transfer to the player using Windows... -
Page 14: Installing Music Studio
Insert the Installation CD into CD-ROM drive. Select language Double click the Music Studio icon on your PC. Select [Install Samsung Music Studio]. Main Window Play List Window File List Window Follow the instructions in the window to complete the installation. -
Page 15: Using Music Studio
T7 AME ENG inlay 1/14/05 18:2912:0 Page 28 Using Music Studio Using Music Studio You can create an Album that will contain a group of your favorite songs for playback. After creating the New Album, click the [To HDD Mode] button in the I Creating an Album File List Window to select music files stored in your computer. -
Page 16: To View Help On Music Studio
T7 AME ENG inlay 1/14/05 18:2912:0 Page 30 Using Music Studio To View Help on Music Studio You can convert CD Audio tracks to MP3 or WMA(Windows Media Audio) format by using Music Studio. I Converting Music File Formats Run Music Studio and press F1. Double click the Music Studio icon on your PC. -
Page 17: Installing Multimedia Studio
T7 AME ENG inlay 1/14/05 18:2912:0 Page 32 Installing Multimedia Studio Installing Multimedia Studio Multimedia Studio is a program that supports image editing, video playback and format conversion, and multimedia album creation. Insert the installation CD into the CD-ROM drive. Follow the instructions in the window to complete the installation. -
Page 18: Using Multimedia Studio
T7 AME ENG inlay 1/14/05 18:2912:0 Page 34 Using Multimedia Studio Using Multimedia Studio Run Multimedia Studio from on the Desktop. Files downloaded without using Multimedia Studio cannot be viewed on the screen. Editing Images Sending images Select the folder containing images to edit from the directory window at the Connect the player to PC. - Page 19 The Multimedia Studio software allows you to capture a still frame from a video file and save Set the size and path of the image at the [Resize images] window and then it as a picture, then transfer it to the YP-T7. click the [OK] button.
-
Page 20: To View Help On Multimedia Studio
T7 AME ENG inlay 1/14/05 18:2912:0 Page 38 Using Multimedia Studio To View Help on Multimedia Studio Press the [Capture] button and then press the [Capture] button when the image you want to capture appears. Run Multimedia Studio and press the Help button at the top of the The selected image will be captured. -
Page 21: Playing Music And Turning Off The Device
T7 AME ENG inlay 1/14/05 18:2912:0 Page 40 Playing Music and Turning Off the Device HOLD Function Make sure the player is fully charged and the earphones are connected. In Hold mode, all buttons are disabled. This is useful when using the player and walking, jogging etc. I Turning Power On and Off Slide the switch in the direction of the arrow. -
Page 22: Recording Mp3S
T7 AME ENG inlay 1/14/05 18:2912:0 Page 42 Recording MP3s Searching for Music/Voice Files To move to other modes from the LINE_REC mode, To search for specific parts during play refer to page 47 "Changing Mode" Push and hold the “M” button left or right during playback to search for Connect the Audio Output port the a specific section of the music file you want to listen to. -
Page 23: Loop Repeating
T7 AME ENG inlay 1/14/05 18:2912:0 Page 44 Loop Repeating MENU Options Press and hold the “M” button to switch to MENU mode. Starting Point to move and press the “M” button briefly to select the menu you want. While playing music files, press the A B button 01:07 ROOT briefly at the beginning of the loop you want to set. -
Page 24: Using Navigation
T7 AME ENG inlay 1/14/05 18:2912:0 Page 46 Using Navigation Using Navigation You can easily search for files or switch modes using the Navigation function. I Changing Mode Press the “M” button to enter Navigation mode You can change from mode to another. (except if you are in FM radio mode), or press and hold the The example below shows how to change from Voice to Music mode. -
Page 25: Setting Playlist
T7 AME ENG inlay 1/14/05 18:2912:0 Page 48 Using Navigation Setting Playlist I Playing/Exiting Folder I Setting Playlist Playing Folder - Move to the file you want in Navigation mode and press the “M” button. The selected file will be marked. Press the “M”... -
Page 26: Fm Radio Settings
T7 AME ENG inlay 1/14/05 18:2912:0 Page 50 FM Radio Settings FM Radio Settings I Listening to FM Radio Select FM Radio in the menu. (refer to “MENU Option”) Select FM Radio Normal. 10:07 to move to the frequency you want. 87.50 Manual Search : Push to change the frequency... - Page 27 T7 AME ENG inlay 1/14/05 18:2912:0 Page 52 FM Radio Settings FM Radio Settings I Searching Stored Frequencies to set the FM record start time Timer Rec 10:07 and record finish time. START Select FM Radio Preset. 87.50 After setting Timer Rec, move to OK, to move to the desired frequency.
-
Page 28: Fm Recording
T7 AME ENG inlay 1/14/05 18:2912:0 Page 54 FM Radio Settings Viewing Image You can select an image file to view while listening to the music. I FM Level Select FM Radio FM Level. Select Image Viewer in the menu. (refer to “MENU Options”) FM Level to select FM Tuner Sensitivity, and then High... -
Page 29: Viewing Text
T7 AME ENG inlay 1/14/05 18:2912:0 Page 56 Viewing Text Setting the Advanced Functions Text Viewer allows you to read text files that were created on your PC. Select Settings in the menu. (refer to “MENU Options”) Text files must have a .txt extension to be viewed by Text Viewer. You can select an text file to view while listening to the music. -
Page 30: Selecting The Play Mode
T7 AME ENG inlay 1/14/05 18:2912:0 Page 58 Selecting the Play mode Sound Settings Press and hold the “M” button. Select Settings My Sound. Press and hold the “M” Button. Select Settings Play Mode. In Play mode, use to move to the mode you want and press I Preset EQ the “M”... - Page 31 T7 AME ENG inlay 1/14/05 18:2912:0 Page 60 Sound Settings Sound Settings Press and hold the “M” button. Select Settings My Sound. I Bass Booster to select Bass Booster On or Off, and then - Auto EQ Table press the “M” button. Bass Booster Bass Booster function is applied only when you select Normal, ID3 Tag Genre...
-
Page 32: Display Settings
T7 AME ENG inlay 1/14/05 18:2912:0 Page 62 Display Settings Display Settings Press and hold the “M” button. Select Settings Display Press and hold the “M” button. Select Settings Display I WOW Set Scroll to select the SRS function you want, and then press the “M” button. Scroll Speed [ Scroll Speed ] The SRS function is applied only when you select the SRS,... - Page 33 T7 AME ENG inlay 1/14/05 18:2912:0 Page 64 Display Settings Display Settings Press and hold the “M” button. Select Settings Display Press and hold the “M” button. Select Settings Display Tag Info. Play Screen Tag Info. to select Tag Info. On or Off. Play Screen to select the play screen.
-
Page 34: Record Settings
T7 AME ENG inlay 1/14/05 18:2912:0 Page 66 Record Settings Record Settings Press and hold the “M” button. Select Settings Record. Press and hold the “M” button. Select Settings Record Rec BitRate to set the recording bit rate. VOR is a voice activated recording function where recording pauses when the sound is When recording music into an MP3 file, you can select one of the following recording bit rates: not loud or too soft. -
Page 35: Play Speed Settings
T7 AME ENG inlay 1/14/05 18:2912:0 Page 68 Time Settings Time Settings Press and hold the “M” button. Select Settings Time Press and hold the “M” button. Select Settings Time Auto Sleep Intro Time to set the sleep time from Auto Sleep Auto Sleep to set the Intro time to 10, 20, 30 seconds or 1 minute. -
Page 36: Deleting File
T7 AME ENG inlay 1/14/05 18:2912:0 Page 70 Deleting File Setting the System Press and hold the “M” button. Select Settings System. Select Settings Delete File. Beep Sound to move to the file you want to delete and then press the “M” button. Beep Sound to select Beep Sound On or Off. -
Page 37: Menu Table
About About If you select About, you can check the software version Version information, total number of tracks and memory capacity. Files Memory Size Return - Go to samsung.com for software updates. Use the button to move and select. “M”... -
Page 38: Troubleshooting
T7 AME ENG inlay 1/14/05 18:2912:0 Page 74 Troubleshooting Troubleshooting The software doesn’t work The player keeps turning off. Refer to the System Requirements In Stop mode, the power is automatically turned off (changes depending on settings). Check to see if there are files saved in it. The player does not work and the LCD displays nothing. -
Page 39: Specifications
Model property rights of certain third parties. In particular, this product is licensed under the Built-in Memory capacity 128MB(YP-T7 H), 256MB(YP-T7 V), 512MB( YP-T7 X), 1GB(YP-T7 Z) following US patents : 5,991,715, 5,740,317, 4,972,484, 5,214,678, 5,323,396, 5,539,829, 3.7V (Li-polymer) Voltage... -
Page 40: Safety Information
Party Responsible for Product Compliance product These limits are designed to provide reasonable Consult the dealer or an experienced radio/TV Trade Name: Samsung Electronics Co., Ltd protection against harmful interference in a technician for help. Samsung Electronics America Model Number: YP-T7 residential installation. -
Page 41: Warranty
Samsung's instructions usage and 2.Samsung's obligations are to the repair of the warranty. maintenance. 6. This warranty does not affect the defective part, and at its discretion, replacement of Return of the product for defective reasons consumer’s statutory rights nor the consumers... - Page 42 CORPORATION WITH RESPECT TO THIS EXTEND TO ANYONE OTHER THAN THE PRODUCT SHALL BE BINDING ON SAMSUNG, ORIGINAL PURCHASER OF THIS SAMSUNG SHALL NOT BE LIABLE FOR LOSS OF PRODUCT, IS NONTRANSFERABLE AND REVENUE OR PROFITS,FAILURE TO REALIZE STATES YOUR EXCLUSIVE REMEDY.