
Related Manuals for Husqvarna 245R


Summary of Contents for Husqvarna 245R
- Page 1 Operator ′ s manual 240R 245R/RX 250R 252RX 265RX Please read the operator’s manual carefully and make sure you E E E E n n n n g g g g l l l l i i i i s s s s h h h h...
-
Page 2: Key To Symbols
Arrows which show limits for handle positioning. Always wear approved protective gloves. Wear sturdy, non-slip boots. Only use non-metallic, flexible cutting attachments, i.e. trimmer heads with trimmer cord. 2 – English KEY TO SYMBOLS Noise emission to the environment according to the European Community’s Directive. -
Page 3: Table Of Contents
General working instructions ... Basic working techniques ... WHAT IS WHAT? What is what on the clearing saw? (240R, 245R)... What is what on the clearing saw? (245RX) ... What is what on the clearing saw? (250R) ... What is what on the clearing saw? (252RX) ... -
Page 4: Safety Instructions
SAFETY INSTRUCTIONS Personal protective equipment IMPORTANT! Whenever you use a clearing saw, brushcutter or trimmer you must wear personal protective equipment that is approved by the authorities. Personal protective equipment does not eliminate the risk of accidents, but it can reduce the effects of an injury in the event of an accident. - Page 5 SAFETY INSTRUCTIONS Cutting attachment guard This guard is intended to prevent loose objects from being thrown towards the operator. The guard also protects the operator from accidental contact with the cutting attachment. WARNING! Never use a cutting attachment without an approved guard. See the chapter on Technical data.
-
Page 6: Checking, Maintaining And Servicing The Machine ' S Safety Equipment
Saw blades are intended for cutting fibrous types of wood. Grass blades and grass cutters are intended for cutting coarse grass. A trimmer head is intended for trimming grass. Locking nut A locking nut is used to secure some types of cutting attachment. - Page 7 SAFETY INSTRUCTIONS • See instructions under the heading Start. Start the machine and apply full throttle. Release the throttle and check that the cutting attachment stops and remains at a standstill. If the cutting attachment rotates with the throttle in the idle position then the carburettor idle setting must be checked.
-
Page 8: Cutting Equipment
SAFETY INSTRUCTIONS Cutting equipment This section describes how to choose and maintain your cutting equipment in order to: • Reduce the risk of kickback. • Obtain maximum cutting performance. • Extend the life of cutting equipment. General rules 1 Only use cutting attachments with the guards we recommend! See the chapter on Technical data. -
Page 9: Cutting Equipment
• Make sure that the cutter on the trimmer guard is intact. This is used to cut the cord to the correct length. • To increase the life of the cord it can be soaked in water for a couple of days. -
Page 10: General Safety Precautions
SAFETY INSTRUCTIONS General safety precautions IMPORTANT! The machine is only designed for trimming grass, grass clearing and/or forestry clearing. The only accessories you can operate with this engine unit are the cutting attachments we recommend in the chapter on Technical data. Never use the machine if you are tired, if you have drunk alcohol, or if you are taking medication that could affect your vision, your judgement or your co-ordination. -
Page 11: General Working Instructions
SAFETY INSTRUCTIONS General working instructions IMPORTANT! This section describes the basic safety precautions for working with clearing saws and trimmers. If you encounter a situation where you are uncertain how to proceed you should ask an expert. Contact your dealer or your service workshop. -
Page 12: Basic Working Techniques
• Grass trimming is a general term for light clearing, e.g. around edges or around trees. A trimmer head or plastic blades are used. WARNING! Sometimes branches or grass get caught between the guard and cutting attachment. -
Page 13: Grass Clearing Using A Grass Blade
SAFETY INSTRUCTIONS • To fell to the right, the bottom of the tree should be pushed to the left. Tilt the blade and bring it diagonally up to the right. Cut with the area of the blade between 3 o’clock and 5 o’clock so that the direction of rotation of the blade pushes the bottom of the tree to the left. -
Page 14: Grass Trimming With A Trimmer Head
Clearing • The clearing technique removes all unwanted vegetation. Keep the trimmer head just above the ground and tilt it. Let the end of the cord strike the ground around trees, posts, statues and the like. CAUTION! This technique increases the wear on the cord. -
Page 15: What Is What
What is what on the clearing saw? (240R, 245R) 1 Blade 2 Grease filler cap 3 Bevel gear 4 Cutting attachment guard 5 Shaft 6 Handlebar 7 Throttle control 8 Stop switch 9 Throttle lock 10 Support eyes for harness... -
Page 16: What Is What On The Clearing Saw? (245Rx)
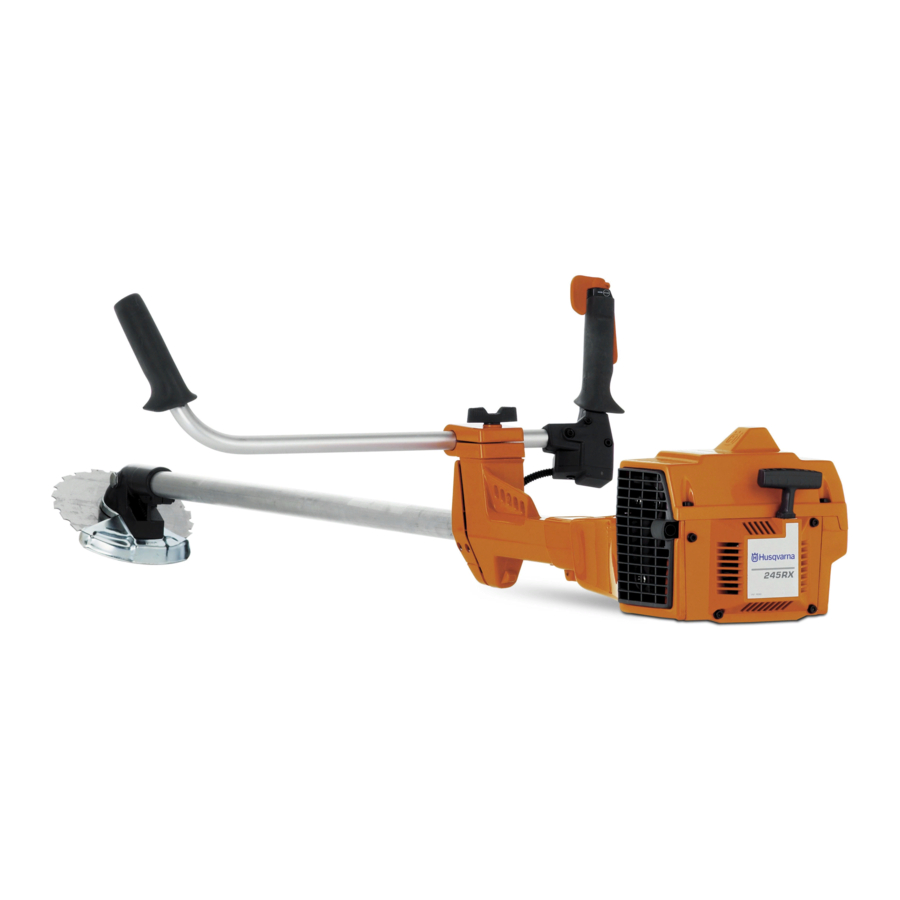
What is what on the clearing saw? (245RX) 1 Blade 2 Grease filler cap 3 Bevel gear 4 Cutting attachment guard 5 Shaft 6 Handlebar 7 Throttle control 8 Stop switch 9 Throttle lock 10 Support eyes for harness 11 Cylinder cover 12 Starter handle 13 Fuel tank 14 Choke control... -
Page 17: What Is What On The Clearing Saw? (250R)
What is what on the clearing saw? (250R) 1 Blade 2 Grease filler cap 3 Bevel gear 4 Cutting attachment guard 5 Shaft 6 Handlebar 7 Throttle control 8 Stop switch 9 Throttle lock 10 Support eyes for harness 11 Cylinder cover 12 Starter handle 13 Choke control 14 Air filter... -
Page 18: What Is What On The Clearing Saw? (252Rx)
What is what on the clearing saw? (252RX) 1 Blade 2 Grease filler cap 3 Bevel gear 4 Cutting attachment guard 5 Shaft 6 Handlebar 7 Throttle control 8 Stop switch 9 Throttle lock 10 Support eyes for harness 11 Cylinder cover 12 Starter handle 13 Choke control 14 Air filter... -
Page 19: What Is What On The Clearing Saw? (265Rx)
What is what on the clearing saw? (265RX) 1 Blade 2 Grease filler cap 3 Bevel gear 4 Cutting attachment guard 5 Shaft 6 Handlebar 7 Throttle control 8 Stop switch 9 Throttle lock 10 Support eyes for harness 11 Cylinder cover 12 Starter handle 13 Fuel tank 14 Choke control... -
Page 20: Assembly
Tighten the knob. Transport position, handlebar (240R, 245R, 245RX, 250R, 252RX) • The handlebar can easily be turned to fit along the shaft for easier transportation and storage. -
Page 21: Assembling The Handlebar And Throttle (265Rx)
This is done using the Allen screws by the right handle. ASSEMBLY Fitting blades and trimmer heads When fitting the cutting attachment it is extremely important that the raised section on the drive disc/support flange engages correctly in the centre hole of the cutting attachment. -
Page 22: Fitting A Blade Guard, Grass Blade And Grass Cutter
Fitting a blade guard, grass blade and grass cutter • The blade guard (A) is fitted using 4 screws (L) and the support plate (M) as shown. CAUTION! Always use the recommended guard for the cutting attachment you are using. See chapter on Technical data. -
Page 23: Fitting The Trimmer Guard And Trimmer Head Trimmy Sii
Fitting the trimmer guard and trimmer head Trimmy SII CAUTION! If the machine is to be used with a trimmer head, the fast idle speed must be reduced by 400-500 rpm. See instructions under the heading Carburettor. • Fit the correct trimmer guard (A) for use with the trimmer head. -
Page 24: Triobalance Harness
Correct height 1 Forestry clearing The machine should be supported in a harness when forestry clearing so that the cutting equipment is angled slightly forwards in relation to the ground. Adjust the height using the strap on the harness for the support hook. -
Page 25: Fuel Handling
Mixture 1:50 (2%). • If HUSQVARNA two-stroke oil is not available, you may use another two-stroke oil of good quality that is intended for air cooled engines. Contact your dealer when selecting an oil. -
Page 26: Starting And Stopping
• Check that the trimmer head and trimmer guard are not damaged or cracked. Replace the trimmer head or trimmer guard if they have been exposed to impact or are cracked. • Never use the machine without a guard nor with a defective guard. - Page 27 STARTING AND STOPPING Stopping Stop the engine by switching off the ignition. WARNING! When the engine is started with the choke in either the choke or start throttle positions the cutting attachment will start to rotate immediately. Starting Hold the body of the machine on the ground using your left hand (CAUTION! Not with your foot!).
-
Page 28: Maintenance
Carburettor Your Husqvarna product has been designed and manufactured to specifications that reduce harmful emissions. After the engine has used 8-10 tanks of fuel the engine will be run-in. To ensure that it continues to run at peak performance and to minimise harmful exhaust emissions... -
Page 29: Muffler
A blocked mesh will cause the machine to overheat and result in damage to the cylinder and piston. 240R/245R/245RX CAUTION! Never use a machine with a defective muffler. WARNING! Mufflers fitted with catalytic converters get very hot during use and remain so for some time after stopping. -
Page 30: Air Filter
English MAINTENANCE Oiling the air filter Always use HUSQVARNA filter oil, art. no. 531 00 92-48. The filter oil contains a solvent to make it spread evenly through the filter. You should therefore avoid skin contact. Put the filter in a plastic bag and pour the filter oil over it. -
Page 31: Spark Plug
Spark plug The spark plug condition is influenced by: • Incorrect carburettor adjustment. • An incorrect fuel mixture (too much or incorrect type of oil). • A dirty air filter. These factors cause deposits on the spark plug electrodes, which may result in operating problems and starting difficulties. -
Page 32: Maintenance Schedule
An off-centre blade will cause vibration that could result in damage to the machine. 11 Check that the trimmer head is undamaged and not cracked. Replace the trimmer head if necessary. 12 Check that the locking nut is tight. Check that the locking screw is tightened when using a support cup with bearings. -
Page 33: Technical Data Technical Data
NOTE! The noise pressure level at operator’s ear and vibrations on the handles are measured with all the approved cutting attachments for the machine. The table indicates the lowest and highest values. TECHNICAL DATA 240R 245R 40,2 44,3 40,0 42,0... - Page 34 Technical data Engine Cylinder displacement, cm Cylinder bore, mm Stroke, mm Idle speed, rpm Recommended max. speed, rpm Speed of output shaft, rpm Max. engine output, acc. to ISO 8893 Catalytic converter muffler Ignition system Manufacturer/type of ignition system Spark plug Electrode gap, mm Fuel and lubrication system Manufacturer/type of carburettor...
- Page 35 Approved accessories 240R, 245R/RX Centre hole in blades/cutters, Ø 20 mm Grass blade/grass cutter Saw blade Plastic blades Trimmer head Support cup Approved accessories 250R Centre hole in blades/cutters, Ø 20 mm Grass blade/grass cutter Saw blade Plastic blades Trimmer head...
-
Page 36: Ec-Declaration Of Conformity
We, Husqvarna AB, SE-561 82 Huskvarna, Sweden, tel: +46-36-146500, declare that the clearing saws Husqvarna 240R, 245R/RX, 250R, 252RX and 265RX with serial numbers dating from 2002 onwards (the year is clearly stated on the rating plate, followed by the serial number), comply with the requirements of the COUNCIL’S DIRECTIVE: of June 22, 1998 ”relating to machinery”... - Page 37 Auto 55 2,7 mm - 9,0 m 3,0 mm - 7,5 m 3,3 mm - 6,0 m 15 cm 6" 15 cm 6" 15 cm 6" >1,1 Kw <1,1 Kw 15 cm 6"...
- Page 40 Trimmy SII ~ 15 cm 35-50 NM 7,0 m 12 cm 5" ~ 3,5 m "Clic"...
- Page 42 Tri Cut ´®z+H1r¶6l¨ ´®z+H1r¶6l¨ <20mm >20mm 6 Nm X 10...
- Page 43 1140178-26 ´®z+H1r¶6l¨ ´®z+H1r¶6l¨ 2003-06-06...