
Related Manuals for VTech CD1281


Summary of Contents for VTech CD1281
- Page 1 User’s manual w w w.v t e c h c a n a d a . c o m Corded telephone Big Button Big Display Model:CD1281...
- Page 2 Important safety instructions on pages 50-51 of this manual. This manual has all the feature operations and troubleshooting necessary to install and operate your new VTech telephone. Please review this manual thoroughly to ensure proper installation and operation of this innovative and feature rich VTech product.
-
Page 3: Table Of Contents
Table of contents Getting started ....1 Speed dial memory ... 28 Parts checklist ....1 Speed dial memory overview . -
Page 4: Getting Started
Power adapter User’s manual w w w.v t e c h c a n a d a . c o m Big Button Big Display Corded telephone Model:CD1281 Mounting bracket Coiled handset cord User’s manual Long telephone line cord Short telephone line cord... -
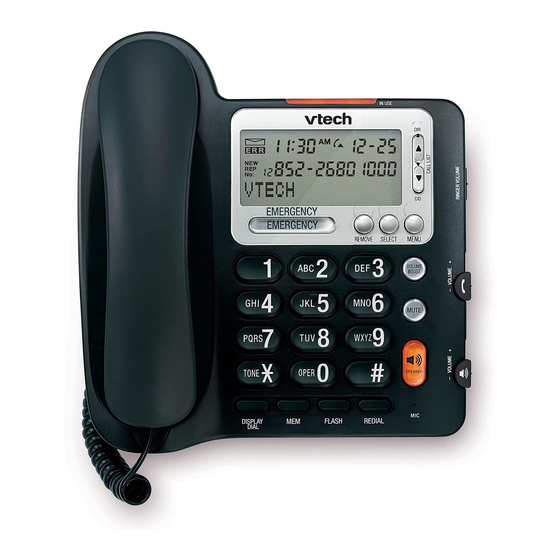
Page 5: Telephone Overview
Getting started Telephone overview REMOVE CALL LIST/DIR/ While reviewing the redial, Press to enter the directory or call log, press to directory (page 30). delete an entry (pages 23, When in the menu, 35 and 43). press to scroll up the list When the telephone is idle, of settings (page 13). - Page 6 Getting started Telephone overview RINGER VOLUME Slide to adjust the ringer Press to enter the speed volume (page 25). dial memory (page 28). /- VOLUME Slide to adjust the listening volume on the Temporarily switch to tone handset (page 25). (touch-tone) dialing (page 27).
-
Page 7: Indicator Lights
Getting started Indicator lights VOLUME BOOST IN USE On when the volume boost Flashes quickly when function is in use (page 26). there is an incoming call. Flashes slowly when another telephone on the MUTE same line is in use. On when the microphone is On when the telephone muted during a call... -
Page 8: Display Screen Messages
Getting started Display screen messages DIRECTORY EMPTY There is no record in the directory. CALL LOG EMPTY There is no record in the call log. Another telephone on the same line is in use. LINE IN USE There is no telephone line cord connected. LINE RINGING There is an incoming call. -
Page 9: Telephone Installation
Getting started Telephone installation If you subscribe to high-speed Internet service (digital subscriber line - DSL) through your telephone line, you must install a DSL filter between the telephone line cord and the telephone wall jack. The filter prevents noise and caller ID problems caused by DSL interference. - Page 10 Getting started 3. To connect the telephone line cord to the telephone, plug one end of the long telephone line cord into the jack labeled TEL LINE on the back of the telephone base. Plug the other end of the long telephone line cord into a telephone wall jack. To connect the power adapter to the telephone, plug the small end of the power adapter into the jack labeled 7.5V DC 100mA on the back of the telephone base.
-
Page 11: Installation Options
Getting started Installation options The mounting bracket must be used for both desktop and wall mount positions. If you want to mount your telephone on a wall, use the provided mounting bracket to connect with a standard dual-stud telephone wall mount plate. If you do not have this wall mount plate, you can purchase one from many hardware or consumer electronic retailers. - Page 12 Getting started 2. Remove the mounting bracket from desktop position. Press the bracket tabs and release them from slots . Pull the bracket away from the telephone base. Desktop position 3. Rotate the bracket 180 degrees to the wall mount position. Install the mounting bracket in the wall mount position by inserting the bracket tabs into the slots...
- Page 13 Getting started 4. To connect the telephone line cord to the telephone, plug one end of the short telephone line cord to the jack labeled TEL LINE on the back of the telephone base Plug the other end of the short telephone line cord to the modular wall jack. To connect the power adapter to the telephone, plug the small end of the power adapter into the jack labeled 7.5V DC 100 mA on the back of the telephone base.
-
Page 14: Wall Mount To Desktop Installation
Getting started Wall mount to desktop installation 1. Slide the telephone upwards, then pull the telephone base away from the wall mount plate. Unplug all cords connected to the telephone base and the wall jack. 2. Lift the handset and place it aside. Hold down the switch hook on the telephone base, then slide the handset tab upwards to remove it from the slot. - Page 15 Getting started 4. Rotate the bracket 180 degrees to the desktop position. Install the mounting bracket in the desktop position by pushing the bracket tabs into the slots firmly on the upper portion of the telephone base, and then push the flexible bracket tabs into slots a and b until they click into place.
-
Page 16: Telephone Settings
Telephone settings About the feature menu Use the feature menu to customize the features of this telephone. The table on the following page provides a summary of the feature menu for this telephone. To navigate the feature menu: When the telephone is idle, press MENU to enter 12:16 10-18 the feature menu. -
Page 17: Feature Summary
Telephone settings Feature summary Default settings are indicated by *. Screen display Function Options SET TIME/DATE 12:00 , 1-01 Set the time and date. SET CONTRAST 1, 2*, 3, 4 Adjust the contrast of LCD screen. COMBINED, Choose how repeated calls are REPEATED CALLS stored in the call log. -
Page 18: Language
Telephone settings Language This telephone is preset to display in English. To change the displays to French or Spanish: After you first install this telephone, the screen automatically shows LANGUAGE. - OR - LANGUAGE Press MENU to enter the menu and then press SELECT repeatedly until the screen displays LANGUAGE. -
Page 19: Screen Contrast
Telephone settings Screen contrast This feature enables you to adjust the screen brightness to a comfortable level, from 1 (light) to 4 (dark). Press MENU to enter the feature menu. Press SELECT repeatedly until the screen displays SET CONTRAST. SET CONTRAST Press to select the desired screen DIR/... -
Page 20: Call List Order
Telephone settings Call list order In order to use this feature, you must subscribe to caller ID service provided by your telephone service provider. When there are new caller ID entries in the call log, you can select the order you view them. Select NEW CALL FIRST to display new missed calls first, then calls by time. -
Page 21: Area Codes
Telephone settings Area codes You can program this telephone to recognize one home area code and up to four local area codes. Home area code: This is the area code for your telephone number. Users dial the seven digits of a telephone number to make a call within their own area code and 11 digits outside their area code. -
Page 22: Home Area Code
Telephone settings Home area code For calls within your area code Dial: Enter in Step 3: 7 digits Your area code (telephone number, no area code) 10 digits (area code + telephone number) 11 digits (1 + area code + telephone number) Press MENU to enter the feature menu. -
Page 23: Local Area Code
Telephone settings Local area code For calls outside your area codes Dial: Enter in Step 3: 11 digits No local area code (1+ area code + telephone number) 10 digits Area codes that do not require 1 (area code + telephone number) Press MENU to enter the feature menu. -
Page 24: Emergency Call
Telephone settings Emergency call This feature enables you to call an emergency number by pressing one button only (page 23). Follow the steps below to set a number for the emergency button: Press MENU to enter the feature menu. Press SELECT repeatedly until the screen displays ___________ EMERGENCY CALL? EMERGENCY CALL? -
Page 25: Telephone Operation
Telephone operation Make and answer a call To make a call: SPEAKER. Make sure there is a dial tone. Lift the handset or press Use the dial pad keys (0 through 9, or #) to dial a desired number. To end a call: •... -
Page 26: Last Number Redial
Telephone operation Last number redial The last number dialed from this telephone (up to 32 digits) is stored in the redial memory. To dial from the redial memory: SPEAKER. Lift the handset or press Press REDIAL. The telephone dials the number automatically. -
Page 27: Chain Dialing
Telephone operation Chain dialing Use this feature to initiate a dialing sequence from numbers stored in the directory, speed dial memory locations or call log while you are on a call. Chain dialing can be useful when accessing numbers (such as bank account numbers or access codes) other than telephone numbers from the directory, speed dial memory locations or call log. -
Page 28: Volume Control
Telephone operation Volume control Ringer volume When the telephone is idle, adjust the RINGER VOLUME switch on the right side of the telephone base to an appropriate volume level (low, middle or high) or turn the ringer off. When the RINGER VOLUME switch is set to OFF, the screen displays the ringer off icon and the telephone does not ring when there is an incoming call. -
Page 29: Volume Boost
Telephone operation Volume boost During a telephone conversation on the handset, use this feature to make the listening volume louder and clearer. To activate the volume boost: • During a call, press VOLUME BOOST. The VOLUME BOOST light turns on. To deactivate the volume boost: •... -
Page 30: Flash
Telephone operation Flash If you subscribe to call waiting service with your telephone service provider, you will hear a beep when there is an incoming call while on a call on the same line. Press FLASH to put your current call on hold and answer the new call. -
Page 31: Speed Dial Memory
Speed dial memory Speed dial memory overview This telephone has 10 speed dial memory locations to store telephone numbers for dialing with two buttons. Each speed dial memory location can store a telephone number up to 24 digits. Create a speed dial number To store a telephone number in a speed dial memory location: When the telephone is idle, press MEM. -
Page 32: Review The Speed Dial Numbers
Speed dial memory Review the speed dial numbers To review the entries stored in speed dial memory: REVIEW STORE When the telephone is idle, press MEM. to scroll to REVIEW. Press DIR/ CID/ Press SELECT. The screen displays ENTER LOCATION? ENTER LOCATION? Press a dial pad key (0 through 9) to choose the desired speed dial memory location. -
Page 33: Directory
Directory Directory overview This telephone can store up to 25 entries with names and telephone numbers in the directory. Names can have up to 15 characters and numbers can have 24 digits. Since directory entries are stored in alphabetical order, you may wish to enter names with the last name first to maintain consistency with information from the caller ID features of this telephone. - Page 34 Directory Create a new directory entry (continued) Press SELECT to save the entry. The screen shows STORED. Repeat Steps 4 through 6 to store more 8002677377 directory entries. MIKE SMITH_ - OR - Press SELECT to save the directory and then REMOVE to exit.
-
Page 35: Character Chart
Directory Character chart Use the dial pad and the chart below to enter a name (up to 15 characters). Each press of a particular key causes the characters to be displayed in the following order: Characters by number of key presses Number key “... -
Page 36: Review The Directory Entries
Directory Review the directory entries When the telephone is idle, press DIR/ to enter the directory. REVIEW STORE to scroll to REVIEW. Press DIR/ CID/ Press SELECT. Press to scroll through the DIR/ CID/ directory entries. 8002677377 - OR - MIKE SMITH Use the dial pad keys to enter the letters associated with the name (see Character chart on the previous page). -
Page 37: Edit A Directory Entry
Directory Edit a directory entry When the telephone is idle, press DIR/ to enter the directory. to scroll to REVIEW. Press DIR/ CID/ REVIEW STORE Press SELECT. Press to scroll through the directory DIR/ CID/ entries. - OR - 8002677377_ Use the dial pad keys to enter the letters associated ENTER NUMBER with the name to search the desired entry. -
Page 38: Dial A Directory Entry
Directory Dial a directory entry When the telephone is idle, press DIR/ to enter the directory. REVIEW STORE to scroll to REVIEW. Press DIR/ CID/ Press SELECT. Press to scroll through the DIR/ CID/ directory entries. 8002677377 - OR - MIKE SMITH Use the dial pad keys to enter the letters associated with the name to search the desired entry. -
Page 39: Caller Id Operation
Caller ID operation About caller ID This telephone has a caller ID feature that works with caller identification service provided by your telephone service provider. There is a fee for this service, and it may not be available in all areas. This telephone can provide information only if both you and the caller are in the areas offering caller identification service, and both telephone service providers use compatible equipment. -
Page 40: How Caller Id Works
Caller ID operation How caller ID works If you subscribe to caller ID service provided by your telephone service provider, information about each caller will show after the first or second ring. The call is not reviewed. The telephone detects an error Time of call from the incoming caller ID. -
Page 41: About The Call Log
Caller ID operation About the call log Information about the last 65 incoming calls is stored in the call log. The most recent call will have the highest entry number. (For example, if there are two calls, the call with entry number 02 in the call log is the latest one.) You can review the call log to find out who has called, then return the call or save the caller’s name and number into the directory or at one of the speed dial memory locations. -
Page 42: Review The Call Log
Caller ID operation Review the call log 7:20 12-03 When the telephone is idle, press CID/ to enter the 1490-2005 call log. TOM MILLER If NEW CALL FIRST is selected in the CALL LIST ORDER menu (page 17) and there are new calls in the call log, press repeatedly to scroll through CID/... -
Page 43: Dial A Call Log Entry
Caller ID operation Dial a call log entry When the telephone is idle, press CID/ to enter the 10:12 12-03 1800-2677377 call log. If NEW CALL FIRST is selected in the CALL LIST MIKE SMITH ORDER menu (page 17) and there are new calls in the call log, press repeatedly to scroll through CID/... -
Page 44: Save A Call Log Entry Into The Directory
Caller ID operation Save a call log entry into the directory When the telephone is idle, press CID/ to enter 10:12 12-03 the call log. 1800-2677377 If NEW CALL FIRST is selected in the CALL LIST MIKE SMITH ORDER menu (page 17) and there are new calls in the call log, press repeatedly to scroll through CID/... -
Page 45: Save A Call Log Entry Into A Speed Dial Memory Location
Caller ID operation Save a call log entry into a speed dial memory location When the telephone is idle, press CID/ to enter the call log. 10:12 12-03 If NEW CALL FIRST is selected in the CALL LIST 1800-2677377 ORDER menu (page 17) and there are new calls in MIKE SMITH the call log, press repeatedly to scroll through... -
Page 46: Delete The Call Log Entries
Caller ID operation Delete the call log entries To delete a call log entry: When the telephone is idle, press CID/ to enter 10:12 12-03 1800-2677377 the call log. If NEW CALL FIRST is selected in the CALL LIST MIKE SMITH ORDER menu (page 17) and there are new calls in the call log, press repeatedly to scroll through... -
Page 47: Appendix
Appendix Troubleshooting If you have difficulty with your telephone, please try the suggestions below. For customer service, visit our website at www.vtechcanada.com or call 1 (800) 267-7377. My telephone does not work at all. • Make sure the power adapter is securely plugged into an electrical outlet not controlled by a wall switch (page 7). -
Page 48: Troubleshooting
Appendix Troubleshooting The telephone does not ring when there is an incoming call. Make sure the ringer volume is not set to OFF (page 25). • • Make sure the telephone line cord is plugged in properly (page 7). • Make sure the handset is placed on the telephone base properly. - Page 49 Appendix Troubleshooting There is interference during a telephone conversation. • If you subscribe to high-speed Internet service (digital subscriber line - DSL) through your telephone line, you must install a DSL filter between the telephone line cord and the telephone wall jack. The filter prevents noise and caller ID problems caused by DSL interference.
- Page 50 Appendix Troubleshooting My caller ID features are not working properly. • Caller ID is a subscription service. You must subscribe to this service from your telephone service provider for this feature to work on your telephone. • The caller might not be calling from an area which supports caller ID. •...
- Page 51 Appendix Troubleshooting I subscribe to a nontraditional telephone service that uses my computer to establish connections, and my telephone doesn’t work. • Make sure your computer is powered on. • Make sure your Internet connection is working properly. • Make sure that the software is installed and running for your nontraditional telephone service.
-
Page 52: Maintenance
Appendix Maintenance Taking care of your telephone Your corded telephone contains sophisticated electronic parts, so it must be treated with care. Avoid rough treatment Place the handset down gently. Save the original packing materials to protect your telephone if you ever need to ship it. Avoid water Your telephone can be damaged if it gets wet. -
Page 53: Important Safety Instructions
Appendix Important safety instructions When using your telephone equipment, basic safety precautions should always be followed to reduce the risk of fire, electric shock and injury, including the following: Read and understand all instructions. Follow all warnings and instructions marked on the product. Unplug this product from the wall outlet before cleaning. - Page 54 Appendix Important safety instructions • If the product does not operate normally by following the operating instructions. Adjust only those controls that are covered by the operating instructions. Improper adjustment of other controls may result in damage and often requires extensive work by an authorized technician to restore the product to normal operation.
-
Page 55: Fcc, Acta And Ic Regulations
Appendix FCC, ACTA and IC regulations FCC Part 15 This equipment has been tested and found to comply with the requirements for a Class B digital device under Part 15 of the Federal Communications Commission (FCC) rules. These requirements are intended to provide reasonable protection against harmful interference in a residential installation. - Page 56 Appendix FCC, ACTA and IC regulations FCC Part 68 and ACTA This equipment complies with Part 68 of the FCC rules and with technical requirements adopted by the Administrative Council for Terminal Attachments (ACTA). The label on the back or bottom of this equipment contains, among other things, a product identifier in the format US:AAAEQ##TXXXX.
-
Page 57: Industry Canada
Appendix FCC, ACTA and IC regulations FCC Part 68 and ACTA If this product is equipped with a corded or cordless handset, it is hearing aid compatible. If this product has memory dialing locations, you may choose to store emergency telephone numbers (e.g., police, fire, medical) in these locations. If you do store or test emergency numbers, please: •... -
Page 58: Limited Warranty
This limited warranty extends only to the Consumer for Products purchased and used in the United States of America and Canada. What will VTech do if the Product is not free from defects in materials and workmanship during the limited warranty period (“Materially Defective Product”)? - Page 59 VTech will notify you and will request that you authorize the cost of repair prior to any further repair activity. You must pay for the cost of repair and return shipping costs for the repair of Products that are not covered by this limited warranty.
- Page 60 Some states/ provinces do not allow limitations on how long an implied warranty lasts, so the above limitation may not apply to you. In no event shall VTech be liable for any indirect, special, incidental, consequential, or similar damages (including,...
-
Page 61: Technical Specifications
Appendix Technical specifications Operating temperature 32°F- 122°F 0°C - 50°C Size Handset: 7.835in X 2.028in X 1.634in Telephone base: 8.701in X 4.055in X 2.028in Weight Handset: 0.661 lb Telephone base: 1.389 lb Power requirements Telephone base: 7.5V DC @ 100mA Memory Telephone directory: 25 memory locations;... -
Page 62: Index
Index About caller ID, 36 Handset volume, 25 About call log, 38 Home area code, 19 About the feature menu, 13 How caller ID works, 37 Answer a call, 22 Area codes, 18–20 Important safety instructions, 50–51 Indicator lights, 4 Caller ID, 36–37 Installation options, 8 Call list order, 17... - Page 63 Index Safety instructions, 50–51 Save a call log entry into a speed dial memory location, 42 Save a call log entry into the directory, 41 Screen contrast, 16 Screen icons, 4 Speakerphone, 22 Speed dial memory overview, 28 Technical specifications, 58 Telephone installation, 6 Telephone overview, 2 Temporary tone dialing, 27...
- Page 64 A member of THE VTECH GROUP OF COMPANIES. Distributed in the U.S.A. by VTech Communications, Inc., Beaverton, Oregon 97008 Distributed in Canada by VTech Technologies Canada Ltd., Richmond, B.C. V6W 1L5 Copyright ©2010 for VTECH TELECOMMUNICATIONS LTD. Printed in China. Issue 4 VTT 11/10...