Husqvarna 315, 320 Operator's Manual
Husqvarna electric chain saw operator's manual
Hide thumbs
Also See for 315, 320:
- Operator's manual (104 pages) ,
- Technical manual (100 pages) ,
- Quick manual (8 pages)

Related Manuals for Husqvarna 315, 320


Summary of Contents for Husqvarna 315, 320
- Page 1 315 / / 320 Electric Operator´s Manual English: page 1-22 Manuele do utilizador Portugês: página 23-44 Manual del operador Espanol: página 45-66 Oδηγιες χρησεως Ελληνικά: σελίδα 67-88 114 01 96-30...
-
Page 2: Symbols
SYMBOLS USED IN OPERATOR'S MANUAL: Always disconnect power before performing cleaning or maintenance work. Always use approved safety gloves. Clean your chain saw regularly. CAUTION! Chain saws are dangerous! Careless or improper use can result in severe or fatal injury. SYMBOLS ON THE CHAIN SAW: CAUTION! Chain saws are dangerous! Careless... -
Page 3: Table Of Contents
Symbols Contents Technical specifications Chain saw parts EC declaration of conformity Important! Read before using chain saw Safe use Kickback prevention Chain brake with kickback guard - Brake band inspection - Kickback guard inspection - Manual chain brake function check - Inertia chain brake function check Chain catcher Right handguard... -
Page 4: Technical Specifications
TECHNICAL SPECIFICATIONS Motor Rated voltage Rated output Frequency Slip clutch Electronic start control Electronic speed control Electronic overload protection Weight Without guide bar and chain With 14" guide bar and chain Chain lubrication Oil tank volume Oil consumption Oil pump Noise levels Equivalent noise intensity at operator's ear, according to international standards... -
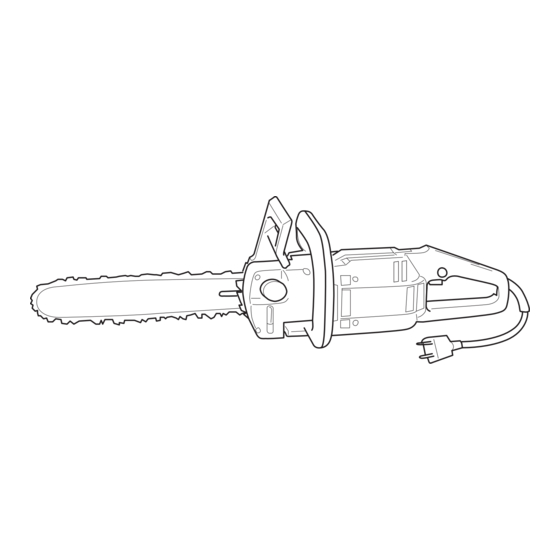
Page 5: Chain Saw Parts
XXXXXX 1. Rear handle 2. Power trigger lockout 3. Front handle 4. Serial No. plate 5. Chain tensioner 6. Chain oil reservoir 7. Chain oil level 8. Ventilation slots 9. Power cable 10. Power trigger 11. Chain 12. Guide bar CHAIN SAW PARTS 13. -
Page 6: Ec Declaration Of Conformity
EC DECLARATION OF CONFORMITY Electrolux Motor AS, N-1708 Sarpsborg, Norway hereby declares that the following chain saws: Husqvarna 315 Electric and Husqvarna 320 Electric, with serial numbers starting at 20100000, - are manufactured in compliance with EU Machine Directive 98/37/EC,... -
Page 7: Safe Use
• See to it that others keep their distance as long as the chain is in motion. Keep onlookers, children and animals away from the work area. Do not let inexperienced persons handle the chainsaw or power cable. • Keep work area clear and well-lighted. Do not operate chain saw under wet or humid conditions, around water or in rain or snow. - Page 8 • Double-insulated! Your electric chain saw is double-insulated for added protection against electric shock. A double-insulated electric tool is designed with two separate «layers» of electrical insulation or one layer of insulation of double thickness between the operator and the tool's conducting parts. Double-insulated tools do not use earthed mains connections and may therefore be connected to any normal 220-240 VAC outlet.
-
Page 9: Kickback Prevention
Kickbacks occur suddenly and without warning. A kickback may be violent enough to throw a chainsaw back at the user. A running chain can inflict severe and even fatal injury. It is imperative for users to be familiar with the causes of kickbacks in order to exercise the proper care and use working techniques to prevent kickback. -
Page 10: Chain Brake With Kickback Guard
• Most accidents caused by kickbacks take place in connection with limbing. Make certain your footing is secure and that there are no i objects nearby which may trip you or make you lose your balance. If you are not careful, the kickback danger zone could make contact with a branch, a nearby tree or some other object which could cause a kickback. - Page 11 • The chain brake (A) is activated either manually (with the left hand) or by the force of inertia (the inertia of the kickback guard resisting the motion of the saw from the force of the kickback). However it is activated, the kickback protection mechanism works in the opposite direction to the force of the kickback.
-
Page 12: Brake Band Inspection
Brake band inspection • Clean sawdust, pitch, and debris from the chain brake and clutch drum. Wear and debris both affect brake function. • Inspect the brake band regularly, ensuring that it is nowhere less than 0.6 mm thick Kickback guard inspection •... -
Page 13: Chain Catcher
The chain catcher is designed to catch a chain which breaks or jumps out of its groove. This problem will generally be avoided, however, if the chain is tensioned properly (see chapter on «Assembly and Adjustment of Guide Bar and Chain») and the chain and guide bar properly maintained. Ensure that the CHAIN CATCHER is undamaged. -
Page 14: Mounting Guide Bar And Adjusting Chain
MOUNTING GUIDE BAR AND ADJUSTING CHAIN CAUTION! Always wear gloves when handling chain. CAUTION! A loose chain can jump out of its groove during operation and cause serious or even fatal injury. 1. Pull kickback guard back against the front handle to ensure that the chain brake is not applied. -
Page 15: Cutting Equipment
7. Tension the chain by screwing the tensioning screw clockwise using the screwdriver tip on the combination tool. 8. The chain is correctly tensioned when the slack on the bottom of the bar is gone, yet the chain is still easily pulled around by hand. 9. -
Page 16: Chain And Guide Bar Lubrication
• Keep chain properly tensioned! A loose chain derails more easily and accelerates wear on guide bar, chain and drive socket. • Ensure that the automatic oiling system works and that the cutting equipment is properly maintained. CHAIN AND GUIDE BAR LUBRICATION CAUTION! Inadequate lubrication can lead to cutting equipment failure and serious or fatal personal injury. -
Page 17: Checking Chain Wear
• If the lubrication system does not seem to be working, and the following steps do not help, take your saw to a service dealer. - Check the guide bar's oil passage and clean if necessary. - Check guide bar groove and clean if necessary. - Ensure that the nose sprocket turns easily and is not clogged. -
Page 18: Starting And Stopping
STARTING AND STOPPING CAUTION! • Make certain at all times that your footing is secure and that the chain touches nothing but the wood you are cutting. • Keep bystanders away from your work area. Starting • Grip the front handle firmly with your left hand. •... - Page 19 • When filing a saw, pay close attention to: TOP-PLATE ANGLE CUTTING ANGLE HORIZONTAL FILE ANGLE FILE DIAMETER FILE DEPTH See «Technical Specifications» for the details which apply to your chain. It is very difficult to file a chain saw correctly without the proper aids. We recommend the use of a file guide to ensure maximum cutting efficiency with the least tendency to kickback.
-
Page 20: Crosscutting
CAUTION! If the chain becomes stuck in the kerf, STOP THE SAW! Do not attempt to jerk the saw free. You could be harmed by the chain if the saw suddenly comes loose. Lever the saw free instead. • Cutting a log on the ground. There is little danger of the saw jamming or the log splintering, but it is difficult to avoid running the saw into the ground when breaking through at the end of the cut. -
Page 21: Limbing
CAUTION! Most kickback accidents take place when limbing. Pay very close attention to the kickback danger zone when cutting limbs under tension! All the principles which apply to crosscutting also apply when cutting thick branches. Cut complicated branches in several stages. Ensure that your footing is secure at all times, whether moving about or standing in one place. -
Page 22: Clearing Branches/Line Of Retreat
Clearing branches/Line of retreat Planned Direction of fall Remove any branches from around the base of the tree which may interfere with your work. It is safest to work from the top down and to keep the tree Danger zone trunk between you and the running chain. -
Page 23: Daily Inspection And Maintenance
When complete, the FELLING CUT must be parallel to the notch and leave a strip of HINGE WOOD at least 1/10 the diameter of the tree. The HINGE WOOD acts as a hinge, steering the direction of the falling tree. If the HINGE WOOD is too small or has been sawn through, or if the notch and the felling cut are mismatched, the tree is no longer under control. - Page 24 Trøskenveien 36 P.O.B. 10 N - 1708 Sarpsborg Norway 25.03.2003...
- Page 25 We hope you find the links below useful. For further gardening information visit Blower Vacs Brush cutters Cultivators Cylinder lawn mowers Electric Fertiliser chainsaws spreaders Garden tractors Garden vacuums Hover mowers Husqvarna chainsaws Lawn scarifiers Lawn tractors Petrol hedge Ride on lawn cutters mowers Ryobi strimmers Scarifiers Westwood Brush Cutters tractors...