Alpine Marine iDA-X100M Owner's Manual
Digital media receiver
Hide thumbs
Also See for Marine iDA-X100M:
- Owner's manual (143 pages) ,
- Quick reference manual (83 pages)
Table of Contents
Advertisement
Quick Links
FOR BOAT USE ONLY/NUR FÜR GEBRAUCH IM BOOT/POUR UTILISATION SUR UN BATEAU UNIQUEMENT/PARA UTILIZAR EN
EMBARCACIONES SOLAMENTE/SOLO PER IMBARCAZIONI/ENDAST FÖR ANVÄNDNING I BÅT/ENKEL VOOR GEBRUIK IN EEN
BOOT/ТОЛЬКО ДЛЯ ИСПОЛЬЗОВАНИЯ В СУДНАХ/UŻYWAĆ JEDYNIE W ŁODZI/ΓΙΑ ΡΗΣΗ Μ Ν ΣΕ ΣΚΑΦ Σ
• OWNER'S MANUAL
Please read before using this equipment.
• BEDIENUNGSANLEITUNG
Lesen Sie diese Bedienungsanleitung
bitte vor Gebrauch des Gerätes.
• MODE D'EMPLOI
Veuillez lire avant d'utiliser cet appareil.
• MANUAL DE OPERACIÓN
Léalo antes de utilizar este equipo.
• ISTRUZIONI PER L 'USO
Si prega di leggere prima di utilizzare il
attrezzatura.
ALPINE ELECTRONICS MARKETING, INC.
1-1-8 Nishi Gotanda,
Shinagawa-ku,
Tokyo 141-0031, Japan
Phone 03-5496-8231
ALPINE ELECTRONICS OF AMERICA, INC.
19145 Gramercy Place, Torrance,
California 90501, U.S.A.
Phone 1-800-ALPINE-1 (1-800-257-4631)
ALPINE ELECTRONICS OF CANADA, INC.
777 Supertest Road, Toronto,
Ontario M3J 2M9, Canada
Phone 1-800-ALPINE-1 (1-800-257-4631)
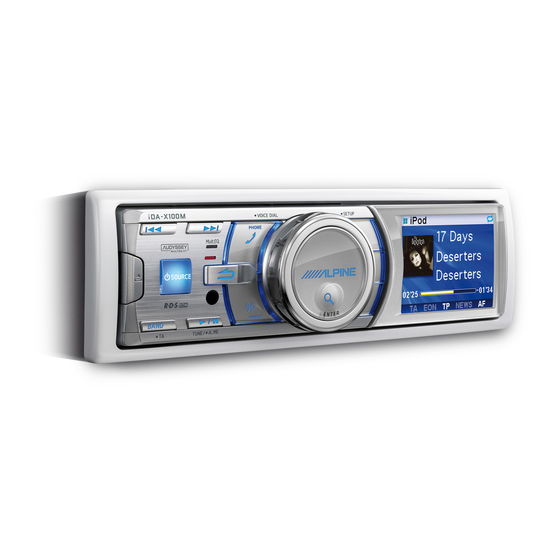
Digital Media Receiver
iDA-X100M
ALPINE ELECTRONICS OF AUSTRALIA PTY. LTD.
161-165 Princes Highway, Hallam
Victoria 3803, Australia
Phone 03-8787-1200
ALPINE ELECTRONICS GmbH
Frankfurter Ring 117, 80807 München, Germany
Phone 089-32 42 640
ALPINE ELECTRONICS OF U.K. LTD.
Alpine House
Fletchamstead Highway, Coventry CV4 9TW, U.K.
Phone 0870-33 33 763
ALPINE ELECTRONICS FRANCE S.A.R.L.
(RCS PONTOISE B 338 101 280)
98, Rue de la Belle Etoile, Z.I. Paris Nord Il,
B.P. 50016, 95945 Roissy Charles de Gaulle
Cedex, France
Phone 01-48638989
• ANVÄNDARHANDLEDNING
Innan du använder utrustningen bör du läsa
igenom denna användarhandledning.
• GEBRUIKERSHANDLEIDING
Lees deze aanwijzingen aandachtig alvorens
dit toestel te gebruiken.
• РУКОВОДСТВО ПО ЭКСПЛУАТАЦИИ
Прочтите настоящее руководство перед
началом использования оборудования.
• INSTRUKCJA OBSŁUGI
Prosimy zapoznać się z tą instrukcją przed
przystąpieniem do użytkowania urządzenia.
• ΕΓ ΕΙΡΙΔΙ
ΡΗΣΤΗ
Παρακαλ ύμε δια άστε τ πριν
ρησιμ π ιήσετε τη συσκευή.
Viale C. Colombo 8, 20090 Trezzano
ALPINE ELECTRONICS DE ESPAÑA, S.A.
Portal de Gamarra 36, Pabellón, 32
01013 Vitoria (Alava)-APDO 133, Spain
ALPINE ELECTRONICS (BENELUX) GmbH
ALPINE ITALIA S.p.A.
Sul Naviglio (MI), Italy
Phone 02-484781
Phone 945-283588
Leuvensesteenweg 510-B6,
1930 Zaventem, Belgium
Phone 02-725-13 15
Designed by ALPINE Japan
68-13530Z18-A
EN
DE
FR
ES
IT
SE
NL
RU
PL
GR
Advertisement
Table of Contents

Related Manuals for Alpine Marine iDA-X100M


Summary of Contents for Alpine Marine iDA-X100M
- Page 1 Si prega di leggere prima di utilizzare il Παρακαλ ύμε δια άστε τ πριν attrezzatura. ρησιμ π ιήσετε τη συσκευή. ALPINE ELECTRONICS MARKETING, INC. ALPINE ELECTRONICS OF AUSTRALIA PTY. LTD. ALPINE ITALIA S.p.A. 1-1-8 Nishi Gotanda, 161-165 Princes Highway, Hallam Viale C. Colombo 8, 20090 Trezzano...
-
Page 3: Table Of Contents
ENGLISH Contents Displaying Radio Text ........11 iPod Operating Instructions How to View the Display ........ 12 Playback ............12 Searching for a desired Song/Title ....13 WARNING Page Skip Function/Percent Skip Function/ Alphabet Skip Function ....... 13 WARNING ..........3 Search Position Memory ......... - Page 4 SETUP IMPRINT Operation (Optional) Changing MultEQ mode .........26 Bluetooth Setting Adjusting Sound Setting in Manual Mode ..26 Setting the Bluetooth Connection Turning Media Xpander ON/OFF (MX) ..27 (Bluetooth IN) ..........22 Setting the MX Level ........27 General Setting Equalizer Presets (Factory’s EQ) ....27 Turning Subwoofer ON/OFF .......27 Setting the Clock Display (Clock Mode) ..
-
Page 5: Operating Instructions
DO NOT DISASSEMBLE OR ALTER. Installation Location Doing so may result in an accident, fire or electric shock. Make sure the iDA-X100M will not be installed in a location subjected to: DO NOT CONNECT A POWER SUPPLY OTHER THAN A DC 12V NEGATIVE GROUND TYPE. - Page 6 • The Bluetooth word mark and logos are owned by the Bluetooth • Avoid usage or storage in the following locations: SIG, Inc. and any use of such marks by Alpine Electronics, Inc. is Anywhere in the boat exposed to direct sunlight or high under license.
-
Page 7: Double Action Encoder Operation
Alternate operation Double Action Press in the outer ring and rotate the Double Action encoder to the left or right. When you release the Double Action encoder, the display Encoder Operation changes. Press the Double Action encoder Double Action encoder There are 2 ways to operate the Double Action encoder. -
Page 8: Getting Started
Attaching Getting Started Insert the right side of the front panel into the main unit. Align the groove on the front panel with the projections on the main unit. Double Action encoder Push the left side of the front panel until it locks firmly into the main unit. -
Page 9: Setting The Time And Calendar
Setting the Time and Calendar Displaying the Calendar/Time Press VIEW. Press and hold FUNC./SETUP for at least 2 seconds The calendar/time is displayed. Pressing VIEW again will return to activate the SETUP selection mode. to normal mode. Rotate the Double Action encoder to select “General”, and then press /ENTER. -
Page 10: Radio
Radio Presetting Stations Manually Select the radio band and tune in a desired radio Double Action encoder station you wish to store in the preset memory. SOURCE Press PRESET. The Preset screen is displayed. Rotate the Double Action encoder to select the preset number. -
Page 11: Rds
Receiving RDS Regional (Local) Stations Double Action encoder Press and hold FUNC./SETUP for at least 2 seconds to activate the SETUP selection mode. Rotate the Double Action encoder to select “Tuner”, and then press /ENTER. Bluetooth General Display iPod Tuner Audio Press /ENTER to select “Regional”. -
Page 12: Setting Pty31 (Emergency Broadcast) Reception
Setting PTY31 (Emergency Broadcast) Receiving Traffic Information reception Press and hold BAND/TA for at least 2 seconds so Turn PTY31 (Emergency Broadcast) reception ON/OFF. that the “TA” indicator lights up. When a traffic information station is tuned in, the “TP” Press and hold FUNC./SETUP for at least 2 indicator lights up. -
Page 13: Receiving Traffic Information While Playing Ipod Or Radio
Receiving Traffic Information While Displaying Radio Text Playing iPod or Radio Text messages from a radio station can be displayed. Press and hold BAND/TA for at least 2 seconds so Press VIEW while receiving FM in the radio mode to select the Radio Text display. -
Page 14: How To View The Display
3 Artist title/Podcast title 4 Album title/Release date 5 Artwork screen When an iPod is connected to the iDA-X100M by using the proper 6 Elapsed time cable, the controls on the iPod are not functional. 7 Remaining time for playing The iPod is connected two different ways depending on the iPod model. -
Page 15: Searching For A Desired Song/Title
• “No Support” is displayed when text information is not compatible Search Position Memory with the iDA-X100M. • When a list is displayed, you can use the page skip percent skip, or During iPod playback, you can quickly move back up the selected alphabet skip function. -
Page 16: Up/Down Function
• The maximum number of characters is 128 (128 byte). • Shuffle Album/Shuffle Song works the same way as iPod Shuffle • Some characters may not be correctly displayed. Albums/Shuffle Songs. • “No Support” is displayed when text information is not compatible with the iDA-X100M. -
Page 17: Usb Memory/Portable Audio Player/Changer How To View The Display
Changer display USB memory/ Changer CD screen display example (if CD text exists) Portable audio player/Changer SOURCE Double Action encoder 1 Mode display FUNC./SETUP 2 CD text (disc name)* 3 CD text (track name)* 4 Disc number 5 Track number 6 Elapsed time 7 RDS indicator Changer CD screen display example (if no CD text exists) -
Page 18: Playback
• “No Support” is displayed when text information is not compatible When using KCA-410C (Versatile Link Terminal), you can connect two with the iDA-X100M. changers and two external outputs (AUX). Press SOURCE on this unit to activate the CD Playback CHG mode. -
Page 19: Repeat Play
CD Changer mode: Repeat Play M.I.X. One : All files in a disc are played back in random sequence, and playback shifts to the next disc. Press FUNC./SETUP. Folder * : Only files in a folder are played back The Function screen is displayed. in random sequence. -
Page 20: File/Folder Name Search (Concerning Mp3/Wma/Aac)
• If USB memory is connected, the folder/file can be searched up to the File/Folder Name Search eighth hierarchy. The ninth and subsequent folder/file(s) cannot be searched and played back. (concerning MP3/WMA/AAC) • Press and hold for at least 2 seconds in the search mode to cancel. •... - Page 21 Method for creating MP3/WMA/AAC files Terminology Audio data is compressed by using MP3/WMA/AAC specified software. For details on creating MP3/WMA/AAC files, refer to Bit rate the user’s manual for that software. This is the “sound” compression rate specified for encoding. The MP3/WMA/AAC file extensions that can be played back on the higher the bit rate, the higher the sound quality, but also the larger unit are as follows:...
-
Page 22: Sound Setting
Sound Setting Setting the Bass Control You can change the Bass Frequency emphasis to create your own tonal preference. IMPRINT Double Action encoder Press and hold IMPRINT for at least 2 seconds. The Sound Setup screen is displayed. Press /ENTER. The Bass Adjustment setting mode is activated. -
Page 23: Setting The Treble Control
Setting the Treble Control Adjusting the High Pass Filter You can change the Treble Frequency emphasis to create your own tonal The High Pass Filter on this unit can be adjusted to suit your personal preference. taste. Press and hold IMPRINT for at least 2 seconds. Press and hold IMPRINT for at least 2 seconds. -
Page 24: Bluetooth Setting
Press and hold for 2 seconds to return to normal SETUP mode. • Pressing during the procedure will return to the previous mode. • During setup, if you press in the outer ring and rotate the Double Use the SETUP menu to flexibly customize the unit to suit your own Action encoder to the left or right, the setting item selection screen preferences and usage. -
Page 25: Turning Mute Mode On/Off (Int Mute)
Turning Mute Mode On/Off (Int Mute) Connecting to an External Amplifier (Power IC) Int Mute On (Initial setting) / Int Mute Off Power IC On (Initial setting) / Power IC Off If a device having the interrupt feature is connected, audio will be When an external amplifier is connected, sound quality can be improved automatically muted whenever the interrupt signal is received from the by stopping the power supply of the built-in amplifier. -
Page 26: Setting Adaptive Steering Remote Control (Steering)
Downloading the Wallpaper (BGV Download) Wallpapers are downloaded only when in USB memory mode. Wallpaper data is available at a web site designed for Alpine product The confirmed signal value of steering remote control Owners. Download the wallpaper to your USB flash memory, Upload the Wallpaper from the flash memory to your unit. -
Page 27: Ipod Setting
Recalling the Audio Adjustment Level iPod Setting You can recall the contents stored in “Storing the Audio Adjustment Level (User Preset)” (page 25). “iPod” is selected on the setup main menu in step 2. Rotate the Double Action encoder to select “User iPod Search Mode Setting Preset”, and then press /ENTER. -
Page 28: Imprint Operation (Optional)
The changes made in manual mode can be stored into a preset. Refer to “Storing and Recalling the Adjusted Contents” (page 30). Alpine introduces IMPRINT - the world’s first technology that thoroughly eliminates in-vehicle acoustic problems that normally Use steps 1 to 5 to select one of the Sound menu degrade sound quality, which enables us to experience music the way modes to modify. -
Page 29: Turning Media Xpander On/Off (Mx)
Turning Media Xpander ON/OFF (MX) Turning Subwoofer ON/OFF On / Off (Initial setting) Subwoofer On (Initial setting) / Subwoofer Off When the Media Xpander is on, you can adjust the Media Xpander level If an optional subwoofer is connected to the unit, make the following (refer to page 27). -
Page 30: Setting The Filter Type
Bandwidth Adjustment (Q) Setting the Filter type Adjustable bandwidth: 1, 1.5, 3 Normal (Initial setting) / Individual Level Adjustment (Gain) If you adjust X-OVER, you can set the channel L and R at the same Adjustable level: -6 to +6 dB level, or independently. -
Page 31: Adjusting The Time Correction
Adjusting the Time Correction Adjusting the Crossover Settings Sound Field Adjustment Time Correction Sound Field Adjustment X-Over Before performing the following procedures, refer to “About the Before performing the following procedures, refer to “About Time Crossover” (page 32). Correction” (page 31). Rotate the Double Action encoder to select Rotate the Double Action encoder to select “Time “X-Over”... -
Page 32: Storing And Recalling The Adjusted Contents
Cut-off frequency (F Storing and Recalling the Adjusted Contents Adjustable frequency bands: User 1 / User 2 / User 3 / User 4 / User 5 / User 6 The contents of all adjusted items (in manual mode) can be stored 3WAY System together into a preset. -
Page 33: About Time Correction
These values are the time correction values for the different About Time Correction speakers. Setting these values to make each sound reach the listening position at the same time as the sound of other speakers. Time Correction Value List The distance between the listener and the speakers in a boat vary widely due to the complex speaker placement. -
Page 34: About The Crossover
---- 12, 18, ---- 200 Hz -12 dB speaker For the recommended crossover frequencies of Alpine speakers, refer 24 dB/oct. to the respective Owner’s Manual. FLAT, 6, Front high 20 Hz - 0 to We are not responsible for damage or malfunction of speakers caused... -
Page 35: Information
- Reset this unit and the iPod. Refer to “Initial System Start-Up” unit is at fault. Otherwise, make sure the rest of your system is properly (page 6). To reset the iPod, refer to the Owner’s Manual of the connected or consult your authorized Alpine dealer. iPod. Basic Indication for iPod Mode (USB connection) No function or display. -
Page 36: Indication For Usb Memory
Indication for USB memory Current Error • The iPod is not verified. - Reset the iPod. • Abnormal current is run to the USB connector device (an error - Try another iPod. message may be displayed if the USB device that is not compatible with the unit is connected). -
Page 37: Indication For Cd Changer
- Attempt to connect another Portable audio player. USB Device Error • Malfunction in the CD Changer. - Consult your Alpine dealer. Press the magazine eject button • A Portable audio player that is not supported by the unit is and pull out the magazine. -
Page 38: Specifications
Specifications FM TUNER SECTION Tuning Range 87.5-108.0 MHz Mono Usable Sensitivity 0.7 µV Alternate Channel Selectivity 80 dB Signal-to-Noise Ratio 65 dB Stereo Separation 35 dB Capture Ratio 2.0 dB MW TUNER SECTION Tuning Range 531-1602 kHz Sensitivity (IEC Standard) 25.1 µV/28 dB LW TUNER SECTION Tuning Range... -
Page 39: Installation And Connections
When connecting the iDA-X100M to the fuse box, make SURROUNDING OBJECTS. sure the fuse for the intended circuit of the iDA-X100M has the appropriate amperage. Failure to do so may result in damage to Arrange wiring and cables in compliance with the manual to the unit and/or the boat. -
Page 40: Installation
When your boat has the Bracket, mount the long hex • Stick the supplied cover sheet on the surface of the unit. bolt onto the rear panel of the iDA-X100M and put • the Rubber Cap on the hex bolt. If your boat does not have the Mounting Support, reinforce the head unit with the metal mounting strap (not supplied). - Page 41 USB cable connection USB memory Connection (sold separately) Insert a USB cable into the unit, and fix with a lock screw. Connect USB memory Connect USB memory to USB cable. USB cable USB memory USB Cable Remove USB memory Pull out USB memory squarely from the USB cable. iPod Connection (sold separately) USB cable USB connection...
-
Page 42: Connections
Connections To iPod or USB memory/ portable audio player (Black) SWRC G.OUT To adaptive steering remote control interface box (Brown/Yellow) ADAPTIVE STEERING REMOTE CONTROL IN1 To adaptive steering remote control interface box (Brown/Orange) ADAPTIVE STEERING REMOTE CONTROL IN2 To adaptive steering remote control interface box To iPod To Marine Remote Commander... - Page 43 An ISO/JASO antenna adapter may be required, depending This lead may be connected to the boat’s lighting system. on the vehicle. This will allow the backlighting of the iDA-X100M to dim whenever the boat’s lights are turned on. Adaptive Steering Remote Control In 1 Lead (Brown/...